Showing posts with label Article. Show all posts

Friday, 7 September 2018

Comments RSS feed address after turning on HTTPS for a blog with a custom domains

This article documents the change the Comments RSS feed associated with blog, when you switch on the HTTPS option for a blog with a custom domain.


If your blog has a custom domain, you now have an option to switch on HTTPS to make it more secure.

If you do this, then the RSS feed address for your blog's comments changes.

This may be handled graciously by your template.  But if you use a service like Feedburner to display recent comments in an HTML gadget, then the gadget will break unless you update.    Well - mine did anyways.   Maybe your settings are different.


What was your blog's RSS comment feed address

Articles published by various people, including Google, say that your blog has various RSS feeds, including  2 site comments feeds.

Atom:   http://yourCustom.Domain/feeds/comments/default
RSS:     http://yourCustom.Domain/feeds/comments/default?alt=rss

(substituting your actual custom domain   eg myBlog.com   for yourCustom.Domain)

However after switching HTTPS on, I found that these were simply re-directing to the homepage - and this was causing any gadgets which used the comments feed to fail with a message like "the RSS feed is no longer available for display".    (I forgot to take a screenshot before fixing it - and now it's fixed I cannot un-fix it because Feedburner won't let me save an invalid feed address!)


What is your blog's RSS comment feed address

After trying various options, I have found that for my custom-domain blogs with HTTPS enabled, the correct RSS address for comments feeds is

RSS:     https://www.yourCustom.Domain/feeds/comments/default?alt=rss
(Again - substituting your actual custom domain   eg myBlog.com   for yourCustom.Domain)


This one may work also - I haven't had a need to test it properly, so don't want to say for certain:
Atom:   https://www.yourCustom.Domain/feeds/comments/default 


Related Articles

Why RSS / Subscribe to Posts is important for your blog

Adding an RSS feed icon to your blog

Finding the RSS feed address for your blog.

The Follow-by-Email gadget:  a very simple way to give your readers access to blog-updates by email

Friday, 10 November 2017

How to change AddThis Follow button settings for a gadget on blog or website

This article shows how to change the accounts presented in an AddThis Follow gadget which has already been set up on a Wordpress-based website.

(Note:   this is only relevant for Wordpress.org users.   Wordpress.com users do not have the same freedom to add or configure plug-ins.)


The AddThis plug-ins for Wordpress provide several functions.  One is a Follow gadget, which lets you offer links to your account on other platforms (eg on Twitter, Facebook and Instragram), so that people who are interested can subscribe to you there, and get updates from you even if they don't visit your blog or website regularly). 

When you install and activate this plugin, there is a screen where you can choose which other platforms to show, and say what your address on those platforms is.   

After you have set up the plug-in, then you an add the AddThis Follow widget to your site,   This gadget displays an icon for each tool which you selected, and each one link to the account that you provided.    How exactly it looks depends on the options you choose, but one possibility (Horizontal Follow) is like this:


But - how do you change these settings after the gadget has been added? 


For most widgets, to change their settings you just:
  • Choose Appearance > Widgets from the left hand menu
  • Find the widget in the list of ones that have been installed
  • Click the down-arrow beside the name, to reveal the options.

And initially, AddThis-Follow looks much the same.  Rather than giving the detailed options immediately, it says

To edit the options for your AddThis tools, please go to the plugin's settings

Which sounds fair enough - there were a lot of values displayed on the page where you selected which social media platforms to include and how to connected them to your blog.


So you click the link, and get taken to a page - example below- which looks nothing like the one where you chose the services to display in the widget.   Even when you scroll down, nothing looks familiar, or even gives any clues about how to update the linked social networking accounts:


How to change the accounts offered by the AddThis Follow widget after it has been added


Don't start with the Appearance > Widgets  menu item.

Instead:
  • Choose with Plugins >  Installed plugins  
  • Find   Follow Buttons by AddThis in the list.
  • Click Settings
  • In the list of gadgets that is displayed, beside the type of Follow button you used (horitzontal or vertical), click the Settings button.    [Yes, that is two Settings clicks in a row.]

This opens up the familiar screen where you can choose social media services by clicking on their icon, and entering your name on that service in the field at the bottom of the page.


Job Done!    

You can now edit the social media accounts linked to your blog  - both correcting errors in the original setup, or adding new accounts which have been added since then.


What this means

Aach AddThis widget (eg AddThis-Follow, AddThis-Inline, etc) has the same settings each time it is used on your site.   So, provided your theme supports having gadgets in multiple places, you can have the Follow-Me gadget several places  (eg in your sidebar and underneath your posts) - always looking the same and linking tothe same social-media accounts.


Related Articles:

There are no related articles for this topic.

Wednesday, 26 July 2017

Understanding the Follow-by-Email gadget and Feedburner

The Follow-by-email gadget uses Feedburner's email-subscription service.   It's very easy to add to your blog, but there are some things that you need to think about if you are using it to deliver blog-posts to your followers by email.


The Follow-by-Email gadget is a very simple way to give your readers access to blog-updates by email: it delivers a message in their inbox every day that you post.

But to decide if it's a good thing to use, to get good value from it, and to troubleshoot any problems, you need to understand a little more about how it works.

And, since it uses Feedburner, this means understanding how Feedburner works, too.


What is Feedburner

The Follow by Email gadget uses a product called Feedburner to manage the list of people who have followed, ie subscribed to your blog. 

Feedburner was originally a tool to enhance the RSS subscriptions that website-owners delivered - see Why RSS / Subscribe to Posts is important for your blog  for info about RSS.   Very roughly speaking, every time a website publishes a new item, Feedburner adds that item to a "feed" or summary of the site, and tells all the subscribers about it, without the subscribers having to visit the website.

One option that Feedburner added was subscribe-by-email:  website owners who use Feedburner for this have to turn the service on, and then put "something" on their website that offers the service to people who want to get emailed updates.   To start with, Feedburner just kept a list of emails addresses, but now it's more sophisticated:   it checks with addresses that they really do want to be subscribed before adding them to the list, and offers an un-subscribe option with each subscription email.

Adding the follow-by-email option to your blog sets this up for you.   It:

  • Sets up a feed, 
  • Turns the email service "on", and 
  • Puts an email--address request box onto your blog.   


What is set up when you add the follow-by-email gadget

The Follow-by-email gadget can be added to your blog the same way you would add any other gadget.   Doing this this means that, you are logged in to a Google account at the time.

If that Google account already owns an entry (ie a "feed") in Feedburner for the blog you're adding the gadget to, then the gadget just uses this feed.

But if the Google account doesn't currently have an entry from the blog, then a new feed is created, and the email service is turned on for it.:
  • The Feed Title is based on the blog's name.  
  • The feed address appears to be fairly random (eg I created one for a blog called "Another test blog", and the feed name is    http://feeds.feedburner.com/blogspot/meaUW


Advantages of the Follow-by-email gadget

This gadget makes it a lot easier to offer a follow-by-email option:  you don't have to set up the feed yourself, or use a HTML-gadget to provide a subscribe-by-email form.

And because it uses Feedburner, you have full access to Feedburner's statistics, and a number of other things that are included in Feedburner's features, including:

Disadvantages of the Follow-by-email gadget

There are some disadvantages of both the gadget, and the approach that Blogger has used to implement it:
  • Google / Blogger have mixed up the words "subscribers" and "followers".  It used to be that subscribers used RSS gadgets (from Feedburner or other feed-providers), and followers used Blogger's own following-tools.   But this new gadget is called "follow-by-email", and it's possible that mixing up the ideas will make some people very confused.
  • Using the gadget, you have very little control over the look and feel of the  follow-by-email option on your blog.  

    Compare this to the "Get updates by email" option which is in the top of the sidebar on this blog:  I've put a lot of effort into getting the wording "just right" so potential subscribers know that they will be getting a please-confirm email.   This on-screen wording means that even if they don't act on the email immediately, they get another reminder about if they come back to the blog again in the future.
  • You have no control over the message that potential follow-by-emailers are shown to tell them to verify their subscription.  It looks like this

    While this message is fine for the tech-minded people who are likely subscribe to an RSS feed, it will probably bring a glazed look to those of your visitors who need a very simple subscribe-by-email option!  
  • People who subscribe to your blog by email don't see any of the widgets on your blog, or any advertisements.   (Unlike regular RSS-feed subscribers for whom you can set up AdSense for feeds).  Despite the options mentioned above, ou have very little control over how they see your messages, especially if they happen to be using email software that shows your messages in plain text.


Related Articles

Customizing the "click the link to subscribe" message
 
Getting a list of all your email subscribers

Why RSS / Subscribe to Posts is important for your blog

The Follow-by-Email gadget:  a very simple way to give your readers access to blog-updates by email

Tuesday, 4 July 2017

Putting files into Blogger's root directory

This article explains the issues, and options, for putting a file into the "root directory" of your Blogger blog.


If you are using certain non-Google products to enhance your Blog, they will sometimes tell you to put a file into your root-directory.   They may even tell you to use an FTP  tool to do this.

Sometimes this happens when a product also gives you code to install into your blog , This approach is used when the code is written for websites in general rather than specifically to work with Blogger: putting useful files into a place relative to the root directory makes it a lot easier to move a website from a test-address to the live one, so is a common approach outside of Blogger.

Or maybe the other tool has been designed to verify that you do own the website in this way, rather than asking you to change the website code itself.


How to add a file to your blog's root directory

The short answer for Blogger users is "sorry, you cannot do this".

The long answer is still no:  "there is no way to do this, but see the rest of this article for an explanation of why, and some suggested work-arounds."


Why not? Every other website tool lets me do this.

Home - cpg1.5.x demo 1287551599033
Posts:  Blogger's tool for managing
the content on our blogs
If you're clever, and have lots of time, you can make a website just using a text-editor (eg notpad), a graphics program, and ftp software that lets you put the files into the right places on computer that's connected to the internet.

Tools like Dreamweaver take away a lot of the time-consuming work, and some of the need for cleverness.  But you still need to know a lot about the internet to do things in a way that makes a good website.

Content management systems make this easier still: they let a technically-minded person do the nuts-and-bolts work to make the website, and give authors / artists / editors / content-creators simpler-to-use tools that let them put "stuff" (ie content) into the website, without needing to worry about the details of how it works.

Blogger is a (very simple) website content-management system, it creates our web-pages for us based on data that we put into certain places. Administrators can set up and change the theme, other people, eg authors simply make posts.

When we use Blogger, the main way that we change the data in our web-pages is using the Blogger software. 

Some items inside posts or gadgets can be changed using other software, eg Google Docs, provided they were were set up using that other software in the first place. But - key point - there is nothing in the way that Blogger is put together that means we need to access the base directory. So they don't let us do so.    And I doubt that this this will change anytime soon.


What to do instead

The options for getting around this restriction depend on how the file that you need to put into your root directory is intended to be used.

Installing code

If you have code to install into your blog, and a file to go with it, then you just need to
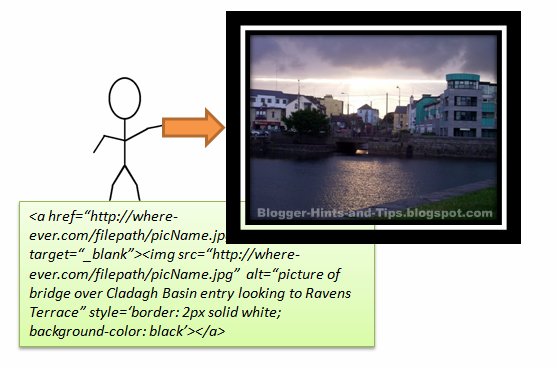
  1. Host the file somewhere else (maybe in your Picasa-web-album for the blog, if it's a picture)
  2. Change the code to point to the full path of where you have hosted the file, instead of the relative path used in the code
For example, here is the code for a button linking to my blog, with the picture in the root directory:
<div class="separator" style="clear: both; text-align: center;"> <a href="http://www.Blogger-hints-and-tips.blogspot.com" imageanchor="1" style="margin-left: 1em; margin-right: 1em;"> <img border="0" src="//Logo.png" width="100" /></a></div>
To change this to use a specific location, I just add a file-path and the file-name of the picture wherever it is hosted.
<div class="separator" style="clear: both; text-align: center;"> <a href="http://www.Blogger-hints-and-tips.blogspot.com" imageanchor="1" style="margin-left: 1em; margin-right: 1em;"> <img border="0" src="https://blogger.googleusercontent.com/img/b/R29vZ2xl/AVvXsEjIm3YtmkR2USZcOU8k1mazFnQYuFfdHRZNl6pnR1Env8240zoaZbyTE0SQ72d5rPw263LVAG-kd7HspaZvhGvl7Op8_aKH4fHEHaybavrsCca5DA8V_S-nM1IbFIzZHb0RsE97tvI86Po_/s320/Logo.png" width="100" /></a></div>

TIP: blogger's editor sometimes gets links mixed up, so it's important to start the filepath with "http://"


Verifying ownership

If someone wants to use a file's position to check that you control a website, then they will have code on their own website that looks for the file in your root directory.

You cannot change this code. And you cannot place the fie.

So you need to ask them for an alternative way to verify, that is suitable for people without root directory access.

 If they don't have any alternatives, try lobbying for this on their product support forum:  by not having alterantives, they are ensuring that Blogger users, among others, cannot use their service.

If the official answer is still "no", then you could also ask in other on-line forums if anyone has found any other work-arounds.


An afterthought: what isn't recommended

I've recently seen someone suggest in a help forum that people with custom domains can put files into their blog's root directory by FTP'ing the files into place.

 This may be true, if the service that you are purchasing from your domain registrar includes file-hosting. But file hosting(*)
  1. Isn't necessary for a custom domain used in Blogger (since Google hosts our files for us), and
  2. Isn't available as part of the services when you buy a custom-domain through Blogger.

So it's not a general solution for most Blogger users, though it may work for some.

Initially I was a little sceptical of the idea: Blogger doesn't expect to see any files in our root directory, so I was concerned that it might do strange things if it found them there. But on reflection, I think there is probably a low risk of this happening, since the file-location is outside Blogger's control.

(*) To avoid any confusion, file hosting and DNS hosting are not the same thing. If you buy a custom domain for your blog from a registrar without going through Google/Blogger, then you do need to pay for DNS hosting, but do not need to buy file-hosting.


Related Articles

File hosts - places to store files used in your blog.

Picasa-web-albums: a quick introduction

How Blogger data is organised

Setting up a new administrator for your blog

Options for letting other people write in your blog

Tuesday, 7 March 2017

The difference between Themes and Templates in Blogger

This article explains the difference between themes and templates in Blogger, Google's blogging tool.


What is (was) a Blogger template

How a blog that is made with Blogger is shown to a visitor is controlled by four sets of information:
  • The posts which the blogger writes (ie the content)
  • A user-editable "configuration file" which records the overall formatting options which the file designer and then the blogger have chosen
  • Another configuration file, called the post-template, which records choices that the blogger has made under Layout > Blog posts (edit), but cannot be edited elsewhere.   
  • Blogger's own software, which puts the other things together with some internal rules to make "web pages".   Bloggers cannot control the rules in this at all.

Originally, the first "configuration file" was called a template.   In fact, officially it was called a design-template, to distinguish it from the post-template.   However because most people aren't aware of the post template, usually just the word "template" is used to mean design-template.


What is a theme

Other blogging tools (eg Wordpress, Tumblr) called their equivalent file a theme.    Most (or even all) of those tools provide less access to change things in the Theme file, for example if you use a Wordpress free-hosted blog, then you cannot change any of the code in your theme, you can only make formatting changes which are allowed for in the Wordpress front-end.

Many of the Wordpress themes have had a lot of  graphic design work done on them - using them gives a blog-site which looks very attractive (or otherwise suited for their purpose) on a wide range of screens.    Many large websites have been made using Wordpress, and so very many professional designers have created Wordpress themes.    Because of this, many people believe that it's easier to get an excellent-looking website from a theme than from a Blogger template.

Blogger templates have now become themes

Recently - I noticed it in March 2017 - Blogger started calling their templates "themes".  
  • They've changed the menu option on their dashboard from "Template" to "Theme".
  • They've changed the action button names in the template/theme editor to say things like "Save theme".
  • They've written various help articles which refer to themes.


What hasn't changed

  • We can still edit our templates themes extensively.
  • The Blogger tools that make the changes in our themes haven't changed:  All the items under the Themes tab on the dashboard are the same as the ones on the Templates tab.
  • The contents of our existing themes are still much the same  (I cannot guarantees they haven't made any changes, but I haven't seen any)
  • The themes that we can choose from when making a new blog, or changing the format of an existing one, are the same.
  • There are hundreds of help and how-to articles written by blogger-helpers like myself, which all refer to templates.   (I've started changing mine - but it's going to take a while!)

What else is going to change?   

This is the big question:   Is the rename a precursor to some other changes, eg restricting how much control we have over our themes? - or is it just a cosmetic change to make Blogger seem more modern?

Will there be some new themes released - ones that look better across a range of devices, maybe even some that are optimized for mobile instead of desktop use?

Will there be new theme-editing features introduced into Blogger's interface, to let us control things we cannot control now?

Conclusion / TL-DR

Only Google's Blogger product managers know exactly what the future plans for Blogger are - and they're not known for talking about the future direction  until they're just about to introduce new features.   

But until they do, my conclusion is that there is no difference between templates and themes in Blogger.  They are simply two different words for exactly the same thing.


NB:   Blogger product a announcements are usually made in the Blogger Buzz blog - and I see that template were still called templates in their most recent post in November 2016:


Related Articles

How to edit your Theme in Blogger

What types of theme / templates does Blogger have

Editing your blog's template:  advantages and disadvantages

How to turn on a mobile theme for your blog

Blogs, Blogger, bloggers, posts pages and screens - understanding Blogger-basics

How to make a real website, using Blogger

Saturday, 11 February 2017

Showing a PowerPoint file in your blog

This article is about options for showing the contents of a PowerPoint file inside your blog.


Previously I've described how to load content from MS Word to your blog.

But some people have material in PowerPoint (or other presentation software) files, that they want to show in their blog.   So far, I've identified three options for doing this.

These approaches should work on any PowerPoint formatted presentation, no matter what tool it was prepared with - except of course if it was Google Docs in which case you go straight to option 2.


Option 1: Each slide as an image

Follow these steps:
  • In PowerPoint, choose Save-as, and choose an image format (eg .png).   
  • When the system asks if you want all slides or just the current one, choose All.
  • Upload all the image files that were created to your blog - it's your choice whether you put them all in the same post, or one-per-post.
    I usually upload them firstly to Picasa web albums or another picture-hosting service, and then just link from my blog to there)

At first, I thought that this was a backward approach.  But recently I wrote an article based on a presentation that I gave several years ago.   After trying various ways of displaying the presentation and  the article, I realised that I was trying to find a way to include all the comments that I made when I used the presentation face-to-face.  To do this, I needed to show each slide individually, so I used this option because it gives full control over what commentary goes with each picture.


Option 2: Convert to a Google Docs Presentation

This is described in detail in  Using Google Docs's publish-and-embed option - I believe it's better than trying to use Google Web-elements, because it achieves much the same thing, and takes one piece (web-elements) out of the equation.


Option 3 Copy and Paste

As with MS Word, copy-and-paste from PowerPoint to Blogger is NOT recommended, because the PowerPoint content can have all sorts of extra HTML codes attached to it, and these can cause negative effects in your blog.

But you may want to copy-and-paste, either because you don't want the content as images, or because you want other things like presenter notes etc that are not stored in the presentation slides.

To do this, you need to:
  • Copy from PowerPoint, 
  • Paste into a text-editor (eg Notepad in Microsoft Windows)
  • Copy again from the text-editor
  • Paste into your blog.

An alternative may be to export the presentation as an outline (ie rich-text or RTF format), and then convert it via Google Docs in the same way that you would for a Word document.   You would need to test this to check if it brings in the items that are stored outside of the slides.


Option 4   Use a slideshow host

Another approach would be to set up on account on SlideShare or a similar service that allows you to upload slideshows and gives you code that you can add to your blog in the usual way, which embeds the slideshow in your blog.  

I haven't tried this one out myself, but in theory at least it should work.


Related Articles

Showing a PowerPoint presentation as a slideshow in your blog

Converting from MS Word to Blogger, via Google Docs

File hosting options - places to keep your files on-line

Tools for applying copyright protection to your blog

Putting embed code from an outside service into your blog
.

Thursday, 12 January 2017

How to not show any posts on your blog's home page, using Blogger

You can set your blog up so that no posts are shown on the main screen - provided you have used some of the other "home page" approaches to give readers other ways of getting to your content.


Previously I've explained how to only show one post on the main page of your blog.

But some people who want to give their blog a home page go further than that, and don't show any posts on the main screen at all.   (Remember, the main screen is where people who navigate to your blog, rather than to posts within it, go.)

This sounds like a strange thing to do - after all, blogs are about posts.

But actually it's fine, provided you use some other tools to let readers move around the blog.  I've made a 150+ page blog this way, and it works very nicely because I have organised the information and used some index-pages (containing lists of bus-routes, suburbs, maps etc) with tables that link to many other posts.


How to show no (ie zero, 0) posts on the main screen

Some people want to do this, as part of the process of giving their blog a home page.  It's not possible if your blog has a Dynamic thene, but can be done for blogs with Layout themes.

There are at least two ways of doing it.

Option 1 - use a custom re-direct for your home-page

Make a new Page (Pages > New Page) and add the material which you want to show on your main screen.    Publish this page.

Take a note of the URL of the Page that you use created.

Go to Settings > Search preferences > Errors and re-directions > Custom re-directs

Click Edit then New re-direct

In the dialog box which opens:

  • Enter a back-slash (ie   /  )into the first (From) box.
  • Enter the URL of the page that you noted earlier into the second (To) box
  • In the To box, remove the blog-address, because Blogger already adds that for you.
    Eg if your URL is     http:/www.myBlog.com/p/home.html
    then just enter           /p/home.html

    (note that you keep the backslash (/) just before the P.
Click the Permanent checkbox.

Click Save just under the entry you just made - it now looks like this:


Click Save changes.


Job Done!   Anyone who goes to your blog's home page will now go automatically to the alternative page you made - and the effect is that no posts are shown on the home page.


Option 2 - use the Posts and Comments setting

Choose the Settings > Posts and Comments panel from the left sidebar.

Enter zero (0) into the Show at most field
Click Save Settings in the top right hand corner of the screen.


    About this method

    The method in Option 2 works:   no posts are shown on your home page.

    But by default, nothting else is shown, either.    Unless you take steps to avoid it, your readers will see a grey box saying "0 Posts" when they look at your blog's main URL.   


    Some of the things you can do to avoid this include hiding the "showing posts with label XXX" message, and creating a gadget that only shows on the "home" page.


    Recommended option

    The custom re-direct option is probably the best approach - and is certainly what I've used for my blogs recently:   it's clean, and doesn't need any special messing around with gadgets etc to put content onto the "home" page.

    But there may be cases where the second option is better - and I have recently confirmed that it still works.


    Whichever option you choose

    Remember that you need to set up some other way to let readers move from your home-page to see your other posts - some of the ways to do this are discussed here.


    Related Articles

    Limiting your blog to only have one post on the main page

    Giving your blog a home page

    Giving readers alternative ways to see the posts in your blog

    What are dynamic view themes?

    Blogger theme types
    .
    Using tables in your blog

    Displaying a gadget only on the home page

    Saturday, 31 December 2016

    Putting a badge for a Facebook Page into your Blog

    This article describes making a Facebook badge to promote your page, and putting it onto your blog.

    What is a Facebook page

    This article is about how to make a badge to promote a Facebook Page.

    This is an example of the "follow me" approach to linking your blog and the social networks, although for Facebook pages your reader becomes a Fan rather than a Friend.

    Many people are confused about when they should use each of the types of "thing" in Facebook, ie
    • Profiles - accounts for flesh-and-blood, living, breathing, individual people
    • Pages - for websites, brands, and organisations that don't want to approve all their Facebook members
    • Groups -  for organisations that want to approve individual members who join (and in return, group-owners can send private messages to individual members.
    The most common "thing" for blogs to have is a Page - and a Badge is the tool which Facebook provides to help you to promote a Page on your blog or other website.


    How to make a badge to promote a Facebook Page

    View all your Pages using the arrow drop-down at the very top right of Facebook's toobar.
    (Facebook chance the place for actions like this from time to time - you may need to look around to find your pages.)

    Copy the URL for the Page you want to promote
    (One way is to right click on its name, and choose copy-link-location- or whatever phrase your browser uses.   Another is to to go the page, and copy the URLfrom your address bar.)

    Come back to this article and click  here --- Facebook Social Plugins, to reach Facebook's tools.
    (I used to have instructions to launch this from Facebook - but I cannot find any link to it from my Pages page any more.)

    Choose Page Plugin  / Web.  

    Scroll down the page, and set the options for your badge.  The first one is critical - the others optional:
    • Facebook Page URL - this needs to be changed to the URL of your page (which you copied earlier)
      If you have less than 25 Fans already, then your page's URL will be something like http://www.facebook.com/pages/Blogger-Hints-and-Tips/144194435594821 and you can get it by copying the link from the list of Pages for your account.
      Once you have more than 25 fans, you can choose a  page-url on the Edit Info > Username screen.
    • Tab - the tab on your page that is shown
    • Width - choose a value that suits the space on your template where you want to put the box.
    • Show faces, show header:  choose options that suit your purpose and blog template
    • Show stream:  this controls whether you show posting from the Page inside your blog
    As you choose options, the preview at the bottom updates to show what the button will look like:


    When you are happy with the selections, choose Get Code.
    • Currently, there are options for an iframe or Javascript SDK:   I recommend using the iframe, unless you are comfortable with the two-part installation needed for the Javascripit, and you are sure that the visitors you want to target will have Javascripti enabled. 


    Copy the code provided

    Install the code into your blog - there several options for installing the HTML, depending on where you want to put the badge or button.


    Job Done!   Your blog will now display a gadget that promotes the selected Facebook page - people can view and like your Page from within your blog.


    What your visitors will see

    People who visit your blog through a web-browser will see a Facebook area, including a Like button and whatever other options you have chosen.

    This can be quite a powerful tool:  you can easily use two or three different combinations on different parts of your blog:  one that has no border, no faces and no header but does show a Stream can effectively look like a "live" feed from your Facebook page to your blog, while another one with different options can show off the size of your fan-base.

    Be aware that the Like button shown in this button gives people the option to Like your Page in facebook  - not your blog directly, and not the current post that they are reading.   If you want them to be able to Like your blog or blog-posts, you need to provide this option separately (and many of your visitors are likely to be confused by the different).

    As always, people who read your blog via a feed reader (Bloglines, Google Reader, etc), or by email subscription (eg having used follow-by-email) may not see the Facebook item, depending on where is places and what options their email program has.


    Customizing the code

    You can change the characteristics of the box without having to generate the code from Facebook again.   For example you can later the width and/or height - just remember to do it in both of the places required if you are using the iframe option:
    <iframe src="http://www.facebook.com/plugins/likebox.php?href=http%3A%2F%2Fwww.facebook.com%2Fpages%2FBlogger-Hints-and-Tips%2F144194435594821&amp;width=160&amp;colorscheme=light&amp;show_faces=false&amp;border_color=purple&amp;stream=true&amp;header=false&amp;height=395" scrolling="no" frameborder="0" style="border:none; overflow:hidden; width:160px; height:395px;" allowTransparency="true"></iframe>

    fyi, I could have just quoted this code, and said to use it on your blog.  But I don't usually do this when I'm describing how to link Blogger and any third party product, because it's likely that Facebook (or whoever) will change their code in the future:  it's always safest to get the most up-to-date copy of the code from the source-site when you need it.

    The facebook page where you get the code from also has more information about controls you can set in the code, too.   Check it out for more information.


    Do you need to own the page you want to promote?

    No - not any more.

    At one stage, the first step in these instructions was to
    "Log into Facebook with a profile (ie personal account) that has administrator rights for the page you want to promote."

    But that's no longer necessary.   You can promote any Facebook page that you want to, on your blog.

    But be aware that if you show the page-feed on your blog, and you don't own the page, then you have no control over what is shown.   It's possible that a feed from someone else's Page will show material which breaks Blogger's terms and conditions - or which you simply don't want on your blog.    For this reason along, I'd recommend only promoting your own, or closely trusted, pages on your blog.


    Related Articles

    Putting HTML from a third-party into your blog

    How the data in Blogger blogs is organised

    Linking Blogs and Websites

    Tools for linking Blogger and the Social Networking sites

    Putting a Facebook "share this" button on your blog

    Copyright, Blogs and Bloggers

    Why RSS / Subscribe to Posts is important for bloggers

    How to rename picture files in Picasa-desktop

    This article is about re-naming files from within Picasa-desktop, to provide SEO benefits for your blog.


    Picasa's desktop software is a good tool for organizing and editing photos on your local computer.   And it is still available for you to use on your computer, even though Picasa-web-albums has been replaced by Google Albums + Google Album Archive.

    For pictures that are important in your blog, I still recommend preparing them in a tool like Picasa-desktop and then uploading the finished versions to Google Photos before putting them into a post, because:
    • The desktop tool has better editing tools (cropping, zooming, auto adjustment, adding watermarks) and Picasa-web-albums does.
    • It lets you control the size of the uploaded file
    • It's easier to ensure sure that you still have full-size files on my local machine for printing etc, as well as smaller, more optimized, copies to use on web-pages.

    Picasa-desktop folders have a very nice relationship with files and directories with the Windows file system:
    Each Picasa folder = one directory on your computer
    Each Picasa photo = one file on your computer.

    And this means that you can set various properties (eg file name) from either inside Picasa or from Windows.


    How to associate keywords with photos in Picasa-desktop

    Picasa-desktop has two tools for adding keywords to photographs:
    • You can enter a caption for each photo. This is basically some text, which is stored "inside" the photo, in a hidden-field that is only visible when you are using a software tool that displays the captions. (In technical terms, the caption is stored inside the  IPTC/XMP Description field inside the JPEG etc file that you have.)
    • You can enter one or more tags for each photo - again, text (individual words or phrases) that is stored in the  IPTC/XMP Keyword field.

    Unfortunately captions and tags aren't shown when you put a photo in your blog.

    This means that the captions and tags are possibly not used by Google in understanding what the photo is about: I've never heard any SEO experts recommending that the  IPTC/XMP fields should be keyword optimized.   For some bloggers this won't be an issue - but it is if SEO is important for you blog.

    Another approach is to put the keyword(s) into the file-name, because file-name is one of the factors that Google looks at when it is indexing images.   And this has a nice spin-off for you as well - it means that they keywords are available to any file-search tools that you use on your computer, not just to specialised ones that work with images.

    For a long time, I believed that to change the name of a file, I had to go out to my Windows files (using Windows Explorer or similar, and rename them there) - and then wait for Picasa to catch up with the change that I'd made in the file system.   But one day I accidentally hit the F2 key, and found that it opens up a very useful dialog box indeed.


    How to Change the name of a file in Picasa desktop

    Navigate to the picture that you want to change the file-name for, using the Picasa-desktop software.

    Press the F2 key. This opens a Rename Files window.

    Type in a new name for the file, for example    concrete-pig-outside-butcher-shop-in-ireland

    Click the option buttons if you want to include today's date or the file-resolution in the name  (I don't usually do this, because I organise my photos into folders according to the date they were taken)


    Click Rename to save the change


    Job done!    The file has a new name in your computer's file system, and is still loaded in your Picasa database.


    How to change the name of a file in Google Album Archive or Google Photos

    Currently there is no way to change the name of a file after it is uploaded it to either Google Album Archive or Google Photos:  .

    One option is to download the photo, rename the file on your desktop, and re-upload it.   But if you change the name in this way, you also need to change the link to the file in every place that it has already been used.   That said, if you only use your photos in one place each, then making a new copy with a different name, uploading it and changing all the existing links can be a good way to deal with copyright theives who have hot-linked directly to your photos.


    How to choose "good" names for your picture files

    Early SEO advice was to use:
    • Lowercase letters only (some computers don't like uppercase)
    • Only hyphens between words (not spaces, underscores, etc)
    • Regular characters only (no á é etc)

    Today, I'm not sure if it matters so much. In most cases, it's probably more important to use rich, descriptive key words  that describe all the aspects of the photo, than to worry about how they're laid out.   But I do tend to follow the advice anyway - just in case.


    Related Articles

    How to show your photos in a slideshow from Picasa

    Does SEO matter for your blog?

    How to put a picture into your blog.

    Understanding Picasa-desktop vs Picasa-web-albums

    Taking action when someone has copied your blog without permission

    Monday, 31 October 2016

    How to center gadgets in Blogger

    This article is about centering gadgets from 3rd parties that you install onto your blog.


    Previously, I've described how to put HTML code from a 3rd party into your blog.

    When code like this is put into a gadget, one common question is "how do I center it?"

    There are (at least) three options for doing this, ie for putting a gadget into the middle (horizontally) of the area it is located in.   These are described below.


    Option 1: Centre all the gadgets in your blog

    To center-align every single gadget in your blog, just, add a CSS rule to your blog.  The rule to add is:
    .widget {
      text-align: center;

    This will centre the contents and title of every gadget on your blog.


    Option 2: Only center-align the specific gadget

    To only centre-align one gadget, which is made from HTML/Javascript code, you can just put the gadget-code from the 3rd party (eg PayPal, Amazon, etc) inside a centering statement, like this:

    <div style="text-align: center;">

    PUT THE CODE FROM THE 3RD PARTY HERE

    </div>
    Install the code into your blog the way you would usually install this 3rd party code.

    This will centre-align the contents (not title) of the specific gadget that you add.

    Note the American spelling of the word "center" - and don't forget to put the closing </div> statement at the end.

    There may be some gadgets where it would be possible to add the centring statement to the gadget code itself, rather than putting it outside.    I don't recommend this (unless you're so comfortable with HTML and CSS that you don't need to be reading this article), because it introduces a risk that you will interfere with some other aspect, or that you will lose the centering if you ever need to refresh the code.


    Option 3 - Make a new style rule just for the gadget

    If you only want to centre one (or several) gadgets - not all of them - then it's best to define a new style that is to be used on specific gadgets:  put this new style into your template, and then apply it to the gadgets like this.
    <div class="YourNewSytle">

    PUT THE CODE FROM THE 3RD PARTY HERE

    </div>

    This approach will only centre the gadget contents - not any header that you give to it.

    There are lots of options that you could put into the new style rule, but at a minimum it needs to have
    .YourNewStyle
    {
      text-align: center;
    }
    Notice that there is a "." (ie a full-stop) before the name of your new style.

    Also, it's best not to use a number as the style-name (eg "2nd-gadgetStyle"), because this doesn't work with some browsers.


    Related Articles

    Putting HTML code from a 3rd party into your blog

    Adding a new CSS style into your template

    Centering the header in your blog

    Putting a gadget above your blog's header

    Removing the attribution gadget from Designer-template blogs 

    Monday, 17 October 2016

    Lining up the first post and the sidebar

    In some Blogger templates, there is a big gap between the bottom of the header and the start of the first post, and this means that the posts and the sidebar are not aligned.  This article explains how to adjust the gap, and so remove that problem.


    In the templates that Blogger provides, as well as all third-party templates, the amount of space between elements on the screen is not accidental:   designers put a lot of effort into working out what spacing will look good, and then finding ways to put CSS code into the template so that the spacing they want is shown in any browser software that Blogger supports.


    But there are times when you may want to change this spacing, and this is easy to do, provided you are willing to accept the disadvantages of editing your template, and if  you can work out exactly which part of the template code to change.


    The pre-Header gap

    A pet-hate of mine is the blank space above the first post, which looks strange unless you put something else in to the space.  In this example, I've got an AdSense link-unit in the area highlighted in red, just to fill in the empty area:


    How to change the gap above the post header

    1  Edit your template  - don't forget to take a backup.


    2  Find this code
    h3.post-title, .comments h4 {
      font: $(post.title.font);
      margin: .75em 0 0;
    }
    The exact numbers used in your template may be different:  the key thing is to find the CSS command that is putting a margin above the post header.  In the template that I took this example from (Simple), it's the "0.75em" - which puts 75% of the space of a the post-header characters as a blank space above the header.


    3   Change the first margin value:  how much to change it by depends on your template, but in some cases I've used 0 successfully.

    In CSS, when a margin statement has three numbers beside it, they refer to the
    • top, 
    • left-and-right, 
    • bottom 
    margins respectively.   So if you want to do something else to the post-header, eg indent it, this is the place to make changes


    4   Click Preview to see what the blog will look like - keep doing this until you get the right setting.


    5   When you are happy with the spacing, click Save Template to apply the changes to your blog.   (Or Clear Edits if you cannot get it right and need to stop trying).


    Note:  If you make a big change to your template like this, it would be a good idea to check out out in at least one version of the other browsers that your readers use - at the moment, this usually means Internet Explorer 8, Firefox and Chrome.   But it may depend on your niche - a tool like Google Analytics will give you some statistics about what browsers, and screen sizes, your visitors have.

    Also, it is possible to make this change by just installing a new CSS rule for h3.post-title into your blog - because the latest one found is always the one used, and because the template designer's Add CSS function puts the rules you add after the othr rules.   I don't recommend it here, though, because working with the original rule makes it easier to see the effect of making changes to any of the values in the area.


    Other affected spacing

    If you have more than one post per page, then this change will also reduce the amount of space between the bottom of one post and the header of the next one.   Depending on your template, you want want to add a little more space into the margin statement in the bottom of the post-footer, eg
    .post-footer {
      margin: 20px -2px 20;
      padding: 5px 10px;
    }

    If you display comments in your blog, you also need to check the impact on comments, because the original command applied to h4 items in comments as well.

    If you are making a lot of changes, you may want to make a test blog, and plan your changes in private before applying them to your main blog.


    Related Articles

    Setting up Google Analytics to get statistics about for your visitors

    Adding a new CSS rule to your blog's template

    Advantanges and disadvantages of editing your template.

    How to edit your blogger template

    Who did your blogger template come from - the quick way of finding out

    Making a test-blog for template changes

    Planning changes to your blog in private

    Thursday, 6 October 2016

    Getting the HTML code to put a picture into your blog's sidebar, header or footer

    This article explains how to use Blogger's Post Editor to get the HTML code that you need to put a picture into your sidebar (or header or footer, or anywhere else a gadget can go).


    The Picture gadget is the normal tool for adding a picture to your blog's sidebar.

    But sometimes you want more control over the picture size or behaviour.  Eg, you may want to have two pictures very close to each other and guarantee that they're the same size.

    To do this, you need to get the HTML code for the picture, and then put it into your blog as an HTML-gadget.  Fortunately, Blogger's Post-editor make it very easy to do this without writing the code yourself.


    Using the Post Editor to generate the HTML for a picture

    1  Start a new Post  (you're not ever going to publish this:  it's just a work-area)

    2  Don't enter any text:   just use the Picture icon on the toolbar to add a picture.   Blogger will prompt you to upload the picture, or to choose it from a Google-album-archive or to enter its URL:  add the picture the way that you usually would.

    3  Switch to the HTML tab   (top left of the editing window).

    This show you the HTML code for displaying the picture, as it is set to display in the Post (depending on the picture-settings you've chosen, it may be centered or right/left aligned, and the size may vary).

    Copy the HTML.

    5  Switch back to Compose, so that you don't get confused the next time you edit a post.

    Return to the list of posts:  you may be asked if you want to leave the page without saving - the answer is Yes.  Or you may have a new draft-status post, which you can delete.


    Job Done!   You now have some HTML code which you can paste into an HTML/Javascript gadget, or anywhere else that you may need it - even into another post that you are editing in a separate window, or into a totally different tool.


    Related Articles

    Stopping pictures on your blog from being "clickable"

    Inserting a Picture into a blog Post.

    Putting 3rd party HTML into your blog

    Center-align the gadgets on your blog

    Hosting pictures outside of Google / Picasa

    Inserting a picture into your blog as a gadget

    Sunday, 4 September 2016

    mail2Post: How to update your blog by email, instead of using Blogger

    Blogger's mail2Post tool lets authors make blog-posts, without using the Blogger software.   All you need to do is set it up, and write posts using your regular email tools.

    Mail2Post and Blogger

    The mail2Post feature, sometimes known as Post-to-profile, is a way of putting content on your blog without using the full Blogger software for writing the post.

    It's not quite as good as using Blogger itself - there are a few features missing - but it is good enough in many situations.


    How to set up mail2Post

    Log in to Blogger with the Google account that you want to have mail2Post rights to your blog:  this account needs to already be set up as an author for the the blog.

    Go to
    • The Settings tab - if you are logged on with an author account, or
    • The Settings > Email tab if you are using an administrator account  

    Beside Posting using email, there is a place where you can enter some "secretWords", to make up an email address that you can use to post to your blog.

    Enter some suitable words:  make sure it's not too easy to guess (your surname would not be a good choice!), so that spammers cannot get into it:


    Choose either to publish emailed updates as soon as they arrive, or to save email as drafts so that you,  or another administrator, can review them before posting.

    Note down the full email address, ie   NAME.your-secret-words@blogger.com   (you will need this later - and unfortunately because of the way it's displayed, it is not easy to copy-and-paste the value).

    Click Save Settings.


    Job Done!   Your blog is now set up so that posts can be created by being emailed to it, instead of requiring someone to use the Blogger software to write each post.


    Using the mail2Post address

    Once mail2Post is set up, anyone who sends an email message to the email address you copied can post to your blog, with what ever restrictions you set.

    You might put message on your blog saying
     "send contributions to YOURNAME.YOURSECRETWORDS@blogger.com"
    But be aware that this could generate a lot of spam.   And in the worse case, the spam could get your blog deleted for breaking Blogger's terms and conditions.

    Alternatively, you might just tell the address to selected people - or perhaps even just use it yourself.


    How is a Blogger Post made from an email message

    When a message is sent to your mail2Post address:
    • The subject-line of your email message becomes the Post-title
    • The body of the email message becomes the body of the post
    • I think:  If you automatically publish emailed posts, then the post date-and-time is the moment at which Blogger's servers received the incoming email message - expressed in Blogger's default time zone (PST OR PDT, I think).
    • No labels are applied to the post
    • The post-author is the profile name of the blog-author who set up the mail2Post address.

    Pictures and Videos
    People have reported various results when they include images and videos inside messages sent via mail2Post.   Personally, I have tested:
    • An attached picture - posted ok, the image is show before all the text from the body of the email message
    • An attached video file (4meg) - posted ok with the video appearing to be above the text from the email message
    • An in-line photo - worked perfectly, the picture is placed in the post in the same position (relative to the text) that it was in the original email.

    I suspect that the results  depend on they type of picture, the email client you are using, and the message format settings.   My testing was with Mozilla Thunderbird, which has a particular way of thinking about "attachments", slightly different from other email systems that I have used (eg Microsoft Outlook).

    Probably the only way to discover how photos are handled when you use your email to send them is to set up a test-blog and experiment with different options.


    What your readers see

    People who read your blog in a web-browser see mail2Post entries just like any other posts.   If your blog displays the poster's name, then mail2Post entries have the name of the blog-author who set up the mail2Post address.

    As mentioned before, the positioning of pictures and videos may not always be as good:  attached pictures, in particular, may be shown as the very stop of the post.

    Apart from that, there is nothing to show visitors that the post was created using email - in either the post or in the blog's RSS feed.


    Related Articles

    Giving someone write access (ie author permissions) to your blog

    Setting up a blog administrator

    Understanding Google accounts

    Setting up a test-blog to try things out in private

    RSS, and why it matters for your blog