Showing posts with label HTML. Show all posts

Saturday, 11 August 2018

How to create a Timer with Start Stop Buttons in Javascript

Calculating time in seconds or milliseconds is sometimes necessary in javascript programming, especially if you are creating some games or animation. This page contains a simple code of javascript timer with "Start" and "Stop" buttons. If you have some basic knowledge of JS Programming then you will easily understand the logic behind it. You may utilize it to make your own timer with little bit of change in coding as per your requirement.

Running version of Script:

0 Seconds

Code:
<div>
    <input id="btnStart" type="button" value="Start" onclick="timestart();" />
    <input id="btnStop" type="button" value="Stop" onclick="timestop();" />
     <h3><span id="timer">0</span> Seconds</h3>
</div>
<script type="text/javascript">
        var check = null;
        var timespent=0;
        var displayfrequency=100; // in milliseconds
        var decimalplaces=1;  // seconds to be displayed in points
        function timestart() 
        {
              var startTime = Date.now();
              check = setInterval(function () {
              var elapsedTime = Date.now() - startTime;
              document.getElementById("timer").innerHTML = (elapsedTime / 1000).toFixed(decimalplaces);
                  }, displayfrequency);
        }

        function timestop() 
        {
            clearInterval(check);
            timespent=document.getElementById("timer").innerHTML;
        }
    </script>

In the above script variable displayfrequency can be adjusted to change the duration after which time displayed in changed. Similarly decimalplaces can be adjusted to change the decimal point of seconds dispalyed. Just play by changing these values and you will understand their usage.

Friday, 10 August 2018

Hiding a DIV in HTML with or without Javascript

Sometimes we need to hide a DIV in a HTML page. There are various ways to do that. Some of them includes usage of Javascript, while some of them don't. However if you learn the usage of Javascript then you can control it more easily. Without wasting the time let me show you the methods.


There are three ways to hide a DIV in a HTML document. The way to use these ways is explained with syntax in both HTML and Javascript. A person who have got basic knowledge of these languages can easily understand that.

Opacity: Opacity is a term more used by photoshop experts. But here we will use it a style for div.
 HTML :  <div id="div1" style="opacity:0.5;">Anything here</div>
Javascript : document.getElementById('div1').style.opacity=0.5;In the above statement opacity controls the visibility of the content of div. If you set opacity to 0.0 then it becomes completely invisible and shows everything behind it, while setting opacity to 1.0 makes it completely visible and hides every thing behind it. Any number between 0.0 to 1.0 will give a translucent effect.

Visibility: As the term suggests, visibility is again a style feature which can be used in the following manner.
HTML : <div id="div1" style="visibility:hidden;">Anything here</div>
Javascript: document.getElementById('div1').style.visibility='hidden';
The negative fact about "visibility" is that it keeps the space reserved for div, but just doesn't show it. So it might show a blank space in document. Visibility has got two options, one is hidden, while second is visible (to show that div again).

Display: This one is the one that i use a lot. It can totally remove the div from a HTML document and it does not leave any space reserved for that div.
HTML : <div id="div1" style="display:none;">Anything here</div>
Javascript: document.getElementById('div1').style.display='none';
As you can see "none" removes the div totally from sight and does not leave any space for that. There are two more options to make the div visible. "block" is used for block elements like <div> and <p>, while "inline" is used for inline elements like <span> and <a>.

I hope that the above coding features of HTML and Javascript will help some of you. If you have any query then feel free to comment.

Thursday, 9 August 2018

Overlapping a DIV with another and adjusting its Opacity

While working with HTML in web designing, sometime we need to overlap a div with another. Those who do it for the very first time find it difficult to do that. Here i have provided a simple example to make it easier for you to do it.

The following code will overlap an existing DIV (with an image). There will be 9 different DIVs overlapping that image at different locations. Opacity of these DIVs can also be changed using a simple function. Check the live version of that code in running condition and then its code provided below.

Running Version:


Code:

<div style="position:relative;width:200px;height:200px;float:left;">
     <img src="https://blogger.googleusercontent.com/img/b/R29vZ2xl/AVvXsEgiXueG_CQgIeD7RWaVwzcRUdOS70AuhT2oyIk1Zf-NVerYOSodMP7MS7RgY5XgYEIZ1xfT5FOwskA5TpOFCsUlvypR0gxmixvsayaB_m55S0e4qDx28v5IKCpIPCoaO2TudhBDRnATJ-hC/s1600/c1.jpg" />
     <div id="div1" style="position:absolute;opacity:0.9;top:0;left:0;width:66px;height:66px;background-color:red"></div>
     <div id="div2" style="position:absolute;opacity:0.9;top:0;left:66px;width:66px;height:66px;background-color:green"></div>
     <div id="div3" style="position:absolute;opacity:0.9;top:0;left:132px;width:66px;height:66px;background-color:blue"></div>
     <div id="div4" style="position:absolute;opacity:0.9;top:66px;left:0px;width:66px;height:66px;background-color:yellow"></div>
     <div id="div5" style="position:absolute;opacity:0.9;top:66px;left:66px;width:66px;height:66px;background-color:pink"></div>
     <div id="div6" style="position:absolute;opacity:0.9;top:66px;left:132px;width:66px;height:66px;background-color:orange"></div>
     <div id="div7" style="position:absolute;opacity:0.9;top:132px;left:0px;width:66px;height:66px;background-color:purple"></div>
     <div id="div8" style="position:absolute;opacity:0.9;top:132px;left:66px;width:66px;height:66px;background-color:violet"></div>
     <div id="div9" style="position:absolute;opacity:0.9;top:132px;left:132px;width:66px;height:66px;background-color:indigo"></div>
</div>
<input type="button" value="Remove Red" onclick="remove()" />
<script>
function remove()
{
document.getElementById('div1').style.opacity=0;
}
</script>

Monday, 31 October 2016

How to center gadgets in Blogger

This article is about centering gadgets from 3rd parties that you install onto your blog.


Previously, I've described how to put HTML code from a 3rd party into your blog.

When code like this is put into a gadget, one common question is "how do I center it?"

There are (at least) three options for doing this, ie for putting a gadget into the middle (horizontally) of the area it is located in.   These are described below.


Option 1: Centre all the gadgets in your blog

To center-align every single gadget in your blog, just, add a CSS rule to your blog.  The rule to add is:
.widget {
  text-align: center;

This will centre the contents and title of every gadget on your blog.


Option 2: Only center-align the specific gadget

To only centre-align one gadget, which is made from HTML/Javascript code, you can just put the gadget-code from the 3rd party (eg PayPal, Amazon, etc) inside a centering statement, like this:

<div style="text-align: center;">

PUT THE CODE FROM THE 3RD PARTY HERE

</div>
Install the code into your blog the way you would usually install this 3rd party code.

This will centre-align the contents (not title) of the specific gadget that you add.

Note the American spelling of the word "center" - and don't forget to put the closing </div> statement at the end.

There may be some gadgets where it would be possible to add the centring statement to the gadget code itself, rather than putting it outside.    I don't recommend this (unless you're so comfortable with HTML and CSS that you don't need to be reading this article), because it introduces a risk that you will interfere with some other aspect, or that you will lose the centering if you ever need to refresh the code.


Option 3 - Make a new style rule just for the gadget

If you only want to centre one (or several) gadgets - not all of them - then it's best to define a new style that is to be used on specific gadgets:  put this new style into your template, and then apply it to the gadgets like this.
<div class="YourNewSytle">

PUT THE CODE FROM THE 3RD PARTY HERE

</div>

This approach will only centre the gadget contents - not any header that you give to it.

There are lots of options that you could put into the new style rule, but at a minimum it needs to have
.YourNewStyle
{
  text-align: center;
}
Notice that there is a "." (ie a full-stop) before the name of your new style.

Also, it's best not to use a number as the style-name (eg "2nd-gadgetStyle"), because this doesn't work with some browsers.


Related Articles

Putting HTML code from a 3rd party into your blog

Adding a new CSS style into your template

Centering the header in your blog

Putting a gadget above your blog's header

Removing the attribution gadget from Designer-template blogs 

Thursday, 6 October 2016

Getting the HTML code to put a picture into your blog's sidebar, header or footer

This article explains how to use Blogger's Post Editor to get the HTML code that you need to put a picture into your sidebar (or header or footer, or anywhere else a gadget can go).


The Picture gadget is the normal tool for adding a picture to your blog's sidebar.

But sometimes you want more control over the picture size or behaviour.  Eg, you may want to have two pictures very close to each other and guarantee that they're the same size.

To do this, you need to get the HTML code for the picture, and then put it into your blog as an HTML-gadget.  Fortunately, Blogger's Post-editor make it very easy to do this without writing the code yourself.


Using the Post Editor to generate the HTML for a picture

1  Start a new Post  (you're not ever going to publish this:  it's just a work-area)

2  Don't enter any text:   just use the Picture icon on the toolbar to add a picture.   Blogger will prompt you to upload the picture, or to choose it from a Google-album-archive or to enter its URL:  add the picture the way that you usually would.

3  Switch to the HTML tab   (top left of the editing window).

This show you the HTML code for displaying the picture, as it is set to display in the Post (depending on the picture-settings you've chosen, it may be centered or right/left aligned, and the size may vary).

Copy the HTML.

5  Switch back to Compose, so that you don't get confused the next time you edit a post.

Return to the list of posts:  you may be asked if you want to leave the page without saving - the answer is Yes.  Or you may have a new draft-status post, which you can delete.


Job Done!   You now have some HTML code which you can paste into an HTML/Javascript gadget, or anywhere else that you may need it - even into another post that you are editing in a separate window, or into a totally different tool.


Related Articles

Stopping pictures on your blog from being "clickable"

Inserting a Picture into a blog Post.

Putting 3rd party HTML into your blog

Center-align the gadgets on your blog

Hosting pictures outside of Google / Picasa

Inserting a picture into your blog as a gadget

Tuesday, 31 May 2016

Adding Image Slideshow on any HTML Webpage / blogger site

A number of web developers face challenge in adding a simple image slideshow in a HTML webpage. There are very tough codes available on net for this task. But most of them demand images to be of same size, or the code is too tough to implement due to usage of css and advanced java script. Here we are proving a simple HTML code with minimal usage of Java script. You can directly use in it your blog post's HTML coding.


Here is the code

<script type="text/javascript">
var x=0;
function rotate(num){
fs=document.ff.slide;
x=num%fs.length;
if(x<0) x=fs.length-1;
document.images.show.src=fs.options[x].value;
fs.selectedIndex=x;}
function auto() {
if(document.ff.fa.value == "Stop"){
rotate(++x);setTimeout("auto()", 2000);}}
</script>
<form name="ff">
<table cellpadding=3 style="border:1px solid;border-collapse:collapse; border-color:#C0C0C0">
<tr><th align=center>Tourist Places in India</th>
</tr><tr><td align=center>
<img src="https://blogger.googleusercontent.com/img/b/R29vZ2xl/AVvXsEgEeL3sokGC8gux_mWzj0GnqIfKrWhzG_lufftZTEQUKK2WOjstfmOrW2I2quRweK8xiISZy9-deS9byfO8Gn5oqIdGcISJJvIC8WxW-Cfkxxa7BpgUREMijUCbJhvrwvbrDvZx27X4Rng/s1600/shimla-manali.jpg" name="show">
</td></tr><tr>
<td align=center style="border:1px solid; border-color:#C0C0C0">
<input type="button" onclick="rotate(0);" value="ll<<" title="Jump to Start" />
<input type="button" onclick="rotate(x-1);" value="Previous " title="Previous photo" style="width:80px;" />
<input type="button" name="fa" onClick="this.value=((this.value=='Stop')?'Start':'Stop');auto();" value="Start Slidshow" title="Auto-play" style="width:150px;" />
<input type="button" onclick="rotate(x+1);" value="Next" title="Next Photo" style="width:80px;" />
<input type="button" onclick="rotate(this.form.slide.length-1);" value=">>ll" title="Jump to end" />
</td></tr><tr>
<td align=center style="border:1px solid; border-color:#C0C0C0">
<select name="slide" onChange="rotate(this.selectedIndex);">
<option value="https://blogger.googleusercontent.com/img/b/R29vZ2xl/AVvXsEgEeL3sokGC8gux_mWzj0GnqIfKrWhzG_lufftZTEQUKK2WOjstfmOrW2I2quRweK8xiISZy9-deS9byfO8Gn5oqIdGcISJJvIC8WxW-Cfkxxa7BpgUREMijUCbJhvrwvbrDvZx27X4Rng/s1600/shimla-manali.jpg">Shimla-Manali </option>
<option value="https://blogger.googleusercontent.com/img/b/R29vZ2xl/AVvXsEjMOsly3S1gpVTbP2indL-e7HoePCazoHZfa28nvVz5VdPL6EIz4V_4_cMwXJnjICnyyUeiRJCokAXZn4UfjATuVglpiyzdGOqUh5ySmLITKiasiar8N4qxPzXVI6mTIlofiSkC_HCBJpk/s1600/darjeeling.JPG">Darjeeling</option>
<option value="https://blogger.googleusercontent.com/img/b/R29vZ2xl/AVvXsEjlDJdTPlQDJXgARxuQhwBMQRcxn01Izl-qYm9deH8pt96JWxPPdHNu1lkWRZTMiKIOlsFFDYxIm0j5mHRaS5vSa-UDwZ0RRfk5oqueqwTF24Pv7HsjiKPLALHYbmSK1RzfehGckF7YwyM/s1600/corbett+national+park.jpg">Corbett National Park 
</option>
<option value="https://blogger.googleusercontent.com/img/b/R29vZ2xl/AVvXsEgwSUF38me6ZzGdtn_EuWzLY4Hw43dfbq8eoTFUj024rwuxNlb4IzALJNqEmibHAQYelr1gLOWI6l6h68dtQHJ-PQgQ71cgZCNpRdzTqsl0chZsomUd7T0MribodKwHoJD3oXsm9P2TRUk/s1600/Lashmir.jpg">Kashmir </option>
<option value="https://blogger.googleusercontent.com/img/b/R29vZ2xl/AVvXsEisMYRrp8qdF-g1gxwgbAyatS4g4HJAaJzV54C_XZHVs4HZaPadwUnpemFo6XdsIHZZGQG6vzPCERA_ke5kddwgj15nVp-C69gcS2xxKJ2B0KP_tpu0RTCpqx4D4LWXDIGEUwqd3smfifw/s1600/andaman.jpg">Andman </option>
<option value="https://blogger.googleusercontent.com/img/b/R29vZ2xl/AVvXsEhMkvV5FJyZOiHi4HF6kKBer0hH2qwxbIQ5jbjmT4loq7Qqod1sBhSILWBclPHPjB8iyZCND69S0T1zEXb9kLTKOdwUssTLCzDx2U7KgSWZgcG11gJ9lrHE6NTQF3j2gO9CK5uftam_MPo/s1600/kerala.jpg">Kerala </option>
<option value="https://blogger.googleusercontent.com/img/b/R29vZ2xl/AVvXsEipeGs81Li9bQbif0KFu2_mM8V-FehcrC6KfpBfbDaCUrjePd9u0qczIYwK4c5bcP6abpP_1ndYPVxdvAGqT2IVwryfa_IlfW2Q1xMG4Gte6039hDKbJVtrDCB5WcJkxz1rRXMo2niDRQI/s1600/Tajmahal.jpg">Tajmahal </option>
<option value="https://blogger.googleusercontent.com/img/b/R29vZ2xl/AVvXsEiBF_0bGxUe0n3QAGxVhMcAlGip2FkPJPXXCDrxNtt2c37UdP-NJubKp9IyNrSEL0rSfq1UI62jPf6kqUawRW2cP1p7WqDPq0TGsZ3HnDkMvsFfT0EJ-QMhybpd3_k5fSV5up7GvC9gyvE/s1600/Goa.jpg">Goa </option>
<option value="https://blogger.googleusercontent.com/img/b/R29vZ2xl/AVvXsEgUPd_w1EJA1ZiUfPpR6WuNZ_9y8FBZzTxr16J8QJ_wCUsMYxeHUeeOEJm5UvaaTOfD5PqLBhaTJn4Fdixu7fJbXfBlDa8hoAdeMUZKzUHWrtlnsxA0qfvbbUP53OYw1MZFU4wLrdx_T_g/s1600/Laddakh.jpg">Ladakh </option>
</select>
</td></tr></table>

 The implementation of the above code will provide the following result


Tourist Places in India

If you are smart enough to be a web developer, then you know how to change the code implement it on your website. You can add or delete images by adding or deleting the <option ></option> tag which is in the end part of the code.

Monday, 4 January 2016

Adding a Share on WhatsApp Button to your Website

Whatsapp is the latest trend in social networking. Web developers already use facebook and twitter, but the latest is Whatsapp. Very few websites have implemented the "Share on Whatsapp" button on their websites. Using this button the viewer can easily share your web-page link to his/her Whatsapp contacts through the Smartphone. The only drawback of this feature is that it works only when somebody accesses it via a smartphone with Whatsapp installed on it.


So lets see how we can implement it on your website. I personally used in on the right column of my website, which remains intact in every post. The code is very simple and given below.

<table><tr>
<td width="28" height="30"><img border="0" width="25" src="https://blogger.googleusercontent.com/img/b/R29vZ2xl/AVvXsEj7cYR14M5BmrkXz0biU4bLfh2SfGk-LkWXcGD6TiKPXfc2lUwdUAzDNZB_EC7PKRJ96nGL9i_xJzGTKLyl1xkf387iyZd03NEl7w_OAiTRKG_y68142lS5tG8xJboBVCFK2KSZV2OsK7G0/s1600/whatsapp.jpg" height="25" /></td>
<td height="30"><a target="_blank" href="whatsapp://send?text=http%3A%2F%2Fbestrix.blogspot.com%2F"
 onmouseover="this.href='whatsapp://send?text='+encodeURIComponent(location.href);"><b>Share on Whatsapp</b></a></td>
</tr></table>

Live Preview:
Share on Whatsapp

If you want to understand the code a bit more, then the above code is a bit lengthy (just provide the right look). The real code is given below.

<a target="_blank" href="whatsapp://send?text=http%3A%2F%2Fbestrix.blogspot.com%2F"
 onmouseover="this.href='whatsapp://send?text='+encodeURIComponent(location.href);"><b>Share on Whatsapp</b></a>

In this code the event onmouseover is used to change the link to currently viewed page by the user. But if you want this code to just share the link of your homepage then you can make it simple, just like provided below.

<a target="_blank" href="whatsapp://send?text=http%3A%2F%2Fbestrix.blogspot.com%2F"><b>Share on Whatsapp</b></a>

Note: In the above code i have maked the name of my blog with green color. Your can change that part by your websites name. Don't use "http://" or "/" mark in that name as its already there in encoded format.

If you know some HTML programming skills then you can modify the code to make it look like anything.

Here are some articles to help you in HTML programming :


Wednesday, 30 December 2015

How to add a Copy Button under some text on your website

You must be visiting this page because you want to know a method to add a COPY button under some text in your website. Once i needed it too and discovered the following code. Its not written by by but it works perfectly.


How this code works :

Before we proceed you have to understand some basics of this code. At first we need a textarea where we put the text to be copied. Then there is a COPY IT Button just after the textarea. When the user clicks on COPY IT button, the text in textarea is copied to clipboard. Then the user can paste that text whereever he/she wants.

(If you want to do something else then I M Sorry !!!)

<p>
  <textarea class="js-copytextarea">
  Sample Text to be copied</textarea><br />
</p>
<p>
  <button class="js-textareacopybtn">Copy it</button>
</p>

<script>
var copyTextareaBtn = document.querySelector('.js-textareacopybtn');
copyTextareaBtn.addEventListener('click', function(event) {
  var copyTextarea = document.querySelector('.js-copytextarea');
  copyTextarea.select();
  try {
    var successful = document.execCommand('copy');
    var msg = successful ? 'successful' : 'unsuccessful';
    console.log('Copying text command was ' + msg);
  } catch (err) {
    console.log('Oops, unable to copy');
  }
});
</script>

Working Example:


This script works perfectly for me in most of the browsers.

Other important pages with some suggestions for blogger template coding.

Tuesday, 30 September 2014

Dynamic Image Map that works when window is resized

Last time i was creating an image map in my website and found my self into a state where image was dynamically resized by browser to fit it into the space. But it created a problem in the image map. Coordinates of Image Map were same as before, while image was resized by the browser. In such a situation i need my image map coordinates to be changed dynamically.
I tried to find a solution to this problem and found that i am not alone facing this problem. Finally i found a solution called dynamic image map. This technique need some java script to be implemented with your image map. This technique is not a tough one. Just follow the following steps.

How to create a dynamic image map with javascript


  • Copy the following code

!function(){"use strict";function a(){function a(){function a(a){function c(a){return a*b[1===(d=1-d)?"width":"height"]}var d=0;return a.split(",").map(Number).map(c).map(Math.floor).join(",")}for(var b={width:h.width/i.width,height:h.height/i.height},c=0;f>c;c++)e[c].coords=a(g[c])}function b(){i.onload=function(){(h.width!==i.width||h.height!==i.height)&&a()},i.src=h.src}function c(){function b(){clearTimeout(j),j=setTimeout(a,250)}window.addEventListener?window.addEventListener("resize",b,!1):window.attachEvent&&window.attachEvent("onresize",b)}var d=this,e=d.getElementsByTagName("area"),f=e.length,g=Array.prototype.map.call(e,function(a){return a.coords}),h=document.querySelector('img[usemap="#'+d.name+'"]'),i=new Image,j=null;b(),c()}window.imageMapResize=function(b){function c(b){if("MAP"!==b.tagName)throw new TypeError("Expected <MAP> tag, found <"+b.tagName+">.");a.call(b)}Array.prototype.forEach.call(document.querySelectorAll(b||"map"),c)},"jQuery"in window&&(jQuery.fn.imageMapResize=function(){return this.filter("map").each(a)})}();

  • Paste it in a blank notepad
  • Save that notepad as MapResizer.js
  • Upload it on your website server. (If you don't have file uploading access, then use yourjavascript.com to upload that file and get its url in your email). You will need the URL of MapResizer.js in the next step.
  • After </map> paste the following code in your HTML document.
<script src="http://ajax.googleapis.com/ajax/libs/jquery/1.11.0/jquery.min.js"></script>
 <script src="Paste complete url of mapresizer.js" type="text/javascript"></script>
 <script type="text/javascript">
  $('map').imageMapResize();
 </script>

Monday, 4 August 2014

Putting pictures side-by-side in a blog post or gadget

This article shows how to put pictures side-by-side in Blogger (or any other website) using HTML, in a way that works for visitors using mobiles (smartphones and tables) as well as larger screens.


Placing pictures side by side in Blogger:  a picture of three images next to each other on the same line
Previously I've explained how to use a table to force photos (and other things) to all show into a line, even if the user's screen is too small to display them all at once.   And I've looked at putting text and pictures side-by-side - assuming you're only working with one picture.

Tables are great if you are showing data and need rigid alignment, or if you don't mind your mobile device visitors having to either scroll, or to pinch their screen so much that they cannot read the text.

But there is a way to lay out pictures so that they display side by side if there's room on the screen, or start on a new line if there's not.

I've done this recently on a blog where really wanted to make a display for last / next week and last / next year on two different dimensions. It looks like this on a smartphone vs a tablet.   Notice that on the tablet, the two middle pictures are on the same line.


How to lay out several pictures side-by-side if there's space, or one-under-another if not

Start to prepare your post in the usual way.

Add your pictures to the post in the usual way. Ideally, put them just before or just after some marker text that you can use to help you to find the code for it in the next step.

Hover over each picture, and choose the small size (you can change this later)

Go into HTML mode.

Find the place where the pictures are.   (If you've used marker-text, just use your browser's search feature to go to it.)

Add this code, just where you want the line of images (or other items) to end up.
<div style="display: inline-block; margin-bottom: 2em; margin-right: 2em; width: NN;">
IMAGE CODE FOR PICTURE</div>
<div style="display: inline-block; margin-bottom: 2em; margin-right: 2em; width: NN;">
IMAGE CODE FOR PICTURE</div>
<div style="display: inline-block; margin-bottom: 2em; margin-right: 0em; width: NN;">
IMAGE CODE FOR PICTURE</div>

That has space for three pictures - you can delete one or add more lines if you want to - just make sure that the very last one has margin-right: 0em; and the others all have margin-right: 2em;

Now, for each picture that you added,
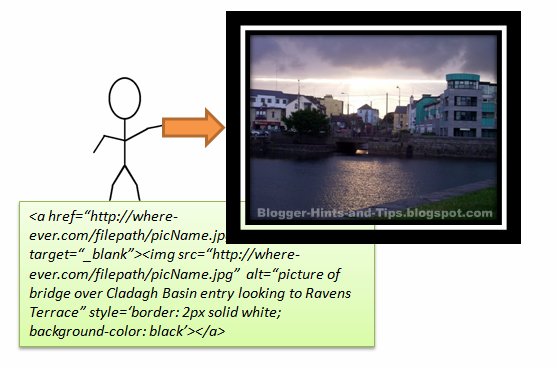
  • Find the HTML code for it.   (This post has a detailed explanation of what the HTML code for a picture)
  • Delete the height = "nn"  part from it   (nnn = whatever number is there)
  • In the width = "nnn" part, replace nnn with  "100%", so it says   width = "100%"
    Note:  this is saying to make the picture take up the whole width of the division you have assigned it to.   You can make it smaller than 100%.   But you want to do it put a bigger margin between the two pictures, then you can do this by increasing the value in   margin-right: 2em;      
  • Move the picture code to where it says IMAGE CODE FOR PICTURE
  • Decide how wide the picture should be, and change the value in Width: NN within that DIV statement to the right amount.
    You can either use pixels (eg width: 100px;), ems (eg width: 20em;) or percentages (width: 40%;)   If you use percentages, then the total amount for all the pictures should be a little less than 100%, so allow for some space between the pictures:  for example, with a 2em margin and three pictures in a row, you may need to make the total approx 90%.

Go back into Compose mode, and check that your pictures look roughly right - if necessary, you may need to adjust the picture sizes.   (See the note below under Troubleshooting for more about this.)
Delete the marker text.


Job done!   Your pictures will now display side-by-side if they can all fit into the user's screen, or one under another if not.


Troubleshooting

Getting the pictures right can be quite fiddly, so I recommend preparing the blog post in private, so you can do this in stages, and save your work regularly as you go.

Your pictures will be vertically aligned on the bottom axis, and this means that the approach will work best with pictures that are the same height.    (I'm working on another article looking at alignment issues - it's they're quite tricky.)

Post editor view vs your visitor's screen

An issue that many new bloggers struggle with is that what they can see in the post editor is not the same as what their blog-visitors will see.

The post editor screen is only a certain width.    Most times, it is smaller than the width of the main body of your blog.  So, if you have used fixed-widths (ie in pixels, or ems, not percentages), more pictures fit on the same line in your blog than in the post editor. But if a visitor is using their smartphone to read your blog (and I do a lot of my blog-reading on the phone these days) - the screen width is less than it is in the post editor.

This is why using <div> statements instead of <table>'s is a good idea.  But it does means that sometimes you will have to compromise on whether things can be put together.

Is this only for pictures?

No - you can use this technique with blocks of text, videos - in fact anything that you can put into your blog.

What about gadgets?

You can use this technique anywhere that you can edit the HTML.  So, you can put pictures in a row in your sidebar, header or footer by using a HTML-gadget.    (This post shows a handy way to get the picture code when you're making gadgets.)

Captions

don't recommend using captions with this this technique.   Blogger shows them using tables:  they put the photo and text into a one-column-two-row table, and this makes working with the picture code a lot more difficult.   If you really want to use them, then add them after you have moved your picture code inside the <div>...</div> statements.


Related Articles:


Using a table to display data in your blog

Marker text helps you to find places in your blog post

Putting text and photographs side-by-side 

How to add a picture to a blog post

How to get the HTML code for a picture when you don't have an insert-picture icon on the toolbar

Monday, 21 July 2014

Find things in your blog-posts' HTML by using temporary "marker text"

This article shows how to use "marker text" to help find things when you need to edit the HTML code behind one of your blog posts.


When you edit a post in Blogger, to start with you generally use the Compose mode, which shows you the formatted view of how your work will look.

But behind that formatted view, every post is actually written in HTML, ie Hyper-text Markup Language - a type of computer language that uses tags like <h2> or <a href="www.foo.com">  to say how to display the contents.

A number of articles, here and in other blogger-helper blogs tell you how to do thing by changing the HTML for the post. But if you are not used to working with HTML, it can be confusing tryign to fix the part that you need to change.

Marker-text is a technique that you can use to "mark" problem areas while you are still in Compose mode, so that you can easily find them again when you are in Edit HTML mode.


How to use marker-text to fix a problem in your post


Start to prepare or edit your post in the usual way.

Go to the place just before the problem you want to fix or change you want to make.

Add some extra blank lines.

In the middle of the extra blank lines, put a few characters or a word that do not occurr anywhere else in your post. I quite often use XXX - but you can use any letters, characters or numbers, for example PROBLEM JUST AFTER HERE or 12345.

Use the copy function to put the text you added (without the blank lines)into your computer's memory.

Optional: Go to the place just after the problem you want to fix or change you want to make, and add some more text eg PUT IT BEFORE HERE

Switch to Edit HTML mode, using the button at the top-left of the post editing window.

Start the "find" feature in your web browser:
  • ctrl / f in Chrome
  • ctrl / f in Internet Explorer

In the search box that opens, use Paste (ctrl / v) to put the exact marker text that you entered into the Find box, and press enter.

The post-edit window will scroll to the place where your marker text is, and it will most likely be highlighted.

You have now found the place where you need to work, so you can now make the HTML changes required.

Once you have fixed all the issues, switch back to Compose mode using the tab in the top left hand corner, and remove all the marker text and extra blank lines that you added.


Good Practise

You will be removing the marker text before you publish your post.

But just in case you accidentally click Publish before you mean to, only use text that would not be embarrassing if some of your readers accidentally see it.

Some RSS readers will see the contents of your post as they are when you first hit Publish, even if you edit them less than two minutes later.)


Leaving your Marker Text in Place

If you might need to find the same place in your post's HTML again, then instead of removing your marker-text, you may just want to comment it out.

To do this, put these characters before it:
<!-- 

and these characters after it
 -->

So it might look like this

<!-- START OF PROBLEM1 HERE -->

Make sure you get the spaces - highlighed in yellow   as well as both of the "-- characters.

If you do this, then you will not be able to see or find your Marker Text when you are in Compose Mode, but you will be able to see and find it when you are in Edit HTML mode.


Related Articles:

How to edit a post you have already published

Using cut, copy and paste in the Blogger post editor

The Blogger-helpers search tool

Friday, 14 March 2014

Blink text in HTML for all Browser (No Javascript) 100% Working

I have tried several methods to blink text on my website. Some of them include CSS methods or Java Scripts. But none of them is 100% functional in all browsers. Especially Java Script method doesn't work if scripts are turned off in any browser. So here i have found an interesting trick to blink text by using simple HTML. most of you might have used this thing but never utilized it in this way.


Blink Text in HTML


There is an example below to show how we can blink text by using simple HTML. First i have written the HTML code and the below is its output.

HTML


<table border="0" cellspacing="0" style="width: 200px;"><tbody>
<tr><td>
<marquee style="height:20;width:200" scrollamount="200" scrolldelay="500">Blinking Text!</marquee>
</td></tr>
</tbody></table>

Output


Blinking Text!

The code shown above is just a marquee to work in such a way that you feel like that the text is blinking. If you have ever done programming then might find this code interesting and you will understand it to a greater extent.

Note: In the code above with of the table, width of marquee and scroll amount should be same. You may change the other things in the code to make it look better.

How to make Hyperlink on Blinking Text


If you want to put a hyperlink on the blinking text then use the <a> tag as we use in simple HTML, but use it outside <marquee> . If you use it inside <marquee> then hyperlink will go off and on with text.

How to decorate the Blinking Text


Just use the simple HTML tags around the blink text to decorate it. For example

HTML


<table border="0" cellspacing="0" style="width: 300px;"><tbody>
<tr><td>
<marquee style="height:50;width:300" scrollamount="300" scrolldelay="500"><font color="Red">
<span style="font-size:25px;"><b>Blinking Text!</b></span></font></marquee>
</td></tr>
</tbody></table>

Output


Blinking Text!

Sunday, 10 March 2013

How to make Dynamic URL in HTML by using Events

Its quiet easy to make dynamic URLs if you are using Javascript or PHP. But if you want to use pure HTML then what will u do ? In this post i will tell you a very simple code in HTML to create a dynamic URL.


What is Dynamic URL ?

A dynamic URL is an address which is generated by a web page when it is needed. It can also be called Dynamic Hyperlinks. To understand it better lets take a look at Static URL( or Static Hyperlinks).

HTML Code
<a href="http://www.facebook.com/sharer.php?u=http://bestrix.blogspot.com" target="_blank" rel="nofollow">Share on Facebook</a>


Output:
Share on Facebook


This Hyperlink contain a Static URL which will always remain same, no matter which post you are reading. It will share the homepage of my website i.e http://bestrix.blogspot.com on facebook. But here need some dynamic URL which can change itself to current post's address, so that it can be shared by users.

How to create Dynamic URL ?

Now i will write a code that will generate Dynamic Hyperlink, as the URL will change itself to current post's address.

HTML Code
<a href="http://www.facebook.com/sharer.php?u=http://bestrix.blogspot.com" target="_blank" rel="nofollow" onmouseover="this.href='http://www.facebook.com/sharer.php?u='+encodeURIComponent(location.href);">Share on Facebook</a>


Output:
Share on Facebook


As you can see that the above hyperlink points to share the current post's URL.
So you can use "onmouseover" event to change the dynamic hyperlinks on your webpage.

This event is very simple.
onmouseover="this.href = 'urlHere';"
you can put it inside <a> tag to generate dynamic hyperlinks.