Showing posts with label Blog structures. Show all posts

Monday, 25 September 2017

How to put posts into pages in Wordpress - without using a plug-in

This article shows how to set up your blog made with Wordpress so that that (it looks like) your posts are on separate web-pages, without needing to install any plugin.

(For this task, the answers for Wordpress.org and Wordpress.com are so very similar that they have been combined into the one article.)


Wordpress, like most blogging platforms, is basically made up of Posts, Pages and Widgets (aka gadgets).

People who are building blogs often want to "put posts into pages" ie to have a page which shows a subset of their posts, based on the category.  

The standard, but unsatisfactory, answer is
"Sorry, that's not how Wordpress works.   Static pages are used for reference information that doesn't change often, which you don't want to be part of your regular post-feed, but which you do want users to have easy access to."

Luckily it's easy to set up your blog so that it looks like your posts are on different pages by following three simple steps.   This is an out-of-the box function and no plug-in's are required.


Follow these steps to put your posts into pages


1   Add Categories to your posts

Edit each post, and add one or more Categories to it.  

It's your choice whether to add a Category to all posts, or just the ones that you want to show up on specific page-look-alike ones.


2 Make a menu

Skip this step if your blog already has a primary menu.   But if it doesn't:

Wordpress.org users:

  • In your Wordpress dashboard, go to Appearance > Menus
  • Enter a name for the menu.   fyi, this name isn't displayed, it's just used to help you know which menu is which,  I usually call it   topMenu
  • Under Menu settings > Display Location, click   Primary menu
  • Click the Save Menu button

Wordpress.com users

  • In your Wordpress dashboard, go to  Customize > Menus > Add a menu
  • Enter a name for the menu.   fyi, this name isn't displayed, it's just used to help you know which menu is which,  I usually call it   topMenu
  • Click Create Menu
  • Under Display Location, click   Primary menu
  • Click the Save and Publish button

3   Add each Category that you want a page for to the menu

In the Wordpress dashboard:
  • Wordpress.org users, choose  Appearance > Menus
  • Wordpress.com users, choose Customize > Menus

Choose the menu which you want people to use to a page of posts  (mostly this will be the primary menu - but in theory you could use any one).

Wordpress.com users - you also need to click Add Item here, to open the next screen.

In the screen that opens, there are four types of items that you can add to a menu.   Click on the drop-down arrow beside Categories to see the current list of category values which you have added.

Select the Category-value(s) that you want to have pages for, and click the Add to Menu button.


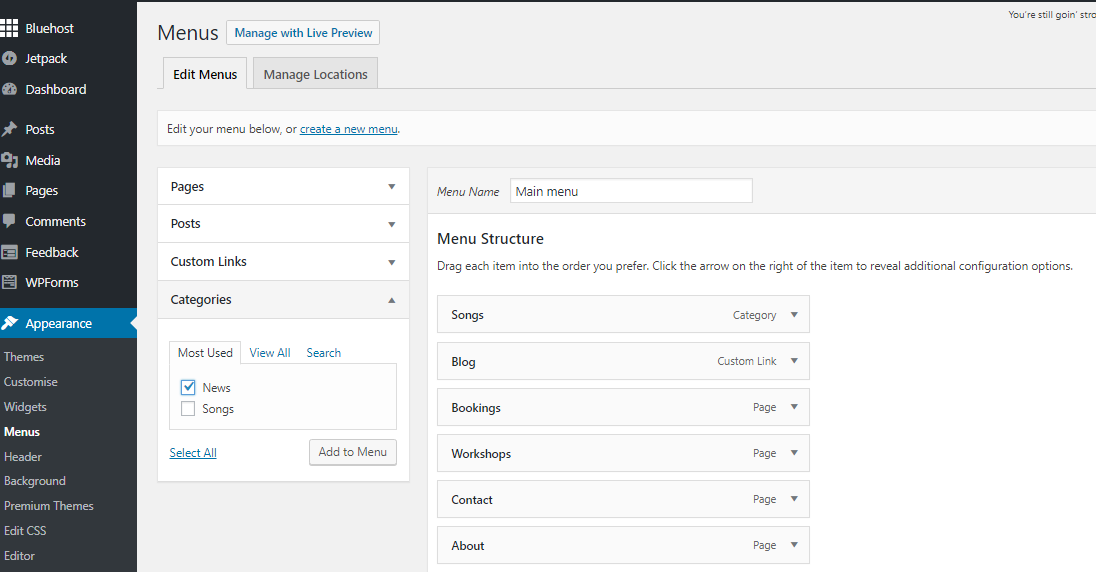
This will add the selected category values to the "Menu Structure" section.  

Drag-and-drop them up and down the list to change the order of the items on the menu.

When you are happy with the order, click the Save Menu or the Save and Publish button.


3   Optional:  Deal with the home-page

By default, Wordpress blogs show posts on the home page, as well as on the "Category pages" for the categories you have assigned to them.

You can stop this by choosing
  • Wordpress.org users:     Appearance > Customize > Static front page   
  • Wordpress.com:    Customize  > Static front page   
and clicking the Static Page radio button.


Next, under the Front Page drop-down box, either
  • Choose one of your existing Pages or
  • Use the Add New link to create a new Page  (you can edit the contents later).

And under Post Page, either
  • Choose one of your existing Pages or
  • Use the Add New link to create a new Page
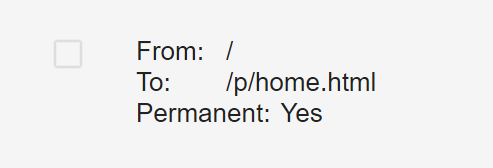
Note that this step is optional:   if you do it, you also need to edit your Menu (see step 2 above),  and add the selected Page to your menu.    If  you don't do this, then you need to have set up some other method for people visiting your blog to get to the posts.


Click Save and Publish    (at the top of the sidebar), to make these changes take effect.


Job Done

It really is that simple.  Your readers can now click on the "pages" in your blog from your menu, and see a list of posts for the Page that they chose.

Even better, if some posts relate to more than one topic, they show up on all of the relevant pages.  


Related Articles

Coming soon.

Tuesday, 4 July 2017

Putting files into Blogger's root directory

This article explains the issues, and options, for putting a file into the "root directory" of your Blogger blog.


If you are using certain non-Google products to enhance your Blog, they will sometimes tell you to put a file into your root-directory.   They may even tell you to use an FTP  tool to do this.

Sometimes this happens when a product also gives you code to install into your blog , This approach is used when the code is written for websites in general rather than specifically to work with Blogger: putting useful files into a place relative to the root directory makes it a lot easier to move a website from a test-address to the live one, so is a common approach outside of Blogger.

Or maybe the other tool has been designed to verify that you do own the website in this way, rather than asking you to change the website code itself.


How to add a file to your blog's root directory

The short answer for Blogger users is "sorry, you cannot do this".

The long answer is still no:  "there is no way to do this, but see the rest of this article for an explanation of why, and some suggested work-arounds."


Why not? Every other website tool lets me do this.

Home - cpg1.5.x demo 1287551599033
Posts:  Blogger's tool for managing
the content on our blogs
If you're clever, and have lots of time, you can make a website just using a text-editor (eg notpad), a graphics program, and ftp software that lets you put the files into the right places on computer that's connected to the internet.

Tools like Dreamweaver take away a lot of the time-consuming work, and some of the need for cleverness.  But you still need to know a lot about the internet to do things in a way that makes a good website.

Content management systems make this easier still: they let a technically-minded person do the nuts-and-bolts work to make the website, and give authors / artists / editors / content-creators simpler-to-use tools that let them put "stuff" (ie content) into the website, without needing to worry about the details of how it works.

Blogger is a (very simple) website content-management system, it creates our web-pages for us based on data that we put into certain places. Administrators can set up and change the theme, other people, eg authors simply make posts.

When we use Blogger, the main way that we change the data in our web-pages is using the Blogger software. 

Some items inside posts or gadgets can be changed using other software, eg Google Docs, provided they were were set up using that other software in the first place. But - key point - there is nothing in the way that Blogger is put together that means we need to access the base directory. So they don't let us do so.    And I doubt that this this will change anytime soon.


What to do instead

The options for getting around this restriction depend on how the file that you need to put into your root directory is intended to be used.

Installing code

If you have code to install into your blog, and a file to go with it, then you just need to
  1. Host the file somewhere else (maybe in your Picasa-web-album for the blog, if it's a picture)
  2. Change the code to point to the full path of where you have hosted the file, instead of the relative path used in the code
For example, here is the code for a button linking to my blog, with the picture in the root directory:
<div class="separator" style="clear: both; text-align: center;"> <a href="http://www.Blogger-hints-and-tips.blogspot.com" imageanchor="1" style="margin-left: 1em; margin-right: 1em;"> <img border="0" src="//Logo.png" width="100" /></a></div>
To change this to use a specific location, I just add a file-path and the file-name of the picture wherever it is hosted.
<div class="separator" style="clear: both; text-align: center;"> <a href="http://www.Blogger-hints-and-tips.blogspot.com" imageanchor="1" style="margin-left: 1em; margin-right: 1em;"> <img border="0" src="https://blogger.googleusercontent.com/img/b/R29vZ2xl/AVvXsEjIm3YtmkR2USZcOU8k1mazFnQYuFfdHRZNl6pnR1Env8240zoaZbyTE0SQ72d5rPw263LVAG-kd7HspaZvhGvl7Op8_aKH4fHEHaybavrsCca5DA8V_S-nM1IbFIzZHb0RsE97tvI86Po_/s320/Logo.png" width="100" /></a></div>

TIP: blogger's editor sometimes gets links mixed up, so it's important to start the filepath with "http://"


Verifying ownership

If someone wants to use a file's position to check that you control a website, then they will have code on their own website that looks for the file in your root directory.

You cannot change this code. And you cannot place the fie.

So you need to ask them for an alternative way to verify, that is suitable for people without root directory access.

 If they don't have any alternatives, try lobbying for this on their product support forum:  by not having alterantives, they are ensuring that Blogger users, among others, cannot use their service.

If the official answer is still "no", then you could also ask in other on-line forums if anyone has found any other work-arounds.


An afterthought: what isn't recommended

I've recently seen someone suggest in a help forum that people with custom domains can put files into their blog's root directory by FTP'ing the files into place.

 This may be true, if the service that you are purchasing from your domain registrar includes file-hosting. But file hosting(*)
  1. Isn't necessary for a custom domain used in Blogger (since Google hosts our files for us), and
  2. Isn't available as part of the services when you buy a custom-domain through Blogger.

So it's not a general solution for most Blogger users, though it may work for some.

Initially I was a little sceptical of the idea: Blogger doesn't expect to see any files in our root directory, so I was concerned that it might do strange things if it found them there. But on reflection, I think there is probably a low risk of this happening, since the file-location is outside Blogger's control.

(*) To avoid any confusion, file hosting and DNS hosting are not the same thing. If you buy a custom domain for your blog from a registrar without going through Google/Blogger, then you do need to pay for DNS hosting, but do not need to buy file-hosting.


Related Articles

File hosts - places to store files used in your blog.

Picasa-web-albums: a quick introduction

How Blogger data is organised

Setting up a new administrator for your blog

Options for letting other people write in your blog

Thursday, 12 January 2017

How to not show any posts on your blog's home page, using Blogger

You can set your blog up so that no posts are shown on the main screen - provided you have used some of the other "home page" approaches to give readers other ways of getting to your content.


Previously I've explained how to only show one post on the main page of your blog.

But some people who want to give their blog a home page go further than that, and don't show any posts on the main screen at all.   (Remember, the main screen is where people who navigate to your blog, rather than to posts within it, go.)

This sounds like a strange thing to do - after all, blogs are about posts.

But actually it's fine, provided you use some other tools to let readers move around the blog.  I've made a 150+ page blog this way, and it works very nicely because I have organised the information and used some index-pages (containing lists of bus-routes, suburbs, maps etc) with tables that link to many other posts.


How to show no (ie zero, 0) posts on the main screen

Some people want to do this, as part of the process of giving their blog a home page.  It's not possible if your blog has a Dynamic thene, but can be done for blogs with Layout themes.

There are at least two ways of doing it.

Option 1 - use a custom re-direct for your home-page

Make a new Page (Pages > New Page) and add the material which you want to show on your main screen.    Publish this page.

Take a note of the URL of the Page that you use created.

Go to Settings > Search preferences > Errors and re-directions > Custom re-directs

Click Edit then New re-direct

In the dialog box which opens:

  • Enter a back-slash (ie   /  )into the first (From) box.
  • Enter the URL of the page that you noted earlier into the second (To) box
  • In the To box, remove the blog-address, because Blogger already adds that for you.
    Eg if your URL is     http:/www.myBlog.com/p/home.html
    then just enter           /p/home.html

    (note that you keep the backslash (/) just before the P.
Click the Permanent checkbox.

Click Save just under the entry you just made - it now looks like this:


Click Save changes.


Job Done!   Anyone who goes to your blog's home page will now go automatically to the alternative page you made - and the effect is that no posts are shown on the home page.


Option 2 - use the Posts and Comments setting

Choose the Settings > Posts and Comments panel from the left sidebar.

Enter zero (0) into the Show at most field
Click Save Settings in the top right hand corner of the screen.


    About this method

    The method in Option 2 works:   no posts are shown on your home page.

    But by default, nothting else is shown, either.    Unless you take steps to avoid it, your readers will see a grey box saying "0 Posts" when they look at your blog's main URL.   


    Some of the things you can do to avoid this include hiding the "showing posts with label XXX" message, and creating a gadget that only shows on the "home" page.


    Recommended option

    The custom re-direct option is probably the best approach - and is certainly what I've used for my blogs recently:   it's clean, and doesn't need any special messing around with gadgets etc to put content onto the "home" page.

    But there may be cases where the second option is better - and I have recently confirmed that it still works.


    Whichever option you choose

    Remember that you need to set up some other way to let readers move from your home-page to see your other posts - some of the ways to do this are discussed here.


    Related Articles

    Limiting your blog to only have one post on the main page

    Giving your blog a home page

    Giving readers alternative ways to see the posts in your blog

    What are dynamic view themes?

    Blogger theme types
    .
    Using tables in your blog

    Displaying a gadget only on the home page

    Monday, 5 October 2015

    How to change or remove the Newer Post and Older Posts links

    This article explains how to hide or change the format of the "Older Posts" and "Newer Post" and "Home" links that are shown at the bottom of Blogger blogs with Layout or Designer themes.


    Why are the older and newer posts links used

    Most designer and layout themes have links at the bottom of your page of blog posts which let readers navigate back and forward among the list of posts.

    This is basic to how a blog is intended to work:  you post regularly, and give people a way to get back to previous posts.

    The pager-links are particularly important on pages that are reached using the Label or Archive gadgets, which may show more posts than you normally have on your home page, or displaying in your blog.

    But some people want to remove them - and this is fine provided readers have other ways of navigating around the blog.


    How to remove "Newer Posts" and "Older Posts" from your blog

    To totally remove these items, you just add some new CSS rules to your template in the usual way.

    To remove "Older Posts" add:
    #blog-pager-older-link {
    float: right;
    }

    To remove "Newer Posts" add:
    #blog-pager-older-link {
    float: right;
    }

    Or to remove both of them and the "Home" link that appears in between them, add:
    #blog-pager {
    display: none;
    }

    How to format the "Newer Posts" and "Older Posts"

    Changing the way that these links look is very similar, you just add the same codes, except instead of 
    display: none;
    you need to use the CSS element for the effect you want.   For example, to make the text bigger and bold, you might use rules like
    font-size: 150%;
    font-weight: bold;

    You need to put these commands inside the curly brackets, where the display: none; is now - make sure that each component has a semi-colon at the end of it.   It makes the code easier to read if each component is on a new line, but this isn't necessary.

    Another option is to swap the "float" commands around to put "older posts" on the left and "newer posts" on the right (I've never quite understood why they were the other way around).


    You can also use background images and colours, with elements like:
    background-image:url('URL OF YOUR IMAGE');
    background-color:#cccccc;

    How to change the "Newer Posts" and "Older Posts" text


    If you want to change the text values - either to different words, or by replacing them totally with pictures, you need to accept the disadvantages of editing your theme.   If this is ok, and you you want to proceed then:

    1  Edit your theme in the usual way

    2  Replace the existing links:
    • To replace the "newer posts" link, find <data:newerPageTitle/>  in your theme, and replace it with whatever text you want.
    • To replace the "older posts" link, find <data:olderPageTitle/>  in your theme, and replace it with whatever text you want.
    • To replace the "home" link, find <data:homeMsg/>  in your theme, and replace it with whatever text you want.   


    In each case, the code you are replacing will be inside some other code, like this:
      <span id='blog-pager-newer-link'>
          <a class='blog-pager-newer-link' expr:href='data:newerPageUrl' expr:id='data:widget.instanceId + &quot;_blog-pager-newer-link&quot;' expr:title='data:newerPageTitle'><data:newerPageTitle/></a>
          </span>
    Make sure that you only replace exactly the code listed above, including the < and >'s.   The other code around sets up the links to the actual older or newer posts, and you don't want to change this.

    Also, if you want to use a picture instead, replace it with <img alt='...' border='0' src='THE URL OF YOUR PICTURE'/> - of course with the right picture URL put in.

    Do make sure that the meaning of your pictures is obvious though - what may look like a cute "newer posts" symbol to you might be totally meaningless to someone else.


    Related Articles

    How to add a CSS rule to your theme

    How to edit your blogger theme

    Understand the advantages and disadvantages of theme editing

    Finding the URL of a picture in Picasa-web-albums

    Understanding designer and layout theme

    Saturday, 31 May 2014

    Giving your Blog a Home Page

    This article is about the options for setting the home page for blogs made with Google's Blogger.


    Blogs don't have a "home page", main page or "landing page" in the same way that regular web-sites do.  Instead, they show the newest post first, since (hopefully!) most readers will be return visitors, coming back to see what's new.

    But there may be blogs/websites where you want a welcome message or a particular post to appear first whenever someone visits your blog, or where you want to put all your posts in reverse order.

    This article is about options for giving your Blogger blog a "home page".

    It lists four options, and gives advantages/disadvantages of each approach, and links to articles with details about implementing each case. If you can think of any more approaches, please leave a comment below.


    Options for giving your blog a home page include:

    • Static page combined with a custom re-direct - as discovered by Nitecruzr, and now described here.  This was my recommended method of home-page implementation for a while.   However it did not work on mobile themes for a while, so I changed my mind.  But it does work on them now, so I'm back to recommending it again.


    Advantages and Disadvantages of each option


    Option Advantages Disadvantages
    Static page and custom re-direct No theme editing is needed

    Easy page editing - no messing around putting content into a gadget

    No gaps on other pages due to the gadget being "missing"

    Simple, elegant, and fully functional for both desktop and mobile visitors.
    Back in 2011, I wrote:  
    "Google probably didn't intend to give us this option when they set up custom re-directs, so it's possible that they might remove it again.   It's such a nice solution, though, that I think it's worth the risk for now".
    But it's now 2017, they haven't removed it yet.   So I'm thinking that it's not going away any time soon.
    Show all posts in reverse order Great for new readers - they can "follow the story". Return visitors have to navigate down to where they were up to last time:  the blog has no way of helping them to remember where that was.

    You can't use most of Blogger's date features:  newer and older posts links will take the reader in the "wrong" direction.  And you have to manually enter any dates that would be relevant.

    Your posts will get "older" as you write more:  this may confuse search-engines, and there's a risk that google might to things to "very old" posts in the future.
    Make one post always show up first You can still use all of Google's date features.

    Readers will know when you actually posted to your blog.

    Great for returning readers:  they can see your (current) welcome comments, and then go straight to the latest post after that.
    You have to remember to edit the "chosen" post every single time that you make a new post - one day, you might forget.

    This approach probably won't work on multi-author blogs:  there's a very high chance that someone would forget to edit the chosen post and change its date.
    Show a "welcome gadget" on the home page only Doesn't need any changes to Post date-time settings.

    Your blog still functions like a blog (older/newer post links , archive gadget etc).

    An HTML/Javascript gadget can be very flexible, and you can get Blogger to write all the HTML for you - see Making a Gadget Like a Post.

    You can use things other than text, eg a picture or even a poll.

    It includes an extreme option:  you could show no posts on the "home" page, and just show the gadget.
    You need to edit your theme to make this work.

    You need to re-do the theme customisation every time that you change to use a different theme.

    The welcome gadget isn't one of your posts: it's not included in exports of your blog contents (It is in an export of your theme - but the words inside it are not included).

    A gadget cannot show quite as many things as a post.  

    Doesn't work for mobile device users if your blog has a mobile theme enabled, unless you some some specific things to make the gadget show on mobile.


    Can you think of other ways?   Please leave a comment below.


    Setting the homepage's post date into the future doesn't work

    Some people suggest that you can set the post-date of your main page in the future - and at some times  this has worked.

    But now that scheduled posting is working the way most people expect it to (ie if you write a post today, and publish it with tomorrow's date, then it is shown to your readers from tomorrow onwards), this will not work - because your "home page" won't show until that future date is reached.

    There may be some ways you can fudge it in to working (eg post the page with a date in the past, and then post it again with a future date).   But I VERY STRONGLY don't recommend this:  even if they work today, they may stop working at some time in the future when Google make a change to how future-dated posts are handled.


    Related Articles

    Displaying a gadget only on the home page

    Showing your oldest post first in Blogger (AKA Showing your posts in reverse order)

    Making one post always come up first

    Changing the date for a post.

    Stopping certain pages from ever appearing on the home page

    Tuesday, 4 March 2014

    How to put put Posts into Pages in Blogger

    This article shows how to set up your blog, using Blogger, so that it looks like your posts are on separate web-pages.


    Can you put Posts onto Pages in Blogger?

    Ever since Google introduced "pages" into Blogger, people have complained that their posts all go onto the "home page", and asked how to put posts onto different pages in their blog.


    The standard, but unsatisfactory, answer is
    "Sorry, that's not how Blogger works.   So called "static" pages in Blogger are meant to be used for reference information that doesn't change often, which you don't want to be part of your regular post-feed, but which you do want users to have easy access to."

    Basically, this is part of the difference between post and pages.

    Luckily it's easy to set up your blog so that it looks like your posts are on different pages [tweet this]    (even though you and I know that this isn't how Blogger works) by following three simple steps.


    Follow these steps to put your posts into pages

    1   Add Categories

    Categorise your posts by adding Labels to them.

    It's your choice whether to add Labels to all posts, or just the ones that you want to show up on specific "pages".


    2 Make a "pages look alike" menu bar

    There are (at least) are three ways of doing this - described below.

    When Blogger first implemented static pages that could link to websites, I suggested choosing which ever option suited your blog best.

    However now, due to the increasing importance of mobile themes, I recommend Option c), because the pages-gadget is the only one mentioned that automatically shows upon mobile-themes.

    a)   With a Labels Gadget    

    Use the usual add-a-gadget approach to put a Labels gadget into the spot where you would put the Pages gadget if you wanted to make a horizontal menu bar with it.

    If your blog has some Labels that you don't want to have "pages" for, then set it to show only some of your Labels:

    b)  With a Linked-list gadget

    Use the usual add-a-gadget approach to put a Link-list gadget where you would put the Pages gadget if you wanted to make a horizontal menu bar with it.
    Add a link to the list for each Label that you want a "page" for.   The HTML to use for each Label value is

    http://YOUR-BLOG-URL/search/label/THE-LABEL-NAME

    You can also add other items (eg individual Posts, or even Bllogger's static "pages" if you really must have them - see why I don't like them!) - see the menu bar at the top of this site for an example of this. 

    c)   With a Pages gadget   <===   RECOMMENDED APPROACH

    Use the usual add-a-gadget approach to put a Pages gadget into the menu bar area.   (You can do this even if you have not created any Pages of content).

    While you are editing the Pages gadget, there is an  + Add external link option.  

    Click on this, and add an entry in like the ones described above in he Linked-list gadget option, putting
    •  the text you want in your menu bar into the Page title field 
    • The label search command into the Web address field.


    3   Optional:  Deal with the home-page

    If you don't want your posts to appear on the "home page" was well as the topic pages, then there are two possibilities:

    OR

    • Give your blog a "home page" using the custom-redirect option discussed in this post.

    However I generally see this as unnecessary, because in most cases, very blog visitors ever see the home page.


    Job Done

    It really is that simple.  Your readers can now click on the "pages" in your blog from a "menu" at the top, and see a list of posts for the Page that they chose.

    Even better, if some posts relate to more than one topic, they show up on both of the relevant pages.    And if you have used the Pages gadget, your blog is well set-up to work with a mobile-theme - which is something that is getting more important every month.

    Don't forget to test your blog, to make sure that the menu bar is working how you expect it to and that it looks OK, in all the browsers that your readers are actually using.


    Related Articles

    Using Labels to group your Blogger Posts

    Adding external and internal URLs to your pages-gadget / menu bar

    Giving your blog a home page

    The difference between posts and pages

    Showing a Gadget only on the Home Page

    Making your blog work for people using smartphones and tablets