Showing posts with label Gadgets. Show all posts

Friday, 10 November 2017

How to change AddThis Follow button settings for a gadget on blog or website

This article shows how to change the accounts presented in an AddThis Follow gadget which has already been set up on a Wordpress-based website.

(Note:   this is only relevant for Wordpress.org users.   Wordpress.com users do not have the same freedom to add or configure plug-ins.)


The AddThis plug-ins for Wordpress provide several functions.  One is a Follow gadget, which lets you offer links to your account on other platforms (eg on Twitter, Facebook and Instragram), so that people who are interested can subscribe to you there, and get updates from you even if they don't visit your blog or website regularly). 

When you install and activate this plugin, there is a screen where you can choose which other platforms to show, and say what your address on those platforms is.   

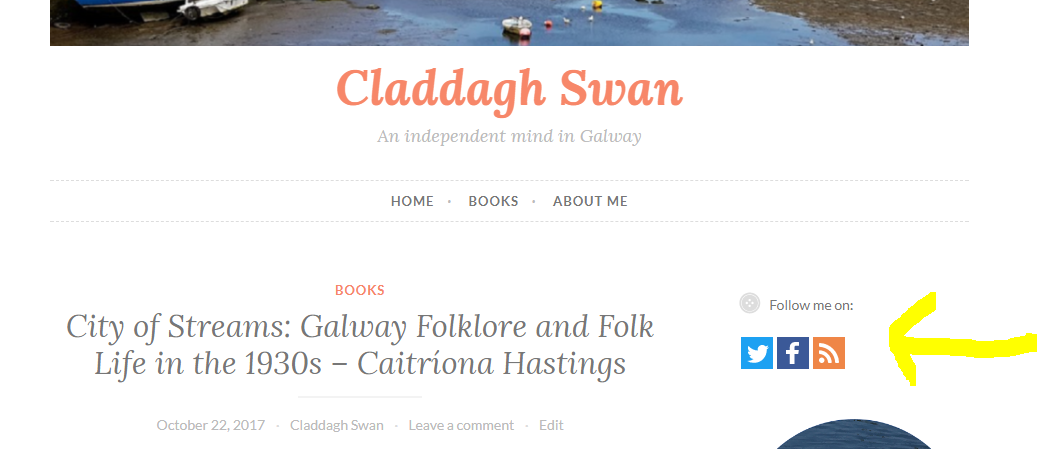
After you have set up the plug-in, then you an add the AddThis Follow widget to your site,   This gadget displays an icon for each tool which you selected, and each one link to the account that you provided.    How exactly it looks depends on the options you choose, but one possibility (Horizontal Follow) is like this:


But - how do you change these settings after the gadget has been added? 


For most widgets, to change their settings you just:
  • Choose Appearance > Widgets from the left hand menu
  • Find the widget in the list of ones that have been installed
  • Click the down-arrow beside the name, to reveal the options.

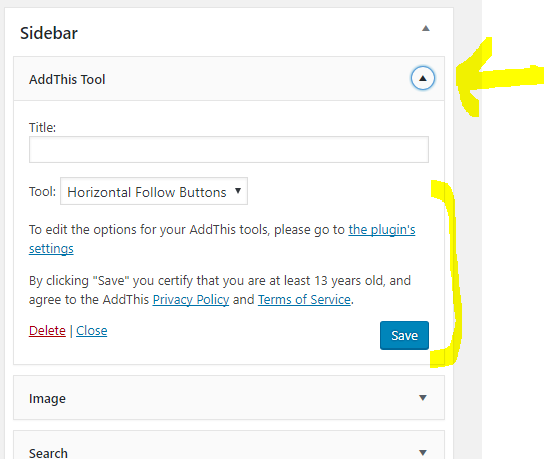
And initially, AddThis-Follow looks much the same.  Rather than giving the detailed options immediately, it says

To edit the options for your AddThis tools, please go to the plugin's settings

Which sounds fair enough - there were a lot of values displayed on the page where you selected which social media platforms to include and how to connected them to your blog.


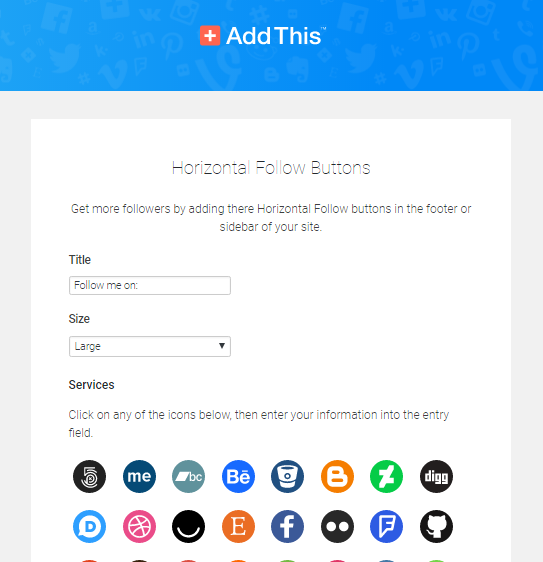
So you click the link, and get taken to a page - example below- which looks nothing like the one where you chose the services to display in the widget.   Even when you scroll down, nothing looks familiar, or even gives any clues about how to update the linked social networking accounts:


How to change the accounts offered by the AddThis Follow widget after it has been added


Don't start with the Appearance > Widgets  menu item.

Instead:
  • Choose with Plugins >  Installed plugins  
  • Find   Follow Buttons by AddThis in the list.
  • Click Settings
  • In the list of gadgets that is displayed, beside the type of Follow button you used (horitzontal or vertical), click the Settings button.    [Yes, that is two Settings clicks in a row.]

This opens up the familiar screen where you can choose social media services by clicking on their icon, and entering your name on that service in the field at the bottom of the page.


Job Done!    

You can now edit the social media accounts linked to your blog  - both correcting errors in the original setup, or adding new accounts which have been added since then.


What this means

Aach AddThis widget (eg AddThis-Follow, AddThis-Inline, etc) has the same settings each time it is used on your site.   So, provided your theme supports having gadgets in multiple places, you can have the Follow-Me gadget several places  (eg in your sidebar and underneath your posts) - always looking the same and linking tothe same social-media accounts.


Related Articles:

There are no related articles for this topic.

Wednesday, 26 July 2017

Understanding the Follow-by-Email gadget and Feedburner

The Follow-by-email gadget uses Feedburner's email-subscription service.   It's very easy to add to your blog, but there are some things that you need to think about if you are using it to deliver blog-posts to your followers by email.


The Follow-by-Email gadget is a very simple way to give your readers access to blog-updates by email: it delivers a message in their inbox every day that you post.

But to decide if it's a good thing to use, to get good value from it, and to troubleshoot any problems, you need to understand a little more about how it works.

And, since it uses Feedburner, this means understanding how Feedburner works, too.


What is Feedburner

The Follow by Email gadget uses a product called Feedburner to manage the list of people who have followed, ie subscribed to your blog. 

Feedburner was originally a tool to enhance the RSS subscriptions that website-owners delivered - see Why RSS / Subscribe to Posts is important for your blog  for info about RSS.   Very roughly speaking, every time a website publishes a new item, Feedburner adds that item to a "feed" or summary of the site, and tells all the subscribers about it, without the subscribers having to visit the website.

One option that Feedburner added was subscribe-by-email:  website owners who use Feedburner for this have to turn the service on, and then put "something" on their website that offers the service to people who want to get emailed updates.   To start with, Feedburner just kept a list of emails addresses, but now it's more sophisticated:   it checks with addresses that they really do want to be subscribed before adding them to the list, and offers an un-subscribe option with each subscription email.

Adding the follow-by-email option to your blog sets this up for you.   It:

  • Sets up a feed, 
  • Turns the email service "on", and 
  • Puts an email--address request box onto your blog.   


What is set up when you add the follow-by-email gadget

The Follow-by-email gadget can be added to your blog the same way you would add any other gadget.   Doing this this means that, you are logged in to a Google account at the time.

If that Google account already owns an entry (ie a "feed") in Feedburner for the blog you're adding the gadget to, then the gadget just uses this feed.

But if the Google account doesn't currently have an entry from the blog, then a new feed is created, and the email service is turned on for it.:
  • The Feed Title is based on the blog's name.  
  • The feed address appears to be fairly random (eg I created one for a blog called "Another test blog", and the feed name is    http://feeds.feedburner.com/blogspot/meaUW


Advantages of the Follow-by-email gadget

This gadget makes it a lot easier to offer a follow-by-email option:  you don't have to set up the feed yourself, or use a HTML-gadget to provide a subscribe-by-email form.

And because it uses Feedburner, you have full access to Feedburner's statistics, and a number of other things that are included in Feedburner's features, including:

Disadvantages of the Follow-by-email gadget

There are some disadvantages of both the gadget, and the approach that Blogger has used to implement it:
  • Google / Blogger have mixed up the words "subscribers" and "followers".  It used to be that subscribers used RSS gadgets (from Feedburner or other feed-providers), and followers used Blogger's own following-tools.   But this new gadget is called "follow-by-email", and it's possible that mixing up the ideas will make some people very confused.
  • Using the gadget, you have very little control over the look and feel of the  follow-by-email option on your blog.  

    Compare this to the "Get updates by email" option which is in the top of the sidebar on this blog:  I've put a lot of effort into getting the wording "just right" so potential subscribers know that they will be getting a please-confirm email.   This on-screen wording means that even if they don't act on the email immediately, they get another reminder about if they come back to the blog again in the future.
  • You have no control over the message that potential follow-by-emailers are shown to tell them to verify their subscription.  It looks like this

    While this message is fine for the tech-minded people who are likely subscribe to an RSS feed, it will probably bring a glazed look to those of your visitors who need a very simple subscribe-by-email option!  
  • People who subscribe to your blog by email don't see any of the widgets on your blog, or any advertisements.   (Unlike regular RSS-feed subscribers for whom you can set up AdSense for feeds).  Despite the options mentioned above, ou have very little control over how they see your messages, especially if they happen to be using email software that shows your messages in plain text.


Related Articles

Customizing the "click the link to subscribe" message
 
Getting a list of all your email subscribers

Why RSS / Subscribe to Posts is important for your blog

The Follow-by-Email gadget:  a very simple way to give your readers access to blog-updates by email

Monday, 31 October 2016

How to center gadgets in Blogger

This article is about centering gadgets from 3rd parties that you install onto your blog.


Previously, I've described how to put HTML code from a 3rd party into your blog.

When code like this is put into a gadget, one common question is "how do I center it?"

There are (at least) three options for doing this, ie for putting a gadget into the middle (horizontally) of the area it is located in.   These are described below.


Option 1: Centre all the gadgets in your blog

To center-align every single gadget in your blog, just, add a CSS rule to your blog.  The rule to add is:
.widget {
  text-align: center;

This will centre the contents and title of every gadget on your blog.


Option 2: Only center-align the specific gadget

To only centre-align one gadget, which is made from HTML/Javascript code, you can just put the gadget-code from the 3rd party (eg PayPal, Amazon, etc) inside a centering statement, like this:

<div style="text-align: center;">

PUT THE CODE FROM THE 3RD PARTY HERE

</div>
Install the code into your blog the way you would usually install this 3rd party code.

This will centre-align the contents (not title) of the specific gadget that you add.

Note the American spelling of the word "center" - and don't forget to put the closing </div> statement at the end.

There may be some gadgets where it would be possible to add the centring statement to the gadget code itself, rather than putting it outside.    I don't recommend this (unless you're so comfortable with HTML and CSS that you don't need to be reading this article), because it introduces a risk that you will interfere with some other aspect, or that you will lose the centering if you ever need to refresh the code.


Option 3 - Make a new style rule just for the gadget

If you only want to centre one (or several) gadgets - not all of them - then it's best to define a new style that is to be used on specific gadgets:  put this new style into your template, and then apply it to the gadgets like this.
<div class="YourNewSytle">

PUT THE CODE FROM THE 3RD PARTY HERE

</div>

This approach will only centre the gadget contents - not any header that you give to it.

There are lots of options that you could put into the new style rule, but at a minimum it needs to have
.YourNewStyle
{
  text-align: center;
}
Notice that there is a "." (ie a full-stop) before the name of your new style.

Also, it's best not to use a number as the style-name (eg "2nd-gadgetStyle"), because this doesn't work with some browsers.


Related Articles

Putting HTML code from a 3rd party into your blog

Adding a new CSS style into your template

Centering the header in your blog

Putting a gadget above your blog's header

Removing the attribution gadget from Designer-template blogs 

Thursday, 6 October 2016

Getting the HTML code to put a picture into your blog's sidebar, header or footer

This article explains how to use Blogger's Post Editor to get the HTML code that you need to put a picture into your sidebar (or header or footer, or anywhere else a gadget can go).


The Picture gadget is the normal tool for adding a picture to your blog's sidebar.

But sometimes you want more control over the picture size or behaviour.  Eg, you may want to have two pictures very close to each other and guarantee that they're the same size.

To do this, you need to get the HTML code for the picture, and then put it into your blog as an HTML-gadget.  Fortunately, Blogger's Post-editor make it very easy to do this without writing the code yourself.


Using the Post Editor to generate the HTML for a picture

1  Start a new Post  (you're not ever going to publish this:  it's just a work-area)

2  Don't enter any text:   just use the Picture icon on the toolbar to add a picture.   Blogger will prompt you to upload the picture, or to choose it from a Google-album-archive or to enter its URL:  add the picture the way that you usually would.

3  Switch to the HTML tab   (top left of the editing window).

This show you the HTML code for displaying the picture, as it is set to display in the Post (depending on the picture-settings you've chosen, it may be centered or right/left aligned, and the size may vary).

Copy the HTML.

5  Switch back to Compose, so that you don't get confused the next time you edit a post.

Return to the list of posts:  you may be asked if you want to leave the page without saving - the answer is Yes.  Or you may have a new draft-status post, which you can delete.


Job Done!   You now have some HTML code which you can paste into an HTML/Javascript gadget, or anywhere else that you may need it - even into another post that you are editing in a separate window, or into a totally different tool.


Related Articles

Stopping pictures on your blog from being "clickable"

Inserting a Picture into a blog Post.

Putting 3rd party HTML into your blog

Center-align the gadgets on your blog

Hosting pictures outside of Google / Picasa

Inserting a picture into your blog as a gadget

Sunday, 21 August 2016

How to put a gadget above your blog's header

This article is about how to put an item (any type of gadget) above the Title section in a blog made with Google Blogger.


If your blog has a layout or designer theme / template, then it most probably has a nav-bar at the top of the screen, followed by a Header section showing your blogs title & description, or a custom header image if you've uploaded one.

And even if you go into the place in the layout-designer where you can re-arrange the layout by drag-and-dropping items, you cannot drag any gadgets to above the header.

But this is easy to change, provided you are willing to accept the disadvantages of editing your blog's theme.


How to allow changes above your blog's header

Follow these steps to make it possible for you (or any blog administrator) to add gadgets to the area about your blog's heading section:

Edit your blog's theme in the usual way

2  Find this code in your theme:
<b:section class='header' id='header' maxwidgets='1' showaddelement='no'>
<b:widget id='Header1' locked='true' title='YOUR BLOG TITLE(Header)' type='Header'/>
Hint:  use the theme-editor search tool, to look for a key phrase like "id='Header1'

Change it to
<b:section class='header' id='header' maxwidgets='4' showaddelement='yes'>
<b:widget id='Header1' locked='true' title='YOUR BLOG TITLE(Header)' type='Header'/>
Notice that there are two changes made:
  • Setting maxwidgets to greater than 1, and
  • Setting showaddelement to Yes, instead of No


Job Done:   after you have successfully saved this change, then the next time you edit your blog layout  (Dashboard > Layout  ), then you will find that you can add or drag-and-drop up to three gadgets to the Heading section of the blog, making a total of four.

You can add even more gadgets by changing the number for maxwidgets to something else.


Related Articles

Disadvantages of editing your blog's layout theme

How to set up an extra administrator for your blog

Types of Blogger theme

Planning changes to your blog - in private

How the data in Blogger blogs is organised

How to edit your Blogger theme

Thursday, 10 March 2016

Solar Air Conditioners in India with Price 100% Off Grid

As summer is arriving the demand of Air Conditioners will increase in market and also the consumption of electricity. Now a days Solar Power is gaining popularity and people started thing about Solar Air Conditioners. These solar Air Conditioners not only help people in cooling their homes and offices but also save their electricity bill. Apart from saving your bill it saves the public electricity.


Last night i was searching for Solar AC for my office and went through a number of websites that can provide it in my city. However it was a tough task as there were a number of websites for selling Solar Power Air Conditioners but none of them display the price (we have to send an inquiry to them to get the price). At last i settled on the website Indiamart which gives a list of number of suppliers and retailers of Solar AC. The link to that particular page is provided at the bottom of this page.

Before you go to that website to purchase one its better to decide about the type of AC that you want to purchase, otherwise you will be confused with the product description. Also you will need to check that what are the contents of the package.

Types of Solar Air Conditioner


  • Off Grid Solar Air Conditioner: These Air Conditioners work fully on Solar Energy. They don't need any normal electricity supply from your home. These Air Conditioners also need some batteries to store the electricity for the night usage. You need to check the contents of the package if the supply the battery with the Solar AC or you need to buy them separately.
  • On Grid / Hybrid Solar Air Conditioners: These Air Conditioners work on both home electricity supply and Solar Energy. During night time these air conditioners switch back from solar mode to normal electricity mode. In such air conditioners the cost of batteries and few solar panels is saved and thus they cost a little less.


Solar Air Conditioners Price

Now the next thing is the price range of these solar air conditioners

  • 1 Ton Solar Air Conditioner Price starts from Rs 40000
  • As you increase the ton capacity to 1.5 Ton, 2 Ton, 2.5 Ton, 3 Ton the price also increases. I tried to search for some low capacity AC such as 0.5 Ton or 0.75 Ton but got nothing. You may try to search for them as smaller ACs will need less number of solar panels and they are sufficient for small rooms or cabins.
  • If you need Solar AC for rural areas the you maybe eligible for some subsidy as some state governments provide subsidy on purchase of solar equipment to encourage the usage of solar energy and reduce governments burden of electricity production.


Before you buy Solar AC

Before purchasing the Solar Power Air Conditioner ensure that you know all details about the contents of the package provided by the seller and warranty on different parts of the package. Warranty provided on different parts such as Compressor, Solar Panels and other parts of AC might be different. Apart from that you also need to check if they provide on-site warranty or not, else you will need to call the technician on your own expense in case of some fault in the equipment.


Where to buy Solar Air Conditioners in India

http://dir.indiamart.com/impcat/solar-air-conditioner.html
The above page is the best (as per my research and knowledge). Here you will find a number of retailers and suppliers for different cities of India. Its better if you can find a retailer in your own city as they can provide a better service without any delay.
If i will find some better Solar Air Conditioner retailer then i will update its address on this page.

Wednesday, 10 February 2016

Displaying a gadget only on the home page - or only on a specific page

This article is about how to set up a gadget / widget in Blogger so that it is only visible on the first place that a reader sees when they visit your blog (often called the "home page").  It is one of a series of articles about controlling what goes on the homepage of your blogspot blog.


Front Page Bob
By Paginator (Own work)
 [CC-BY-3.0], via Wikimedia Commons
There are a number of reasons why you might want to put a gadget only the screen that shows when a visitor first navigates to your blog's home page.

You may want to show a welcome message, or a topic-index page, or to give a view of your recent tweets or some other RSS feed.    

No matter what the reason, the process is very similar:

How to make a gadget only appear on the first page

Note:  in Blogger, the words "gadget", "widget", and even "page-element" all mean the same thing.  I generally use "gadget", because the Page Elements tab currently says "Add a Gadget".  But they're absolutely the same.

1   Add the gadget

Do this in the usual way.


2  Place the gadget

Drag-and-drop the gadget to the place where you want it.   It may be over or under your blog-posts gadget, or in a totally different place.

A popular place for a gadget that is going to look like a "home page" would be in the Body section, just above the Blog Posts gadget, where "Test Gadget" is in this example:


3   Find the Gadget-ID  in the usual way.


4  Find the code for your gadget:

Edit your template.

Click in the search box inside the template editor, and look for the widget name that you noted in step 3.   Once you've found it, notice what comes after it.   In this example, it's the line for Blog1:
          <b:section class='main' id='main' showaddelement='no'>
<b:widget id='Text1' locked='false' title='Test gadget' type='Text'/>
<b:widget id='Blog1' locked='true' title='Blog Posts' type='Blog'/>

Use the expansion triangle at the left side of the template editor to expand this section of the code.  After you do, it will look like:
 <b:section class='main' id='main' showaddelement='no'>
<b:widget id='Text1' locked='false' title='Test gadget' type='Text'>
<b:includable id='main'>
  <!-- only display title if it's non-empty -->
  <b:if cond='data:title != &quot;&quot;'>
    <h2 class='title'><data:title/></h2>
  </b:if>
  <div class='widget-content'>
    <data:content/>
  </div>
  <b:include name='quickedit'/>
</b:includable>
</b:widget>
<b:widget id='Blog1' locked='true' title='Blog Posts' type='Blog'>

5   Add conditional formatting

You need to put conditional formatting code around the code for the gadget - makings sure that it doesn't go around the code for anything else!  (which is why you noted what comes afterwards in step 4)

And to avoid leaving blank space where the gadget would have gone, you need to update a "hide" instruction to apply it to the gadget-id you noted in step 3.

The code to use is this - except put the gadget-id instead of the XXX.

<b:if cond='data:blog.canonicalUrl == data:blog.homepageUrl'>

THE red CODE FOR YOUR GADGET GOES IN HERE 
<b:else/>

<style type='text/css'>
#XXXX {display:none;}/*remove blank space that the gadget leaves*/
</style>
</b:if>

The example above looks like this, when the code has been added:
<b:section class='main' id='main' showaddelement='no'>
<b:widget id='Text1' locked='false' title='Test gadget' type='Text'>
<b:includable id='main'>
  <b:if cond='data:blog.canonicalUrl == data:blog.homepageUrl'>  <!-- only display title if it's non-empty -->
  <b:if cond='data:title != &quot;&quot;'>
    <h2 class='title'><data:title/></h2>
  </b:if>
  <div class='widget-content'>
    <data:content/>
  </div>

  <b:include name='quickedit'/>

<b:else/>

<style type='text/css'>
#Text1 {display:none;}/*remove blank space that the gadget leaves*/
</style>

</b:if>
</b:includable>
</b:widget>
<b:widget id='Blog1' locked='true' title='Blog Posts' type='Blog'>


6  Check that it's worked

Preview your blog before you save the changes:  check that the the widget is visible.

Save the template changes, and look at your blog.  Check that
  • The widget is on the first page
  • The widget is not seen when you look at an older page (eg one from your archive)
  • The other elements of your blog (other widgets, blog post titles, dates and contents) are all as you expect them - on the first screen, and on other screens too.

If anything is wrong with how your blog is working, go back to the template editor (Layout > Edit HTML), and upload from the copy of your template that you made at the beginning of step 1.   This will let you blog work properly, while you figure out what went wrong.


How to display a gadget only on a specific post or page


Follow exactly the same approach as above.

But instead of  
<b:if cond='data:blog.canonicalUrl == data:blog.homepageUrl'>

Make the conditional statement based on something else.

This can be a different condition, or a specific page URL.    For example to display a gadget only on a specific page, use this code, and put the address of the page instead of POST-URL:
<b:if cond='data:blog.canonicalUrl == "POST-URL"'>>

Note:   for the address of the page, if your blog does not have a custom domain, then be careful to use the "blogspot.com" version of the address, not one with a country-level name  (eg the blogspot.in or blogspot.co.uk version)


To display a gadget on every page except a specifc one, replace the double equals signs (==) with the HTML code for not, which is an exclamation mark followed by an equal sign (!=).   For example:
<b:if cond='data:blog.canonicalUrl != data:blog.homepageUrl'>

Blogger have now provided an expanded list of conditional statements - you can find information about it:


Where to get more information

Controlling what goes on the homepage

Adding a gadget / widget / page-element to your blog

Editing your blogger template

Putting a slideshow from Picasa onto your blog

Getting the HTML code to put a picture into your blog

Making a gadget that looks like a posthttp://buzz.blogger.com/2015/06/even-more-expansions-to-blogger.html

Monday, 4 August 2014

How to find a gadget in the Add a Gadget list - quickly

This article explains a quick way to find the widget that you are looking for in the list that Blogger displays when you use the Add a Gadget tool.


When you start to add a gadget to your blog, Blogger opens a new window listing all the existing page-elements that are available (in two tabs) and allowing you to upload a widget of your own (in a third tab.)

Currently, the first tab (called Basics) has 28 gadgets listed, while the second one (called More gadgets) has 899, displayed in pages of 30.

There is a search-for-gadgets feature available on the second tab - but it doesn't return gadgets that are listed on the first tab.   And even when it did, I didn't recommend it, because sometimes 3rd party gadgets with similar names were listed before the official widgets developed by Blogger.

So, to find a gadget that's listed in the Basics tab, you have to scroll down the list until you see the gadget you want.   However there are some problems with this.
  • Given that there are 28 gadgets listed, but only about 4 shown at each click (may be different if you have a larger screen), this can be a lot of clicks.
  • It's very easy to miss the gadget you want, and keep clicking through to the bottom instead.

But there is a very simple way to go directly to the gadget you want, provided you know what it is called, or some words that are shown in the description of that gadget and no other.


How to navigate directly to your desired gadget

Choose Add a gadget

When the new window has opened, use your browser's "find" command.
  • In Chrome and Firefox, this is ctrl /f ,   ie hold down the Control key while pressing the "f" key once.

Type in a  few letters of the name (or description) of the gadget you want.  
Note:  these can be any letter, they don't have to be at the start.  But they must appear together.


Usually, as soon as you start typing, your web-browser will start scrolling down to the first place in the screen where the letters you type appear.   So if you choose the gadget details you type carefully, you should end up scrolled down to the gadget you want very quickly indeed.

The scroll bar at the side shows how far down the window you have come, and also if there are more cases of those letters further down the page.

And once you are at the gadget you want, you can just click the name or the blue plus-sign on the right side to open the gadget configuration page.

To sum up:

Use your browser's Find tool to go straight to what your're looking for in the Add a Gadget list. 
[tweet this]


What to search for to find popular gadgets

The words that I search for most often when I'm adding gadgets are:
  • HTM - for the HTML/Javsascript gadget
  • Ads - for the Adsense gadget
  • Link L - for the linked-list gadget.


What about you - what gadgets do you most frequently add to your blogs?


Related Articles:

Backing up your gadget settings

How to add a gadget to your blog

Where to find the HTML code for popular Blogger widgets

Monday, 14 July 2014

How to add a Google Contacts button to your blog, website or desktop

This article shows how to add a button that takes a user straight to Google Contacts to your blog or website.   It also distributes a picture that you can use in other places (eg your PC desktop) to make your own Google Contacts icon.


Most people have a button on their computer or smartphone, which they use to start their email.  For some, this goes straight to their Gmail account in a web-browser, while others use an system like Thunderbird or Outlook to look at their email messages in a Gmail account and/or in email accounts they have with other services.

If you use Gmail as your email system, then Google also gives you an address book, which they call Contacts. This is not the same as the address book in Thunderbird or Outlook etc, which is saved on your local computer.   Instead, the Google address book is saved on the internet, in your Google account.

Google Contacts is tightly linked to your Gmail account, and the way that most people access it is by:
  • Going to Gmail 
  • Clicking on the Contacts button in the left-sidebar.

But you can go straight into your Google Contacts, without having to load Gmail first.   And I often find that it is faster, especially if I just want to look up an address or phone number and not send an email.

To go directly into your Google Contacts book, just type    www.google.com/contacts into the address-bar of your web-browser.

This is easy - but some people would prefer to have a button that they can click, rather than having to manually type an address.

So I have created a picture that can be used on such a button, and written up instructions on how to add it to your website, or your computer.   This is licensed under Creative Commons:  I am giving permission for it to be freely used on any website, so long as you say where it came from in the way that I've shown below.

(If you a wondering "why on earth would anyone want that" - then please don't waste time reading further - you are clearly not the target audience of this post!   I know that there are some people who will be delighted with the idea, and that's who I'm writing for today.)


How to add a Google Contacts button to your blog or website

Set up a place to put the button

If you want to add the button to Blogger, then just add a gadget in the usual way, and choose gadget-type of HTML/Javascript.

If you want to add it to some other type of blog or website, then you need to use whatever procedure is required to add 3rd-party HTML to your site.

Add the code

The HTML code to add is:
<div class="separator" style="clear: both; text-align: center;"><a href="https://www.google.com/contacts" imageanchor="1" style="margin-left: 1em; margin-right: 1em;" target="_blank"><img border="0" src="https://blogger.googleusercontent.com/img/b/R29vZ2xl/AVvXsEj480VvLbdF9vgh_Rrnk3IzeuTlAgS-EdyZRjVxOLE9sved7FYghcWrg-v-axrSOVBGRpDUeUy4avH1WAAO1TUoWM77RZ1ZMdTBH5cmdpUsdZdYjS2AnNcFicvy1OSvSHmlM7LXifWzqotU/s490/google-contacts-icon.png" width="50%" /><!-- Google Contacts Start button from www.Blogger-hints-and-tips.blogspot.com   Design © Blogger Hints-an-Tips, 2014.   Licensed under Creative Commons Attribution-ShareAlike 4.0 International (CC BY-SA 4.0)  -->  </a></div>

Make sure you all all the code, including the Creative Commons license information - this is what says you are allowed to use the picture.

Configure the size

You can change the size of the button by changing the number in this statement:
width="98%"
On my sidebar in Blogger-Hint-and-tips, I have it set to 50%.

You can use either a percentage value, as shown, or a pixels or em measure, for example
width="50px"
width="10em"

Job done!

Save the change in the usual way, and you will have a button on your website which opens Google Contacts


How to add a Google Contacts button to your computer / laptop / desktop

This is a little more difficult to describe, because it depends on exactly what computer and operating system you have, and what you mean by adding the button "to your computer".   But here are some options.

Browser Favorites

One option is to go to  www.google.com/contacts   and then before you do anything else save it to the Favourites section in your browser - and then you know you can get to Contacts using your regular internet button and choosing it from your favourites.


In the Windows desktop

Right click on your desktop
  1. Choose New
  2. Choose Shortcut
  3. In the screen that asks what you want the shortcut to, enter  www.google.com/contacts
  4. Click Next
  5. Enter the Name you want the link to have, eg "Google Contacts", and click Finish


The shortcut that is added to your desktop has a standard internet picture.   To change it to another
  1. Download this file to your computer, and save it somewhere.
  2. Right click on the shortcut that was created, and choose Properties.
  3. Choose Change Icon
  4. Choose the file that you saved in step 1


Note:   these instructions were prepared using Windows 8 - they may vary slightly for earlier versions.   But the same general approach applies.


Related Articles:

Copyright, blogs and bloggers

How to add a gadget to your blog

Monday, 21 April 2014

Keep a backup copy of complicated gadget settings

This article explains why it's a good idea to keep a backup copy of settings for your gadget, in particular for HTML/Javascript gadgets that have complicated, hard-to-regenerate, code.


Blogger's backup tools let you take copies of:
  • your post-contents and (separately) 
  • your template. 

Some 3rd party backup tools (eg HTTRack) let you make backup copies of how your blog looks - including the consequences of displaying your gadgets.

But as far as i know, there is no way that you can back up the settings (ie parameters or configuration) that are stored inside the widgets on your blog.

This can be a problem if you accidentally remove a gadget, or if you have an HTML gadget and get the code wrong in it: Blogger is quite unforgiving sometimes, and the HTML/Javascript gadget editor simply removes any code that it doesn't understand.

In some cases, this isn't not a big problem  eg if you show a picture as a gadget, then it's generally easy enough to work out characteristics that you would need to enter to re-create the gadget.

But if you lose a complex gadget (eg your own customised set of subscription buttons), then re-creating it could be difficult and time-consuming.

So - for HTML/Javascript gadgets which have code which you think is complex, I recommend keeping a backup copy of the gadget code somewhere.

Personally I usually put it in a post in a private blog where I draft posts and keep the documentation for each blog - but you could use a range of other places, eg a text file on your computer or on Google Drive, or even any email message to yourself.


How to back up code from HTML/Javascript gadgets in a private blog post

Every time you edit a gadget that you want to keep a backup for, then just before you click Save:
  • Press Ctrl/a to select all the text in the gadget window.
  • Press ctrl/C to copy it
  • Switch to use Blogger in a different window
  • Open up the documentation blog, and navigate to the post where you keep the code for that gadget
  • Edit that post - or make a new one if you don't have one already.
  • Make sure that you're in Compose view, and the Options > Compose Mode setting is on "show HTML literally" (ie not on "interpret HTML")
  • Paste the gadget code into the post, and publish it.

Although this sounds tedious, it's really very quick to do. And losing complicated gadget code, even once, is a good incentive to remember to back it up every time.

Hint: Put a comment to remind yourself where to back this gadget at the top and/or bottom of the gadget code. This reduces the chance that you will forget. A comment is done in HTML like this:
<!-- DON'T FORGET TO BACK UP THIS GADGET CODE  -->


How to back up complicated non-code gadgets

If your gadget has complicated settings which aren't code, one option is to take a screen-shot and save it to your photo collection, or even just a text-file or documentation-blog post where you keep notes about what the settings are.

You won't be able to automatically restore your gadget settings from this, but it should be a good reminder of what you need to do (provided you can find the picture when you need it).

Unfortunately there's no easy way to pack up linked-list or blogroll gadgets at the moment. However making a copy of your site using HTTracker will show you the list, and what the items link to.

Or you could build your linked list code manually (using the same trick that that I recommend for getting picture code) and put it into a HTML/Javascript gadget, which is based up as described above. The code for a handcrafted linked-list gadget looks like this:
<ul>
<li>PUT THE TEXT HERE FOR YOUR FIRST LINK TEXT.</li>
<li>PUT THE TEXT HERE FOR YOUR SECOND LINK TEXT.</li>
<li>PUT THE TEXT HERE FOR YOUR THIRD LINK TEXT.</li>
<li>etc</li>
</ul>


Related Articles:

How to add a picture as a gadget in Blogger

Using the post-editor to build HTML code for gadgets

Prepare your blog-posts in private, using a documentation blog

Monday, 20 January 2014

Putting a picture on your blog as a Gadget

You can put a picture anywhere in your Blogger blog that you can insert a gadget - and you can make it link to a post in your blog or to any other website.

The Image gadget

Dry dock in Claddagh Basin
A very simple way to put a picture into your blog is to use an Image gadget (previously called a Picture gadget).

This is a tool that Blogger provides to make is easy to add a picture that shows up on all screen and is linked to somewhere.

Often gadgets (sometimes called widgets or page elements) are put on the sidebar - but in many blogger templates they can go in other places too (header, footer, etc).

Follow these steps to add a picture gadget in Blogger

1  Make sure you know where the original picture is and that you have copyright permission to use it.

2  Copy the location (URL or file system full path-name) of the picture - and remember whether it's on your computer, or on the internet.
(This article tells you how to find the URL of a picture that's already stored in Google Album Archive. )

3  In Blogger, follow the usual Add a Gadget procedure, and choose the Image gadget from the list of options (you may have to scroll down to find it in the list).

4  In the Configure-Image box, enter the options you want for your picture.   These include:
  • The title for the Gadget,
  • The caption for the picture
    (the small words that go underneath it, usually explaining it, or where it came from),
  • What should happen when a reader clicks the picture - put this into the Link field
  • Where to find the picture
    (ie the file-location that you copied in step 2)
  • Whether to re-size (ie shrink) the picture to fix the space in the sidebar in your current template.

5 Press Save.

6  If necessary, drag-and-drop the new gadget to the place where you want the picture to go, and press Save.


What your visitors see

People who visit your blog in a web-browser, will see the picture, in the place where you put the gadget.  However pictures are not supported gadgets for dynamic view templates, so it won't be see if you use one of these.

Also, people who see your blog through an RSS reader, or by receiving emailed updates don't see any gadgets, so they will not see the picture.  

If you entered a value for Link, your visitor's browser leaves your blog and goes to the Link location:  with the Picture gadget, then there is no way to make this open a new window.   If you want to do so, then use an HTML gadget instead, get the code for the picture, and put target = "_blank"   into it:, so the code looks something like: 
<a href="YOUR LINK" imageanchor="1" style="margin-left: 1em; margin-right: 1em;" target = "_blank"><img border="0" src="YOUR PICTURE LOCATION" /></a>


Related Articles

Options for putting pictures into your blog

Copyright, blogs and bloggers

Picasa and Blogger - an overview

Getting the HTML to add a picture to your blog

Finding a picture's URL in Google Album Archive

Finding the URL of a picture stored in Flickr

Showing a PowerPoint presentation in your blog

Why RSS / Subscribe to Posts is important for bloggers

Following a blog by email

Thursday, 22 August 2013

Latest Smartphones in USA (Samsung, LG, HTC, Nokia, Android, Blackberry)

Latest Smartphones in USA

Smartphones are the latest sensation in the world of mobile phones, and USA is not untouched by this fact. People in USA are also crazy for smartphones. Everyone wants to get the latest smartphone in his/her hand. Especially teenagers, they want the latest smartphone to show their friends. Here we bring you the latest smartphones in USA. These smartphones are either launched or will be launched during upcoming months.


Latest Samsung Smartphones: 

Samsung is going to be the best smartphone seller in whole world. Its market is increasing continuously due to low price and high features.


Latest LG Smartphones: 

LG is comparably new in market but getting good response from customers.

Latest Nokia Smartphones: 

Nokia is one of the oldest playest in cell phone market. It never compromises on quality. Samsung is the only brand giving competetion to Nokia. Nokia is not so fast in Smartphone race.

Latest Android Smartphones: 

Android is the latest sensation in smartphone market. This is a operating system for mobile device and most most of the smartphones use it.

Latest HTC Smartphones: 

HTC is one of its kind. Its high speed processors and multitasking features make it different from others.


Latest Blackberry Smartphones: 

Blackberry is first choice of businessmen and professionals who don't compromise on security.

People visit this page while searching for


  • smartphones in usa 
  • smartphones made in usa 
  • best smartphones in usa 
  • unlocked smartphones in usa 
  • latest smartphones in usa 
  • top smartphones in usa 
  • samsung smartphones in usa 
  • smartphones prices in usa 
  • nokia smartphones in usa 
  • smartphones available in usa 
  • acer smartphones in usa 
  • best smartphones in usa 
  • blackberry smartphones in usa 
  • smartphones built in usa 
  • best selling smartphones in usa 
  • buy unlocked smartphones in usa 
  • best unlocked smartphones in usa 
  • blackberry smartphones prices in usa 
  • buy smartphones online in usa 
  • cheap smartphones in usa 
  • cheapest smartphones in usa 
  • compare smartphones in usa 
  • cost of smartphones in usa 
  • no contract smartphones in usa 
  • smartphones deals usa 
  • dell smartphones in usa 
  • dual sim smartphones in usa 
  • sony ericsson smartphones in usa 
  • gsm smartphones in usa 
  • htc smartphones in usa 
  • htc smartphones prices in usa 
  • smartphones market usa 
  • smartphones made in usa 
  • motorola smartphones in usa 
  • most popular smartphones in usa 
  • smartphones manufactured in usa 
  • nokia smartphones in usa 
  • new smartphones in usa 
  • nokia smartphones price in usa 
  • smartphones online usa 
  • price of smartphones in usa 
  • cost of smartphones in usa 
  • most popular smartphones in usa 
  • popular smartphones in usa 
  • prepaid smartphones in usa 
  • smartphones price list in usa 
  • samsung smartphones price in usa 
  • htc smartphones prices in usa 
  • blackberry smartphones prices in usa 
  • nokia smartphones price in usa 
  • smartphones usa unlocked 
  • upcoming smartphones in usa 
  • used smartphones in usa 
  • unlocked smartphones price in usa 
  • top 10 smartphones in usa 
  • top 10 selling smartphones in usa 
  • top 5 smartphones in usa 


Wednesday, 3 July 2013

New Google+ badges and follow buttons can be used in Blogger

This Quick-tip introduces the new Google+ plugins that Google released in late June 2013


quick-tips logo
Recently, Google+ Developers blog announced a vastly improved set of Google+ plugins for use with websites.

Most (all?) of them are not yet available as Blogger gadgets, so you have to get the code from the Google+ resources site, and add it to your blog like you would add any 3rd party code.

The new options include a more "industry-standard" follow on Google+ button, and new badges for Pages, Communities and Hangouts, as seen here. (I've previously explained why you might like to have a G+ community alongside your blog.)

They are configurable (size, dark/light, style, etc) - but  you need to work out how to apply the configuration settings to the code.   That said, I've added them to this site without any configuration (see the top of the sidebar), and the default options appear to work well. And it's not actually as hard as it looks: in general you just follow the pattern of:

  • Changing   https://plus.google.com/{pageId}     to link to the "thing" (Page, Community, Profile) that you are displaying in the badge.
  • Using the "<div class="g-page" data-href="https://plus.google.com/{pageId}"></div>" form of the code, ie the one that's completely inside a "div" statement.
  • Adding extra information to it using "data-"   for example,   "<div class="g-page" data-href="https://plus.google.com/{pageId}" data-layout="landscape" data-width="200">


There is one interesting sentence in the announcement:
"Existing badges will stick around for up to 90 days, giving you time to configure the new version for your website. After 90 days, we'll automatically upgrade any Google+ badges to the new design."
I wonder how that will relate to the Google + gadgets that are available in Blogger's Add-a-gadget function now - maybe they will be automatically be changed too.   (In 90 days ... yeah, right ...)