Showing posts with label Home page. Show all posts

Thursday, 12 January 2017

How to not show any posts on your blog's home page, using Blogger

You can set your blog up so that no posts are shown on the main screen - provided you have used some of the other "home page" approaches to give readers other ways of getting to your content.


Previously I've explained how to only show one post on the main page of your blog.

But some people who want to give their blog a home page go further than that, and don't show any posts on the main screen at all.   (Remember, the main screen is where people who navigate to your blog, rather than to posts within it, go.)

This sounds like a strange thing to do - after all, blogs are about posts.

But actually it's fine, provided you use some other tools to let readers move around the blog.  I've made a 150+ page blog this way, and it works very nicely because I have organised the information and used some index-pages (containing lists of bus-routes, suburbs, maps etc) with tables that link to many other posts.


How to show no (ie zero, 0) posts on the main screen

Some people want to do this, as part of the process of giving their blog a home page.  It's not possible if your blog has a Dynamic thene, but can be done for blogs with Layout themes.

There are at least two ways of doing it.

Option 1 - use a custom re-direct for your home-page

Make a new Page (Pages > New Page) and add the material which you want to show on your main screen.    Publish this page.

Take a note of the URL of the Page that you use created.

Go to Settings > Search preferences > Errors and re-directions > Custom re-directs

Click Edit then New re-direct

In the dialog box which opens:

  • Enter a back-slash (ie   /  )into the first (From) box.
  • Enter the URL of the page that you noted earlier into the second (To) box
  • In the To box, remove the blog-address, because Blogger already adds that for you.
    Eg if your URL is     http:/www.myBlog.com/p/home.html
    then just enter           /p/home.html

    (note that you keep the backslash (/) just before the P.
Click the Permanent checkbox.

Click Save just under the entry you just made - it now looks like this:


Click Save changes.


Job Done!   Anyone who goes to your blog's home page will now go automatically to the alternative page you made - and the effect is that no posts are shown on the home page.


Option 2 - use the Posts and Comments setting

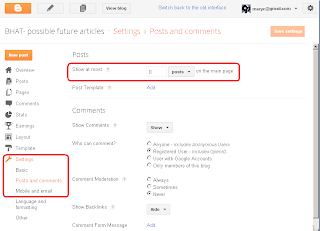
Choose the Settings > Posts and Comments panel from the left sidebar.

Enter zero (0) into the Show at most field
Click Save Settings in the top right hand corner of the screen.


    About this method

    The method in Option 2 works:   no posts are shown on your home page.

    But by default, nothting else is shown, either.    Unless you take steps to avoid it, your readers will see a grey box saying "0 Posts" when they look at your blog's main URL.   


    Some of the things you can do to avoid this include hiding the "showing posts with label XXX" message, and creating a gadget that only shows on the "home" page.


    Recommended option

    The custom re-direct option is probably the best approach - and is certainly what I've used for my blogs recently:   it's clean, and doesn't need any special messing around with gadgets etc to put content onto the "home" page.

    But there may be cases where the second option is better - and I have recently confirmed that it still works.


    Whichever option you choose

    Remember that you need to set up some other way to let readers move from your home-page to see your other posts - some of the ways to do this are discussed here.


    Related Articles

    Limiting your blog to only have one post on the main page

    Giving your blog a home page

    Giving readers alternative ways to see the posts in your blog

    What are dynamic view themes?

    Blogger theme types
    .
    Using tables in your blog

    Displaying a gadget only on the home page

    Wednesday, 10 February 2016

    Displaying a gadget only on the home page - or only on a specific page

    This article is about how to set up a gadget / widget in Blogger so that it is only visible on the first place that a reader sees when they visit your blog (often called the "home page").  It is one of a series of articles about controlling what goes on the homepage of your blogspot blog.


    Front Page Bob
    By Paginator (Own work)
     [CC-BY-3.0], via Wikimedia Commons
    There are a number of reasons why you might want to put a gadget only the screen that shows when a visitor first navigates to your blog's home page.

    You may want to show a welcome message, or a topic-index page, or to give a view of your recent tweets or some other RSS feed.    

    No matter what the reason, the process is very similar:

    How to make a gadget only appear on the first page

    Note:  in Blogger, the words "gadget", "widget", and even "page-element" all mean the same thing.  I generally use "gadget", because the Page Elements tab currently says "Add a Gadget".  But they're absolutely the same.

    1   Add the gadget

    Do this in the usual way.


    2  Place the gadget

    Drag-and-drop the gadget to the place where you want it.   It may be over or under your blog-posts gadget, or in a totally different place.

    A popular place for a gadget that is going to look like a "home page" would be in the Body section, just above the Blog Posts gadget, where "Test Gadget" is in this example:


    3   Find the Gadget-ID  in the usual way.


    4  Find the code for your gadget:

    Edit your template.

    Click in the search box inside the template editor, and look for the widget name that you noted in step 3.   Once you've found it, notice what comes after it.   In this example, it's the line for Blog1:
              <b:section class='main' id='main' showaddelement='no'>
    <b:widget id='Text1' locked='false' title='Test gadget' type='Text'/>
    <b:widget id='Blog1' locked='true' title='Blog Posts' type='Blog'/>

    Use the expansion triangle at the left side of the template editor to expand this section of the code.  After you do, it will look like:
     <b:section class='main' id='main' showaddelement='no'>
    <b:widget id='Text1' locked='false' title='Test gadget' type='Text'>
    <b:includable id='main'>
      <!-- only display title if it's non-empty -->
      <b:if cond='data:title != &quot;&quot;'>
        <h2 class='title'><data:title/></h2>
      </b:if>
      <div class='widget-content'>
        <data:content/>
      </div>
      <b:include name='quickedit'/>
    </b:includable>
    </b:widget>
    <b:widget id='Blog1' locked='true' title='Blog Posts' type='Blog'>

    5   Add conditional formatting

    You need to put conditional formatting code around the code for the gadget - makings sure that it doesn't go around the code for anything else!  (which is why you noted what comes afterwards in step 4)

    And to avoid leaving blank space where the gadget would have gone, you need to update a "hide" instruction to apply it to the gadget-id you noted in step 3.

    The code to use is this - except put the gadget-id instead of the XXX.

    <b:if cond='data:blog.canonicalUrl == data:blog.homepageUrl'>

    THE red CODE FOR YOUR GADGET GOES IN HERE 
    <b:else/>

    <style type='text/css'>
    #XXXX {display:none;}/*remove blank space that the gadget leaves*/
    </style>
    </b:if>

    The example above looks like this, when the code has been added:
    <b:section class='main' id='main' showaddelement='no'>
    <b:widget id='Text1' locked='false' title='Test gadget' type='Text'>
    <b:includable id='main'>
      <b:if cond='data:blog.canonicalUrl == data:blog.homepageUrl'>  <!-- only display title if it's non-empty -->
      <b:if cond='data:title != &quot;&quot;'>
        <h2 class='title'><data:title/></h2>
      </b:if>
      <div class='widget-content'>
        <data:content/>
      </div>

      <b:include name='quickedit'/>

    <b:else/>

    <style type='text/css'>
    #Text1 {display:none;}/*remove blank space that the gadget leaves*/
    </style>

    </b:if>
    </b:includable>
    </b:widget>
    <b:widget id='Blog1' locked='true' title='Blog Posts' type='Blog'>


    6  Check that it's worked

    Preview your blog before you save the changes:  check that the the widget is visible.

    Save the template changes, and look at your blog.  Check that
    • The widget is on the first page
    • The widget is not seen when you look at an older page (eg one from your archive)
    • The other elements of your blog (other widgets, blog post titles, dates and contents) are all as you expect them - on the first screen, and on other screens too.

    If anything is wrong with how your blog is working, go back to the template editor (Layout > Edit HTML), and upload from the copy of your template that you made at the beginning of step 1.   This will let you blog work properly, while you figure out what went wrong.


    How to display a gadget only on a specific post or page


    Follow exactly the same approach as above.

    But instead of  
    <b:if cond='data:blog.canonicalUrl == data:blog.homepageUrl'>

    Make the conditional statement based on something else.

    This can be a different condition, or a specific page URL.    For example to display a gadget only on a specific page, use this code, and put the address of the page instead of POST-URL:
    <b:if cond='data:blog.canonicalUrl == "POST-URL"'>>

    Note:   for the address of the page, if your blog does not have a custom domain, then be careful to use the "blogspot.com" version of the address, not one with a country-level name  (eg the blogspot.in or blogspot.co.uk version)


    To display a gadget on every page except a specifc one, replace the double equals signs (==) with the HTML code for not, which is an exclamation mark followed by an equal sign (!=).   For example:
    <b:if cond='data:blog.canonicalUrl != data:blog.homepageUrl'>

    Blogger have now provided an expanded list of conditional statements - you can find information about it:


    Where to get more information

    Controlling what goes on the homepage

    Adding a gadget / widget / page-element to your blog

    Editing your blogger template

    Putting a slideshow from Picasa onto your blog

    Getting the HTML code to put a picture into your blog

    Making a gadget that looks like a posthttp://buzz.blogger.com/2015/06/even-more-expansions-to-blogger.html

    Saturday, 31 May 2014

    Giving your Blog a Home Page

    This article is about the options for setting the home page for blogs made with Google's Blogger.


    Blogs don't have a "home page", main page or "landing page" in the same way that regular web-sites do.  Instead, they show the newest post first, since (hopefully!) most readers will be return visitors, coming back to see what's new.

    But there may be blogs/websites where you want a welcome message or a particular post to appear first whenever someone visits your blog, or where you want to put all your posts in reverse order.

    This article is about options for giving your Blogger blog a "home page".

    It lists four options, and gives advantages/disadvantages of each approach, and links to articles with details about implementing each case. If you can think of any more approaches, please leave a comment below.


    Options for giving your blog a home page include:

    • Static page combined with a custom re-direct - as discovered by Nitecruzr, and now described here.  This was my recommended method of home-page implementation for a while.   However it did not work on mobile themes for a while, so I changed my mind.  But it does work on them now, so I'm back to recommending it again.


    Advantages and Disadvantages of each option


    Option Advantages Disadvantages
    Static page and custom re-direct No theme editing is needed

    Easy page editing - no messing around putting content into a gadget

    No gaps on other pages due to the gadget being "missing"

    Simple, elegant, and fully functional for both desktop and mobile visitors.
    Back in 2011, I wrote:  
    "Google probably didn't intend to give us this option when they set up custom re-directs, so it's possible that they might remove it again.   It's such a nice solution, though, that I think it's worth the risk for now".
    But it's now 2017, they haven't removed it yet.   So I'm thinking that it's not going away any time soon.
    Show all posts in reverse order Great for new readers - they can "follow the story". Return visitors have to navigate down to where they were up to last time:  the blog has no way of helping them to remember where that was.

    You can't use most of Blogger's date features:  newer and older posts links will take the reader in the "wrong" direction.  And you have to manually enter any dates that would be relevant.

    Your posts will get "older" as you write more:  this may confuse search-engines, and there's a risk that google might to things to "very old" posts in the future.
    Make one post always show up first You can still use all of Google's date features.

    Readers will know when you actually posted to your blog.

    Great for returning readers:  they can see your (current) welcome comments, and then go straight to the latest post after that.
    You have to remember to edit the "chosen" post every single time that you make a new post - one day, you might forget.

    This approach probably won't work on multi-author blogs:  there's a very high chance that someone would forget to edit the chosen post and change its date.
    Show a "welcome gadget" on the home page only Doesn't need any changes to Post date-time settings.

    Your blog still functions like a blog (older/newer post links , archive gadget etc).

    An HTML/Javascript gadget can be very flexible, and you can get Blogger to write all the HTML for you - see Making a Gadget Like a Post.

    You can use things other than text, eg a picture or even a poll.

    It includes an extreme option:  you could show no posts on the "home" page, and just show the gadget.
    You need to edit your theme to make this work.

    You need to re-do the theme customisation every time that you change to use a different theme.

    The welcome gadget isn't one of your posts: it's not included in exports of your blog contents (It is in an export of your theme - but the words inside it are not included).

    A gadget cannot show quite as many things as a post.  

    Doesn't work for mobile device users if your blog has a mobile theme enabled, unless you some some specific things to make the gadget show on mobile.


    Can you think of other ways?   Please leave a comment below.


    Setting the homepage's post date into the future doesn't work

    Some people suggest that you can set the post-date of your main page in the future - and at some times  this has worked.

    But now that scheduled posting is working the way most people expect it to (ie if you write a post today, and publish it with tomorrow's date, then it is shown to your readers from tomorrow onwards), this will not work - because your "home page" won't show until that future date is reached.

    There may be some ways you can fudge it in to working (eg post the page with a date in the past, and then post it again with a future date).   But I VERY STRONGLY don't recommend this:  even if they work today, they may stop working at some time in the future when Google make a change to how future-dated posts are handled.


    Related Articles

    Displaying a gadget only on the home page

    Showing your oldest post first in Blogger (AKA Showing your posts in reverse order)

    Making one post always come up first

    Changing the date for a post.

    Stopping certain pages from ever appearing on the home page

    Tuesday, 4 March 2014

    How to put put Posts into Pages in Blogger

    This article shows how to set up your blog, using Blogger, so that it looks like your posts are on separate web-pages.


    Can you put Posts onto Pages in Blogger?

    Ever since Google introduced "pages" into Blogger, people have complained that their posts all go onto the "home page", and asked how to put posts onto different pages in their blog.


    The standard, but unsatisfactory, answer is
    "Sorry, that's not how Blogger works.   So called "static" pages in Blogger are meant to be used for reference information that doesn't change often, which you don't want to be part of your regular post-feed, but which you do want users to have easy access to."

    Basically, this is part of the difference between post and pages.

    Luckily it's easy to set up your blog so that it looks like your posts are on different pages [tweet this]    (even though you and I know that this isn't how Blogger works) by following three simple steps.


    Follow these steps to put your posts into pages

    1   Add Categories

    Categorise your posts by adding Labels to them.

    It's your choice whether to add Labels to all posts, or just the ones that you want to show up on specific "pages".


    2 Make a "pages look alike" menu bar

    There are (at least) are three ways of doing this - described below.

    When Blogger first implemented static pages that could link to websites, I suggested choosing which ever option suited your blog best.

    However now, due to the increasing importance of mobile themes, I recommend Option c), because the pages-gadget is the only one mentioned that automatically shows upon mobile-themes.

    a)   With a Labels Gadget    

    Use the usual add-a-gadget approach to put a Labels gadget into the spot where you would put the Pages gadget if you wanted to make a horizontal menu bar with it.

    If your blog has some Labels that you don't want to have "pages" for, then set it to show only some of your Labels:

    b)  With a Linked-list gadget

    Use the usual add-a-gadget approach to put a Link-list gadget where you would put the Pages gadget if you wanted to make a horizontal menu bar with it.
    Add a link to the list for each Label that you want a "page" for.   The HTML to use for each Label value is

    http://YOUR-BLOG-URL/search/label/THE-LABEL-NAME

    You can also add other items (eg individual Posts, or even Bllogger's static "pages" if you really must have them - see why I don't like them!) - see the menu bar at the top of this site for an example of this. 

    c)   With a Pages gadget   <===   RECOMMENDED APPROACH

    Use the usual add-a-gadget approach to put a Pages gadget into the menu bar area.   (You can do this even if you have not created any Pages of content).

    While you are editing the Pages gadget, there is an  + Add external link option.  

    Click on this, and add an entry in like the ones described above in he Linked-list gadget option, putting
    •  the text you want in your menu bar into the Page title field 
    • The label search command into the Web address field.


    3   Optional:  Deal with the home-page

    If you don't want your posts to appear on the "home page" was well as the topic pages, then there are two possibilities:

    OR

    • Give your blog a "home page" using the custom-redirect option discussed in this post.

    However I generally see this as unnecessary, because in most cases, very blog visitors ever see the home page.


    Job Done

    It really is that simple.  Your readers can now click on the "pages" in your blog from a "menu" at the top, and see a list of posts for the Page that they chose.

    Even better, if some posts relate to more than one topic, they show up on both of the relevant pages.    And if you have used the Pages gadget, your blog is well set-up to work with a mobile-theme - which is something that is getting more important every month.

    Don't forget to test your blog, to make sure that the menu bar is working how you expect it to and that it looks OK, in all the browsers that your readers are actually using.


    Related Articles

    Using Labels to group your Blogger Posts

    Adding external and internal URLs to your pages-gadget / menu bar

    Giving your blog a home page

    The difference between posts and pages

    Showing a Gadget only on the Home Page

    Making your blog work for people using smartphones and tablets