1. Blogger.com pe ja kar layout pe click kre
2. Ab Favicon ke option ke aage edit pe click kre
3. Yha pe 2 options ko select kren
1. Choose file pe click kar ke apna logo select kre apne pc se
2. Logo select kar ke save pe click kar de
4. Ab ap pehle wali window pe automatic wapis aa jaye ge
5. Ab apni blog ko open kre aur apna logo check kre
Apki blog ka logo ab change ho chuka

Showing posts with label Blogger. Show all posts
Showing posts with label Blogger. Show all posts
Thursday, 14 June 2018
How To Add Category Widget?
1. Sub se pehle blogger.com ko open kar ke layout pe click kre
2. Ab sidebar-right-1 me Add a Gadget pe click kre
3. Iske bad aik new window open ho gi uss me labels par click kre
4. Ab title me labels ki jgha categories likh ke save pe click kar de
5. Phir jub bhi new post karni ho to right side me labels pe click karna hai
6. Labels pe click karne ke bad aik box show ho ga
Tuesday, 5 June 2018
Feed URL of Blogger Website with Smaller Size
Recently i was submitting my blog for automatic post sharing on dlvr.it , which is a good platform to share your recent posts on social networks through automation. Here you need to add a few routes and get your facebook and twitter accounts connected and add the website feed URL. Initially it was fun and everything went fine. But recently it stopped sharing my posts on facebook and twitter.
As i investigated into the matter, i found that it was because my website has become bigger and the number of posts has increased. This enlargement affected the feed size.
Previously i was using the following feed URL :
https://www.websitename.com/feeds/posts/default?=rss
The it was showing that the feed size is more than 512 KB. But the feed size was beyond my control. I tried to submit the sitemap URL, but that didn't work.
I tried following URLs but nothing was of any use.
Above URLs included both RSS and Atom feed.
At last i got the solution after looking at the following URL
https://www.websitename.com/atom.xml?redirect=false&start-index=1&max-results=100
The end of the above URL indicated that it will create food of only 100 posts. However my task can be easily accomplished just by using 10 most recent posts. So i created edited the last value in the above URL from 100 to 10 . It worked perfectly for me. The final product was :
https://www.websitename.com/atom.xml?redirect=false&start-index=1&max-results=10
If you have also faced the same problem with your blogger feed URL, the most probably the above solution will work for you. Just don't forget to relace the name of your blog/website in the above feed URL.
I
As i investigated into the matter, i found that it was because my website has become bigger and the number of posts has increased. This enlargement affected the feed size.
Previously i was using the following feed URL :
https://www.websitename.com/feeds/posts/default?=rss
The it was showing that the feed size is more than 512 KB. But the feed size was beyond my control. I tried to submit the sitemap URL, but that didn't work.
I tried following URLs but nothing was of any use.
- https://www.websitename.com/feeds/posts/default?alt=rss
- https://www.websitename.com/atom.xml
Above URLs included both RSS and Atom feed.
At last i got the solution after looking at the following URL
https://www.websitename.com/atom.xml?redirect=false&start-index=1&max-results=100
The end of the above URL indicated that it will create food of only 100 posts. However my task can be easily accomplished just by using 10 most recent posts. So i created edited the last value in the above URL from 100 to 10 . It worked perfectly for me. The final product was :
https://www.websitename.com/atom.xml?redirect=false&start-index=1&max-results=10
If you have also faced the same problem with your blogger feed URL, the most probably the above solution will work for you. Just don't forget to relace the name of your blog/website in the above feed URL.
I
Tuesday, 15 May 2018
How to use a HTML Table as a database through Javascript
As a professional blogger i am often reminded of the drawbacks of using blogger for doing something professional. One such thing is using databases. It is nearly impossible to use a big database file to create a dynamic page on blogger. But here i have successfully generated javascript to use a HTML Table as a database on a blogger post. However this feature is not just limited to usage on blogger platform (anyone can implement it), if javascript is allowed on client side. The best part is that the table (or database) is kept hidden while the dynamic page is generated.
The worst part of this type of implementation of database is that whole table (or database) is downloaded as a webpage and then dynamic page is created. It is not suggested if you are using a large database, as it will affect the page opening time and then processing of that data through java script.
Result of the above code is provided below. Just select the country and city and see the magic.
If you check the above code you will find that there is a table in above HTML code which looks like:
This table is accessed by javascript. Country and Cities name are populated through it into the result form. When you select your preferred country, then it populates the cities name into the dropdown menu after searching for them in table. I you have got some knowledge of javascript then you may understand it better after looking into the code.
The worst part of this type of implementation of database is that whole table (or database) is downloaded as a webpage and then dynamic page is created. It is not suggested if you are using a large database, as it will affect the page opening time and then processing of that data through java script.
<div id="hiddendiv" style="display: none;">
<table id="pollTable">
<tr><td></td><td>City</td></tr>
<tr><td>Afghanistan</td><td>Kabul - ISAF HQ</td></tr>
<tr><td>Afghanistan</td><td>Mazar-e Sharif - Camp Northern Lights </td></tr>
<tr><td>Andorra</td><td>Escaldes-Engordany</td></tr>
<tr><td>Argentina</td><td>Buenos Aires</td></tr>
<tr><td>Australia</td><td>Adelaide</td></tr>
<tr><td>Australia</td><td>Brisbane</td></tr>
<tr><td>Australia</td><td>Bunbury</td></tr>
<tr><td>United States of America</td><td>Cleveland-Elyria-Mentor, OH</td></tr>
<tr><td>United States of America</td><td>Clinton, IA</td></tr>
<tr><td>United States of America</td><td>Colorado Springs, CO</td></tr>
</table>
</div>
<form id="pollform" name="pollform">
<p id="selectcountry"></p>
<p id="selectcity"></p>
<p id="resultsentense"></p>
</form>
<script>
window.onload = populatecountries();
function populatecountries()
{
var oldcountry="";
var newcountry="";
var selectcountry = "<b>Select your Country</b> : ";
selectcountry = selectcountry + '<select name="country" onclick=populatecities()>';
var myTab = document.getElementById('pollTable');
// LOOP THROUGH EACH ROW OF THE TABLE AFTER HEADER.
for (i = 0; i < myTab.rows.length; i++)
{
// GET THE CELLS COLLECTION OF THE CURRENT ROW.
var objCells = myTab.rows.item(i).cells;
newcountry = objCells.item(0).innerHTML;
if (newcountry!=oldcountry)
{
selectcountry = selectcountry + '<option value="' + newcountry + '">' + newcountry + '</option>';
oldcountry = newcountry;
}
}
selectcountry = selectcountry + "</select>";
document.getElementById('selectcountry').innerHTML = selectcountry;
}
function populatecities()
{
var selectedcountry=document.pollform.country.value;
var oldcity="";
var newcity="";
var selectcity = "<b>Select your City</b> : ";
selectcity =selectcity + '<select name="city" onclick=writeresult()>';
var myTab = document.getElementById('pollTable');
// LOOP THROUGH EACH ROW OF THE TABLE AFTER HEADER.
for (i = 0; i < myTab.rows.length; i++)
{
// GET THE CELLS COLLECTION OF THE CURRENT ROW.
var objCells = myTab.rows.item(i).cells;
if (selectedcountry==objCells.item(0).innerHTML)
{
newcity = objCells.item(1).innerHTML;
if (newcity!=oldcity)
{
selectcity = selectcity + '<option value="' + newcity + '">' + newcity + '</option>';
oldcity = newcity;
}
}
}
selectcity = selectcity + "</select>";
document.getElementById('selectcity').innerHTML = selectcity;
}
function writeresult()
{
var selectedcountry=document.pollform.country.value;
var selectedcity=document.pollform.city.value;
var resultstatement = '<h3>You have selected ' + selectedcity + ' , which is a popular city of ' + selectedcountry + '.</h3>' ;
document.getElementById('resultsentense').innerHTML = resultstatement;
}
</script>
Result of the above code is provided below. Just select the country and city and see the magic.
If you check the above code you will find that there is a table in above HTML code which looks like:
| Country | City |
| Afghanistan | Kabul - ISAF HQ |
| Afghanistan | Mazar-e Sharif - Camp Northern Lights |
| Andorra | Escaldes-Engordany |
| Argentina | Buenos Aires |
| Australia | Adelaide |
| Australia | Brisbane |
| Australia | Bunbury |
| United States of America | Cleveland-Elyria-Mentor, OH |
| United States of America | Clinton, IA |
| United States of America | Colorado Springs, CO |
Saturday, 17 March 2018
How to put Google search results controls in the language you actually speak
This article shows you how to put the options and controls in the Google search results page into the language that you actually speak, rather than the official language of the country you (or your Internet Service Provider) are in.
Tonight I noticed that Google's search-results are still in English, but the option links and controls (eg Next-page, Images, Videos) are all showing in the Irish language (known as Galeic to some people) presumably because I'm in Ireland, and it was (until a couple of hours ago) St Patrick's day.

This is nice of Google. But unfortunately many people here - yes, even thought who learned Irish at school for 14 years - don't actually speak Irish. And personally I didn't even go to school here, so I can't even say "Please may I go to the toilet" (the first Irish-language phrase learned by many an Irish child).
So putting these words back into English is pretty important to me: I can guess where Images / Videos / Next are, because I used them so often. but no way can I remember what the rest of the items in the search results menus bar are.
But I'm finding it difficult to identify what actually made the difference and changed the language of the controls shown to me. Becuase I'm pretty certain that it wasn't something I changed.
Right now, my best advice is to browse your Search Preference page, and chenck that it is working in the order you said. If not, ask for help from the IT people in your office or organisation.
Note - this is not the same as the language of your actual search results, just the controls which let you move through the search results.#
Tonight I noticed that Google's search-results are still in English, but the option links and controls (eg Next-page, Images, Videos) are all showing in the Irish language (known as Galeic to some people) presumably because I'm in Ireland, and it was (until a couple of hours ago) St Patrick's day.

This is nice of Google. But unfortunately many people here - yes, even thought who learned Irish at school for 14 years - don't actually speak Irish. And personally I didn't even go to school here, so I can't even say "Please may I go to the toilet" (the first Irish-language phrase learned by many an Irish child).
So putting these words back into English is pretty important to me: I can guess where Images / Videos / Next are, because I used them so often. but no way can I remember what the rest of the items in the search results menus bar are.
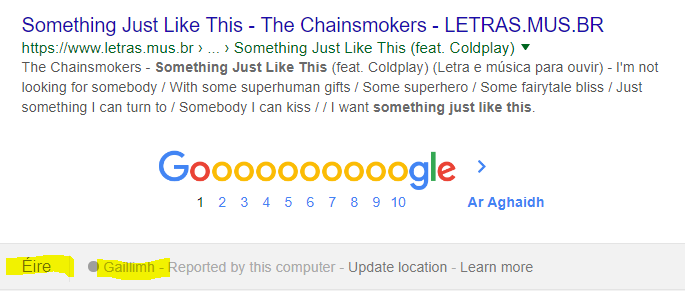 |
| Problem; Google is calling my city by it's Irish-language name, which I cannot even pronounce correctly, just less find on a map! |
How to change Google search engine results page (SERP) control language to a different language
This sounds like it should be simple. And I have managed to do it: within half an hour of my starting this article, Google's search-results page has controls in English again.But I'm finding it difficult to identify what actually made the difference and changed the language of the controls shown to me. Becuase I'm pretty certain that it wasn't something I changed.
Right now, my best advice is to browse your Search Preference page, and chenck that it is working in the order you said. If not, ask for help from the IT people in your office or organisation.
Note - this is not the same as the language of your actual search results, just the controls which let you move through the search results.#
Related Articles
There are no related articles for this topic.Friday, 9 February 2018
How to Careat a Blog with Blogspot ?
Step #1: Sign Up For Blogspot
First of all, go to Blogger.com home page and sign up to create a free blog on blogspot platform.
Quick note: Create a GMail account if you don’t have it yet. It’s the easiest way to create a free blog on Blogger.
Once you are logged into your Google account, you will now see “New Blog” button on the left side. Click on it to create a new blog on Blogger.
Step
Wednesday, 31 January 2018
How to add adfly on blogger?
Introduction to adf.ly
Get paid to share your links!
AdFly doesn't need any introduction to be honest, but it's my responsibility to inform you.
AdFly is a URL shortening service which shrinks larger URL into the smaller one, and the good thing is that they pay for every click on their link.
if You Not Have Adf.ly Account Sign-up Now
Getting
Wednesday, 26 July 2017
Understanding the Follow-by-Email gadget and Feedburner
The Follow-by-email gadget uses Feedburner's email-subscription service. It's very easy to add to your blog, but there are some things that you need to think about if you are using it to deliver blog-posts to your followers by email.
 The Follow-by-Email gadget is a very simple way to give your readers access to blog-updates by email: it delivers a message in their inbox every day that you post.
But to decide if it's a good thing to use, to get good value from it, and to troubleshoot any problems, you need to understand a little more about how it works.
And, since it uses Feedburner, this means understanding how Feedburner works, too.
Feedburner was originally a tool to enhance the RSS subscriptions that website-owners delivered - see Why RSS / Subscribe to Posts is important for your blog for info about RSS. Very roughly speaking, every time a website publishes a new item, Feedburner adds that item to a "feed" or summary of the site, and tells all the subscribers about it, without the subscribers having to visit the website.
One option that Feedburner added was subscribe-by-email: website owners who use Feedburner for this have to turn the service on, and then put "something" on their website that offers the service to people who want to get emailed updates. To start with, Feedburner just kept a list of emails addresses, but now it's more sophisticated: it checks with addresses that they really do want to be subscribed before adding them to the list, and offers an un-subscribe option with each subscription email.
Adding the follow-by-email option to your blog sets this up for you. It:
If that Google account already owns an entry (ie a "feed") in Feedburner for the blog you're adding the gadget to, then the gadget just uses this feed.
But if the Google account doesn't currently have an entry from the blog, then a new feed is created, and the email service is turned on for it.:

And because it uses Feedburner, you have full access to Feedburner's statistics, and a number of other things that are included in Feedburner's features, including:
Getting a list of all your email subscribers
Why RSS / Subscribe to Posts is important for your blog
The Follow-by-Email gadget: a very simple way to give your readers access to blog-updates by email

But to decide if it's a good thing to use, to get good value from it, and to troubleshoot any problems, you need to understand a little more about how it works.
And, since it uses Feedburner, this means understanding how Feedburner works, too.
What is Feedburner
The Follow by Email gadget uses a product called Feedburner to manage the list of people who have followed, ie subscribed to your blog.Feedburner was originally a tool to enhance the RSS subscriptions that website-owners delivered - see Why RSS / Subscribe to Posts is important for your blog for info about RSS. Very roughly speaking, every time a website publishes a new item, Feedburner adds that item to a "feed" or summary of the site, and tells all the subscribers about it, without the subscribers having to visit the website.
One option that Feedburner added was subscribe-by-email: website owners who use Feedburner for this have to turn the service on, and then put "something" on their website that offers the service to people who want to get emailed updates. To start with, Feedburner just kept a list of emails addresses, but now it's more sophisticated: it checks with addresses that they really do want to be subscribed before adding them to the list, and offers an un-subscribe option with each subscription email.
Adding the follow-by-email option to your blog sets this up for you. It:
- Sets up a feed,
- Turns the email service "on", and
- Puts an email--address request box onto your blog.
What is set up when you add the follow-by-email gadget
The Follow-by-email gadget can be added to your blog the same way you would add any other gadget. Doing this this means that, you are logged in to a Google account at the time.If that Google account already owns an entry (ie a "feed") in Feedburner for the blog you're adding the gadget to, then the gadget just uses this feed.
But if the Google account doesn't currently have an entry from the blog, then a new feed is created, and the email service is turned on for it.:
- The Feed Title is based on the blog's name.
- The feed address appears to be fairly random (eg I created one for a blog called "Another test blog", and the feed name is http://feeds.feedburner.com/blogspot/meaUW
Advantages of the Follow-by-email gadget
This gadget makes it a lot easier to offer a follow-by-email option: you don't have to set up the feed yourself, or use a HTML-gadget to provide a subscribe-by-email form.And because it uses Feedburner, you have full access to Feedburner's statistics, and a number of other things that are included in Feedburner's features, including:
- Customizing the "click the link to subscribe" message,
- Getting a list of all your email subscribers (verified and unverified), and
- Configuring the look-and-feel (including timing and from-address) of the daily email to your follow-by-emailers.
Disadvantages of the Follow-by-email gadget
There are some disadvantages of both the gadget, and the approach that Blogger has used to implement it:- Google / Blogger have mixed up the words "subscribers" and "followers". It used to be that subscribers used RSS gadgets (from Feedburner or other feed-providers), and followers used Blogger's own following-tools. But this new gadget is called "follow-by-email", and it's possible that mixing up the ideas will make some people very confused.
- Using the gadget, you have very little control over the look and feel of the follow-by-email option on your blog.
Compare this to the "Get updates by email" option which is in the top of the sidebar on this blog: I've put a lot of effort into getting the wording "just right" so potential subscribers know that they will be getting a please-confirm email. This on-screen wording means that even if they don't act on the email immediately, they get another reminder about if they come back to the blog again in the future. - You have no control over the message that potential follow-by-emailers are shown to tell them to verify their subscription. It looks like this
While this message is fine for the tech-minded people who are likely subscribe to an RSS feed, it will probably bring a glazed look to those of your visitors who need a very simple subscribe-by-email option!

- People who follow your blog by email will not be included in your Followers gadget or count - though you can use the Feedcount button to show how many subscribers your blog has.
- People who subscribe to your blog by email don't see any of the widgets on your blog, or any advertisements. (Unlike regular RSS-feed subscribers for whom you can set up AdSense for feeds). Despite the options mentioned above, ou have very little control over how they see your messages, especially if they happen to be using email software that shows your messages in plain text.
Related Articles
Customizing the "click the link to subscribe" messageGetting a list of all your email subscribers
Why RSS / Subscribe to Posts is important for your blog
The Follow-by-Email gadget: a very simple way to give your readers access to blog-updates by email
Tuesday, 4 July 2017
Putting files into Blogger's root directory
This article explains the issues, and options, for putting a file into the "root directory" of your Blogger blog.
 If you are using certain non-Google products to enhance your Blog, they will sometimes tell you to put a file into your root-directory. They may even tell you to use an FTP tool to do this.
Sometimes this happens when a product also gives you code to install into your blog , This approach is used when the code is written for websites in general rather than specifically to work with Blogger: putting useful files into a place relative to the root directory makes it a lot easier to move a website from a test-address to the live one, so is a common approach outside of Blogger.
Or maybe the other tool has been designed to verify that you do own the website in this way, rather than asking you to change the website code itself.
The long answer is still no: "there is no way to do this, but see the rest of this article for an explanation of why, and some suggested work-arounds."
If you're clever, and have lots of time, you can make a website just using a text-editor (eg notpad), a graphics program, and ftp software that lets you put the files into the right places on computer that's connected to the internet.
Tools like Dreamweaver take away a lot of the time-consuming work, and some of the need for cleverness. But you still need to know a lot about the internet to do things in a way that makes a good website.
Content management systems make this easier still: they let a technically-minded person do the nuts-and-bolts work to make the website, and give authors / artists / editors / content-creators simpler-to-use tools that let them put "stuff" (ie content) into the website, without needing to worry about the details of how it works.
Blogger is a (very simple) website content-management system, it creates our web-pages for us based on data that we put into certain places. Administrators can set up and change the theme, other people, eg authors simply make posts.
When we use Blogger, the main way that we change the data in our web-pages is using the Blogger software.
Some items inside posts or gadgets can be changed using other software, eg Google Docs, provided they were were set up using that other software in the first place. But - key point - there is nothing in the way that Blogger is put together that means we need to access the base directory. So they don't let us do so. And I doubt that this this will change anytime soon.
TIP: blogger's editor sometimes gets links mixed up, so it's important to start the filepath with "http://"
 If someone wants to use a file's position to check that you control a website, then they will have code on their own website that looks for the file in your root directory.
You cannot change this code. And you cannot place the fie.
So you need to ask them for an alternative way to verify, that is suitable for people without root directory access.
If they don't have any alternatives, try lobbying for this on their product support forum: by not having alterantives, they are ensuring that Blogger users, among others, cannot use their service.
If the official answer is still "no", then you could also ask in other on-line forums if anyone has found any other work-arounds.
 I've recently seen someone suggest in a help forum that people with custom domains can put files into their blog's root directory by FTP'ing the files into place.
This may be true, if the service that you are purchasing from your domain registrar includes file-hosting. But file hosting(*)
So it's not a general solution for most Blogger users, though it may work for some.
Initially I was a little sceptical of the idea: Blogger doesn't expect to see any files in our root directory, so I was concerned that it might do strange things if it found them there. But on reflection, I think there is probably a low risk of this happening, since the file-location is outside Blogger's control.
(*) To avoid any confusion, file hosting and DNS hosting are not the same thing. If you buy a custom domain for your blog from a registrar without going through Google/Blogger, then you do need to pay for DNS hosting, but do not need to buy file-hosting.
Picasa-web-albums: a quick introduction
How Blogger data is organised
Setting up a new administrator for your blog
Options for letting other people write in your blog

Sometimes this happens when a product also gives you code to install into your blog , This approach is used when the code is written for websites in general rather than specifically to work with Blogger: putting useful files into a place relative to the root directory makes it a lot easier to move a website from a test-address to the live one, so is a common approach outside of Blogger.
Or maybe the other tool has been designed to verify that you do own the website in this way, rather than asking you to change the website code itself.
How to add a file to your blog's root directory
The short answer for Blogger users is "sorry, you cannot do this".The long answer is still no: "there is no way to do this, but see the rest of this article for an explanation of why, and some suggested work-arounds."
Why not? Every other website tool lets me do this.
 |
| Posts: Blogger's tool for managing the content on our blogs |
Tools like Dreamweaver take away a lot of the time-consuming work, and some of the need for cleverness. But you still need to know a lot about the internet to do things in a way that makes a good website.
Content management systems make this easier still: they let a technically-minded person do the nuts-and-bolts work to make the website, and give authors / artists / editors / content-creators simpler-to-use tools that let them put "stuff" (ie content) into the website, without needing to worry about the details of how it works.
Blogger is a (very simple) website content-management system, it creates our web-pages for us based on data that we put into certain places. Administrators can set up and change the theme, other people, eg authors simply make posts.
When we use Blogger, the main way that we change the data in our web-pages is using the Blogger software.
Some items inside posts or gadgets can be changed using other software, eg Google Docs, provided they were were set up using that other software in the first place. But - key point - there is nothing in the way that Blogger is put together that means we need to access the base directory. So they don't let us do so. And I doubt that this this will change anytime soon.
What to do instead
The options for getting around this restriction depend on how the file that you need to put into your root directory is intended to be used.Installing code
If you have code to install into your blog, and a file to go with it, then you just need to- Host the file somewhere else (maybe in your Picasa-web-album for the blog, if it's a picture)
- Change the code to point to the full path of where you have hosted the file, instead of the relative path used in the code
<div class="separator" style="clear: both; text-align: center;"> <a href="http://www.Blogger-hints-and-tips.blogspot.com" imageanchor="1" style="margin-left: 1em; margin-right: 1em;"> <img border="0" src="//Logo.png" width="100" /></a></div>To change this to use a specific location, I just add a file-path and the file-name of the picture wherever it is hosted.
<div class="separator" style="clear: both; text-align: center;"> <a href="http://www.Blogger-hints-and-tips.blogspot.com" imageanchor="1" style="margin-left: 1em; margin-right: 1em;"> <img border="0" src="https://blogger.googleusercontent.com/img/b/R29vZ2xl/AVvXsEjIm3YtmkR2USZcOU8k1mazFnQYuFfdHRZNl6pnR1Env8240zoaZbyTE0SQ72d5rPw263LVAG-kd7HspaZvhGvl7Op8_aKH4fHEHaybavrsCca5DA8V_S-nM1IbFIzZHb0RsE97tvI86Po_/s320/Logo.png" width="100" /></a></div>
Verifying ownership
You cannot change this code. And you cannot place the fie.
So you need to ask them for an alternative way to verify, that is suitable for people without root directory access.
If they don't have any alternatives, try lobbying for this on their product support forum: by not having alterantives, they are ensuring that Blogger users, among others, cannot use their service.
If the official answer is still "no", then you could also ask in other on-line forums if anyone has found any other work-arounds.
An afterthought: what isn't recommended
This may be true, if the service that you are purchasing from your domain registrar includes file-hosting. But file hosting(*)
- Isn't necessary for a custom domain used in Blogger (since Google hosts our files for us), and
- Isn't available as part of the services when you buy a custom-domain through Blogger.
So it's not a general solution for most Blogger users, though it may work for some.
Initially I was a little sceptical of the idea: Blogger doesn't expect to see any files in our root directory, so I was concerned that it might do strange things if it found them there. But on reflection, I think there is probably a low risk of this happening, since the file-location is outside Blogger's control.
(*) To avoid any confusion, file hosting and DNS hosting are not the same thing. If you buy a custom domain for your blog from a registrar without going through Google/Blogger, then you do need to pay for DNS hosting, but do not need to buy file-hosting.
Related Articles
File hosts - places to store files used in your blog.Picasa-web-albums: a quick introduction
How Blogger data is organised
Setting up a new administrator for your blog
Options for letting other people write in your blog
Tuesday, 7 March 2017
The difference between Themes and Templates in Blogger
This article explains the difference between themes and templates in Blogger, Google's blogging tool.
 How a blog that is made with Blogger is shown to a visitor is controlled by four sets of information:
Originally, the first "configuration file" was called a template. In fact, officially it was called a design-template, to distinguish it from the post-template. However because most people aren't aware of the post template, usually just the word "template" is used to mean design-template.
Many of the Wordpress themes have had a lot of graphic design work done on them - using them gives a blog-site which looks very attractive (or otherwise suited for their purpose) on a wide range of screens. Many large websites have been made using Wordpress, and so very many professional designers have created Wordpress themes. Because of this, many people believe that it's easier to get an excellent-looking website from a theme than from a Blogger template.


What types of theme / templates does Blogger have
Editing your blog's template: advantages and disadvantages
How to turn on a mobile theme for your blog
Blogs, Blogger, bloggers, posts pages and screens - understanding Blogger-basics
How to make a real website, using Blogger
What is (was) a Blogger template

- The posts which the blogger writes (ie the content)
- A user-editable "configuration file" which records the overall formatting options which the file designer and then the blogger have chosen
- Another configuration file, called the post-template, which records choices that the blogger has made under Layout > Blog posts (edit), but cannot be edited elsewhere.
- Blogger's own software, which puts the other things together with some internal rules to make "web pages". Bloggers cannot control the rules in this at all.
Originally, the first "configuration file" was called a template. In fact, officially it was called a design-template, to distinguish it from the post-template. However because most people aren't aware of the post template, usually just the word "template" is used to mean design-template.
What is a theme
Other blogging tools (eg Wordpress, Tumblr) called their equivalent file a theme. Most (or even all) of those tools provide less access to change things in the Theme file, for example if you use a Wordpress free-hosted blog, then you cannot change any of the code in your theme, you can only make formatting changes which are allowed for in the Wordpress front-end.Many of the Wordpress themes have had a lot of graphic design work done on them - using them gives a blog-site which looks very attractive (or otherwise suited for their purpose) on a wide range of screens. Many large websites have been made using Wordpress, and so very many professional designers have created Wordpress themes. Because of this, many people believe that it's easier to get an excellent-looking website from a theme than from a Blogger template.
Blogger templates have now become themes
Recently - I noticed it in March 2017 - Blogger started calling their templates "themes".- They've changed the menu option on their dashboard from "Template" to "Theme".
- They've changed the action button names in the template/theme editor to say things like "Save theme".
- They've written various help articles which refer to themes.

What hasn't changed
- We can still edit our
templatesthemes extensively. - The Blogger tools that make the changes in our themes haven't changed: All the items under the Themes tab on the dashboard are the same as the ones on the Templates tab.
- The contents of our existing themes are still much the same (I cannot guarantees they haven't made any changes, but I haven't seen any)
- The themes that we can choose from when making a new blog, or changing the format of an existing one, are the same.
- There are hundreds of help and how-to articles written by blogger-helpers like myself, which all refer to templates. (I've started changing mine - but it's going to take a while!)
What else is going to change?
This is the big question: Is the rename a precursor to some other changes, eg restricting how much control we have over our themes? - or is it just a cosmetic change to make Blogger seem more modern?
Will there be some new themes released - ones that look better across a range of devices, maybe even some that are optimized for mobile instead of desktop use?
Will there be new theme-editing features introduced into Blogger's interface, to let us control things we cannot control now?
Conclusion / TL-DR
Only Google's Blogger product managers know exactly what the future plans for Blogger are - and they're not known for talking about the future direction until they're just about to introduce new features.
But until they do, my conclusion is that there is no difference between templates and themes in Blogger. They are simply two different words for exactly the same thing.
NB: Blogger product a announcements are usually made in the Blogger Buzz blog - and I see that template were still called templates in their most recent post in November 2016:

Related Articles
How to edit your Theme in BloggerWhat types of theme / templates does Blogger have
Editing your blog's template: advantages and disadvantages
How to turn on a mobile theme for your blog
Blogs, Blogger, bloggers, posts pages and screens - understanding Blogger-basics
How to make a real website, using Blogger
Saturday, 11 February 2017
Showing a PowerPoint file in your blog
This article is about options for showing the contents of a PowerPoint file inside your blog.
 Previously I've described how to load content from MS Word to your blog.
But some people have material in PowerPoint (or other presentation software) files, that they want to show in their blog. So far, I've identified three options for doing this.
These approaches should work on any PowerPoint formatted presentation, no matter what tool it was prepared with - except of course if it was Google Docs in which case you go straight to option 2.
At first, I thought that this was a backward approach. But recently I wrote an article based on a presentation that I gave several years ago. After trying various ways of displaying the presentation and the article, I realised that I was trying to find a way to include all the comments that I made when I used the presentation face-to-face. To do this, I needed to show each slide individually, so I used this option because it gives full control over what commentary goes with each picture.
But you may want to copy-and-paste, either because you don't want the content as images, or because you want other things like presenter notes etc that are not stored in the presentation slides.
To do this, you need to:
An alternative may be to export the presentation as an outline (ie rich-text or RTF format), and then convert it via Google Docs in the same way that you would for a Word document. You would need to test this to check if it brings in the items that are stored outside of the slides.
I haven't tried this one out myself, but in theory at least it should work.
Converting from MS Word to Blogger, via Google Docs
File hosting options - places to keep your files on-line
Tools for applying copyright protection to your blog
Putting embed code from an outside service into your blog
.

But some people have material in PowerPoint (or other presentation software) files, that they want to show in their blog. So far, I've identified three options for doing this.
These approaches should work on any PowerPoint formatted presentation, no matter what tool it was prepared with - except of course if it was Google Docs in which case you go straight to option 2.
Option 1: Each slide as an image
Follow these steps:- In PowerPoint, choose Save-as, and choose an image format (eg .png).
- When the system asks if you want all slides or just the current one, choose All.
- Upload all the image files that were created to your blog - it's your choice whether you put them all in the same post, or one-per-post.
I usually upload them firstly to Picasa web albums or another picture-hosting service, and then just link from my blog to there)
At first, I thought that this was a backward approach. But recently I wrote an article based on a presentation that I gave several years ago. After trying various ways of displaying the presentation and the article, I realised that I was trying to find a way to include all the comments that I made when I used the presentation face-to-face. To do this, I needed to show each slide individually, so I used this option because it gives full control over what commentary goes with each picture.
Option 2: Convert to a Google Docs Presentation
This is described in detail in Using Google Docs's publish-and-embed option - I believe it's better than trying to use Google Web-elements, because it achieves much the same thing, and takes one piece (web-elements) out of the equation.Option 3 Copy and Paste
As with MS Word, copy-and-paste from PowerPoint to Blogger is NOT recommended, because the PowerPoint content can have all sorts of extra HTML codes attached to it, and these can cause negative effects in your blog.But you may want to copy-and-paste, either because you don't want the content as images, or because you want other things like presenter notes etc that are not stored in the presentation slides.
To do this, you need to:
- Copy from PowerPoint,
- Paste into a text-editor (eg Notepad in Microsoft Windows)
- Copy again from the text-editor
- Paste into your blog.
An alternative may be to export the presentation as an outline (ie rich-text or RTF format), and then convert it via Google Docs in the same way that you would for a Word document. You would need to test this to check if it brings in the items that are stored outside of the slides.
Option 4 Use a slideshow host
Another approach would be to set up on account on SlideShare or a similar service that allows you to upload slideshows and gives you code that you can add to your blog in the usual way, which embeds the slideshow in your blog.I haven't tried this one out myself, but in theory at least it should work.
Related Articles
Showing a PowerPoint presentation as a slideshow in your blogConverting from MS Word to Blogger, via Google Docs
File hosting options - places to keep your files on-line
Tools for applying copyright protection to your blog
Putting embed code from an outside service into your blog
.
Thursday, 12 January 2017
How to not show any posts on your blog's home page, using Blogger
You can set your blog up so that no posts are shown on the main screen - provided you have used some of the other "home page" approaches to give readers other ways of getting to your content.
 Previously I've explained how to only show one post on the main page of your blog.
But some people who want to give their blog a home page go further than that, and don't show any posts on the main screen at all. (Remember, the main screen is where people who navigate to your blog, rather than to posts within it, go.)
This sounds like a strange thing to do - after all, blogs are about posts.
But actually it's fine, provided you use some other tools to let readers move around the blog. I've made a 150+ page blog this way, and it works very nicely because I have organised the information and used some index-pages (containing lists of bus-routes, suburbs, maps etc) with tables that link to many other posts.
There are at least two ways of doing it.
Take a note of the URL of the Page that you use created.
Go to Settings > Search preferences > Errors and re-directions > Custom re-directs
Click Edit then New re-direct
In the dialog box which opens:
Enter zero (0) into the Show at most field

But there may be cases where the second option is better - and I have recently confirmed that it still works.
Remember that you need to set up some other way to let readers move from your home-page to see your other posts - some of the ways to do this are discussed here.
Giving your blog a home page
Giving readers alternative ways to see the posts in your blog
What are dynamic view themes?
Blogger theme types
.
Using tables in your blog
Displaying a gadget only on the home page

But some people who want to give their blog a home page go further than that, and don't show any posts on the main screen at all. (Remember, the main screen is where people who navigate to your blog, rather than to posts within it, go.)
This sounds like a strange thing to do - after all, blogs are about posts.
But actually it's fine, provided you use some other tools to let readers move around the blog. I've made a 150+ page blog this way, and it works very nicely because I have organised the information and used some index-pages (containing lists of bus-routes, suburbs, maps etc) with tables that link to many other posts.
How to show no (ie zero, 0) posts on the main screen
Some people want to do this, as part of the process of giving their blog a home page. It's not possible if your blog has a Dynamic thene, but can be done for blogs with Layout themes.There are at least two ways of doing it.
Option 1 - use a custom re-direct for your home-page
Make a new Page (Pages > New Page) and add the material which you want to show on your main screen. Publish this page.Take a note of the URL of the Page that you use created.
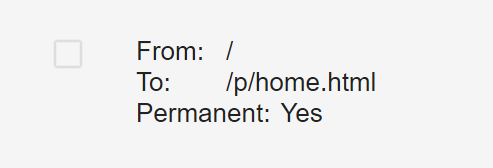
Go to Settings > Search preferences > Errors and re-directions > Custom re-directs
Click Edit then New re-direct
In the dialog box which opens:
- Enter a back-slash (ie / )into the first (From) box.
- Enter the URL of the page that you noted earlier into the second (To) box
- In the To box, remove the blog-address, because Blogger already adds that for you.
Eg if your URL is http:/www.myBlog.com/p/home.html
then just enter /p/home.html
(note that you keep the backslash (/) just before the P.
Click the Permanent checkbox.
Click Save just under the entry you just made - it now looks like this:

Click Save changes.
Job Done! Anyone who goes to your blog's home page will now go automatically to the alternative page you made - and the effect is that no posts are shown on the home page.
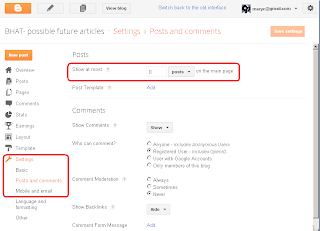
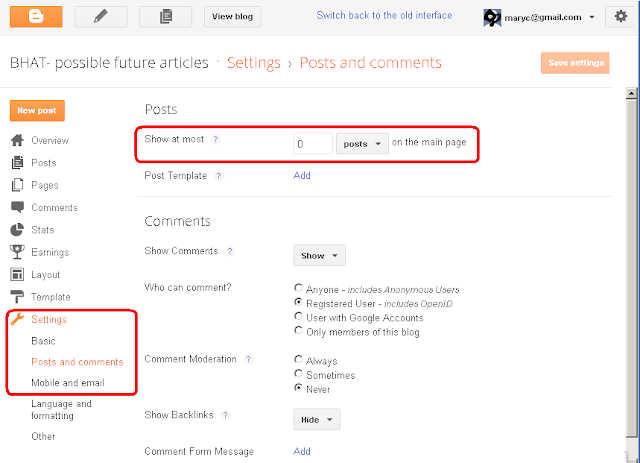
Option 2 - use the Posts and Comments setting
Choose the Settings > Posts and Comments panel from the left sidebar.Enter zero (0) into the Show at most field
Click Save Settings in the top right hand corner of the screen.
About this method
The method in Option 2 works: no posts are shown on your home page.
But by default, nothting else is shown, either. Unless you take steps to avoid it, your readers will see a grey box saying "0 Posts" when they look at your blog's main URL.

Some of the things you can do to avoid this include hiding the "showing posts with label XXX" message, and creating a gadget that only shows on the "home" page.
Recommended option
The custom re-direct option is probably the best approach - and is certainly what I've used for my blogs recently: it's clean, and doesn't need any special messing around with gadgets etc to put content onto the "home" page.
But there may be cases where the second option is better - and I have recently confirmed that it still works.
Whichever option you choose
Remember that you need to set up some other way to let readers move from your home-page to see your other posts - some of the ways to do this are discussed here.Related Articles
Limiting your blog to only have one post on the main pageGiving your blog a home page
Giving readers alternative ways to see the posts in your blog
What are dynamic view themes?
Blogger theme types
.
Using tables in your blog
Displaying a gadget only on the home page
Monday, 2 January 2017
How to get a valid URL for a picture in Google Photos
This article explains the problems with getting valid, SEO-friendly links to images that are in Google Photos - and shows a way of doing this using Google products.
Previously I've explained how to get a URL for a picture stored in Google Photos - and the difference between Photo's "shareable links" and real photo URLs.

1 If you haven't done so already, then upload the photo to Google Photos, in whatever way you usually would (if you have your smartphone synched with your Google account, you may not even notice uploading it).
2 In Google Photos, find the photo and put it into an album.
(It doesn't matter which album you use - and you can delete the album again later, you just need the photo to be in an album for now, and you need to remember which album this is).
3 Using a desktop or laptop computer (ie not your phone), go to Blogger
Or like this, if you didn't give the image a better filename before uploading it:
11 Find the part which starts src=" and ends with a closing quote-mark. This is the URL for the picture you chose. In the example above, it's the part in bold-red
Using marker text to find things in your post's HTML code
Things to consider before starting to use Blogger
Using Blogger's post-editor as an HTML generator
Previously I've explained how to get a URL for a picture stored in Google Photos - and the difference between Photo's "shareable links" and real photo URLs.
The sort of link you get with this procedure looks like this:
There are some issues with using URLs (aka web-addresses) obtained like this:
Luckily, there is a way around these problems, which gives you a web-address for a picture stored in Google Photos that ends with the same file extension which you uploaded to Photos (eg .jpg, .png .bmp), and which includes the keywords which you used in the file name.
https://blogger.googleusercontent.com/img/b/R29vZ2xl/AVvXsEgYxpOSCnbGPMbJxfueuAQHTX5QJrmPjGiTokw2Rn8G2ufgHPWrkV3bOko8RDlsOcz5xPXtqLB83KGfu6eIkkye9FLoYB8ub8eGY5R3Uhq7x3Scw0P6Rsf5_LQOsBWxx071nv4MGDauMOLj/w1006-h566-no/
There are some issues with using URLs (aka web-addresses) obtained like this:
- They aren't recognised as valid image file links by many online tools which ask for the URL for an image (eg phpBB, Blogger - and many others)
- Sometimes they stop working
(I've not been able to track down exactly when, but there are reports around the internet from people who say that links like this work for a while and then stop).
- They don't include the SEO-targeted keywords which you carefully used to name the photograph file before uploading it to Google Photos.
(Not everyone does this, and it's a lot harder for photos that were taken on your phone. But some people do it, and to them not having the keywords in the photo URL is a big deal.)
Luckily, there is a way around these problems, which gives you a web-address for a picture stored in Google Photos that ends with the same file extension which you uploaded to Photos (eg .jpg, .png .bmp), and which includes the keywords which you used in the file name.

How to get a valid URL / web-address for a picture in Google Photos, using Blogger
1 If you haven't done so already, then upload the photo to Google Photos, in whatever way you usually would (if you have your smartphone synched with your Google account, you may not even notice uploading it).
2 In Google Photos, find the photo and put it into an album.
(It doesn't matter which album you use - and you can delete the album again later, you just need the photo to be in an album for now, and you need to remember which album this is).
3 Using a desktop or laptop computer (ie not your phone), go to Blogger
- If you've never used Blogger before, you may be asked to accept the terms and conditions. Just say "yes" to this (you are't actually going to use Blogger to publish anything).
- If you don't already have a blog, the click the Create a blog link, and follow the steps to create one.
(You won't be publishing this blog, so it doesn't really matter what name you give it or what template you use - just pick anything that's available. )
- Or if you do have one or more blogs, just pick one (any one is OK: you're not actually going to publish to it) and go into the Blogger Dashboard.
4 Click New Post
This opens up the post editor.
5 In the tool-bar at the top of the post editor window, click the Insert image icon.


6 Choose the From the Google Album Archive tab.
(Google have changed the name for this a couple of times since they introduced the feature - right now it says exactly what I've listed here - the name may vary, but you get the idea: choose your Google Albums).
7 Navigate to the album that you put the picture into, in step two. Open it, and find the picture, and select it.
8 Choose Ok.
9 Wait a moment while the image is placed into your blog-post, and automatically resized.
9 Wait a moment while the image is placed into your blog-post, and automatically resized.
10 Click on the Edit HTML tab (currently at the top left side of the post-editor) to go into Edit HTML mode. You will see HTML code like this.
<div class="separator" style="clear: both; text-align: center;">
<a href="https://blogger.googleusercontent.com/img/b/R29vZ2xl/AVvXsEgv4mROt3D5Sh68s4Jurl7W1LT3fmrElAyZxDNvQplGNIlqGYy5-wvg3aql4mi_MNFs81IdZr_f53Yjm_LDaTqTKdR-ZYHbysPVN7fZpzUYHOPB6WoybFq6bnLkoWCI395Y9S8R8leAAtE/s1600/tarmacadam-promenade-sunny-september-day.PNG" imageanchor="1" style="margin-left: 1em; margin-right: 1em;"><img border="0" height="180" src="https://blogger.googleusercontent.com/img/b/R29vZ2xl/AVvXsEgv4mROt3D5Sh68s4Jurl7W1LT3fmrElAyZxDNvQplGNIlqGYy5-wvg3aql4mi_MNFs81IdZr_f53Yjm_LDaTqTKdR-ZYHbysPVN7fZpzUYHOPB6WoybFq6bnLkoWCI395Y9S8R8leAAtE/s320/tarmacadam-promenade-sunny-september-day.PNG" width="320" /></a></div>
<div class="separator" style="clear: both; text-align: center;">
<a href="https://blogger.googleusercontent.com/img/b/R29vZ2xl/AVvXsEhVCSF2uDy4vOicTUgIwNEboZwB_QO2xGAtc0FQIebj6i6-ThAvq610m-YvPrymQe_um8l-omAQBIQtlcLfgVGSRg8of-FemTsI6UCThTuiHYbzAWKnQ-8IWvOkGIKE1pK-zlVdEer3sKw/s1600/DSC_3573.JPG" imageanchor="1" style="margin-left: 1em; margin-right: 1em;"><img border="0" height="180" src="https://blogger.googleusercontent.com/img/b/R29vZ2xl/AVvXsEhVCSF2uDy4vOicTUgIwNEboZwB_QO2xGAtc0FQIebj6i6-ThAvq610m-YvPrymQe_um8l-omAQBIQtlcLfgVGSRg8of-FemTsI6UCThTuiHYbzAWKnQ-8IWvOkGIKE1pK-zlVdEer3sKw/s320/disc0137.JPG" width="320" /></a></div>
12 Select and copy the text between the two quote marks after src= ie the equivalent to the piece of code shown in red.
Job done! A general-purpose, valid, well-formed, web-address for the picture you want is now in your computer's memory, and can be pasted into anyplace where you want to use it.
To get out of Blogger, click Close (near the top right of the screen), and agree to leave the page anyway even though it means you will lose your work.
Troubleshooting / Extra for experts
Finding the image code in your post
If there is other material in the post that you are using, then you may want to put some marker text before and after the photo while you are still in Compose mode, to make it easier to find the right part when you are in Edit HTML mode.Getting a valid link to someone else's photo
You may want to find a valid URL for a photo that someone else has shared with you - but of course you cannot add this to one of your own albums. In this case, the solution is to download a copy of the photo which was shared, then upload it to your own Google Photos.Using the blog you've made for other things
Maybe using Blogger like this has given you ideas about other things you can use it for: that's great, Blogger is an excellent tool for publishing material on the internet with a minimum of fuss - while also having enough features to let you do some sophisitcated things. And even just the post editor can be a handy HTML generator at times. You might like to read Getting Started with Blogger, for some tips about how to set up your Google account and very first blog.Other challenges?
Do you have any questions around this approach, and how to solve problems with it? Please a message in the Comments box at the bottom of the page, and I'll see if I can find a solution.Related Articles
How to get an URL for a picture stored in Google Photos - version 1Using marker text to find things in your post's HTML code
Things to consider before starting to use Blogger
Using Blogger's post-editor as an HTML generator
Saturday, 31 December 2016
Putting a badge for a Facebook Page into your Blog
This article describes making a Facebook badge to promote your page, and putting it onto your blog.
 This article is about how to make a badge to promote a Facebook Page.
This is an example of the "follow me" approach to linking your blog and the social networks, although for Facebook pages your reader becomes a Fan rather than a Friend.
Many people are confused about when they should use each of the types of "thing" in Facebook, ie
(Facebook chance the place for actions like this from time to time - you may need to look around to find your pages.)
Copy the URL for the Page you want to promote
(One way is to right click on its name, and choose copy-link-location- or whatever phrase your browser uses. Another is to to go the page, and copy the URLfrom your address bar.)
Come back to this article and click here --- Facebook Social Plugins, to reach Facebook's tools.
(I used to have instructions to launch this from Facebook - but I cannot find any link to it from my Pages page any more.)
Choose Page Plugin / Web.
Scroll down the page, and set the options for your badge. The first one is critical - the others optional:

When you are happy with the selections, choose Get Code.

Copy the code provided
Install the code into your blog - there several options for installing the HTML, depending on where you want to put the badge or button.
Job Done! Your blog will now display a gadget that promotes the selected Facebook page - people can view and like your Page from within your blog.
 People who visit your blog through a web-browser will see a Facebook area, including a Like button and whatever other options you have chosen.
This can be quite a powerful tool: you can easily use two or three different combinations on different parts of your blog: one that has no border, no faces and no header but does show a Stream can effectively look like a "live" feed from your Facebook page to your blog, while another one with different options can show off the size of your fan-base.
Be aware that the Like button shown in this button gives people the option to Like your Page in facebook - not your blog directly, and not the current post that they are reading. If you want them to be able to Like your blog or blog-posts, you need to provide this option separately (and many of your visitors are likely to be confused by the different).
As always, people who read your blog via a feed reader (Bloglines, Google Reader, etc), or by email subscription (eg having used follow-by-email) may not see the Facebook item, depending on where is places and what options their email program has.
fyi, I could have just quoted this code, and said to use it on your blog. But I don't usually do this when I'm describing how to link Blogger and any third party product, because it's likely that Facebook (or whoever) will change their code in the future: it's always safest to get the most up-to-date copy of the code from the source-site when you need it.
The facebook page where you get the code from also has more information about controls you can set in the code, too. Check it out for more information.
At one stage, the first step in these instructions was to
But that's no longer necessary. You can promote any Facebook page that you want to, on your blog.
But be aware that if you show the page-feed on your blog, and you don't own the page, then you have no control over what is shown. It's possible that a feed from someone else's Page will show material which breaks Blogger's terms and conditions - or which you simply don't want on your blog. For this reason along, I'd recommend only promoting your own, or closely trusted, pages on your blog.
How the data in Blogger blogs is organised
Linking Blogs and Websites
Tools for linking Blogger and the Social Networking sites
Putting a Facebook "share this" button on your blog
Copyright, Blogs and Bloggers
Why RSS / Subscribe to Posts is important for bloggers
What is a Facebook page

This is an example of the "follow me" approach to linking your blog and the social networks, although for Facebook pages your reader becomes a Fan rather than a Friend.
Many people are confused about when they should use each of the types of "thing" in Facebook, ie
- Profiles - accounts for flesh-and-blood, living, breathing, individual people
- Pages - for websites, brands, and organisations that don't want to approve all their Facebook members
- Groups - for organisations that want to approve individual members who join (and in return, group-owners can send private messages to individual members.
How to make a badge to promote a Facebook Page
View all your Pages using the arrow drop-down at the very top right of Facebook's toobar.(Facebook chance the place for actions like this from time to time - you may need to look around to find your pages.)
Copy the URL for the Page you want to promote
(One way is to right click on its name, and choose copy-link-location- or whatever phrase your browser uses. Another is to to go the page, and copy the URLfrom your address bar.)
Come back to this article and click here --- Facebook Social Plugins, to reach Facebook's tools.
(I used to have instructions to launch this from Facebook - but I cannot find any link to it from my Pages page any more.)
Choose Page Plugin / Web.
Scroll down the page, and set the options for your badge. The first one is critical - the others optional:
- Facebook Page URL - this needs to be changed to the URL of your page (which you copied earlier)
If you have less than 25 Fans already, then your page's URL will be something like http://www.facebook.com/pages/Blogger-Hints-and-Tips/144194435594821 and you can get it by copying the link from the list of Pages for your account.
Once you have more than 25 fans, you can choose a page-url on the Edit Info > Username screen.
- Tab - the tab on your page that is shown
- Width - choose a value that suits the space on your template where you want to put the box.
- Show faces, show header: choose options that suit your purpose and blog template
- Show stream: this controls whether you show posting from the Page inside your blog

When you are happy with the selections, choose Get Code.
- Currently, there are options for an iframe or Javascript SDK: I recommend using the iframe, unless you are comfortable with the two-part installation needed for the Javascripit, and you are sure that the visitors you want to target will have Javascripti enabled.

Copy the code provided
Install the code into your blog - there several options for installing the HTML, depending on where you want to put the badge or button.
Job Done! Your blog will now display a gadget that promotes the selected Facebook page - people can view and like your Page from within your blog.
What your visitors will see
This can be quite a powerful tool: you can easily use two or three different combinations on different parts of your blog: one that has no border, no faces and no header but does show a Stream can effectively look like a "live" feed from your Facebook page to your blog, while another one with different options can show off the size of your fan-base.
Be aware that the Like button shown in this button gives people the option to Like your Page in facebook - not your blog directly, and not the current post that they are reading. If you want them to be able to Like your blog or blog-posts, you need to provide this option separately (and many of your visitors are likely to be confused by the different).
As always, people who read your blog via a feed reader (Bloglines, Google Reader, etc), or by email subscription (eg having used follow-by-email) may not see the Facebook item, depending on where is places and what options their email program has.
Customizing the code
You can change the characteristics of the box without having to generate the code from Facebook again. For example you can later the width and/or height - just remember to do it in both of the places required if you are using the iframe option:<iframe src="http://www.facebook.com/plugins/likebox.php?href=http%3A%2F%2Fwww.facebook.com%2Fpages%2FBlogger-Hints-and-Tips%2F144194435594821&width=160&colorscheme=light&show_faces=false&border_color=purple&stream=true&header=false&height=395" scrolling="no" frameborder="0" style="border:none; overflow:hidden; width:160px; height:395px;" allowTransparency="true"></iframe>
fyi, I could have just quoted this code, and said to use it on your blog. But I don't usually do this when I'm describing how to link Blogger and any third party product, because it's likely that Facebook (or whoever) will change their code in the future: it's always safest to get the most up-to-date copy of the code from the source-site when you need it.
The facebook page where you get the code from also has more information about controls you can set in the code, too. Check it out for more information.
Do you need to own the page you want to promote?
No - not any more.At one stage, the first step in these instructions was to
"Log into Facebook with a profile (ie personal account) that has administrator rights for the page you want to promote."
But that's no longer necessary. You can promote any Facebook page that you want to, on your blog.
But be aware that if you show the page-feed on your blog, and you don't own the page, then you have no control over what is shown. It's possible that a feed from someone else's Page will show material which breaks Blogger's terms and conditions - or which you simply don't want on your blog. For this reason along, I'd recommend only promoting your own, or closely trusted, pages on your blog.
Related Articles
Putting HTML from a third-party into your blogHow the data in Blogger blogs is organised
Linking Blogs and Websites
Tools for linking Blogger and the Social Networking sites
Putting a Facebook "share this" button on your blog
Copyright, Blogs and Bloggers
Why RSS / Subscribe to Posts is important for bloggers
How to rename picture files in Picasa-desktop
This article is about re-naming files from within Picasa-desktop, to provide SEO benefits for your blog.
 Picasa's desktop software is a good tool for organizing and editing photos on your local computer. And it is still available for you to use on your computer, even though Picasa-web-albums has been replaced by Google Albums + Google Album Archive.
For pictures that are important in your blog, I still recommend preparing them in a tool like Picasa-desktop and then uploading the finished versions to Google Photos before putting them into a post, because:
Picasa-desktop folders have a very nice relationship with files and directories with the Windows file system:
And this means that you can set various properties (eg file name) from either inside Picasa or from Windows.
Unfortunately captions and tags aren't shown when you put a photo in your blog.
This means that the captions and tags are possibly not used by Google in understanding what the photo is about: I've never heard any SEO experts recommending that the IPTC/XMP fields should be keyword optimized. For some bloggers this won't be an issue - but it is if SEO is important for you blog.
Another approach is to put the keyword(s) into the file-name, because file-name is one of the factors that Google looks at when it is indexing images. And this has a nice spin-off for you as well - it means that they keywords are available to any file-search tools that you use on your computer, not just to specialised ones that work with images.
For a long time, I believed that to change the name of a file, I had to go out to my Windows files (using Windows Explorer or similar, and rename them there) - and then wait for Picasa to catch up with the change that I'd made in the file system. But one day I accidentally hit the F2 key, and found that it opens up a very useful dialog box indeed.

Press the F2 key. This opens a Rename Files window.
Type in a new name for the file, for example concrete-pig-outside-butcher-shop-in-ireland
Click the option buttons if you want to include today's date or the file-resolution in the name (I don't usually do this, because I organise my photos into folders according to the date they were taken)

Click Rename to save the change
Job done! The file has a new name in your computer's file system, and is still loaded in your Picasa database.
One option is to download the photo, rename the file on your desktop, and re-upload it. But if you change the name in this way, you also need to change the link to the file in every place that it has already been used. That said, if you only use your photos in one place each, then making a new copy with a different name, uploading it and changing all the existing links can be a good way to deal with copyright theives who have hot-linked directly to your photos.
Today, I'm not sure if it matters so much. In most cases, it's probably more important to use rich, descriptive key words that describe all the aspects of the photo, than to worry about how they're laid out. But I do tend to follow the advice anyway - just in case.
Does SEO matter for your blog?
How to put a picture into your blog.
Understanding Picasa-desktop vs Picasa-web-albums
Taking action when someone has copied your blog without permission
For pictures that are important in your blog, I still recommend preparing them in a tool like Picasa-desktop and then uploading the finished versions to Google Photos before putting them into a post, because:
- The desktop tool has better editing tools (cropping, zooming, auto adjustment, adding watermarks) and Picasa-web-albums does.
- It lets you control the size of the uploaded file
- It's easier to ensure sure that you still have full-size files on my local machine for printing etc, as well as smaller, more optimized, copies to use on web-pages.
Picasa-desktop folders have a very nice relationship with files and directories with the Windows file system:
Each Picasa folder = one directory on your computer
Each Picasa photo = one file on your computer.
And this means that you can set various properties (eg file name) from either inside Picasa or from Windows.
How to associate keywords with photos in Picasa-desktop
Picasa-desktop has two tools for adding keywords to photographs:- You can enter a caption for each photo. This is basically some text, which is stored "inside" the photo, in a hidden-field that is only visible when you are using a software tool that displays the captions. (In technical terms, the caption is stored inside the IPTC/XMP Description field inside the JPEG etc file that you have.)
- You can enter one or more tags for each photo - again, text (individual words or phrases) that is stored in the IPTC/XMP Keyword field.
Unfortunately captions and tags aren't shown when you put a photo in your blog.
This means that the captions and tags are possibly not used by Google in understanding what the photo is about: I've never heard any SEO experts recommending that the IPTC/XMP fields should be keyword optimized. For some bloggers this won't be an issue - but it is if SEO is important for you blog.
Another approach is to put the keyword(s) into the file-name, because file-name is one of the factors that Google looks at when it is indexing images. And this has a nice spin-off for you as well - it means that they keywords are available to any file-search tools that you use on your computer, not just to specialised ones that work with images.
For a long time, I believed that to change the name of a file, I had to go out to my Windows files (using Windows Explorer or similar, and rename them there) - and then wait for Picasa to catch up with the change that I'd made in the file system. But one day I accidentally hit the F2 key, and found that it opens up a very useful dialog box indeed.
How to Change the name of a file in Picasa desktop
Navigate to the picture that you want to change the file-name for, using the Picasa-desktop software.Press the F2 key. This opens a Rename Files window.
Type in a new name for the file, for example concrete-pig-outside-butcher-shop-in-ireland
Click the option buttons if you want to include today's date or the file-resolution in the name (I don't usually do this, because I organise my photos into folders according to the date they were taken)
Click Rename to save the change
Job done! The file has a new name in your computer's file system, and is still loaded in your Picasa database.
How to change the name of a file in Google Album Archive or Google Photos
Currently there is no way to change the name of a file after it is uploaded it to either Google Album Archive or Google Photos: .One option is to download the photo, rename the file on your desktop, and re-upload it. But if you change the name in this way, you also need to change the link to the file in every place that it has already been used. That said, if you only use your photos in one place each, then making a new copy with a different name, uploading it and changing all the existing links can be a good way to deal with copyright theives who have hot-linked directly to your photos.
How to choose "good" names for your picture files
Early SEO advice was to use:- Lowercase letters only (some computers don't like uppercase)
- Only hyphens between words (not spaces, underscores, etc)
- Regular characters only (no á é etc)
Today, I'm not sure if it matters so much. In most cases, it's probably more important to use rich, descriptive key words that describe all the aspects of the photo, than to worry about how they're laid out. But I do tend to follow the advice anyway - just in case.
Related Articles
How to show your photos in a slideshow from PicasaDoes SEO matter for your blog?
How to put a picture into your blog.
Understanding Picasa-desktop vs Picasa-web-albums
Taking action when someone has copied your blog without permission
Subscribe to:
Posts (Atom)