Tuesday, 31 May 2016

Adding Image Slideshow on any HTML Webpage / blogger site

A number of web developers face challenge in adding a simple image slideshow in a HTML webpage. There are very tough codes available on net for this task. But most of them demand images to be of same size, or the code is too tough to implement due to usage of css and advanced java script. Here we are proving a simple HTML code with minimal usage of Java script. You can directly use in it your blog post's HTML coding.


Here is the code

<script type="text/javascript">
var x=0;
function rotate(num){
fs=document.ff.slide;
x=num%fs.length;
if(x<0) x=fs.length-1;
document.images.show.src=fs.options[x].value;
fs.selectedIndex=x;}
function auto() {
if(document.ff.fa.value == "Stop"){
rotate(++x);setTimeout("auto()", 2000);}}
</script>
<form name="ff">
<table cellpadding=3 style="border:1px solid;border-collapse:collapse; border-color:#C0C0C0">
<tr><th align=center>Tourist Places in India</th>
</tr><tr><td align=center>
<img src="https://blogger.googleusercontent.com/img/b/R29vZ2xl/AVvXsEgEeL3sokGC8gux_mWzj0GnqIfKrWhzG_lufftZTEQUKK2WOjstfmOrW2I2quRweK8xiISZy9-deS9byfO8Gn5oqIdGcISJJvIC8WxW-Cfkxxa7BpgUREMijUCbJhvrwvbrDvZx27X4Rng/s1600/shimla-manali.jpg" name="show">
</td></tr><tr>
<td align=center style="border:1px solid; border-color:#C0C0C0">
<input type="button" onclick="rotate(0);" value="ll<<" title="Jump to Start" />
<input type="button" onclick="rotate(x-1);" value="Previous " title="Previous photo" style="width:80px;" />
<input type="button" name="fa" onClick="this.value=((this.value=='Stop')?'Start':'Stop');auto();" value="Start Slidshow" title="Auto-play" style="width:150px;" />
<input type="button" onclick="rotate(x+1);" value="Next" title="Next Photo" style="width:80px;" />
<input type="button" onclick="rotate(this.form.slide.length-1);" value=">>ll" title="Jump to end" />
</td></tr><tr>
<td align=center style="border:1px solid; border-color:#C0C0C0">
<select name="slide" onChange="rotate(this.selectedIndex);">
<option value="https://blogger.googleusercontent.com/img/b/R29vZ2xl/AVvXsEgEeL3sokGC8gux_mWzj0GnqIfKrWhzG_lufftZTEQUKK2WOjstfmOrW2I2quRweK8xiISZy9-deS9byfO8Gn5oqIdGcISJJvIC8WxW-Cfkxxa7BpgUREMijUCbJhvrwvbrDvZx27X4Rng/s1600/shimla-manali.jpg">Shimla-Manali </option>
<option value="https://blogger.googleusercontent.com/img/b/R29vZ2xl/AVvXsEjMOsly3S1gpVTbP2indL-e7HoePCazoHZfa28nvVz5VdPL6EIz4V_4_cMwXJnjICnyyUeiRJCokAXZn4UfjATuVglpiyzdGOqUh5ySmLITKiasiar8N4qxPzXVI6mTIlofiSkC_HCBJpk/s1600/darjeeling.JPG">Darjeeling</option>
<option value="https://blogger.googleusercontent.com/img/b/R29vZ2xl/AVvXsEjlDJdTPlQDJXgARxuQhwBMQRcxn01Izl-qYm9deH8pt96JWxPPdHNu1lkWRZTMiKIOlsFFDYxIm0j5mHRaS5vSa-UDwZ0RRfk5oqueqwTF24Pv7HsjiKPLALHYbmSK1RzfehGckF7YwyM/s1600/corbett+national+park.jpg">Corbett National Park 
</option>
<option value="https://blogger.googleusercontent.com/img/b/R29vZ2xl/AVvXsEgwSUF38me6ZzGdtn_EuWzLY4Hw43dfbq8eoTFUj024rwuxNlb4IzALJNqEmibHAQYelr1gLOWI6l6h68dtQHJ-PQgQ71cgZCNpRdzTqsl0chZsomUd7T0MribodKwHoJD3oXsm9P2TRUk/s1600/Lashmir.jpg">Kashmir </option>
<option value="https://blogger.googleusercontent.com/img/b/R29vZ2xl/AVvXsEisMYRrp8qdF-g1gxwgbAyatS4g4HJAaJzV54C_XZHVs4HZaPadwUnpemFo6XdsIHZZGQG6vzPCERA_ke5kddwgj15nVp-C69gcS2xxKJ2B0KP_tpu0RTCpqx4D4LWXDIGEUwqd3smfifw/s1600/andaman.jpg">Andman </option>
<option value="https://blogger.googleusercontent.com/img/b/R29vZ2xl/AVvXsEhMkvV5FJyZOiHi4HF6kKBer0hH2qwxbIQ5jbjmT4loq7Qqod1sBhSILWBclPHPjB8iyZCND69S0T1zEXb9kLTKOdwUssTLCzDx2U7KgSWZgcG11gJ9lrHE6NTQF3j2gO9CK5uftam_MPo/s1600/kerala.jpg">Kerala </option>
<option value="https://blogger.googleusercontent.com/img/b/R29vZ2xl/AVvXsEipeGs81Li9bQbif0KFu2_mM8V-FehcrC6KfpBfbDaCUrjePd9u0qczIYwK4c5bcP6abpP_1ndYPVxdvAGqT2IVwryfa_IlfW2Q1xMG4Gte6039hDKbJVtrDCB5WcJkxz1rRXMo2niDRQI/s1600/Tajmahal.jpg">Tajmahal </option>
<option value="https://blogger.googleusercontent.com/img/b/R29vZ2xl/AVvXsEiBF_0bGxUe0n3QAGxVhMcAlGip2FkPJPXXCDrxNtt2c37UdP-NJubKp9IyNrSEL0rSfq1UI62jPf6kqUawRW2cP1p7WqDPq0TGsZ3HnDkMvsFfT0EJ-QMhybpd3_k5fSV5up7GvC9gyvE/s1600/Goa.jpg">Goa </option>
<option value="https://blogger.googleusercontent.com/img/b/R29vZ2xl/AVvXsEgUPd_w1EJA1ZiUfPpR6WuNZ_9y8FBZzTxr16J8QJ_wCUsMYxeHUeeOEJm5UvaaTOfD5PqLBhaTJn4Fdixu7fJbXfBlDa8hoAdeMUZKzUHWrtlnsxA0qfvbbUP53OYw1MZFU4wLrdx_T_g/s1600/Laddakh.jpg">Ladakh </option>
</select>
</td></tr></table>

 The implementation of the above code will provide the following result


Tourist Places in India

If you are smart enough to be a web developer, then you know how to change the code implement it on your website. You can add or delete images by adding or deleting the <option ></option> tag which is in the end part of the code.

How to Add AdSense Page-level ads in Blogspot

Recently, page-level ads were made available for blogspot bloggers and webmasters which means that you can now display AdSense Ads right on your mobile templates. You can now monetize your efforts on the templates as you do with mobile apps thanks to the Google Admob Ads.

Why Choose AdSense Page-level ads?

There are a number of reasons why you choose page-level ads from AdSense to bolster your revenue stream.
  • Increase Revenues
  • Provide Better User Experience
  • Two New Formats
  • Doesn't Count Against 3 Ad Limit
  • Optimized and Responsive to Mobile Needs

Page-level Ad Formats

Today, the two types of page-level ads available include Anchors which are ads places at the bottom of the screen and Vignettes which are full screen ads that work similar to Admob's Interstitial adverts.
Vignettes tend to be more effective for mobile advertising.

how to add adsense page-level ads in blogspot

How to Setup Page-Level Ads in Blogspot Blogs

The good news is that you can install these ads from AdSense fairly quickly and easily thanks to the process which guides you through.

1. Log into your AdSense Account
2. Click on this link
3. Click the two toggle buttons to switch on "Anchor/overlay ads" and "Vignette ads"

enable adsense page-level ads in blogger

4. Scroll down and click the "Get Code" button

enable adsense page-level ads in blogger

5. Copy the code

google adsense page-level ads code

6. Go to Blogger, then Template and Backup your Template
7. Click the 'Edit HTML' button and search for the </head> tag
8. Paste the page-level ad code above the </head> tag

Note: You will also need to replace the attribute async with async="async" in order to help complete the process, otherwise Blogger will give you an error message. Once you have completed these steps, all you need to do is save it to your template.

Test Page-level ads in your Blogger template

After installation, get out your mobile device so you can test the AdSense page-level ads and see if they are working correctly. You will need to be a visitor to your site in order to check out the ads.
  • Type #googleads at the end of the URL so you can access them
  • Select the ad format from the tabbed box that will appear above the body of the blog
  • Check out the ads
You will get to see the ads in action before the public does so that you can tell if they are working fine. If you are impressed with what you see, then it is ready to go. However, if you see something that you want to change or if the ads are not present, you'll need to start over again.

The Effectiveness of Page-level ads

Since October, 2015 when these ads were first rolled out the effectiveness that they have demonstrated is considerable. Today, the ads have been used in countries all over the world and they continue to impress. For those who have already used these mobile ads on WordPress or other blogger blogs you can see just how effective they have been in terms of reaching all of your visitors. In addition, the effect on your revenue may be considerable depending on the popularity of your blog.

In the end, AdSense page-level ads are remarkably effective for mobile use and will help you build a stronger income base for your blog.

How to Fix Mixed Content Errors in Blogspot Blogs

With HTTPS now automatic in Blogger the benefits have been considerable. However, there are some issues that are now facing bloggers thanks to this change in policy and one of the most common is mixed content errors.

What are mixed content errors?

This is when a web page becomes secured by SSL, but it contains both secure HTTPS and also the non-secure HTTP which is usually links, scripts, style sheets, video, and images. This results in browser errors that negatively affect the performance of your website and cause security issues. This means that source codes such as template, layout gadget, and post and paste may be causing the issues in the HTML side of the equation.

http to https

How to identify mixed content errors?

This is a fairly straightforward process that you can use through Google Chrome:

1. Visit blog using HTTPS, for example - https://yourblog.blogspot.com
2. Access the Chrome Menu at the top-right of your browser window and go to "More Tools" > "Developer Tools" and switch to the "Console" tab or use the CTRL + SHIFT + J keys to open the JavaScript console
3. Look in the Console for mixed content errors which will look similar to these:

mixed content, chrome console

Examples of mixed content errors include, but are not limited to the following:

- Insecure Script Request
- Insecure Image Request
- Insecure URL Request

You should list all unsecured URLs and visit the other pages on your blog to check for other mixed content errors.

Fix the mixed content errors in a Blogger template

To fix the errors encountered which may be found in the template or layout, you will need to do the following:

1. Go to Blogger and select your blog, then click on "Template" and press the "Edit HTML" button
2. Click anywhere in the code area and press CTRL + F to search for http://

http:// to https:// blogger

3. Replace all http:// prefixes with https://

Verify that the new URLs using the HTTPS addresses work by opening them in a new window on your browser. If the links you are receiving provide the same results, then you can Save Template.

To check for layout errors:

Go to Blogger and click on 'Layout' > check for any HTML/JavaScript gadget and click 'Edit' on each gadget. Replace all http:// prefixes with https:// then verify that they are working and hit Save.

Fix the mixed content errors in Blogger posts and pages

To check for post and page errors, do the following:

1. Log into your Blogger Dashboard and select your blog, then click on 'Posts' or 'Pages' and select any post or page > hit the "Edit" link below the Post/Page title.

2. Once the Post editor opens, switch to the "HTML" tab and press CTRL + F keys to look for http:// prefixes. After you found them, replace http:// with https://

fix mixed content errrors

Be sure to verify that the new link works by opening up your browser and testing them. After you've tested them, hit Update.

Update to the Blogger post editor to fix mixed content

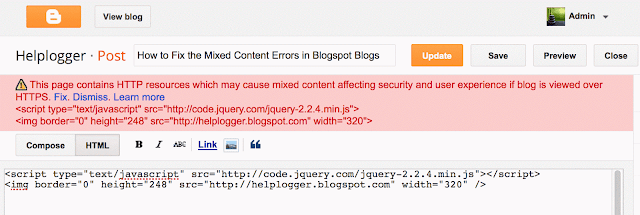
To find and fix mixed content errors automatically, Blogger has released a warning tool that alerts you to possible mixed content issues in your posts. All you need to do is go to "Edit" inside a post, switch to the "HTML" tab and hit the Update button. All of the errors will be presented along with the ability to fix them. Once they have been corrected, hit Update.

mixed content error

In the end, fixing these types of errors will greatly improve the performance of your blog, particularly when it comes to pages that may have this particular issue with mixed content generating errors. It also applies to custom domains as well as long as you have an SSL certificate. All it takes is a few minutes and you can greatly improve your blog site that has been impeded with mixed content errors.

Sunday, 29 May 2016

Automatic Featured Posts Slider Widget for Blogger

Anyone with a blog wants readers to stay rather than move on to another. It's not being selfish but after someone has read one post, you'd definitely want them to read another, right? After all, isn't it one of the tenets of SEO to make people stay longer on your blog if it has to have a fighting chance at the rankings game?

The question now is: how exactly do you entice them to read a few more of your blog posts?

First off, you don't know exactly what brought a reader to your site. Well, you sort of do, if you have Google Analytics and all that. But that's beside the point. It wouldn't be productive for you to stare at GA the entire day hoping that it will tell you that yes, someone has been perusing your blog.

The point being driven at here is that you have to offer more on your blog. It's not enough that you get traffic from search engines and other sites; you also have to add some extras that will entice visitors to stay longer.

How exactly do you do that?

The Tactics of Persuading Users to Stay

Bloggers have employed a variety of tactics to persuade readers to stay. For one, they load the sidebar with widgets for Popular Posts, for example. Of course, it would be in the interest of your readers to know which other posts on your blog are gaining traction. Maybe those pieces are of interest to them as well. As a result, you've got one surefire way of making readers stay.

Now, what if you want to highlight Featured Posts, for example? Let's say that your blog has been around for a number of years and in that span, it has produced some great content that received quite the number of shares, likes, +1s, comments on so on. Wouldn't that be the kind of post you want featured? Unless your reader was looking for that topic specifically, there's little chance that they might uncover that gem if you don't bring it to their attention.

Thankfully, it's quite possible to add a Featured Posts slider for Blogger. And if you don't know how to make one yourself, this is exactly what this post is for. Here's an awesome Featured Posts slider widget that you can use on your blog.


How to Add Featured Posts Slider Widget in Blogger

1. Go to 'Layout' > click the 'Add a gadget' link in the sidebar area and select 'HTML/JavaScript' gadget from the pop-up window.

2. Add the code below inside the empty box:
<style type="text/css">
ul.featured-widget-list,ul.featured-widget-list li{margin:0;padding:0;list-style:none;position:relative }ul.featured-widget-list li{display:none}ul.featured-widget-list li:nth-child(1){display:block;line-height:0}ul.featured-widget-list img{border:0;width:100%;height:auto}ul.featured-widget-list .featuredbg{width:100%;height:100%;position:absolute;z-index:2;left:0;top:0;opacity:.6;background-image:url(https://blogger.googleusercontent.com/img/b/R29vZ2xl/AVvXsEjFFzRgZJdjhCCWhP37d09JNsg_n7Yn5xWdSHZhlGGPvzKpTLocXcRB9pdvSbwCAFcWhoLMvdZHi6FCOzlR-zKUvYFYr1ibnS6bYRXh8Qq25iQuztoOl31V2tXtLcePEXFSB_1DoMk7CUY/s400/overlay-bg.png);background-position:0% 100%;background-repeat:repeat-x}ul.featured-widget-list .featuredbg:hover{opacity:.1}ul.featured-widget-list h5{position:absolute;left:0;right:0;text-align:center;bottom:10px;z-index:2;color:#fff;margin:0;text-transform: capitalize;padding:10px 20px;line-height:1.9em;letter-spacing:0.3px;font: 600 16px 'Abel', sans-serif;overflow:hidden}ul.featured-widget-list li:hover h5{bottom:30px}ul.featured-widget-list .featured-meta{font: 11px 'Abel', sans-serif;letter-spacing:0.3px;position:absolute;bottom:0;left:0;right:0;text-align:center;z-index:2;color:#fff;opacity:0}ul.featured-widget-list h5, ul.featured-widget-list .featured-meta {-webkit-transition: all 0.3s;-moz-transition: all 0.3s;-o-transition: all 0.3s;transition: all 0.3s;}ul.featured-widget-list li:hover .featured-meta{bottom:20px;opacity:1}.feat-buttons{position:absolute;top:50%;left:0;z-index:5;width:100%}
.feat-buttons a{text-indent:-9999px;margin:0 7px;width:15px;height:15px;padding:5px;background:#000;-ms-filter:"progid:DXImageTransform.Microsoft.Alpha(Opacity=60)";filter: alpha(opacity=60);-moz-opacity:0.6;-khtml-opacity:0.6;opacity:0.6;position:relative;-webkit-border-radius: 50%;-moz-border-radius: 50%;border-radius: 50%;}.feat-prev{float:left;}.feat-next{float:right;}.feat-buttons a.feat-prev::before, .feat-buttons a.feat-next::before{content:"";width:0;height:0;border-width:6px 7px;border-style:solid;border-color:transparent #fff transparent transparent;position:absolute;top:50%;margin-top:-6px;margin-left:-11px;left:50%}
.feat-buttons a.feat-next::before{border-color:transparent transparent transparent #fff;margin-left:-3px}
</style>
<div id="featuredbwidget"></div>
<link href='https://fonts.googleapis.com/css?family=Abel' rel='stylesheet' type='text/css'/>
<script src="http://ajax.googleapis.com/ajax/libs/jquery/1.8.0/jquery.min.js" type="text/javascript"></script>
<script type='text/javascript'>
//<![CDATA[
featuredbwidget({
listURL:"https://helplogger.blogspot.com/",
featuredNum:9,
listbyLabel:false,
feathumbSize:350,
interval:3000,
autoplay:true,
featuredID:"#featuredbwidget"
});
function featuredbwidget(a){(function(e){var h={listURL:"",featuredNum:3,featuredID:"",feathumbSize:300,interval:5000,autoplay:false,loadingFeatured:"nextfeatured",pBlank:"https://blogger.googleusercontent.com/img/b/R29vZ2xl/AVvXsEhRk0fnCEmbvQWtK8lbcNQcje3H-WwF5NjFtDCcdCyIicHvxzNoc2EMwa3NY-KkDEhbQ8BuCIXCEtxozghce9g13Qm4iQunE9E15ZOimkAZh4nvYxPYjZVWKGvp0iMNMS_rATvWvFIt-y0/s500/no-image.png",byMonth:["Jan","Feb","Mar","Apr","May","Jun","Jul","Aug","Sep","Oct","Nov","Dec"],listbyLabel:false};h=e.extend({},h,a);var g=e(h.featuredID);var d=h.featuredNum*200;g.html('<div class="featslider"><ul class="featured-widget-list"></ul><div class="feat-buttons"><a href="#" class="feat-prev">Prev</a><a href="#" class="feat-next">Next</a></div></div>');var f=function(w){var q,k,m,u,x,p,t,v,r,l="",s=w.feed.entry;for(var o=0;o<s.length;o++){for(var n=0;n<s[o].link.length;n++){if(s[o].link[n].rel=="alternate"){q=s[o].link[n].href;break}}if("media$thumbnail" in s[o]){u=s[o].media$thumbnail.url.replace(/\/s[0-9]+\-c/g,"/s"+h.feathumbSize+"-c")}else{u=h.pBlank.replace(/\/s[0-9]+(\-c|\/)/,"/s"+h.feathumbSize+"$1")}k=s[o].title.$t;r=s[o].published.$t.substring(0,10);m=s[o].author[0].name.$t;x=r.substring(0,4);p=r.substring(5,7);t=r.substring(8,10);v=h.byMonth[parseInt(p,10)-1];l+='<li><a href="'+q+'"><div class="featuredbg"></div><img class="featuredthumb" src="'+u+'"/><h5>'+k+'</h5></a><div class="featured-meta"><span class="fdate"><span class="fday">'+t+'</span> <span class="fmonth">'+v+'</span> <span class="fyear">'+x+'</span></span> - <span class="fauthor">'+m+"</span></div></li>"}e("ul",g).append(l).addClass(h.loadingFeatured)};var c=function(){e(h.featuredID+" .feat-next").click()};var b=function(){e.get((h.listURL===""?window.location.protocol+"//"+window.location.host:h.listURL)+"/feeds/posts/summary"+(h.listbyLabel===false?"":"/-/"+h.listbyLabel)+"?max-results="+h.featuredNum+"&orderby=published&alt=json-in-script",f,"jsonp");setTimeout(function(){e(h.featuredID+" .feat-prev").click(function(){e(h.featuredID+" .featslider li:first").before(e(h.featuredID+" .featslider li:last"));return false});e(h.featuredID+" .feat-next").click(function(){e(h.featuredID+" .featslider li:last").after(e(h.featuredID+" .featslider li:first"));return false});if(h.autoplay){var i=h.interval;var j=setInterval(c,i);e(h.featuredID+" .featslider li:first").before(e(h.featuredID+" .featslider li:last"));e(h.featuredID+" .featslider").hover(function(){clearInterval(j)},function(){j=setInterval(c,i)})}e("ul",g).removeClass(h.loadingFeatured)},d)};e(document).ready(b)})(jQuery)};
//]]>
</script>

Automatic Featured Posts Slider Settings

  • listURL - replace "https://helplogger.blogspot.com/" with your blog URL
  • featuredNum - add the number of posts to display in the slider
  • listbyLabel - if you want to display posts by category / label, such as the tag fashion, it will be written as listbyLabel: "fashion"
  • feathumbSize - the size or dimension of the image in pixels
  • interval - time taken to change the slides position in milliseconds
  • autoplay - replace true with false if you don't want the slides to change automatically.
3. Once you are done with the settings, click the 'Save' button.

Now, this code is for a slider widget which means that instead of just a random list of Featured Posts, you get to display them with images (if they have one) and you can include effects too. You can also control how many slides should be shown because it just wouldn't be prudent to feature your entire oeuvre, right?

Plus, being a slider widget, it adds a nice little visual to your site. And we all know how visuals are important in enticing people to stay, don't we?

Tuesday, 24 May 2016

SweetFX Mod Graphics

                                                                                                     
Installation Instructions
  •                                                                        Click the "download " button below 
  Copy and paste all of the files that are in the .zip file into your games .exe directory (usually     looks something like C:\Program Files\Steam\steamapps\common\Total War WARHAMMER)
Press the "Scrlk" key to toggle the effect on and off. Leave a comment if you enjoy it

Trainer Total War Warhammer


Wenja Grammar: Reflexive -ra

Today's grammar post will focus on the reflexive marker -ra.  Reflexives are always object markers that refer to the subject of the sentence.  A good example is seen in the following sentence, where "himself" and "he" are the same person.


So how do you do this in Wenja? Recall the all-important Sentence Starters in Wenja: words like nu 'now', tu 'then, until', ma 'but', na 'not', may 'don't', etc.  The reflexive marker is always going to attach itself to the sentence starter(s).  

  1. Nu-ra pacham.  'And I see myself.'
  2. Na-ra Udam hada. 'An Udam doesn't eat himself.'
  3. May-ra kayda. 'Don't hit yourself.'

If there's not a sentence starter, then -ra will attach itself to whatever word is at the beginning of the sentence:

  1. Udam-ra hada. 'An Udam eats himself.'
  2. Kayda-ra! 'Hit yourself!'
  3. Winja-ra nartar lajarsh. 'Wenja gather (themselves) in the east.' (from the game)

Some verbs, such as bawga 'be useful; use' have different meanings depending on if the -ra particle is used.  Compare:

  1. Hisu bawga.  'An arrow is useful.'
  2. Hisu-ra bawgam. 'I use an arrow.'

Another example is bida 'serve; respond, answer':

  1. Nakway bidam. 'I serve no one.' (from the game)
  2. Nakway-ra bidam. 'I respond to no one.'

Next grammar post we'll look at an extremely common verb that's super weird -- wayda 'know; find'.

Thursday, 19 May 2016

AUD/USD Forex Report 20th May 2016


                                                        AUD/USD Primary & Weekly Cycles

Treat the Trend as a break and extend pattern towards this week's lows @ .7187. (random support) Previous Report

 As noted in the previous report, the trend had changed because of the failure of the Yearly 50% level to hold and the breakout of the Weekly lows.

Once the Weekly lows had broken, we follow the 'Dilernia Principle of Break and Extend" in this case down into .7187, which has now completed.

The overall trend is to continue down into .7038, however don't be surprised to see a rise and retest of the Weekly 50% level and the MAY 50% level beforehand.

In Conclusion:- Trend Down into .7038 with an each way bet on a short-term bounce from this level @ .7187

How to Speak Wenja: Kum kway kaka shawsarsh? (What the $%@# are they yelling at me?), Part 2


Héi Rosháni hesti.


Hésu wos (Smarkaka)! Today we're shifting gears to the other language spoken in Oros: Izila.  Here are 30 common expressions you'll hear when encountering them in the open world.  Note that < ə > = "uh"; < x > = "ch" in German Bach, Scottish loch, Hebrew chayyim, etc.
  1. Pésti. 'Pest'
  2. Məryéso!  'You die!'
  3. Hantiyóm hest.  'That was close.'
  4. Súxlis me páxst.  'Suxli protected me.'
  5. Hámbispeks.  'Careful.'
  6. Ké 'smi.  'I am here.'
  7. Solwéi me!  'Save me!'
  8. Néi!  'No!'
  9. Báyom hantiyóm.  'Danger is close.'
  10. Kwíd?  'What?'
  11. Súxli, páxsdi me.  'Suxli, protect me.'
  12. Hantéi, pərskóx!  'Stop, please!'
  13. Áp' dérkso.  'Look out.'
  14. Áp' stákso!  'Stay away!'
  15. Wénja!  Tá sərté!  'Wenja!  Capture them!'
  16. Áu hidi.  'Go away.'
  17. Kwíd hesti?  'What is that?'
  18. Gwér!  Hlékseso!  'Beast!  Defend yourself!'
  19. Winkméda!  'We are being attacked!'
  20. Párdal!  Kalóm, mo- [yelp] 'Leopard!  Beautiful, but- [yelp]'
  21. Tekslitóm Wénja!  'Armed Wenja!'
  22. Nokéit! 'That hurt!'
  23. Hlénktu!  'Curse it!'
  24. Hlənktóm pésti!  'Damn pest!'
  25. Yód pésti, tód məntéis mene héit.  'One less pest to worry about.'
  26. Dénkmən héit!  'One less annoyance!'
  27. Tód swéyont kóri pəlnékəm!  'I swatted that buzzing fly!'
  28. Kərtós né hesmi.  'I'm not wounded.'
  29. Ályons monéiti deusmi.  'I must warn the others.'
  30. Púr nos dwiskénti.  'They fear our fire.'

Monday, 16 May 2016

How to Speak Wenja: Kum kway kaka shawsarsh? (What the $%@# are they yelling at me?), Part 1


Smarkaka, sakush!  Our last two Winja Warshta on the names of beasts were well received, no doubt because many of the words given were very useful for your visits to Oros.  We'll continue this with a series of posts called Kum kway kaka shawsarsh, or "What the #$%@ are they yelling at me?"  Today we'll begin with some simple expressions from the Udam.
  1. Nay!  "No!"
  2. Sakwi!  "Help!"
  3. Udam majish.  Winja manu.  "Udam are big.  Wenja are small."
  4. Wayka!  "Attack!"
  5. U Winja wayda.  "Find the Wenja."
  6. Gwam. Yawda!  "Come. Fight!"
  7. Pur!  "Fire!"
  8. Baya!  "Danger!"
  9. Shwapa / Dus.  "Bad."
  10. Digway.  "It hurts."
  11. Gwan! "Kill!"
  12. May gwan! "Don't kill!"
  13. Um kayda.  "Hit me."
  14. Ta lasiwa.  "You're weak."
  15. Su! "Good!"
  16. Winja chawda. "The Winja is hiding."
  17. Winja shantiy.  Darsh. "The Wenja is close.  Look."
  18. Winja wanam.  "I hunt Wenja."
  19. U hay!  "Go!"
  20. San urgi. "No tracks."
  21. U hada!  "Eat!"
  22. Gwar (lawhan, hars, etc.) pacham. "I see a beast (lion, bear, etc.)"
  23. May dwis! "Not again!"
  24. Kway? "What?"
  25. U Winja shanchi! "Stop the Wenja!"
  26. Ta drawbam.  "I'll break you."
  27. Dramta!  "You run!"
  28. U gwar wayda.  "Find the beast."
  29. Ku chlawta?  Hay.  "Did you hear? Go."
  30. Marwa?  "Dead?"

Sunday, 15 May 2016

Quick Show Map Mod

This Mod brings Quick Show Map Mod Feature to GTA SA.

HOW TO USE ?

-Press "M" to show Map and "M" again to close Map.

HOW TO INSTALL ?

To Install just put "CLEO" folder to your GTA SA Folder.
CLEO 4.3 Requires.


BUG

-pressing "M" will show the Map, but Don't press "esc" during Map Shown, It Crashes Game.(Don't know why?) Press "M" again to close map.

Thanks To
http://www.gtamodding.com/wiki/Memory_Addresses_(SA)
for Memory Addresses

Enjoy !
^_^

Author: Rakesh_nama

SweetFX Mod Graphics Final Fantasy X X 2 HD Remaster


                                                                       Installation Instructions

  •                                                                        Click the "download " button below 
  Copy and paste all of the files that are in the .zip file into your games .exe directory (usually     looks something like C:\Program Files\Steam\steamapps\common\FINAL FANTASY FFX&FFX-2 HD Remaster)

Press the "Scrlk" key to toggle the effect on and off. Leave a comment if you enjoy it
                   

Saturday, 14 May 2016

Trainer Dark Souls III v1.03-v1.04.1 Plus 28


SA Windowed Mod


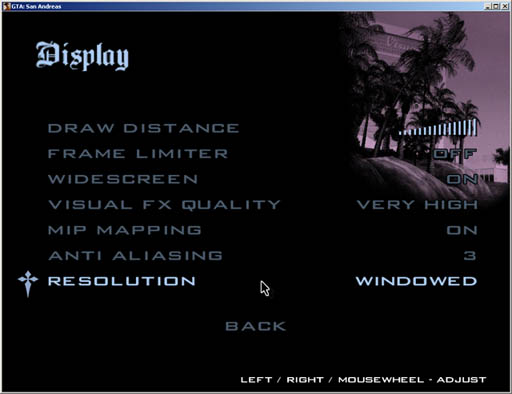
SA Window allows you to play SA in a window. This might have already been possible with other tools, but this one is different since it doesn't use a Direct3D hook. Instead it modifies game functions to allow you to select a windowed esolution. This is selectable from both the startup dialog box and the Advanced Display menu.
-If you want a specific window resolution then first pick the fullscreen resolution and then select windowed.

Installation:
Put "SAWindow.asi" in SA root folder.


Author:
ModelingMan

Friday, 13 May 2016

Trainer DOOM 2016


Trainer Final.Fantasy.X.X-2.HD.Remaster


SA_LODless

QQwEqWt.jpg
SA LODless is a modification that removes all of the LODs from SA and also increase draw distances for all of the HQ models in game. This is achieved by transferring HQ models from Binary IPLs for every sector of the map and transfer the IPL lines to its IPL counterpart and then deleting the LOD lines. Binary IPLs used by main.scm & interiors are left intact. This modification is compatible with the default main.scm, SAMP and numerous different cleo scripts, map mods etc. I cannot promise that every mod will be compatible, as long as the mod does not use LODs for any reason, then it should be compatible with SA LODless.

What is the difference between this & .LOD Mod by -BLITZ-?
.LOD Mod replaces the Lods with its HQ counterparts while LODless simply just deletes them from the IPLs.

Do I need any additional plugins to make this work?
You need to download Open Limit Adjuster to stop the game from crashing, you don't need to change limits as the limit adjuster will work out of the box with LODless. You will then need ThirteenAG's IDE_DD_Tweaker to stop you from falling through the ground! You can get the limit adjuster & the IDE_tweaker from the download section in the Project 2dfx thread.

Are there any bugs?
- Models will only appear when you are looking towards the area. While this is not actually a bug with this mod, the game automatically loads the LODs no matter if you are looking at the area or not, then replaces the Lods with the HQ models when you do look. Hopefully this can be sorted one day.
- When entering a interior and the game plays the animation of entering through the door, you won't see any buildings as LODs are by default loaded. Hopefully sorting this problem will be as simple as _DK's binthesky.cs script along with the problem above.

How do I install this?
- Copy & replace all the files in put_to_root_of_gta_sa to your game directory
- Double click on SA_LODless.bat and let it do its job. The script will transfer the LODs over to SAMPCOL.img if SAMP exists in the directory
- Done! You may delete SA_LODless.bat, SA_LODless.ims, SA_LODless_SAMP & IMGConsole folder

Can I install this using Modloader?
Yes!
- Create a folder in Modloader and copy gta3.img from your models folder to the newly created folder for this mod
- Follow the steps above

K7WYSIjh.jpg

Why release this?
With IDE_tweaker you can theoretically 'hide' lods from view, which makes them useless and taking up unnecessary IDs and space in gta3.img.

Credits
UZI-I - Binary IPL Manager
_DK - binthesky
Link/2012 - Open Limit Adjuster
fastman92 - Fastman92 IMG Console
ThirteenAG - IDE_DD_Tweaker & Draw Distance Changer


You may modify, re-release, pretty much do whatever you want with this mod without my permission. All I ask is for you to mention me in your credits. If not, oh well not a big deal.

Grove Street INSANITY HD


Brand new revamp of Grove Street area. This Mod Replaces original GTA SA Groove street with HD one.
-Available in two versions
1.Aero Version (HQ)
Requirements
  • CPU AMD X2 / Dual Core 2.50 Ghz +
  • GPU 1 GB + 
  • Shader Model 3.0 +
  • RAM 3 GB +
2.Light Version       
Requirements
  • CPU Pentium 4 / AMD 1.50 Ghz +
  • GPU 256 MB + 
  • Shader Model 2.0 +
  • RAM 1 GB +

How To Install?

before Installation these files requires:
Clean GTA San Andreas
now to install, choose your version and Drag modloader to GTA San Andreas Folder.

Video

Author:
Ezekiel_RN

GTA SA CLEO Library 4.3.21


CLEO library (or simply CLEO) - a hugely popular extensible plugin for the Grand Theft Auto games series by Rockstar Games, allowing the use of thousands of unique mods which change or expand the gameplay. There are different versions of CLEO made for GTA III, GTA Vice City and GTA San Andreas.

Features

Scripts
Using CLEO it's possible to add custom scripts written with Sanny Builder or another script editor to the game without starting a new game. Adding and removing a script is as easy as copying and deleting a file in the CLEO folder.
These third-party scripts are entirely user-made and are in no way supported by the developers of this library. While CLEO itself should work in a wide range of game installations, individual scripts are known to have their own compatibility restrictions and can not be guaranteed to work.

Opcodes
CLEO 4 adds 100 useful scripting commands (opcodes) that make possible to work with external files, to change the game memory, to call exe functions with custom parameters and much more.
New opcodes were added in the fourth version to play audio streams, to format strings, to display custom texts on screen without using external text files (.fxt, .gxt). To assess all the achievements and use them in your scripts, install the latest version of the CLEO library.

Plugins
CLEO plugins are dynamic libraries having the .CLEO extension. At startup, the CLEO library scans the CLEO folder for the files with that extension and tries to load them. If successful, the plugins begin to work and do what they were made for.
CLEO 4 allows to make new opcodes using sources of the CLEO SDK. The starter kit contains three examples of such plugins.
Plugins are installed in the same way as scripts.

Installation
CLEO 4 is distributed with an auto-installer. To install the library run the installer and follow its instructions.
CLEO 4.3 supports three different versions of GTA San Andreas: 1.0, 1.01, 3.0 (steam).
CLEO requires an 'ASI Loader' installed to run which is provided with the release. The ASI Loader requires overwriting one original game file: vorbisFile.dll - be sure to make a backup of this file. No additional files are replaced, however the following files and folders are added:
- cleo\ (CLEO script directory)
- cleo\FileSystemOperations.cleo (file system plugin)
- cleo\IniFiles.cleo (ini config plugin)
- cleo\IntOperations.cleo (int operations plugin)
- cleo\cleo_save\ (CLEO save directory)
- cleo.asi (core library)
- bass.dll (audio engine library)
- vorbisHooked.dll (Silent's ASI Loader)

All plugins are optional, however they may be required by various CLEO scripts.
CLEO 4 for San Andreas needs the BASS.dll v2.4 to be installed. This dll file can be downloaded from the official site of Un4seen Developments Ltd.

Compatibility Mode
CLEO is continually being improved and extended over time. In very rare circumstances, some scripts written for CLEO 3 may not work while using CLEO 4. However, since CLEO 4.3 you are able to enable a 'legacy mode' to increase compatibility with CLEO 3 scripts by naming them with the extension '.cs3'. CLEO 4.3 will load '.cs' and '.cs4' scripts normally and load '.cs3' scripts in CLEO 3 compatibility mode, in which certain small behaviours of the CLEO library will change to achieve better compatibility with that script. However, most CLEO 3 scripts will work without the need for compatibility mode being set as CLEO 4.3 also detects certain necessary CLEO 3 behaviours. Specifically, scripts which use the uninitialized storage data after a SCM function call to work.

Credits
The author and original developer of the CLEO library is Seemann.
Alien began development of CLEO 4, now continued by Deji.
The developers have no connection with Take 2 Interactive or Rockstar Games and have no liability for any negative consequences caused by using this product or any of the additional products included. Use it at your own risk.
CLEO 4.3 uses the ASI Loader by Silent.
More information about changes in version 4.3 and the CLEO library features can be found in the readme files which are installed along with CLEO and at this topic.

Thanks to:
Stanislav Golovin (a.k.a. listener) for his great work in exploration of the GTA series.
mfisto for the alpha-testing of CLEO 4, his support and advices.
NTAuthority and LINK/2012 for additional support with CLEO 4.3.

Open Limit Adjuster


This is a open source limit adjuster for Grand Theft Auto III, Vice City and San Andreas aiming to bring back limit adjusters to the scene.
However it does not aim to be just a limit adjuster, but a limit purger, that's, turning whatever previously was limited into unlimited, being only limited by the machine/application capacity.

Goals
  • Bring limit adjusters back to the scene, but not totally centralized into one person.
  • Avoid little limit adjusters here and there.
  • Be an extremely stable limit adjuster.
  • Purge out limits from the face of the community, we are in a dynamic world!
Download
The latest release can be found at GitHub, the ini comes configured to the best experience.
https://github.com/T...a3vcsa/releases

Author:
LINK/2012

Silent's ASI Loader 1.3


This is a DLL file which adds ASI plugin loading functionality to San Andreas.
What makes it better from any other ASI Loaders available?


Features
  • Increased compatibility - all current loaders share a flaw, which sometimes results in a plugin loading failure. This loader uses a brand new loading method developed by NTAuthority, which makes it work all the time.
  • Compatible with 3.0 (old Steam) and new Steam Executables.
  • Loads files located in the game root directory and scripts folder (although not all the plugins are guaranteed to work properly when located in the latter!).
  • Has an INI file in which you can toggle on/off plugins loading.
  • Has an ability of loading plugins exclusive for specific Executable and/or exclude another plugins from loading on specific Executable.
  • Lightweight and fast.
  • When an encrypted EXE (like Steam EXE) is used, plugins are loaded after it gets decrypted - no need to wait in the ASI code.

This loader is also used in Grand Theft Auto: Vice City Stories PC Edition and Vigilante Justice Total Conversions.
In order to install it, you just need to place both DLL files into game directory, overwriting the old files.

Usage

Basic Plugin Installation:
If you want to add an ASI for all Executable versions you have, put it either in game root directory or scripts folder. Various plugins may fail to work properly when running from scripts folder, it is advised to move it to the game directory if plugin fails to launch properly.

Advanced Plugin Installation:
If you have multiple Executable versions and want to make each one use different ASI plugins, you can create a new folder inside scripts folder with the same name as your Executable (so gta_sa.exe gets gta_sa folder, my_fancy_exe.exe gets my_fancy_exe folder etc.). Plugins placed in thisfolder will be exclusive to specific Executable.
You also can make specific Executables override global settings and load/ignore all plugins via settings.ini edit. Specific Executable can also ignore only some of the plugins - see advanced_plugin_management_example for more info.

Credits & License
Firstly, thanks to NTAuthority for sharing his code snippet, and also for Stanislav "listener" Golovin for sharing his ASI Loader source, which acted as a base for my version of the tool.
As the following tool is open source, it's under the Silent's License. It means that the source code is for learning purposes, as all source code is. You may only use it for your own projects but NOT to recreate or build on the original work.

Author:
Silent

GTA SA Mod Loader


Mod Loader is a plugin that adds an user-friendly and easy way to install and uninstall modifications into the game without changing anything in the game installation. The user only needs to put the mods in the modloader directory and that's all.

Features:

  • Do not replace any original file, all the mods are installed by injection on the fly.
  • Instant mod refreshing, you can refresh mods on the go without closing the game.
  • Game menu for configurations, providing a even easier management of mods.
  • Bug-free audio modding. When installing sound mods with Mod Loader, you'll no longer encounter this bug.
  • Mod Loader will automatically read data lines from readme (.txt) files.
  • If you have several of the same .dat files, Mod Loader will merge them together for you.
  • Allows you to link mods to profiles, which is very useful for installing TC's with Mod Loader, isolating them completly from the rest of your mods.
  • Mod Loader allows you to use command line arguments, you can find information on them here.
Screenies


Author:
LINK/2012