Showing posts with label Widgets. Show all posts

Sunday, 29 May 2016

Automatic Featured Posts Slider Widget for Blogger

Anyone with a blog wants readers to stay rather than move on to another. It's not being selfish but after someone has read one post, you'd definitely want them to read another, right? After all, isn't it one of the tenets of SEO to make people stay longer on your blog if it has to have a fighting chance at the rankings game?

The question now is: how exactly do you entice them to read a few more of your blog posts?

First off, you don't know exactly what brought a reader to your site. Well, you sort of do, if you have Google Analytics and all that. But that's beside the point. It wouldn't be productive for you to stare at GA the entire day hoping that it will tell you that yes, someone has been perusing your blog.

The point being driven at here is that you have to offer more on your blog. It's not enough that you get traffic from search engines and other sites; you also have to add some extras that will entice visitors to stay longer.

How exactly do you do that?

The Tactics of Persuading Users to Stay

Bloggers have employed a variety of tactics to persuade readers to stay. For one, they load the sidebar with widgets for Popular Posts, for example. Of course, it would be in the interest of your readers to know which other posts on your blog are gaining traction. Maybe those pieces are of interest to them as well. As a result, you've got one surefire way of making readers stay.

Now, what if you want to highlight Featured Posts, for example? Let's say that your blog has been around for a number of years and in that span, it has produced some great content that received quite the number of shares, likes, +1s, comments on so on. Wouldn't that be the kind of post you want featured? Unless your reader was looking for that topic specifically, there's little chance that they might uncover that gem if you don't bring it to their attention.

Thankfully, it's quite possible to add a Featured Posts slider for Blogger. And if you don't know how to make one yourself, this is exactly what this post is for. Here's an awesome Featured Posts slider widget that you can use on your blog.


How to Add Featured Posts Slider Widget in Blogger

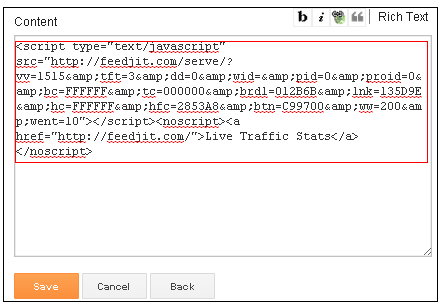
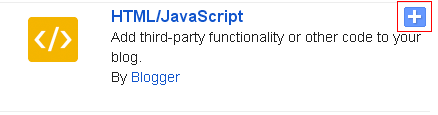
1. Go to 'Layout' > click the 'Add a gadget' link in the sidebar area and select 'HTML/JavaScript' gadget from the pop-up window.

2. Add the code below inside the empty box:
<style type="text/css">
ul.featured-widget-list,ul.featured-widget-list li{margin:0;padding:0;list-style:none;position:relative }ul.featured-widget-list li{display:none}ul.featured-widget-list li:nth-child(1){display:block;line-height:0}ul.featured-widget-list img{border:0;width:100%;height:auto}ul.featured-widget-list .featuredbg{width:100%;height:100%;position:absolute;z-index:2;left:0;top:0;opacity:.6;background-image:url(https://blogger.googleusercontent.com/img/b/R29vZ2xl/AVvXsEjFFzRgZJdjhCCWhP37d09JNsg_n7Yn5xWdSHZhlGGPvzKpTLocXcRB9pdvSbwCAFcWhoLMvdZHi6FCOzlR-zKUvYFYr1ibnS6bYRXh8Qq25iQuztoOl31V2tXtLcePEXFSB_1DoMk7CUY/s400/overlay-bg.png);background-position:0% 100%;background-repeat:repeat-x}ul.featured-widget-list .featuredbg:hover{opacity:.1}ul.featured-widget-list h5{position:absolute;left:0;right:0;text-align:center;bottom:10px;z-index:2;color:#fff;margin:0;text-transform: capitalize;padding:10px 20px;line-height:1.9em;letter-spacing:0.3px;font: 600 16px 'Abel', sans-serif;overflow:hidden}ul.featured-widget-list li:hover h5{bottom:30px}ul.featured-widget-list .featured-meta{font: 11px 'Abel', sans-serif;letter-spacing:0.3px;position:absolute;bottom:0;left:0;right:0;text-align:center;z-index:2;color:#fff;opacity:0}ul.featured-widget-list h5, ul.featured-widget-list .featured-meta {-webkit-transition: all 0.3s;-moz-transition: all 0.3s;-o-transition: all 0.3s;transition: all 0.3s;}ul.featured-widget-list li:hover .featured-meta{bottom:20px;opacity:1}.feat-buttons{position:absolute;top:50%;left:0;z-index:5;width:100%}
.feat-buttons a{text-indent:-9999px;margin:0 7px;width:15px;height:15px;padding:5px;background:#000;-ms-filter:"progid:DXImageTransform.Microsoft.Alpha(Opacity=60)";filter: alpha(opacity=60);-moz-opacity:0.6;-khtml-opacity:0.6;opacity:0.6;position:relative;-webkit-border-radius: 50%;-moz-border-radius: 50%;border-radius: 50%;}.feat-prev{float:left;}.feat-next{float:right;}.feat-buttons a.feat-prev::before, .feat-buttons a.feat-next::before{content:"";width:0;height:0;border-width:6px 7px;border-style:solid;border-color:transparent #fff transparent transparent;position:absolute;top:50%;margin-top:-6px;margin-left:-11px;left:50%}
.feat-buttons a.feat-next::before{border-color:transparent transparent transparent #fff;margin-left:-3px}
</style>
<div id="featuredbwidget"></div>
<link href='https://fonts.googleapis.com/css?family=Abel' rel='stylesheet' type='text/css'/>
<script src="http://ajax.googleapis.com/ajax/libs/jquery/1.8.0/jquery.min.js" type="text/javascript"></script>
<script type='text/javascript'>
//<![CDATA[
featuredbwidget({
listURL:"https://helplogger.blogspot.com/",
featuredNum:9,
listbyLabel:false,
feathumbSize:350,
interval:3000,
autoplay:true,
featuredID:"#featuredbwidget"
});
function featuredbwidget(a){(function(e){var h={listURL:"",featuredNum:3,featuredID:"",feathumbSize:300,interval:5000,autoplay:false,loadingFeatured:"nextfeatured",pBlank:"https://blogger.googleusercontent.com/img/b/R29vZ2xl/AVvXsEhRk0fnCEmbvQWtK8lbcNQcje3H-WwF5NjFtDCcdCyIicHvxzNoc2EMwa3NY-KkDEhbQ8BuCIXCEtxozghce9g13Qm4iQunE9E15ZOimkAZh4nvYxPYjZVWKGvp0iMNMS_rATvWvFIt-y0/s500/no-image.png",byMonth:["Jan","Feb","Mar","Apr","May","Jun","Jul","Aug","Sep","Oct","Nov","Dec"],listbyLabel:false};h=e.extend({},h,a);var g=e(h.featuredID);var d=h.featuredNum*200;g.html('<div class="featslider"><ul class="featured-widget-list"></ul><div class="feat-buttons"><a href="#" class="feat-prev">Prev</a><a href="#" class="feat-next">Next</a></div></div>');var f=function(w){var q,k,m,u,x,p,t,v,r,l="",s=w.feed.entry;for(var o=0;o<s.length;o++){for(var n=0;n<s[o].link.length;n++){if(s[o].link[n].rel=="alternate"){q=s[o].link[n].href;break}}if("media$thumbnail" in s[o]){u=s[o].media$thumbnail.url.replace(/\/s[0-9]+\-c/g,"/s"+h.feathumbSize+"-c")}else{u=h.pBlank.replace(/\/s[0-9]+(\-c|\/)/,"/s"+h.feathumbSize+"$1")}k=s[o].title.$t;r=s[o].published.$t.substring(0,10);m=s[o].author[0].name.$t;x=r.substring(0,4);p=r.substring(5,7);t=r.substring(8,10);v=h.byMonth[parseInt(p,10)-1];l+='<li><a href="'+q+'"><div class="featuredbg"></div><img class="featuredthumb" src="'+u+'"/><h5>'+k+'</h5></a><div class="featured-meta"><span class="fdate"><span class="fday">'+t+'</span> <span class="fmonth">'+v+'</span> <span class="fyear">'+x+'</span></span> - <span class="fauthor">'+m+"</span></div></li>"}e("ul",g).append(l).addClass(h.loadingFeatured)};var c=function(){e(h.featuredID+" .feat-next").click()};var b=function(){e.get((h.listURL===""?window.location.protocol+"//"+window.location.host:h.listURL)+"/feeds/posts/summary"+(h.listbyLabel===false?"":"/-/"+h.listbyLabel)+"?max-results="+h.featuredNum+"&orderby=published&alt=json-in-script",f,"jsonp");setTimeout(function(){e(h.featuredID+" .feat-prev").click(function(){e(h.featuredID+" .featslider li:first").before(e(h.featuredID+" .featslider li:last"));return false});e(h.featuredID+" .feat-next").click(function(){e(h.featuredID+" .featslider li:last").after(e(h.featuredID+" .featslider li:first"));return false});if(h.autoplay){var i=h.interval;var j=setInterval(c,i);e(h.featuredID+" .featslider li:first").before(e(h.featuredID+" .featslider li:last"));e(h.featuredID+" .featslider").hover(function(){clearInterval(j)},function(){j=setInterval(c,i)})}e("ul",g).removeClass(h.loadingFeatured)},d)};e(document).ready(b)})(jQuery)};
//]]>
</script>

Automatic Featured Posts Slider Settings

  • listURL - replace "https://helplogger.blogspot.com/" with your blog URL
  • featuredNum - add the number of posts to display in the slider
  • listbyLabel - if you want to display posts by category / label, such as the tag fashion, it will be written as listbyLabel: "fashion"
  • feathumbSize - the size or dimension of the image in pixels
  • interval - time taken to change the slides position in milliseconds
  • autoplay - replace true with false if you don't want the slides to change automatically.
3. Once you are done with the settings, click the 'Save' button.

Now, this code is for a slider widget which means that instead of just a random list of Featured Posts, you get to display them with images (if they have one) and you can include effects too. You can also control how many slides should be shown because it just wouldn't be prudent to feature your entire oeuvre, right?

Plus, being a slider widget, it adds a nice little visual to your site. And we all know how visuals are important in enticing people to stay, don't we?

Tuesday, 22 September 2015

5 Best Popular Posts Widgets for Blogger

If you're using Blogger as the platform for your personal or business blog, you're probably looking for ways to customize it and make it your own. This way, you'll make your webpages unique and eye-catching and ensure they'll stand out from the many other pages on the internet. You'll also grab the attention of your target market, encourage them to browse through your blog and become your loyal readers and followers.

Fortunately, there are lots of ways to personalize your Blogger blog, and one of these is to customize your Popular Posts widget. Haven't installed this yet? Don't worry since putting it in your blog easy.
popular posts widget for blogger

Adding the Popular Posts Widget for Blogger

Just click on your blog title, access the "Layout" menu, click "Add a Gadget" and choose "Popular Posts". A window will appear asking you to configure the widget by choosing which posts you'll feature (e.g. those that were most viewed in the past 7 days or 30 days or from the beginning of your blog). You'll also be asked to choose how many posts you'll feature in your Popular Posts section and select if you'll show the post title only or along with the image thumbnail and/or the snippet. (Remember that each widget style has different requirements, so follow the styles and instructions carefully to find out if you need the snippet and image thumbnail or not).

Configuring Popular Posts Widget for Blogger

Once you've followed these instructions, you'll get to see the basic version of the Popular Posts Widget for Blogger in your blog. You can stick with this if it matches your blog design but, if it sticks out like a sore thumb or doesn't suit your taste, there's no need to fret since you can personalize it. You can choose from the following styles - see the demo blog:

Popular Posts Style 1 - Box within a box

This is an interesting widget style since it uses your snippet and image thumbnail in a unique way. Your snippet is written in opaque text and placed in a small transparent box. This, in turn, is placed in a bigger rectangular box, wherein your image thumbnail is used as a background. Choosing this Popular Posts Widget for Blogger can be a great option if you want to brighten up your blog and grab the attention of readers with your colorful photos.

popular posts widget for blogger

CSS code:
<style type='text/css'>
.sidebar .PopularPosts ul{margin:0;padding:0;}.sidebar .PopularPosts ul li{list-style:none !important;padding:0 !important;margin-bottom:10px;}.sidebar .PopularPosts .item-thumbnail{height:190px;margin:0;overflow:hidden;width:100%;}.sidebar .PopularPosts .item-title{position: relative;}.sidebar .PopularPosts img{height:auto;width:100%;padding:0;}.sidebar .PopularPosts .item-title a{color: #FFFFFF;font:20px Oswald;text-transform:uppercase;padding:10px;position:absolute;right:0;left:0px;margin:0px auto;text-align:center;text-decoration:none;top:40px;width:60%;height:26px;overflow:hidden;z-index:2;}
.sidebar .PopularPosts .item-snippet{background:rgba(0, 0, 0, 0.35);border-top:6px solid rgba(0, 0, 0, 0.1);border-bottom:6px solid rgba(0, 0, 0, 0.1);color:#FFFFFF;left:0px;right:0px;margin:0px auto;padding:65px 10px 10px;position:absolute;font:13px 'Times New Roman',Times,FreeSerif,serif;text-align:center;top:35px;width:60%;z-index:1;}.sidebar .PopularPosts .item-content{position:relative;}
</style>

Popular Posts Style 2 - Large thumbnails with small post titles underneath

This uses the same code as the basic Blogger Popular Posts Widget with a few tweaks. Popularized by well-known blogs, this style is eye-catching because it focuses on pictures, which don't only summarize the posts' content but also add visual drama to the entire page. This is particularly useful for blogs that focus on clothes, makeup, art and other topics that highly depend on visual presentation to better express ideas.
popular posts widget for blogger
CSS code:
<style type='text/css'>
.sidebar .PopularPosts ul{counter-reset:popularcount;margin:0;padding:0;}.sidebar .PopularPosts ul li{width:100%;list-style:none !important;padding:0 !important;margin-bottom:20px;position:relative;border:0;text-align:center;}.sidebar .PopularPosts .item-thumbnail a{clip: auto;display:block;height:auto;height:120px;}.sidebar .PopularPosts .item-thumbnail{width:100%;height:120px;overflow:hidden;position:relative;margin-bottom:15px;}.sidebar .PopularPosts .item-thumbnail::before{background:rgba(0, 0, 0, 0);border-bottom:29px solid #fff;border-left:29px solid transparent;border-right:29px solid transparent;bottom:0px;content:&quot;&quot;;height:0;width:0px;left:0px;right:0px;margin-left:auto;margin-right:auto;position:absolute;z-index:3;}.sidebar .PopularPosts .item-thumbnail:after{color:#000;content:counter(popularcount, decimal);counter-increment:popularcount;font:13px &quot;Times New Roman&quot;,Times,FreeSerif,serif;list-style-type:none;position:absolute;bottom:0;margin:0px auto;left:0px;right:0px;z-index:4;}.sidebar .PopularPosts .item-thumbnail img{position:relative;width:100%;height:auto;padding:0;}.sidebar .PopularPosts .item-title{font:15px &#39;Oswald&#39;, sans-serif;text-transform:uppercase;margin:0px auto;padding-bottom:10px;border-bottom:1px solid #000;}.sidebar .PopularPosts .item-title a{color:#000;text-decoration:none;}.sidebar .PopularPosts .item-snippet{padding:10px 15px;font:13px &quot;Times New Roman&quot;,Times,FreeSerif,serif;}
</style>

Popular Posts Style 3 - Colorful boxes

If your blog needs a pop of color, this is the right choice for you. This widget style presents your Popular Posts in several boxes that feature a thumbnail image and have bright, eye-catching shades like light green, ocher yellow and vivid orange. Each box has a different color, and you can add up to four boxes.

popular posts widget for blogger

CSS code:
<style type='text/css'>
.sidebar .PopularPosts ul{padding:0;margin:0;}.sidebar .PopularPosts .item-thumbnail a{clip:auto;display:block;height:auto;overflow:hidden;}.sidebar .PopularPosts .item-thumbnail{width:130px;height:130px;border-right:5px solid #fff;margin:0px 10px 0px 0px !important;position:relative;}.sidebar .PopularPosts .item-thumbnail img{position:relative;height:auto;width:100%;padding:0;}.sidebar .PopularPosts ul li{float:left;margin-bottom:5px;max-height:130px;min-width:250px;overflow:hidden;}.sidebar .PopularPosts ul li:first-child{background:#D9EDF7;}.sidebar .PopularPosts ul li:first-child + li{background:#F2DEDE;}.sidebar .PopularPosts ul li:first-child + li + li{background:#DFF0D8;}.sidebar .PopularPosts ul li:first-child + li + li + li{background:#FFEEBC;}.sidebar .PopularPosts ul li:first-child + li + li + li + li{background:#E0E0E0;}.sidebar .PopularPosts .item-title{font:13px &#39;Oswald&#39;, sans-serif;text-transform:uppercase;padding:10px 5px 10px;}.sidebar .PopularPosts .item-title a{color:#000;text-decoration:none;}.sidebar .PopularPosts .item-snippet{font:13px &quot;Times New Roman&quot;,Times,FreeSerif,serif;padding-right:5px;}.sidebar .PopularPosts .widget-content ul li{padding:0px 5px 0px 0px!important;}
</style>

Popular Posts Style 4 - Grid layout

Just like the large-picture widget style, the grid layout is an excellent option if you want to showcase your pictures or if your blog depends on visual information. However, the title of your posts won't be included in the layout, so readers will have to hover their mouses on the images to read the titles.

popular posts widget for blogger

CSS code:
<style type='text/css'>
.sidebar .PopularPosts ul{padding:0;}.sidebar .PopularPosts ul li:first-child{width:100%;max-height:100%;opacity:0.9;}.sidebar .PopularPosts ul li:nth-child(even){margin-right:2%;}.sidebar .PopularPosts ul li{-moz-box-sizing:border-box;-webkit-box-sizing:border-box;box-sizing:border-box;position:relative;padding:0px !important;width:49%;max-height:120px;opacity:0.4;overflow:hidden;float:left;margin-bottom:2%;-webkit-transition: all 0.5s ease 0s;-moz-transition:all 0.5s ease 0s;-ms-transition:all 0.5s ease 0s;-o-transition:all 0.5s ease 0s;transition:all 0.5s ease 0s;}.sidebar .PopularPosts ul li:hover{opacity:1;}.sidebar .PopularPosts .item-thumbnail{margin:0;width:100%;line-height:0;}.sidebar .PopularPosts ul li img {-moz-box-sizing:border-box;-webkit-box-sizing:border-box;box-sizing: border-box;width:100%;height:auto;padding:0;}.sidebar .PopularPosts .item-content:hover .item-title a,.sidebar .PopularPosts .item-thumbnail-only:hover .item-title a{visibility:visible;opacity:1;}.sidebar .PopularPosts .item-title a{color:#fff;background:rgba(0, 0, 0, 0) linear-gradient(to bottom, rgba(0, 0, 0, 0) 0%, rgba(0, 0, 0, 0.93) 100%, rgba(0, 0, 0, 0.85) 100%);text-decoration:none;position:absolute;text-align:center;font:13px &#39;Oswald&#39;, sans-serif;left:0;right:0;bottom:0%;padding:100px 10px 10px;opacity:0;visibility:hidden;}.sidebar .PopularPosts .item-snippet{display:none;}
</style>

Popular Posts Style 5 - Numbered posts

If you love numbered lists, or if you'd like to make your blog more organized, this can be the perfect option. By using the code for this widget style, your Popular Posts will be automatically numbered and will feature clean, minimalistic boxes that include your snippet and image thumbnail.

popular posts widget for blogger

CSS code:
<style type='text/css'>
.sidebar .PopularPosts ul{counter-reset:popularcount;margin:0;padding:0;}.sidebar .PopularPosts ul li{float:left;max-height:130px;min-width:250px;position:relative;}.sidebar .PopularPosts .item-thumbnail::after{color:rgba(255,255,255, 0.63);content:counter(popularcount, decimal);counter-increment: popularcount;font:70px &#39;Oswald&#39;, sans-serif;list-style-type:none;position:absolute;left:5px;top:-5px;z-index:4;}.sidebar .PopularPosts .item-thumbnail::before{background:rgba(0, 0, 0, 0.3);bottom:0px;content:&quot;&quot;;height:100px;width:100px;left:0px;right:0px;margin:0px auto;position:absolute;z-index:3;}.sidebar .PopularPosts .item-thumbnail a{clip:auto;display:block;height:auto;overflow:hidden;}.sidebar .PopularPosts .item-thumbnail{width:100px;height:100px;margin:0px 10px 0px 0px !important;position:relative;}.sidebar .PopularPosts .item-thumbnail:hover:before{display:none;}.sidebar .PopularPosts .item-thumbnail img{position:relative;padding-right:0px !important;height:auto;width:100%;}.sidebar .PopularPosts .item-title{font:13px &#39;Oswald&#39;, sans-serif;text-transform:uppercase;padding:0px 5px 10px;}.sidebar .PopularPosts .item-title a{color:#000;text-decoration:none;}.sidebar .PopularPosts .item-snippet{font:13px &quot;Times New Roman&quot;,Times,FreeSerif,serif;}.sidebar .PopularPosts .widget-content ul li{padding:0px 5px 0px 0px !important;}.sidebar .PopularPosts .item-content{padding:5px 0px;border-bottom:1px dotted #dedede;overflow:hidden;height:100px;position:relative;}
</style>
These are just some of the widget styles you can choose from. When you've picked a style you want, make sure to copy its CSS code. Once you do so, go to your blog, click "Theme" on the left side and select "Edit HTML" under the template preview.

These next codes need to be pasted above the "</head>" or "</body>" tags, so check the instruction to know exactly where you need to put the code.

Adding the CSS

When the template editor has opened, click anywhere inside the code area and hit CTRL + F or Command F to search the following tag:
</head>
Just ABOVE the </head> tag, copy-paste the CSS code of one of the styles above.


Important: If the Popular Posts widget is located in the footer of your blog, remove the .sidebar class found in the CSS code in order to make it work.

Please note that most of the styles are using the 'Oswald' font which you need to add to your template's code as well.

So, search for this tag:
<head>
... and just BELOW it, add this line:
<link href='https://fonts.googleapis.com/css?family=Oswald:400,700' rel='stylesheet' type='text/css'/>

Adding the JavaScript

These styles also require using a script in order to resize the popular posts image / thumbnail and trim the post snippet and title. To add the JavaScript code, search the </body> tag and paste the following script just above it:
<script src='//ajax.googleapis.com/ajax/libs/jquery/1.11.1/jquery.min.js'/>
<script type='text/javascript'>
//<![CDATA[
$(".popular-posts img").attr("src",function(t,s){return s.replace("/w72-h72-p-k-no-nu/","/s350-c/")}),$(".popular-posts ul li .item-snippet").each(function(){var t=$(this).text().substr(0,60),s=t.lastIndexOf(" ");s>10&&$(this).text(t.substr(0,s).replace(/[?,!\.-:;]*$/,"..."))}),$(".popular-posts ul li .item-content a").each(function(){var t=$(this).text().substr(0,60),s=t.lastIndexOf(" ");s>=6&&$(this).text(t.substr(0,s).replace(/[?,!\.-:;]*$/,"..."))});
//]]>
</script>
Note: if you have already the jQuery library in your template, remove the line in red.

After you have added all the codes in the right place, press the "Save theme" button to save the changes.

That's it!

The five Popular Posts widgets for Blogger featured today are all great solutions for adding a popular post section to your blog. They all have different appearance for determining what makes a post popular, but the end result is the same: visitors are always one click away from your best content. Try some of these styles, find your favorite, and see how it impacts the performance of your blog.

Saturday, 5 September 2015

How to Add a Gadget Above the Header in Blogger

Blogger's Dashboard feature allows users to adjust the appearance of their blog with a few clicks of the mouse. Within the Dashboard, there is a " Layout " feature which lets bloggers add Gadgets such as RSS feeds, traffic counters, embedded media to their sites, adding beautiful widgets, showing notifications, pictures, etc.

Mainly by default in Blogger "Layout", you can see several places to add a Gadget. Such as:-

Right below the Title and above the posts, The Sidebars, The Footer, etc.

It is easy to identify them because all of them have a big linked title yelling " Add a Gadget ". Click on the link and you can choose the gadgets you want to add. After adding them, you can drag and rearrange them. You can also drag one from the side bar to the footer, above the post, below the post, etc.

Now, by editing your Blog's HTML code, you can allow for the addition of a Gadget above the header. Let's see some steps adding " Add a Gadget " icon above the header of your Blog.

Adding a Gadget Above the Header in Blogger

Step-1. Log into your Blogger account. Once logged in, you will be transported to your Dashboard.
Step-2. Select "Template", then click "Edit HTML".
Step-3. Scroll through the HTML code within the text box and locate this fragment:
<div id="header-wrapper">
Or you can press Ctrl+F and search below;
<div class="header-wrapper">
Step-4. Now you will find the detailed fragment. Just beneath the line <<div class='header-wrapper'> you will see below;


<b:section class='header' id='header' maxwidgets='1' showaddelement='no'> 
From above change maxwidgets='1' to maxwidgets='5'.
Step-5. Just next to maxwidgets - in showaddelement='no', change 'no' to 'yes'.
Step-6. This is an important step - Hit the "Save" button, lol.
Step-7. After saving return to your Dashboard. Select "Layout". Above your header, there will be a link titled "Add a Gadget". Click this and add the Gadget of your choice.
Step-8. Save your changes and view your blog to ensure the widget was added correctly.

Hope this tutorial helped you. If you like our posts, share to your friends and comment below if you have any concern. Do not forget to subscribe us.

Enjoy !

Friday, 4 September 2015

How to List the Post Titles of all POSTS from your Blogger/Blogspot Blog [Tutorial]

In this Tutorial, we will show you how to list the Titles of your blog's more than 500 recent posts. If you are looking for an alternative to Blogger's gadget, then this might be very useful to you.

As we experienced, to retrieve the posts of a blog, you can use the URL like this:

http://***.blogspot.com/feeds/posts/default?alt=json&callback=mycallbackfunc&start-index=1&max-results=100

However, it does not work if your blog has more than 500 posts and you want to list them all. Our experiment showed that even you supplied a big number like (e.g.-10000) for max results, only up to 500 posts would return. To retrieve the list of more than 500 posts, we need a loop to do that. The following is how we implemented it for our several blogs.
We can also label all posts in a single page in another way, i.e. SITEMAP/Table Of Contents shows post titles with separated labels and a New! text with recently published posts.
Go through this link How to create a Sitemap/Table of Contents in Blogger to create a page of All Posts Titles for your information/use.
Click here >> SITEMAP to see our Sitemap / Table Of Contents.
Now lets come to the point,

Code goes here :-
<div><ul id="postList12"></ul></div>
<script type="text/javascript">
var startIndex = 1;
var maxResults = 100;
function sendQuery12()
{
var scpt = document.createElement("script");
scpt.src = "/feeds/posts/summary?alt=json&callback=processPostList12&start-index=" + startIndex + "&max-results=" + maxResults;
document.body.appendChild(scpt);
}
function processPostList12(root)
{
var elmt = document.getElementById("postList12");
if (!elmt)
return;
var feed = root.feed;
if (feed.entry.length > 0)
{
for (var i = 0; i < feed.entry.length; i++)
{
var entry = feed.entry[i];
var title = entry.title.$t;
for (var j = 0; j < entry.link.length; j++)
{
if (entry.link[j].rel == "alternate")
{
var url = entry.link[j].href;
if (url && url.length > 0 && title && title.length > 0)
{
var liE = document.createElement("li");
var a1E = document.createElement("a");
a1E.href = url;
a1E.textContent = title;
liE.appendChild(a1E);
elmt.appendChild(liE);
}
break;
}
}
}
if (feed.entry.length >= maxResults)
{
startIndex += maxResults;
sendQuery12();
}
}
}
sendQuery12();
</script>
Now you can put above code in two different ways anywhere in your blogger/blogspot blog. We would recommend to put the code in sidebars - left/right, that's the first way and you can put code in a html page which we can used it as a Sitemap of a blog or Archive or List of All post in a Single page.
Lets see how we can insert above given code in blogger/blogspot blog.

First Method: Putting the List in a Gadget

Inserting code in sidebars - left right, of a Blog.
Step:1. Go to Dashboard>>Layout
Step:2. Select add a Gadget Link
Step:3. Select HTML/Javascript gadget
Step:4. Enter the Title of your Widget, e.g. All Posts List
Step:5. Copy above code and paste the code inside the content box
Step:6. Now save and view your blog.

Second Method: Putting the List in a Page

Inserting code in a Page.
Step:1. Go to Dashboard>>Layout
Step:2. Select Page
Step:3. To create page click on New Page button
Step:4. Click Edit HTML tab to switch to HTML mode
Step:5. Copy and paste the code into the Editor
Step:6. Now publish and view your post. The list should appear inside the page.

We hope this Tutorial helps you to align list of all posts in sidebars and in a page as a content of table/sitemap. If you think this helped, subscribe us.
Enjoy !

Sunday, 23 August 2015

How to Add Contact Form on a Blogger/Blogspot BLOG

If you have a BLOG/WEBSITE, it is very important that you should have a CONTACT page on it. It is how visitors, brands, and companies can reach you and it’s something that every blogger should have. If sharing your email address on your blog is not your cup of tea, a contact form can serve as an easy way for others to get in touch.

If you do go the route of using a contact form, we do suggest that you also include an email address on the Contact page as well. You can set one up specifically for your blog if you don’t want your personal email address to be seen. The reason we believe this is so important to offer both options is because most brands and companies will not fill out a contact form to contact you. They usually want to email you through their own email client and add you to their contacts.
To add a Contact Form to Blogger/Blogspot can be done with a few coding tweaks. Blogger/Blogspot actually offers a Free Contact Form for your blog, unfortunately they’ve made it as a Gadget and placed it on the Layout page so that it is added to your sidebar. It is shown below;

Not the ideal place for a contact form, if you ask us ! It should be situated on its own page. Here is how our contact form looks like - BLOGGER ADDICT's Contact Us Form.

So we would like to show you how to set it up in following simple Steps;

Adding a Contact Form to Blogger:

Step 1. – First, go to the Layout page in Blogger and click an Add a Gadget link. From the popup, choose More Gadgets in the sidebar and then select Contact Form and add it. It doesn’t matter where it ends up in your sidebar right now, since we are going to modify that and make it look nice!


Step-2. Now, visit your Dashboard to the left, Template >> Edit HTML page.

Click inside of the editor text area and press CTRL+F (CMD+F on a Mac) and in the search bar type ContactForm then hit enter.

It should find the code below. Click the black down arrow to the left of:

<b:widget id='ContactForm1' locked='false' title='Contact Form' type='ContactForm'>
then click the down arrow again beside:

<b:includable id='main'>
if they are not already open.

Step-3. You will see this code:

<b:includable id='main'>
 
<b:if cond='data:title != &quot;&quot;'>
    <h2 class='title'><data:title/></h2>
  </b:if>
  <div class='contact-form-widget'>
    <div class='form'>
      <form name='contact-form'>
        <p/>
        <data:contactFormNameMsg/>
        <br/>
        <input class='contact-form-name' expr:id='data:widget.instanceId + &quot;_contact-form-name&quot;' name='name' size='30' type='text' value=''/>
        <p/>
        <data:contactFormEmailMsg/> <span style='font-weight: bolder;'>*</span>
        <br/>
        <input class='contact-form-email' expr:id='data:widget.instanceId + &quot;_contact-form-email&quot;' name='email' size='30' type='text' value=''/>
        <p/>
        <data:contactFormMessageMsg/> <span style='font-weight: bolder;'>*</span>
        <br/>
        <textarea class='contact-form-email-message' cols='25' expr:id='data:widget.instanceId + &quot;_contact-form-email-message&quot;' name='email-message' rows='5'/>
        <p/>
        <input class='contact-form-button contact-form-button-submit' expr:id='data:widget.instanceId + &quot;_contact-form-submit&quot;' expr:value='data:contactFormSendMsg' type='button'/>
        <p/>
        <div style='text-align: center; max-width: 222px; width: 100%'>
          <p class='contact-form-error-message' expr:id='data:widget.instanceId + &quot;_contact-form-error-message&quot;'/>
          <p class='contact-form-success-message' expr:id='data:widget.instanceId + &quot;_contact-form-success-message&quot;'/>
        </div>
      </form>
    </div>
  </div>
  <b:include name='quickedit'/>
</b:includable>
Delete everything shown in red so you should just be left with:

<b:includable id='main'></b:includable>
Step-4. Now, do a new search, this time just look for ]]></b:skin> and paste the below provided code directly before it:

/*CUSTOM CONTACT FORM BY ICANBUILDABLOG.COM */
.contact-form-widget {
margin-left:auto;
margin-right:auto;
width: 600px;
max-width: 100%;
padding: 0px;
color: #000;
}
.fm_name, .fm_email {
float:left;
padding:5px;
width:48%
}
.fm_message {
padding:5px;
}
.contact-form-name, .contact-form-email {
width: 100%;
max-width: 100%;
margin-bottom: 10px;
height:40px;
padding:10px;
font-size:16px;
}
.contact-form-email-message {
width:100%;
max-width: 100%;
height:100px;
margin-bottom:10px;
padding:10px;
font-size:16px;
}
.contact-form-button-submit {
border-color: #C1C1C1;
background: ##f6f6f6;
color: #585858;
width: 20%;
max-width: 20%;
margin-bottom: 10px;
height:30px;
font-size:16px;
}
.contact-form-button-submit:hover{
background: ##f6f6f6;
color: #000000;
border: 1px solid #FAFAFA;
}
Step-5. Save the template then go to Pages to create a new Contact page if you haven’t got one already. In the page editor, switch to HTML mode and paste the following:

<div class="widget ContactForm" id="ContactForm1">
<div class="contact-form-widget">
<div class="form">
<form name="contact-form">
<div class="fm_name">
Your Name:
<input class="contact-form-name" id="ContactForm1_contact-form-name" name="name" size="30" type="text" value="" /></div>
<div class="fm_email">
E-mail Address *:
<input class="contact-form-email" id="ContactForm1_contact-form-email" name="email" size="30" type="text" value="" /></div>
<div style="clear:both">
</div>
<div class="fm_message">
Message *:
<textarea class="contact-form-email-message" cols="25" id="ContactForm1_contact-form-email-message" name="email-message" rows="5"></textarea>
<input class="contact-form-button contact-form-button-submit" id="ContactForm1_contact-form-submit" type="button" value="Submit" />
<div class="contact-form-error-message" id="ContactForm1_contact-form-error-message">
</div>
<div class="contact-form-success-message" id="ContactForm1_contact-form-success-message">
</div>
</div>
</form>
</div>
</div>
</div>
 
Step-6. Save your page and view your new contact form ! It should look like this, you can customize as your own:


Since this uses the Blogger Gadget interface, the emails sent using this form will be sent to the email associated with your account. You can change this email address in the Admin settings of your blog.

We hope this tutorial may have helped you in learning How to Add Contact Form on a Blogger/Blogspot BLOG. Share this tutorial with your friends and don't forget to subscribe us. Enjoy !

Sunday, 16 August 2015

Free Feedjit Live Traffic Feed For Blogger

Do you want to see where Traffic is coming from on your Blogger Blog (Blogspot Blog) ?

Live Traffic widget can help you to show visitor's Traffic flow.

So you can see in real time, WHO, FROM WHERE coming on your site and ON WHICH ARTICLE !!

Feedjit is a free tracking tool that tracks visitors to a blog in real time and identifies what pages are visited. In this Blogger tutorial you will learn how to add a Feedjit widget to your blog which will track where visitors originate from and what pages they viewed. Adding a Feedjit widget to your Blogger blog is easy and takes less than 5 minutes. This tutorial is suitable for all Blogger bloggers (Blogspot beginners).

Feedjit monitors traffic to your site and ranks it based on popularity and relevance against the traffic received by other Feedjit users in your local area. There is a choice of 4 different widgets: Live Traffic Feed, Live Traffic Map, Recommended Reading, and Page Popularity. Each of these widgets has different functions.
Feedjit Live Traffic Feed Widget for Blogger

Places a widget on your Blogger blog of the last 10 visitors. By clicking on the real time link you can actually view the last 50 or so visitors along with the keyword search phrase used to find your site. The Feedjit's Live Traffic Feed shows statistics in real-time about:


The city and country your visitors are in
The website they arrived from, if any
The page they visited on your website
Which external link they clicked to leave your site, if any
Feedjit Traffic Map

The Traffic Map widget places visitors to your site on a world map according to their physical location

Feedjit Recommended Reading
The Recommended Reading widget makes suggestions to visitors about what other blog posts they might be interested in based on general page popularity

Feedjit Page Popularity
The Page Popularity widget lists the 10 most popular pages that have been accessed by visitors on that day.

How to Add a Feedjit Live Traffic Feed Widget (Gadget) to Blogger:

Step-1. Visit Feedjit
Step-2. Select Live Traffic Feed.
Step-3. Now Click on Select a color scheme, Select widget width (pixels), manage Number of Visitors feedjit shows and Customize your Color scheme. This will allow you to enter colors to match the theme of your blog, Just edit the color of your need.

And then just select Blogger Blog from Drop down menu to install Feedjit on your Blog and Click on GO button. You will see below screenshot. Now you will have two steps installation process. Step-1, Clicking button on Step-1, it will take you to Sign in to BLOGGER and Step-2, If you are already signed in and just click on step-2. Installation is done.
If above doesn't work, you can sign in Blogger/Blogspot and follow the instructions:

Step-1. Navigate to Layout > Page Elements in your blog if that page is not already open
Step-2. Select Add a Gadget in the Sidebar and then HTML/Javascript
Step-3. Paste the code by placing the mouse in the box and right clicking and selecting paste
<script type="text/javascript" src="http://feedjit.com/serve/?vv=1515&amp;tft=3&amp;dd=0&amp;wid=&amp;pid=0&amp;proid=0&amp;bc=FFFFFF&amp;tc=000000&amp;brd1=012B6B&amp;lnk=135D9E&amp;hc=FFFFFF&amp;hfc=2853A8&amp;btn=C99700&amp;ww=200&amp;went=10"></script><noscript><a href="http://feedjit.com/">Live Traffic Stats</a></noscript>
Step-4. Save the widget and then using the drag and drop feature of Blogger move it to your desired location.

Step-5. Note HTML/Javascript widgets are best placed after your other widgets for faster loading.
Save Template

Click on View Blog to view your newly created Feedjit widget

Click on Options in the Feedjit widget and then Ignore My Browser otherwise the widget will record your visit each time you view your blog. The option on the widget will now change to Stop Ignoring Me which you can reverse by clicking on the link again.If you use more than one browser you will need to tell Feedjit to ignore you for each browser.

This Blogger tutorial has discussed how to add a Feedjit Live Traffic Feed widget, gadget or button to Blogger to track where visitors are being directed from and what posts they are most interested in. A Feedjit Live Traffic Feed will help you learn about the visitors to your blog and what search phrase they used to arrive. To add a Feedjit Live Traffic Feed widget to Blogger is simple and takes less than 2 minutes to install.

Enjoy! If you like Our Post just follow us and Subscribe.

Friday, 14 August 2015

How to make an automatic Carousel slider based on labels?

Welcome to all, we will discuss how to create automatic Carousel slider based on your labels in blogger. All you have to do is only replace with your own label and the slider will work based on the label that you add in Edit HTML template. This widget "carousel slider" we made is very simple and we only used jCarousellite script without adding easing effects or mousewheel.

Step-1. You must login to blogger with your account.
Step-2. After that select the blog that you want to add slider.
Step-3. Go to the template >> Edit HTML and check the expand widget templates, don't forget to backup your template first.
Step-4. And then place this following codes above ]]></b:skin>:
#carousel{width:950px;height:185px;margin-bottom:0px;position:relative;display:block}
#carousel .container{position:absolute;left:49px;width:895px;height:185px;overflow:hidden;background:url(https://blogger.googleusercontent.com/img/b/R29vZ2xl/AVvXsEgpTGA4AlHNe7wyjxS6DnuUDj0L9citFop5a_b_Br_T80n_cnubC79896GzCq3Z50q0w3gfO4LdXcLSEg94y6Wd6fBKgL9IXG6ydz6QygbpOj7FecTF63t_6COOxdbGKCDn5n1-Sd-s1os/s1600/scroller-bg.png) repeat center}
#carousel #previous_button{position:absolute;width:49px;height:185px;background:url(https://blogger.googleusercontent.com/img/b/R29vZ2xl/AVvXsEjjsXrcGXeVsHV6ZljFsh4jl3TBm5B5sXdoGCS7ynRA5q19E5GydoKEbbOI3pfN-6w9UmJrDGoY_lXc93fOU6AIZFGrBwKZxeVZdmlJBh9qD1kxlnP2KroXyejeFo2L_S6ueiIa7yBUCEs/s1600/prev.png) center;z-index:100;cursor:pointer;border-right:1px solid #ccc}
#carousel #previous_button:hover{background:url(https://blogger.googleusercontent.com/img/b/R29vZ2xl/AVvXsEjdFe2e8PU8JBd7X_ksc3yhnowkYAsw_HaG5TCZ6-uFR71dhsR8A3G4RpFza-n9enBNrwejcTGdswJ0cr1RfSc_g3t8GrFcElfjzyw2dEiSJX3n6ManGJKdNYu1kXBS5X9kxnNa1OFYEPc/s1600/prev.png) center}
#carousel #next_button{position:absolute;right:0;width:49px;height:185px;background:url(https://blogger.googleusercontent.com/img/b/R29vZ2xl/AVvXsEhpWUmBNuDI7a2hgNLt9YC6d9tgK_HzCNmh5YWVUQTzz7XRiXmTow9_pIDYeZV0KTEeuc6u3t4x3j_yjbKw1Yt8K4zXMyxJwVOodfATEVSdxrvgP-bTFXhrW3n-58edH0UcL8ntY8KB-DA/s1600/next.png) center;z-index:100;cursor:pointer;border-left:1px solid #ccc}
#carousel #next_button:hover{background:url(https://blogger.googleusercontent.com/img/b/R29vZ2xl/AVvXsEhqHkOgjLJ-olo-7ytey4cvVJQ0YJMcvyuio1XPt0Nfh2kd5B9kqhDgT6nDeYx77ezOPFtRrJoA-7YMQNiyNWR4J2ndIXVRP6zJ4lxbv7jKfbW9gfY6KKH9NpLFbPx7hvxaxR08t9b3Cbc/s1600/next.png) center}
#carousel ul{width:100000px;position:relative;margin-top:10px}
#carousel ul li{background:#fff url(https://blogger.googleusercontent.com/img/b/R29vZ2xl/AVvXsEi2VdPNlP1d-vZ3r1CBhOyQFy5ldVXtEg1bTE0WPFfSMcP-4NA2j7lTuw4Ff7QBYLQiAC8a5qnRwm2FMmlTQeZeWjUQQ8EYXOqzz51jwRQdB-C9jspueikow6x8wJ51kJRE3cMhGnNNjL4/s1600/main.png) repeat-x top;display:inline;float:left;text-align:center;font-weight:700;font-size:.9em;line-height:1.2em;border:1px solid #ccc;width:145px;height:150px;margin:0 4px 20px 7px;padding:6px;-webkit-border-radius:4px;-moz-border-radius:4px;border-radius:4px;}
#carousel ul li:hover{filter:alpha(opacity=75);opacity:.75;}
#carousel ul li a.slider_title{color:#222;display:block;margin-top:5px}
#carousel ul li a.slider_title:hover{color:#cd1713}
#carousel a img{display:block;background:#fff;margin-top:0}
Look at some codes with the red color above, that's the width and height of the slider in the demo that we made, change with your own size depend on your template width.

Step-5. Still in Edit HTML, add this following code above </head> :
<script src='http://ajax.googleapis.com/ajax/libs/jquery/1.7.2/jquery.min.js' type='text/javascript'/>
<script src='https://masolis-javascript.googlecode.com/svn/trunk/carousellite.js' type='text/javascript'/>
<script type='text/javascript'>
//<![CDATA[
imgr = new Array();
imgr[0] = "https://blogger.googleusercontent.com/img/b/R29vZ2xl/AVvXsEiK98kOT7EEOPhbfNqf92ZXpV1FAoa9ZcwkCCpmT_1l2U7TDAq8oN_ROyAI6HFXAhIhDPi5xgpSY4PuG_J9byhsKfndGtkrHwMbCrpvqw6yxXTgivyRO8pckjjJNRNY9XOWPR2qL4Yebyg/s1600/no+image.jpg";
showRandomImg = true;
aBold = true;
summaryPost = 140;
summaryTitle = 25;
numposts1 = 15;
label1 = "news";
function removeHtmlTag(strx,chop){
var s = strx.split("<");
for(var i=0;i<s.length;i++){
if(s[i].indexOf(">")!=-1){
s[i] = s[i].substring(s[i].indexOf(">")+1,s[i].length);
}
}
s = s.join("");
s = s.substring(0,chop-1);
return s;
}
function showrecentposts(json) {
j = (showRandomImg) ? Math.floor((imgr.length+1)*Math.random()) : 0;
img = new Array();
document.write('<ul>');
for (var i = 0; i < numposts1; i++) {
var entry = json.feed.entry[i];
var posttitle = entry.title.$t;
var pcm;
var posturl;
if (i == json.feed.entry.length) break;
for (var k = 0; k < entry.link.length; k++) {
if (entry.link[k].rel == 'alternate') {
posturl = entry.link[k].href;
break;
}
}
for (var k = 0; k < entry.link.length; k++) {
if (entry.link[k].rel == 'replies' && entry.link[k].type == 'text/html') {
pcm = entry.link[k].title.split(" ")[0];
break;
}
}
if ("content" in entry) {
var postcontent = entry.content.$t;}
else
if ("summary" in entry) {
var postcontent = entry.summary.$t;}
else var postcontent = "";
postdate = entry.published.$t;
if(j>imgr.length-1) j=0;
img[i] = imgr[j];
s = postcontent ; a = s.indexOf("<img"); b = s.indexOf("src=\"",a); c = s.indexOf("\"",b+5); d = s.substr(b+5,c-b-5);
if((a!=-1)&&(b!=-1)&&(c!=-1)&&(d!="")) img[i] = d;
//cmtext = (text != 'no') ? '<i><font color="'+acolor+'">('+pcm+' '+text+')</font></i>' : '';
var month = [1,2,3,4,5,6,7,8,9,10,11,12];
var month2 = ["Jan","Feb","Mar","Apr","May","Jun","Jul","Aug","Sep","Oct","Nov","Dec"];
var day = postdate.split("-")[2].substring(0,2);
var m = postdate.split("-")[1];
var y = postdate.split("-")[0];
for(var u2=0;u2<month.length;u2++){
if(parseInt(m)==month[u2]) {
m = month2[u2] ; break;
}
}
var daystr = day+ ' ' + m + ' ' + y ;
var trtd = '<li class="car"><div class="thumb"><a href="'+posturl+'"><img width="145" height="100" class="alignnone" src="'+img[i]+'"/></a></div><p><a class="slider_title" href="'+posturl+'">'+posttitle+'</a></p></li>';

document.write(trtd);
j++;
}
document.write('</ul>');
}
//]]>
</script>
Notes: See the red URL script above, that's the latest series jQuery.min.js script code that we use to made this slider. And if you've found jQuery.min.js although with the different series in your template, no longer need to insert the red codes. There must be only one jQuery.min.js in your template, it is up to the serial number, if possible the latest version.
Blue code (15) : amount of your post that display in the slider. news was a label that I choose to show up in slider.

Step-6. Next step you must call the slider to appear in your blog. Place this following code above <div id='main-wrapper'>:
<b:if cond='data:blog.pageType != &quot;item&quot;'>
<div id='carousel'>
<div id='previous_button'/>
<div class='container'>
<script>
document.write(&quot;&lt;script src=\&quot;/feeds/posts/default/-/&quot;+label1+&quot;?max-results=&quot;+numposts1+&quot;&amp;orderby=published&amp;alt=json-in-script&amp;callback=showrecentposts\&quot;&gt;&lt;\/script&gt;&quot;);
</script>
<div class='clear'/>
</div>
<div id='next_button'/>
</div>
<script type='text/javascript'>
(function($) { $(document).ready(function(){
$(&quot;#carousel .container&quot;).jCarouselLite({
auto:4000,
scroll: 1,
speed: 800,
visible: 5,
start: 0,
circular: true,
btnPrev: &quot;#previous_button&quot;,
btnNext: &quot;#next_button&quot;
});
})})(jQuery)
</script>
</b:if>
You can also put the following codes in the bottom of your navigation menu or you can also placed in your footer side, that's depend on your needs.

Step-7. The final step, 'Save templates' and see the results.

Subscribe Us or like us on Facebook if this tutorial really helped you. Don't miss to apply this automatic Carousel Slider in your blogger template. If you have any queries, just drop the comment in comment section. Enjoy!

How to Remove “Powered By Blogger” Attribution Widget ?

Today we can give you the easiest method that “How to Remove Powered By Blogger Attribution Widget from Blogger/Blogspot ?”. This is not a Difficult Stuff that How to Remove Powered by Blogger Attribution widget from Blogspot. We have seen many bloggers who were tired of/irritated from this because it is seen on the Blogger label that cause blog not Looking Professional. That is why they want to Remove it. One More thing to remember, In Blogger Layout the “remove” option is disable by default in all blogger templates. But now in Templates you can Remove this Widget by your Self. Lets do some practice guys:

Remove "Powered By Blogger" Attribution Widget ?

Step-1. Firstly Open you Blogger Account and Choose that Blog you want to Remove the Attribute Widget.

Step-2. Now Go to Template >> HTML In this Section you see “Jump to Widget” Option Click on it and Choose “Attribution1″ Widget and it will automatically Point to that Line.

Step-3. Now Press CTRL+F and Search for this Below Line.<b:widget id=’Attribution1′ locked=’true’ title=” type=’Attribution’>

Step-4. Now, Time to remove This. Just Replace ‘true’ with ‘false’ Like we Demonstrate in Above Screenshot.

Step-5. After this Your Code looks Like : <b:widget id=’Attribution1′ locked=’false’ title=” type=’Attribution’>.

Step-6. Save Your Template and Go To Blogger Dashboard >> Layout.

Step-7. See the Attribute Widget in Layout and Click Edit and Now Remove Option will Appear in Attribute Widget. Simply Click On Remove Button and remove Your “Powered By Blogger” Attribution Widget.

Now Click on View and Preview your Blog. Now you notice that “Powered by Blogger” Attribution is Removed. It is mainly set by Blogger in Default and in Disable Remove Permission for this Widget.

If this Article is Helpful for you, Please subscribe and share you Experience Below in Comments.

How to create Random posts widget with image thumbnails and snippets for Blogger

You know that Visitors to your website is very important. When your blog has too many posts, visitors don't always have much time or desire to through all the posts written there in order to make an idea of the blogs content. So, an advance Random Posts widget that will allow visitors to find content more easily could be really useful. This tutorial will show you how to add a random posts widget to display a list of posts in a random order with thumbnails and excerpts/snippets.
Adding RANDOM POSTS With Thumbnails And Posts Summary (Snippets) On Blogger:

Step-1. Login to your blogger account, select your blog and go to Layout.
Step-2. Add new widgets by clicking on the Add a gadget link and select Html/JavaScript from the popup window.
Step-3. After adding the Html/JavaScript you need to copy the following script and paste it in the Content box.
<style>
#random-posts img {
border: 1px #eeeeee;
float: left;
margin-right: 5px;
width: 50px;
height: 50px;
background-color: #F5F5F5;
padding: 3px;
transition: all 0.2s linear 0s;
}
#random-posts img:hover {
opacity: 0.6;
}
ul#random-posts {
list-style-type: none;
padding: 0px;
}
#random-posts a {
font-size: 10px;
text-transform: uppercase;
padding: 0px auto 5px;
}
#random-posts a:hover {
text-decoration: none;
}
.random-summary {
font-size: 11px;
background: none;
padding: 5px;
margin-right: 8px;
}
#random-posts li {
margin-bottom: 10px;
border-bottom: 1px solid #EEEEEE;
padding: 4px;
}
</style>
<ul id='random-posts'>
<script type='text/javaScript'>
var randomposts_number = 5;
var randomposts_chars = 50;
var randomposts_details = 'no';
var randomposts_comments = 'Comments';
var randomposts_commentsd = 'Comments Disabled';
var randomposts_current = [];
var total_randomposts = 0;
var randomposts_current = new Array(randomposts_number);
function randomposts(json) {
total_randomposts = json.feed.openSearch$totalResults.$t
}
document.write('<script type=\"text/javascript\" src=\"/feeds/posts/default?alt=json-in-script&max-results=0&callback=randomposts\"><\/script>');
function getvalue() {
for (var i = 0; i < randomposts_number; i++) {
var found = false;
var rndValue = get_random();
for (var j = 0; j < randomposts_current.length; j++) {
if (randomposts_current[j] == rndValue) {
found = true;
break
}
};
if (found) {
i--
} else {
randomposts_current[i] = rndValue
}
}
};
function get_random() {
var ranNum = 1 + Math.round(Math.random() * (total_randomposts - 1));
return ranNum
};
</script>
<script type='text/javaScript'>
function random_posts(json) {
for (var i = 0; i < randomposts_number; i++) {
var entry = json.feed.entry[i];
var randompoststitle = entry.title.$t;
if ('content' in entry) {
var randompostsnippet = entry.content.$t
} else {
if ('summary' in entry) {
var randompostsnippet = entry.summary.$t
} else {
var randompostsnippet = "";
}
};
randompostsnippet = randompostsnippet.replace(/<[^>]*>/g, "");
if (randompostsnippet.length < randomposts_chars) {
var randomposts_snippet = randompostsnippet
} else {
randompostsnippet = randompostsnippet.substring(0, randomposts_chars);
var whitespace = randompostsnippet.lastIndexOf(" ");
randomposts_snippet = randompostsnippet.substring(0, whitespace) + "&#133;";
};
for (var j = 0; j < entry.link.length; j++) {
if ('thr$total' in entry) {
var randomposts_commentsnum = entry.thr$total.$t + ' ' + randomposts_comments
} else {
randomposts_commentsnum = randomposts_commentsd
}; if (entry.link[j].rel == 'alternate') {
var randompostsurl = entry.link[j].href;
var randomposts_date = entry.published.$t;
if ('media$thumbnail' in entry) {
var randompoststhumb = entry.media$thumbnail.url
} else {
randompoststhumb = "https://blogger.googleusercontent.com/img/b/R29vZ2xl/AVvXsEgR2bMmH85yjxR6WYQiOFkDC1Eebws0L74hgGS-6h0r2KCSIrid40A4OJgnNoym6vU8yi-3zxRftySJB_hvz14ViNbS79KDE-DdUw2tk8b-y8Sjd_6VPgOwvoWAbZp9hfPz0bTnQ-06vlM/s1600/no_thumb.png"
}
}
};
document.write('<li>');
document.write('<a href="' + randompostsurl + '" rel="nofollow"><img alt="' + randompoststitle + '" src="' + randompoststhumb + '"/></a>');
document.write('<div><a href="' + randompostsurl + '" rel="nofollow">' + randompoststitle + '</a></div>');
if (randomposts_details == 'yes') {
document.write('<span><div class="random-info">' + randomposts_date.substring(8, 10) + '.' + randomposts_date.substring(5, 7) + '.' + randomposts_date.substring(0, 4) + ' - ' + randomposts_commentsnum) + '</div></span>'
};
document.write('<br/><div class="random-summary">' + randomposts_snippet + '</div><div style="clear:both"></div></li>')
}
};
getvalue();
for (var i = 0; i < randomposts_number; i++) {
document.write('<script type=\"text/javascript\" src=\"/feeds/posts/default?alt=json-in-script&start-index=' + randomposts_current[i] + '&max-results=1&callback=random_posts\"><\/script>')
};
</script></ul>
Random Post Option:

- Thumbnail Dimensions: to change the size of the thumbnails in pixels, replace the 50px value.
- Summary length: you can control the length of the summary (in characters) by changing the 50 value from var randomposts_chars=110;
- Post info: if you want to show the post date and comment count, change 'no' from var randomposts_details='no'; to 'yes';
- Font Size for Posts Titles and Summary: to modify the font size for the post snippet, modify the 11px value and for the posts title, the 10px value;

Click on the Save button and View your blog. The sidebar will display a random posts widget on each of your blog pages.

Enjoy !

Tuesday, 11 August 2015

How to create a Sitemap/Table of Contents in Blogger

Sitemap/Table of Contents is a page that shows all the posts that are published on your blog in a separate page. As we know, that blog archive shows all the required data but not in a single page. This Table of Contents will make it easier for your readers to find that they are looking for. The gadget we are going to share with you today will help you to add a Table of Contents in a single page. This table of contents shows post titles with separated labels and a New! text with recently published posts.


How To Create A Sitemap/Table Of Contents In Blogger ?

Step 1. Log in to your Blogger Dashboard
Step 2. Go to Pages >> New Page and select Blank Page from the list as shown below


Step 3. Click on HTML and Paste the following code in the HTML Box
<style> 
p.labels a{color: #242424; text-transform: uppercase;font-size: 15px;}
a.post-titles {color: #0000FF;} 
ol li{list-style-type:decimal;line-height:25px;} 
</style> <script> 
//<![CDATA[ 
var postTitle=new Array();var postUrl=new Array();var postPublished=new Array();var postDate=new Array();var postLabels=new Array();var postRecent=new Array();var sortBy="titleasc";var tocLoaded=false;var numChars=250;var postFilter="";var numberfeed=0;function bloggersitemap(a){function b(){if("entry" in a.feed){var d=a.feed.entry.length;numberfeed=d;ii=0;for(var h=0;h<d;h++){var n=a.feed.entry[h];var e=n.title.$t;var m=n.published.$t.substring(0,10);var j;for(var g=0;g<n.link.length;g++){if(n.link[g].rel=="alternate"){j=n.link[g].href;break}}var o="";for(var g=0;g<n.link.length;g++){if(n.link[g].rel=="enclosure"){o=n.link[g].href;break}}var c="";if("category" in n){for(var g=0;g<n.category.length;g++){c=n.category[g].term;var f=c.lastIndexOf(";");if(f!=-1){c=c.substring(0,f)}postLabels[ii]=c;postTitle[ii]=e;postDate[ii]=m;postUrl[ii]=j;postPublished[ii]=o;if(h<10){postRecent[ii]=true}else{postRecent[ii]=false}ii=ii+1}}}}}b();sortBy="titleasc";sortPosts(sortBy);sortlabel();tocLoaded=true;displayToc2();document.write('</br><div class="sitemap-link"><a href="http://blogolect.blogspot.com/2014/01/create-sitemap-table-of-contents-in-blogger.html" style="font-size: 10px; text-decoration:none; color: #5146CD;">Grab This Widget</a></div>')}function filterPosts(a){scroll(0,0);postFilter=a;displayToc(postFilter)}function allPosts(){sortlabel();postFilter="";displayToc(postFilter)}function sortPosts(d){function c(e,g){var f=postTitle[e];postTitle[e]=postTitle[g];postTitle[g]=f;var f=postDate[e];postDate[e]=postDate[g];postDate[g]=f;var f=postUrl[e];postUrl[e]=postUrl[g];postUrl[g]=f;var f=postLabels[e];postLabels[e]=postLabels[g];postLabels[g]=f;var f=postPublished[e];postPublished[e]=postPublished[g];postPublished[g]=f;var f=postRecent[e];postRecent[e]=postRecent[g];postRecent[g]=f}for(var b=0;b<postTitle.length-1;b++){for(var a=b+1;a<postTitle.length;a++){if(d=="titleasc"){if(postTitle[b]>postTitle[a]){c(b,a)}}if(d=="titledesc"){if(postTitle[b]<postTitle[a]){c(b,a)}}if(d=="dateoldest"){if(postDate[b]>postDate[a]){c(b,a)}}if(d=="datenewest"){if(postDate[b]<postDate[a]){c(b,a)}}if(d=="orderlabel"){if(postLabels[b]>postLabels[a]){c(b,a)}}}}}function sortlabel(){sortBy="orderlabel";sortPosts(sortBy);var a=0;var b=0;while(b<postTitle.length){temp1=postLabels[b];firsti=a;do{a=a+1}while(postLabels[a]==temp1);b=a;sortPosts2(firsti,a);if(b>postTitle.length){break}}}function sortPosts2(d,c){function e(f,h){var g=postTitle[f];postTitle[f]=postTitle[h];postTitle[h]=g;var g=postDate[f];postDate[f]=postDate[h];postDate[h]=g;var g=postUrl[f];postUrl[f]=postUrl[h];postUrl[h]=g;var g=postLabels[f];postLabels[f]=postLabels[h];postLabels[h]=g;var g=postPublished[f];postPublished[f]=postPublished[h];postPublished[h]=g;var g=postRecent[f];postRecent[f]=postRecent[h];postRecent[h]=g}for(var b=d;b<c-1;b++){for(var a=b+1;a<c;a++){if(postTitle[b]>postTitle[a]){e(b,a)}}}}function displayToc(a){var l=0;var h="";var e="Post Title";var m="Click to sort by title";var d="Date";var k="Click to sort by date";var c="Category";var j="";if(sortBy=="titleasc"){m+=" (descending)";k+=" (newest first)"}if(sortBy=="titledesc"){m+=" (ascending)";k+=" (newest first)"}if(sortBy=="dateoldest"){m+=" (ascending)";k+=" (newest first)"}if(sortBy=="datenewest"){m+=" (ascending)";k+=" (oldest first)"}if(postFilter!=""){j="Click to view all"}h+="<table>";h+="<tr>";h+='<td class="header1">';h+='<a href="javascript:toggleTitleSort();" title="'+m+'">'+e+"</a>";h+="</td>";h+='<td class="header2">';h+='<a href="javascript:toggleDateSort();" title="'+k+'">'+d+"</a>";h+="</td>";h+='<td class="header3">';h+='<a href="javascript:allPosts();" title="'+j+'">'+c+"</a>";h+="</td>";h+='<td class="header4">';h+="Read all";h+="</td>";h+="</tr>";for(var g=0;g<postTitle.length;g++){if(a==""){h+='<tr><td class="entry1"><a href="'+postUrl[g]+'">'+postTitle[g]+'</a></td><td class="entry2">'+postDate[g]+'</td><td class="entry3">'+postLabels[g]+'</td><td class="entry4"><a href="'+postPublished[g]+'">Read</a></td></tr>';l++}else{z=postLabels[g].lastIndexOf(a);if(z!=-1){h+='<tr><td class="entry1"><a href="'+postUrl[g]+'">'+postTitle[g]+'</a></td><td class="entry2">'+postDate[g]+'</td><td class="entry3">'+postLabels[g]+'</td><td class="entry4"><a href="'+postPublished[g]+'">Read</a></td></tr>';l++}}}h+="</table>";if(l==postTitle.length){var f='<span class="toc-note">Show All '+postTitle.length+" Posts<br/></span>"}else{var f='<span class="toc-note">Show '+l+" posts by category '";f+=postFilter+"' the "+postTitle.length+" Total Posts<br/></span>"}var b=document.getElementById("toc");b.innerHTML=f+h}function displayToc2(){var a=0;var b=0;while(b<postTitle.length){temp1=postLabels[b];document.write("<p/>");document.write('<p class="labels"><a href="/search/label/'+temp1+'">'+temp1+"</a></p><ol>");firsti=a;do{document.write("<li>");document.write('<a class="post-titles" href="'+postUrl[a]+'">'+postTitle[a]+"</a>");if(postRecent[a]==true){document.write(' - <strong><span style="color: rgb(255, 0, 0);">New!</span></strong>')}document.write("</li>");a=a+1}while(postLabels[a]==temp1);b=a;document.write("</ol>");sortPosts2(firsti,a);if(b>postTitle.length){break}}}function toggleTitleSort(){if(sortBy=="titleasc"){sortBy="titledesc"}else{sortBy="titleasc"}sortPosts(sortBy);displayToc(postFilter)}function toggleDateSort(){if(sortBy=="datenewest"){sortBy="dateoldest"}else{sortBy="datenewest"}sortPosts(sortBy);displayToc(postFilter)}function showToc(){if(tocLoaded){displayToc(postFilter);var a=document.getElementById("toclink")}else{alert("Just wait... TOC is loading")}}function hideToc(){var a=document.getElementById("toc");a.innerHTML="";var b=document.getElementById("toclink");b.innerHTML='<a href="#" onclick="scroll(0,0); showToc(); Effect.toggle(\'toc-result\',\'blind\');">?? Display Table of Contents</a> <img src="https://blogger.googleusercontent.com/img/b/R29vZ2xl/AVvXsEit5b9DVugDIpBexNhk43nR9zgf7tgjS_uHNnsTd1JC36tBA7tfyuuBYS0PpJSVaWPtq5GlTlcFbY4HuwW3E4NCJlJy6MoU7xxcGGNVykCpzdetA1egttiMPZb2Eq1yOm9dILNFjWcW8nSs/s1600/new_icon.gif"/>'}function looptemp2(){for(var a=0;a<numberfeed;a++){document.write("<br>");document.write('Post Link : <a href="'+postUrl[a]+'">'+postTitle[a]+"</a><br>");document.write('Read all : <a href="'+postPublished[a]+'">'+postTitle[a]+"</a><br>");document.write("<br>")}}; 
//]]>
</script> 
<script src="http://addictofblogging.blogspot.com/feeds/posts/default?max-results=9999&amp;alt=json-in-script&amp;callback=bloggersitemap"></script>
  • Replace addictofblogging.blogspot.com with your Blog/website URL address 
  • Replace #242424 and 15px to change the font size and color of label
Step 4. Hit the Publish Button

And you're done
Feel Free to Ask.
For any questions or suggestions, leave a comment. Don't forget to subscribe us. :D