Sunday, 31 January 2016

Forex Report AUD/USD 1st February 2016

AUD/ USD Primary & Weekly Cycles
 
The price of the Australian dollar didn't hit the major support zones in January around the 2016 lows.
 
The AUD may have another go in February, as the new 50% level pushes the AUD back into those levels, however it won't surprise me to see and move back towards the 3-month highs in February.
 
Trade on the side of the February 50% level @.7098.

Friday, 29 January 2016

How to save yourself from Online Banking Frauds

Online Banking Frauds are making news now a days. Most of the non-tech savvy people don't activate their net banking due to their fear of net banking frauds. Only the correct knowledge about internet banking and the correct way to use it can remove this fear. Most the online banking frauds occur due to ignorance of the user and mishandling of user access information like User-ID and Password.

  • Use the correct website for Online Banking: In some cases of online banking fraud, user used the incorrect website (or Phishing website) for internet banking. For example, you wanted to open website of ABC Bank , which is abcbank.com -- but instead of opening that website you typed abvbank.com and a similar banking website opens and you use your used-id and password on it. Due to such foolish things your access information is stolen by some smart hacker who designed that similar looking website with almost similar domain name. Your one misspelling of that website name can lead you to something inappropriate for you. You can protect yourself from such things by just using bookmarks feature in your browser. Save your netbanking website name in your browser bookmarks and access it through those bookmarks instead of typing it yourself.
  • Use some sort of Internet Security: There are a number of Antivirus available in the market that also provide internet security. These security softwares alert you, when you go to some phishing website. These security software also protect your system from some computer viruses which can target the sensisitive information stored on your computer.
  • Don't save your netbanking passwords in your computer: Saving your netbanking password on your computer is a bad practice. It might save your time in logging into the website but it makes your access information vulnerable to others. If some tech-savvy person use your computer for a few minutes, he/she can easily copy that information. Some computer virus can also copy such information and send it to some other people without even sharing your laptop/desktop with somebody else. In such case antivirus software might help you, but its better not to store such information on your PC.
  • Change your Password at a regular Interval: Changing your netbanking password at a regular interval is a good habit to be more secure. Even if somebody has stolen your old password , he/she will not be able to use it anymore.
  • Keep you password in your Brain: Its better not to write your password anywhere else except your brain. But still if you think that you will not be able to remember it, then store it at a place which is not accessible by others and easily accessible by you. Know how to choose a secure password.
  • Only shop through reputed websites: Online shopping is trending now a days. Try to go for Cash-on-delivery (COD), but when its comes to making payment online first check the reputation of shopping website before making any payment. If its a reputed website only then choose the option of online payment.
Types of Banking Frauds and how to save yourself

There is no harm in being modern and using the technology but its necessary to do it safely. There are pros and cons of everything, same is with net banking. So use Internet banking and play it safely for your own betterment.

How to report a Net Banking Fraud

How to make your Password more Secure and Unpredictable

In modern electronic world password is the key to your life. A good password not only secures your social networking but also secures your online banking transactions. Every banking website asks its users to choose a password which is unpredictable by others. Here we will tell you a few important things which will help you in deciding your password.


Before we go for deciding a password, its better to know what should not be your password.

  • your name
  • your date of birth
  • your social security number or any other ID number
  • your car / bike registration number
  • date of birth of your spouse, kids, parents
  • name of your spouse, kids, parents
  • The word "password"
  • Series of numbers like "123456789" or "0000000000" or "111111111"


The above mentioned passwords are one of those which are easily predictable and anybody trying to get access to your account will try them. So its better not to use them and if you have already used them then now is the time to change them.

Now here are a few tips to improve the security of your password by making it unpredictable. We will use the password "password" and try to make it more secure.

  • Use Capslock : While generating a password you can use capital letters in it to make it more secure. Fore example "PASSword" is more secure than "password". In most of the cases password are case-sensitive, so this feature should be used in any way. Example : "PaSwOrD" .
  • Use Special Characters: You can sue special characters like @,#,$,& to make your password unpredictable. These characters can be inserted anywhere in your password. For example "p@$$word" is better than "password".
  • Use numbers: Just like special characters, numbers can also be used to make your password unimaginable. For Example "Passw0rd" is a better variation of "password". Just by changing a "o" to "0" , i to 1, B to 8, are a few variations that can be used in a password. You may also add numbers in the beginning, end or middle of passwords.
  • Use All of the Above: If you use all 3 tricks listed above in the same password then that password will be completely unpredictable. For Example "p@s$W0Rd" is much more safer than "password" or any other variations listed above. 


Note: Don't use the passwords generated on this page. Use you own brain to generate your own passwords. Don't ask anybody else to help you in choosing a password for you.

Just choosing a right password is not surety of your online transactions being safe.
Know how to save yourself from internet banking frauds.

Tuesday, 26 January 2016

How to use your own icons in Google My Maps

This article shows how to use your own icons to label places in maps that you make with the My Maps' feature in  Google Maps.


My Maps is a tool provided by Google Maps that lets you make a map showing a specific collection of places.

Why is this helpful?   Well, you can search for a collection of places in regular Google Maps, and share the maps you can see - but if you do this, other people will see different places that are marked on the version of the maps that Google shows them, not the same as the places that are marked for you.    To guarantee what set of places other people see, you need to make a map in My Maps, and then you can share this specific map.

My Maps provides a standard set of icons that can be used for labelling places - and these days it's a pretty impressive standard set.   But it still doesn't include numbers, letters or other labels - and the icons provided may not be styled the way you would like.

Luckily Google have provided a way for you to use any icon to label points on a map you make.


How to use your own custom icon in a My Maps map

Make your map, and add the place(s) you would like to attach a custom icon to.

In the bar on the left hand side, hover your mouse over a place-marker which you want to assign a specific icon to.   

The line for that item will highlight slightly, and a small colour / paint-tipping icon appear will to the right of the place description, like this:


Click on the paint-tipping / colour icon

This opens a small hover-window, where you can choose the colour or icon shape.


Click the button at the bottom labelled More Icons.

On the pop-up that opens, you are able to select an icon from one of the categories available (currently Business, Crisis, Facilities and services, Points of interest, Recreational Activities, Transport, and  Weather).   Don't select any of these.


Instead, at the bottom of the screen, enter in the URL (ie website address) of a  file that you want to use as a marker.  (.jpg  .png  .bmp, and .gif   files can all be used).

Click Add Icon.

This adds the picture that you linked to the list of items available under Custom Icons, and selects it.


Click Ok to apply this icon to the point-marker that is being edited.


Job done!   Your map now has a marker that is made from your own image.


Things to be aware of / Troubleshooting

  • You need to load the image file to a file-host which handles picture files yourself:   there is no option to load a file directly from the More Icons tab.
  • The image file needs to stay, unchanged, in the place where you linked to - and that place has to be available to anyone who might look at the map: if you are sharing the map with "anyone in the world" then the markers need to be available like that, too.
  • The image file should be small to speed up loading time:   images in the set of markers I use are approx 2k each.
  • Markers will be displayed in the same small size as Google's markers, ie 32x32 pixels:   there's no point using a large, detailed photograph if it will shrunk down to so tiny that the details can't be seen.
  • You must provide the actual URL of the picture you want to use as a marker, not the Google Photos shareable link.   (Because the latter includes more than just the photo).
  • I don't know any way to bulk-load many custom icons into a My Maps map at the same time.   (There was a way to do this in the old Google Custom Maps, but this doesn't work in My Maps.)    Or to make one icon available to many / all your your My Maps at once.   If you have a solution for this, please leave a comment below.
  • If you your icon background to be transparent, then you need to create it in RGB colour mode: Icons with a transparent background created in Indexed colour mode don't work.


Related Articles

File hosts:  places used to store pictures used in Blogger

Hosting pictures outside of Google Photos / Picasa Web Albums

How to get shareable links to Google Photos

7 Data Recovery v3.6 Enterprise Serial Keys


7 Data Recovery
7-Data Recovery is an easy to use, all-in-one and even more is a complete data recovery software for rescuing files (Documents, Photos, Videos, Musics, etc.) under almost any conditions. 7-Data Recovery Suite allow you to recover any accidentally deleted files, damaged or formatted hard drive, and lost or deleted partition from from local and external drives, memory card, camera, android phones directly from your PC.
Features
  • Recover any files from accidentally deleted files
  • Recover any files from Lost and Deleted Partitions
  • Recover any files from Memory Card
  • Recover any files from Mobile Phone
  • Complete Recovery from Local and External Drive
How to install?
  1. Install 7-Data Recovery Suite
  2. Run and register with Key in Key.rar
Screenshots
Download

Kaspersky Reset Trial 5.1.0.7 Final (Trial Resetter)


Kaspersky Reset Trial (Trial Resetter)
Kaspersky Reset Trial – a program to reset the trial ( for reuse trial period ) antivirus Kaspersky Lab products .
Supported Programs
  • Kaspersky Antivirus 2012 to Kaspersky Antivirus 2016
  • Kaspersky Internet Security 2011 to Kaspersky Internet Security 2016
  • Kaspersky Total Security 2016
  • Kaspersky CRYSTAL 2.0.
  • Kaspersky CRYSTAL 3.0.
  • Kaspersky Endpoint Security 8
  • Kaspersky Endpoint Security 10
  • Kaspersky Endpoint Security 8
  • Kaspersky Endpoint Security 10
  • Kaspersky Anti-Virus 6.0 for Windows Workstations
  • Kaspersky Anti-Virus 6.0 for Windows Servers
What’s New
  • The algorithm of preservation and transfer activation of anti-virus products.
  • Improved code.
Screenshots
Downloads

Monday, 25 January 2016

Making someone an author on your blog

This article shows you how to set up another person (ie another Google account) as an author for your blog.

Google, Blog-Authors and Blogger

Setting someone up as an "author" in Blogger is one way that you can let other people post to your blog.

It's easy to do: you tell blogger to create an invitation, which sends the person an email saying you would like to be an author, they click a link in the email and then sign in with a Google account to accept the invitation. And once it is done, the person can write and edit their own posts.
All you need to know is the person's email address: it doesn't matter if it's a gmail address or not.  You can send invitations to people with hotmail, yahoo, and indeed any email address where your invitee can read their email.

 However the other person will need to use a Google account (which doesn't necessarily include Gmail) to accept the invitation: don't waste time inviting people who are allergic to Google and not willing to sign up for an account.


How to make someone an author on your blog

Send them an invitation:
  • Go to Settings > Basic > Permissions
  • Beside Blog Authors, click + Add Authors
  • Enter the email address of the person you want to invite
  • Click Ok


A few minutes later, the email address that you sent to receives an email invitation, like this, from no-reply@google.com:
-------- Original Message --------
Subject: You have been invited to contribute to AnotherTestBlog
Date: Tue, 06 Dec 2011 20:47:45 +0000
From:   THE NAME OF FROM YOUR BLOGGER PROFILE 
To: maryc@act.nz

The Blogger user Mary has invited you to contribute to the blog: AnotherTestBlog.

To contribute to this blog, visit:
http://www.blogger.com/i.g?inviteID=468-GEEKY-LOOKING-CODE-973&blogID=31-GEEKY-LOOKING-CODE-83

You'll need to sign in with a Google Account to confirm the invitation and start posting to this blog. If you don't have a Google Account yet, we'll show you how to get one in minutes.

To learn more about Blogger and starting your own free blog visit http://www.blogger.com.


When the person who gets the email clicks on the link, they are taken to Blogger, and asked to sign in

Once they have clicked the link and sign in, the Google account that they log in with has "author rights" to your blog (just the one you invited them to, not any others you've made).

The person does not need to have a gmail or Google account for you to invite them to be an author - but they will need to sign in using a Google account (new or existing) to accept the invitation.


What you will see

Once the person has accepted the invitation, the Google account name (which looks like an email address) that they use to accept it is shown as an author on the permissions tab (the one that you went to to invite them to be an author):


If they accept the invitation by signing to Google in with a different email address than the one you invited, you will get a message telling you about this. It says
-------- Original Message --------
Subject: Your invitation was accepted using a different email address
Date: Tue, 06 Dec 2011 22:51:33 +0000
From: Blogger
To: YOUR-EMAIL-ADDRESS

Your invitation for THE-EMAIL-ADDRESS-YOU-INVITED for your private blog "AnotherTestBlog" has been accepted, but using a different email address. It has been accepted by THE-ACCEPTING-EMAIL ADDRESS.

If your invitation has been accepted by someone you do not know or did not intend to invite, please visit the Permissions tab of your blog where you can choose to revoke access.

Thanks,
 The Blogger Team


What your new author will see

When your new author logs in to Blogger.com - using the Google account they accepted your invitation with - they see a regular Blogger dashboard, except that they only have access to a limited range of functions:


An author can:

  • Create a post,
  • Edit the date for posts they have made
  • Turn comments of for posts they can edit (provided the default setting is On)
  • Edit a post that they made
  • Add a mobile device so they can post using SMS/MMS - (this may only work in certain countries)
  • Set themselves up to post using email (the mail2Post feature) - note that their "secret words" address is different to yours - and that an author could use this feature to let anyone else post from their account.
  • Remove themselves as an author


An author cannot:

  • Edit posts made by other authors or administrators
  • Change the template, layout or gadgets
  • Change the blog's URL, title or description
  • Set up for any email address to receive comment-moderation alert messages
  • Moderate comments (even about their own posts), or change the global comments settings
  • Edit any of the blog's Pages
  • See the blog's statistics
  • Install AdSense into the blog (although they can put ad-units of their own inside their own posts)
  • Give other people permission to write on the blog - except by sharing their own mail2Post "secret words" address.
  • Change the default language and date/time settings for the blog
  • Alter the RSS feed settings in any way
  • Set up Google Analytics for the blog
  • Edit the Adult-content warning setting, or the blog's Open-ID URL.


Troubleshooting

Be sure your transfer works

If you are accepting the invitation yourself (eg you are transferring the blog to another Google account that you control), then make sure that you either
  • [Recommended]: use a different browser for each Google account, or
  • Each time you need to change Google accounts, log out of the present account, clear your cache and re-start your browser.

Make sure the emails arrive

We sometimes see questions in Blogger Help Forum from people who say that they sent invitations, but the email message was never received.

The most common solution is that the author-to-be needs to check their spam folder - very often that's where the messages have gone.  If that doesn't work:
  • Try sending the person an email address from your regular email account - so you know if there's a  problem with their email.
  • Cancel the invitation (there's a link in the Invitation screen), wait a few minutes and try again.
  • Try sending an invitation to a different email address that you control, and forwarding that message (without clicking the accept link) to the person.yourself.

If none of this helps, post a question in Blogger Help Forum: tell us your blog's URL, and exactly what options you have tried.


More things to think about

As well as giving the person rights, you may also need to work with them to make sure they understand how you use certain features in Blogger:
  • What policies do you have for responding to comments - Who is notified about comments left about their posts?  What guidelines are followed about complaints?  How do you deal with spam and abuse - and what do you regard as abuse?
  • How do you organise pictures, and other external files that your blog uses?
    I always upload pictures to Picasa-web-albums outside of Blogger, LINK so I can control the picture size/resolution. If you do this, you need to make sure that your new author knows where to file their pictures.
  • Have you got a place where you keep policies, documetation, ideas for new posts, etc (eg I use a separate documentation blog for this) - does your new author need access to this?


What next?

Giving someone administrator access to your blog.


Related Articles

Understanding Google accounts

Putting AdSense ads into your posts

How to put posts into your blog's pages

Why RSS / Subscribe to Posts matters for your blog

Your blog and the so-called-social networks:  Facebook, Twitter, eg al

Putting pictures onto your blog

Advertising and your blog, some things to consider

Tuesday, 19 January 2016

Turning the RSS feed off or on again

By default, public Blogger sites offer an RSS feed.  But there may be times when you need to turn it off, either for good or temporarily.


Previously I've explained what RSS is and why it's important for bloggers.

But there may be times when you want to turn off your RSS feed, either because you don't want to offer one at all, or because you want to make some posts, or changes to existing posts that are not notified to  your RSS subscribers.

Or you may need to turn it back on again - for example, if you want to use a dynamic template, to offer a subscribe-by-email option, or to enable automatic posting to Google +.


How turn off your blog's RSS feed

  • Go to the Settings > Other tab.
  • Under "Site Feed", use the drop-down to change Allow Blog Feed to "None".  
    (This is the only option that totally turns your feed off:  the others, including Custom, leave some aspects of the feed on.)


How turn on your RSS feed

This is just the same as turning the feed off (see above), except that your need to choose one of these options instead:
  • Full - the whole post is shown in your feed
  • Until Jump Break  - only the part of the post before the jump break is sent to your feed
  • Short - only the first 120 (ish) letters, or less if the jump break comes first, are sent to your feed.

Also, the new interface has a Custom option, and the old interface has an Advanced Mode.   If you use these , you can individually set the value for post feed, comments feed (all comments), and comments-feed-per-post.


Private blogs and RSS
Blogs that are not public do not offer RSS feeds, because they cannot be secured.   So if your blog is private, then it does not matter what setting you choose, your blog will not offer an RSS feed.


Related Articles

Understanding RSS - why it's imporant for bloggers who want to grow an audience

What are dynamic templates

Linking your blog and the social networks

Follow-by-email gadget:  an easy way to offer email subscriptions

Private blogs aren't as secure as you might think

Chrome extension empties your Steam inventory


I recently got notified about the following topic (and post) on TeamFortress.tv:
Known scammer alt opening a gambling site

In there, you can see a Steam user named Delta (Steam profile down below) has created several 'helpful' Chrome extensions for Counter-Strike: Global Offensive (CS:GO).

A few examples:


'Read and change all your data on the websites you visit'


Other examples are:

CSGODouble Theme Changer
CS:GO Double Withdraw Helper
Csgodouble AutoGambling Bot
Improved CSGODouble

Instead of being able to change your CS:GO Double theme, your items from your inventory are getting stolen; instead of trading with X or Y person you trust, the items go to the scammer rather than whoever you're trading with:


All the addons he made can be found here. You can report them to Google as well by clicking 'Report Abuse' > 'Malware'. Note: some of them are still in the store despite several reports.

Update (20/01): all mentioned extensions are now removed from the Chrome Web Store.


76561198254328724 is the Steam ID of the scammer, who currently has a/is on trade probation; which means they recently had a trade ban removed.


Update (20/01): 'Delta' is now trade banned (again):


You can find his Steam profile here and his SteamRep profile here. (SteamRep is "a non-profit site that partners with community administrators to improve the safety of game-related trading.")


Disinfection

As opposed to actual SteamStealers, this one's pretty easy to disinfect or remove, as you can simply remove the extension(s) from Chrome:


In this example:


You may read more about installing, managing and removing extensions here. If you're having problems removing one of the extensions, you can also try resetting your Chrome browser.


Prevention


Does it look suspicious? Does it sound too good to be true? Don't install it!

For more prevention tips on securing your Steam account, see my earlier post about SteamStealers here.

Steam also has a FAQ set up in regards to: Spyware, Malware, Adware, or Virus Interfering with Steam


Conclusion

SteamStealers are (unfortunately) nothing new. Criminals are getting craftier and better in attempting to steal items or account credentials (along with other credentials) from unsuspecting users.

As opposed to actual malware or SteamStealers being loaded on your machine, this time it's a browser extension - thus be wary of anything that looks too good to be true and think twice
before you install anything (whether that be an extension, a 'screensaver' or images that look like you ;) ).

Follow the prevention tips above to stay safe. For any questions or feedback, don't hesitate to comment.


Monday, 18 January 2016

New Samsung Gear 2 Classic Milanese Loop Band Available at focuseak.com

Samsung's Gear S2 Classic is currently on the market at $349, one of the most expensive smartwatches which costs as much as an Apple Watch. Now The next big things is available! New Samsung Gear 2 Classic Milanese Loop Band now start sells at focuseak.com that make you stand out. Simple to Customize your Samsung Gear S2 classic with The best third party strap.

The Gear S2 classic features traditional watch lugs, which means it is compatible with any strap that has a standard 20mm pin. Now Take a look at what we have launched.

Samsung Gear 2 Classic Milanese Loop Band
The Milanese loop for Samsung Gear 2 Classic Watch is made of high quality 316LStainless Steel with Stainless Steel Buckle that make long time use. The Unique magnet design helps you to adjust the length easily, more convenient to wear and off. The band comes with 2 colors, including stylish Black and Silver.

Samsung Gear 2 Classic Milanese Loop Band

Samsung also released a video that shows us how to customize the Gear S2 Classic with traditional watch bands

We'll be updating this list if more bands join in. Now enjoy your time!

New Huawei Watch Milanese Loop and Stainless Steel Band Now Available

Watch Out! New Huawei Watch Milanese Loop and Stainless Steel Band Available at focuseak.com

For everyone who own or ready to get the beautiful Huawei Watch, you should know that removing and replacing the bands on the watch is incredibly easy. You can slap on any band that has a lug width of 18mm if you don’t fall in love with stainless steel and genuine leather band from Huawei. Now let’s start the tour.

No1. Huawei Watch Milanese Loop Band

The Milanese loop for Huawei Watch is made of high quality 316L Steel that make long time use. The Unique magnet design helps you to adjust the length easily, more convenient to wear and off.
The band comes with 3 colors, including Black, Silver and Rose Gold. Just choose the favorite one you like.

No2. Huawei Watch Stainless Steel Band

Our watch strap is made of 316L Stainless Steel with Stainless Steel Buckle, the best Link Bracelet band Fits for Huawei Smartwatch. Now Personalize your Huawei Watch with this refined strap.
Check out our Huawei Watch Bands here. 

Now enjoy your time!

DevCorner: Superpowers HTML5 collaborative game maker open-sourced!

Great news for HTML5 game developers: a few days ago Superpowers was released under the ISC license.

What is Superpowers? A game development platform (an integrated editor but you can collaborate in realtime online; how cool is that! :D ) for making HTML5 games using TypeScript (a superset of Javascript). But you will also be able to work with other languages, so far support for the well known LÖVE2D is available.

Learn more in this video:


The source is available here and there is also an repository with a few sample games. If you like what they are doing, please consider becoming a supporter.

Looking forward to your new HTML5 games!

Sunday, 17 January 2016

SnapTube – YouTube Downloader HD Video Beta v4.0.1.8219 Mod Apk


SnapTube – YouTube Downloader HD Video 
SnapTube – The downloader videos and music easier from YouTube.
DOWNLOAD IN MULTIPLE RESOLUTIONS
MP4 videos are available in resolutions: choose the small size of 360 pixels or the high-definition 720 pixels.
DIRECT MP3 DOWNLOADS
Download any YouTube music video directly as an MP3 file. No extra encoding process or plugin needed. Save space and listen to your favorite music video anytime you want.
SEARCH VIDEOS WITH KEYWORDS
Search a video with keywords. Easily find the exact video you want.
DISCOVER NEW VIDEOS
Explore videos in your favorite categories like Music and Movies. Discover new videos with recommended lists from our curators.
MANAGE VIDEO DOWNLOADS
Pause, cancel or resume a video download. Delete the videos you don’t need anymore. Manage all of your video downloads in one place.
What’s in Mod
  1. NO ADS
  2. Clean design lets you focus on your videos. No annoying ads.
How to Install?
  1. Download & Install APK
  2. Enjoy :)
Screenshots
Download Links


Uniblue PowerSuite 2016 Serial Keys


Uniblue PowerSuite 2016
Unleash your computer’s full potential, Without expert care, your computer is vulnerable to speed and stability problems. Restore your PC’s performance with Powersuite, the ultimate maintenance solution.
Features
  • Optimize settings and resource management.
    Powersuite will tweak and manage your computer for extra speed. Activate the speed tools to power your PC’s efficiency.
  • Maintain your hard disk.
    Powersuite will clean up junk files and old backups, as well as compress large files to gain space.
  • Update your drivers.
    Powersuite will provide the latest driver updates for enhanced hardware efficiency.
Instructions
  1. Install Uniblue PowerSuite 2016 [Trial]
  2. Download the file given below
  3. Extract it
  4. Copy the Serial Key and Launch Uniblue PowerSuite 2016
  5. Disable your internet
  6. Click on register & Paste the Serial Key
  7. Click on Activate
Screenshots
Downloads

Saturday, 16 January 2016

ABILITIES Bar Position Fixed(Merged with V Hud)

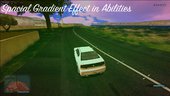
GTA V Style Chatracter Switch v4 Ability Bar Posion Fixed. 

In Next Version of My Mod "V Style Character Switch with Changeable clothes"
I Fixed Ability Bars Position.
Now This Bar is merged with GTA V Hud by Dk22pac.
But There is a huge Bug That bar just work in 1024x600x32 resolution.
But No Problem, I'll Fix it !
HOW TO USE IT NOW !!!!!
- Download GTA V Hud by DK22PAC v0.925
- Change GTA SA Resolution to 1024x600x32.
- if Your Graphic Card not supports this resolution, Download exdisp.asi (Display Extender).
- Copy This Settings(until Timers) and Paste in your GTA_V_Hud_by_Dk22pac.ini

; Settings for GTA V HUD mod by DK22Pac
; File created by: DK22Pac
; File editors:

[MAIN]
sSetName=default
bUpdateSettingsPermanently=0
bCheckForOldPlugin=1
bEnableLog=1
sVersion=0.925

[GENERAL]
bNextGenRadar=1
bOverlayColor=1
bOverlayBlur=0

[CUSTOM_ABILITY]
bEnable=0
iValue=0

[WIDESCREEN]
; Use these values to move HUD elements (left/right panel)
fOffsetLeft=25.0
fOffsetRight=25.0
fOffsetTop=4.0
fOffsetBottom=18.0

[RADAR]
fRadarRange=200.0
fRadarRange3D=400.0
fRadarShift=35.0
fRadarShift3D=220.0
iRadar3DAnimTime=500
; not used for NG radar
iRadarSectionAlpha=150
fRadarX=137.0
fRadarY=99.0
fRadarWHalf=112.0
fRadarHHalf=72.0
; NG stuff
fNgRadarX=135.5
fNgRadarY=96.5
fNgRadarWHalf=137.5
fNgRadarHHalf=96.5
fNgRadarBorderSize=19.0 ; used for aircraft tex clipping
fNgRadarBorderSizeForBlips=25.0 ; used to place blips normally
;
fRadarSpriteSize=9.0
fRadarSpriteSizeInMenu=13.0
fRadarPlayerSpriteSize=12.0
RadarRect.fLeft=18.0
RadarRect.fRight=255.0
RadarRect.fTop=189.0
RadarRect.fBottom=9.0
; Next-gen radar mask rect
RadarMask.fLeft=0.0
RadarMask.fRight=273.0
RadarMask.fTop=193.0
RadarMask.fBottom=0.0
;
fLevelBlipBaseSize=5.0
fLevelBlipAdditionalSize=0.5
fLevelBlipBaseSizeInMenu=6.0
fLevelBlipAdditionalSizeInMenu=0.6
RadarDamageRect.fLeft=23.0
RadarDamageRect.fRight=250.0
RadarDamageRect.fTop=171.0
RadarDamageRect.fBottom=27.0
RadarDamageColor.iR=250
RadarDamageColor.iG=0
RadarDamageColor.iB=50
RadarDamageColor.iA=80
iRadarDamageTime=2000
; Affects radar map quality only, not the actual size
iRadarMapSizeX=1080
iRadarMapSizeY=1080
;
fRadarPlaneShift=14.0 ; radar plane texture rotation center (x: fRadarX, y: fRadarY - fRadarPlaneShift)

[RADAR_BAR_P1]
HealthBar.fLeft=23.0
HealthBar.fTop=23.0
HealthBar.fBottom=15.0
HealthBar.fWidth=112.0
ArmorBar.fLeft=138.0
ArmorBar.fTop=23.0
ArmorBar.fBottom=15.0
ArmorBar.fWidth=55.0
BreathBar.fLeft=196.0
BreathBar.fTop=23.0
BreathBar.fBottom=15.0
BreathBar.fWidth=54.0
HealthBarB.fLeft=23.0
HealthBarB.fTop=23.0
HealthBarB.fBottom=15.0
HealthBarB.fWidth=112.0
ArmorBarB.fLeft=138.0
ArmorBarB.fTop=23.0
ArmorBarB.fBottom=15.0
ArmorBarB.fWidth=55.0
; Next-gen stuff
BackgroundRect.fLeft=23.0
BackgroundRect.fTop=27.0
BackgroundRect.fRight=250.0
BackgroundRect.fBottom=11.0
BackgroundRect.Color.iR=0
BackgroundRect.Color.iG=0
BackgroundRect.Color.iB=0
BackgroundRect.Color.iA=0
;

[RADAR_BAR_P2]
HealthBar.fLeft=23.0
HealthBar.fTop=183.0
HealthBar.fBottom=175.0
HealthBar.fWidth=112.0
ArmorBar.fLeft=138.0
ArmorBar.fTop=183.0
ArmorBar.fBottom=175.0
ArmorBar.fWidth=112.0
BreathBar.fLeft=196.0
BreathBar.fTop=183.0
BreathBar.fBottom=175.0
BreathBar.fWidth=54.0
HealthBarB.fLeft=23.0
HealthBarB.fTop=183.0
HealthBarB.fBottom=175.0
HealthBarB.fWidth=112.0
ArmorBarB.fLeft=138.0
ArmorBarB.fTop=183.0
ArmorBarB.fBottom=175.0
ArmorBarB.fWidth=55.0
; Next-gen stuff
BackgroundRect.fLeft=23.0
BackgroundRect.fTop=187.0
BackgroundRect.fRight=250.0
BackgroundRect.fBottom=171.0
BackgroundRect.Color.iR=0
BackgroundRect.Color.iG=0
BackgroundRect.Color.iB=0
BackgroundRect.Color.iA=0
;

[GPS]
fGPSLineSize_OnRadar=5.0
fGPSLineSize_InMenu=9.0
GPSLineColor.iRed=163
GPSLineColor.iGreen=68
GPSLineColor.iBlue=222
GPSLineColor.iAlpha=255
GPSRect.fLeft=24.0
GPSRect.fRight=250.0
GPSRect.fTop=50.0
GPSRect.fBottom=26.0
GPSRectColor.iRed=0
GPSRectColor.iGreen=0
GPSRectColor.iBlue=0
GPSRectColor.iAlpha=170
GPSDistanceText=m
GPSDistanceText1k=km
GPSDistanceTextSize.fHeight=1.1
GPSDistanceTextSize.fWidth=0.6
GPSDistanceTextPosn.fX=245.0
GPSDistanceTextPosn.fY=50.0
; ng mode
GPSNgDistanceTextPosn.fX=47.0
GPSNgDistanceTextPosn.fY=50.0
;
GPSDistanceTextColor.iRed=255
GPSDistanceTextColor.iGreen=255
GPSDistanceTextColor.iBlue=255
GPSDistanceTextColor.iAlpha=200
GPSPathDirectionTexRect.fLeft=32.0
GPSPathDirectionTexRect.fRight=47.0
GPSPathDirectionTexRect.fTop=48.0
GPSPathDirectionTexRect.fBottom=33.0
fDistToRemoveDestinationBlip=20.0
bShowPathForStaticBlips=1

[TIMERS]
fBaseY=10.0
fBaseX=20.0
fBarWidth=0.0
fBarHeight=0.0
fBarWithLineHeight=10.0
fBarLineX=1218.0
fBarLineY=5.0
fBarLineW=54.0
fBarLineH=10.0
fSpaceBetweenBars=4.0
iBarLineR=235
iBarLineG=236
iBarLineB=39
iBarLineA=255
fBarTextX=6.0
fBarTextY=33.0
fBarTextW=0.8
fBarTextH=1.6
fBarDescrTextX=131.0
fBarDescrTextY=24.0
fBarDescrTextW=0.6
fBarDescrTextH=1.0
fVehicleNameSize=0.1
fPlaceNameSize=0.1


Friday, 15 January 2016

Forex Report AUD/USD 16th January 2016

AUD/USD Primary Cycles
 
the AUD is heading lower as part of the Primary Cycles for 2016, with 3 areas that will provide some resistance (Previous Report)
 
Sadly, the AUD didn't reach those resistance areas, and now looks to be completing the move down into the 2016 lows earlier than expected.
 
These lows are seen as Major Support in 2016, especially if it reaches .6703.
 
However, there's a breakout of the January lows @ .7043 that's likely going to form resistance for the rest of the month.
 
 Any long term buying support in the AUD will probably move into another stalled movement because of this, however we can reassess the price action at the start of February.
 

How to Calculate Walking Distances using Google Maps

Have you ever wondered that if you can calculate the walking distances in your neighborhood without going out of your home. You have reached this page because you might be willing to do so.

Yes its possible to measure the short distances (or walking distance) between two places and also calculate the time required to cover that distance on foot or car. You can do so by using Google maps. Google maps can be accessed through maps.google.com .


Here are the steps to measure the Distance between two locations


  • Open maps.google.com
  • Once the page is loaded, zoom to the location where you want to measure the distance.
  • You will also see a direction dialogue box at top left corner of the page as shown below.


  • Click on the direction link  in that direction dialogue box. It will expand the direction dialogue box, just like shown below.


  • Now click on the location (starting point), from where you want to measure distance. Then it will appear like shown below.

  • Now click on the destination point in the map. Now Google maps will check all routes and their distances (just like shown below).


  • Same routes also displayed on map as shown below.


As you can see that it is one of the best ways to measure the distance through different routes and time taken to cover that distance on foot. If you want to see the satellite view of that route, then this feature is also available in google maps by using the satellite image symbol shown at the bottom left corner on the page.

I hope that this method of measuring short distances will help some of you.  

Thursday, 14 January 2016

V Style Character Switch with changeble clothes v3.0

Author : Rakesh_nama
Spacial Thanks To : ThatsMe, Astitva & M.T.H.


>> DESCRIPTION <<
- This Mod Bring GTA V Style switching in characters feature to GTA San Andreas.
- Each Player Can Change Clothes.
- Now all Characters have their own ability.
- You Can Call Other Character or both Other Characters For Help.

>> New Features of v3.0 <<
- More Quick Swithing: press "Tab+Arrow Keys" to Switch into another character.
- Own Personal Vehicles.
- Insanity Style V Loading Screens Added in this Mod.
- This Time Just One Ability Bar instead of Three.
- Grandiant Added in abilities.
- Ability Key Changed to "Caps Lock".(because pressing "Conversation No" shows Weapon Wheel in V Hud by Dk22pac)

>> HOW TO USE <<
Tab+Arrow Keys: to Switch To other Character.
Caps Lock : To use Ability
H+B : to Call both other
H+M : to Call Micheal For Help
H+F : to Call Franklin For Help
H+T : to Call Trevor For Help
note : you Can change these Buttons By editing "switch.ini" located in "CLEO" Folder.

>> Installation <<
STEP 1
Before Installing This Mod, First You have to Download and Install Franklin Player.img Reloaded 2016 by M.T.H. :
Direct Link :
http://gtafiles.gtainside.com/downloads/ftph/1451780124_Franklin Mega Update By MTH.rar

Now if you already have this mod or You have Downloaded This Mod, Jump to STEP 2.

STEP 2
There are Two Types of installation Choose one of these :
Type 1. Manual Installation
- From Folder "V Style Character Switch" Copy "CLEo", "data", "Models" & "text" folders To your GTA SA Folder.
- Than Put Files From "To GTA3.img" Folder to "Models\gta3.img" using Alcies IMG Editor.
- Than Put Files From "To PLAYER.img" Folder to "Models\gta3.img" using Alcies IMG Editor.
Type 2. EASY Installation
- Just Put "V Style Character Switch" to "Modloader" Folder.
- Its bug free and recommanded Installation type.

HOPE U All GUYS LIKE IT !!!
Please RATE This MOD !!!
Please Make Comments For Help, Suggesions or Advice !