Monday, 10 February 2014

How to customize or edit the linkwithin related post widget

LinkWithin is a very popular widget that shows the related posts with a thumbnail and although it is not a new gadget among bloggers, many avoid using it for its lack of customization. So, this tutorial will show you how to add LinkWithin on a Blogger blog and how to customize it.

This is what we will do with this gadget:
  • Change the location of the gadget;
  • Remove the LinkWithin link;
  • Change the "You might also like" title with any other text;
  • Add rounded borders to images;
  • Remove the border that separates posts;
  • Add a background color;
  • Change the background color on mouse over;
  • Change the post titles color and font

Adding the LinkWithin gadget to Blogger

First of all we need to install the LinkWithin gadget. For this, we have to go to the LinkWithin homepage and type in the required information:

linkwithin gadget, related posts widget, blogger widgets
Although it provides the option to choose Blogger as a platform, we will select Other in order to implement the code directly into our template and then modify it. Select the number of posts (stories) according to the width of the content area - if the width of the posts container is narrower, then it is recommended to display fewer related posts.

By clicking on the "Get widget!" button, we'll be given the code that we need use it. It should look something like this:
<script>
var linkwithin_site_id = XXXXXXX;
</script>
<script src="http://www.linkwithin.com/widget.js"></script>
<a href="http://www.linkwithin.com/"><img src="http://www.linkwithin.com/pixel.png" alt="Related Posts Plugin for WordPress, Blogger..." style="border: 0" /></a>
That's the basic code we need to copy. Now login into your Blogger account > select your blog to where you want to add the LinkWithin gadget and go to "Template" > click on the "Edit HTML" button:


Cick anywhere inside the code area and press the CTRL + F keys to search for the following line:
<div class='post-footer'>
Just above this line, paste the LinkWithin code.

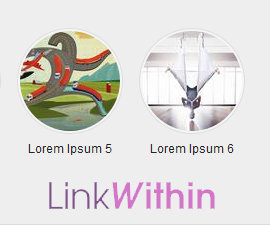
By doing so you already have the LinkWithin gadget on your blog and the result will be like this:

linkwithin gadget, related posts widget, blogger widgets
Note: If you would like to display it only in post pages, you can enclose the code using a Blogger conditional tag.

Change the LinkWithin gadget location

By default, this widget will always appear right at the end of your posts. In the LinkWithin FAQ page we can find solutions on how to fix this - simply add the code below where we want the widget to appear:
<div class='linkwithin_div'/>
This will make the gadget to display right where we added the code. Even if we don't want to change the gadget location, this line is required so that we can customize it later.

Replacing the "You might also like" LinkWithin text

By default, the LinkWithin gadget shows the "You might also like" title but we can change the text to anything we want. Just add the line below in blue within the LinkWithin code:
<div class='linkwithin_div'/>
<script>
var linkwithin_site_id = XXXXXXX;
</script>
<script>linkwithin_text='Related Posts:'</script>
<script src="http://www.linkwithin.com/widget.js"></script>
<a href="http://www.linkwithin.com/"><img src="http://www.linkwithin.com/pixel.png" alt="Related Posts Plugin for WordPress, Blogger..." style="border: 0" /></a>
And change the text - in this case, it will show "Related posts" instead of "You may also like these stories".

Changing the LinkWithin background color and thumbnails style

Within the template's code, search for the ]]></b:skin> tag and just above it, add the following CSS styling:
.linkwithin_div {
background: #EEEEEE; /* Background color for the related posts container */
padding: 0 10px;
border-top: 1px solid #DBDBDB;  /* Top border for the related posts container */
border-bottom: 1px solid #DBDBDB;  /* Bottom border for the related posts container */
}
.linkwithin_text {
font-family: Cambria,Georgia,sans-serif;
font-size:18px; /* Size for the related posts title */
color:#898989; /* Color for the related posts title */
}
a#linkwithin_logolink_0, a#linkwithin_logolink_1, a#linkwithin_logolink_2, a#linkwithin_logolink_3, a#linkwithin_logolink_4, a#linkwithin_logolink_5, a#linkwithin_logolink_6, a#linkwithin_logolink_7, a#linkwithin_logolink_8, a#linkwithin_logolink_9, a#linkwithin_logolink_10, a#linkwithin_logolink_11, a#linkwithin_logolink_12, a#linkwithin_logolink_13, a#linkwithin_logolink_14, a#linkwithin_logolink_15, a#linkwithin_logolink_16, a#linkwithin_logolink_17, a#linkwithin_logolink_18, a#linkwithin_logolink_19, a#linkwithin_logolink_20 {
display:none;
}
.linkwithin_posts {
width: 500px !important; /* Width for the related posts container */
}
.linkwithin_posts a {
border: 0 !important;
padding-right: 10px !important;
}
.linkwithin_posts a:hover {
background: #F5F5F5 !important; /* Background color on mouseover */
}
.linkwithin_img_0 {
background: #F5F5F5;
border: 1px solid #C1C1C1;
padding: 2px !important;
transition:all .2s linear;
 -o-transition:all .5s linear;
-moz-transition:all .2s linear;
-webkit-transition:all .2s linear;
}
.linkwithin_img_0:hover {
background: #ffffff;
padding: 2px !important;
opacity:.6;
filter:alpha(opacity=60)

.linkwithin_img_0 div, div.linkwithin_img_0,
.linkwithin_img_1 div, div.linkwithin_img_1,
.linkwithin_img_2 div, div.linkwithin_img_2,
.linkwithin_img_3 div, div.linkwithin_img_3,
.linkwithin_img_4 div, div.linkwithin_img_4,
.linkwithin_img_5 div, div.linkwithin_img_5,
.linkwithin_img_6 div, div.linkwithin_img_6,
.linkwithin_img_7 div, div.linkwithin_img_7,
.linkwithin_img_8 div, div.linkwithin_img_8,
.linkwithin_img_9 div, div.linkwithin_img_9,
.linkwithin_img_10 div, div.linkwithin_img_10,
.linkwithin_img_11 div, div.linkwithin_img_11,
.linkwithin_img_12 div, div.linkwithin_img_12,
.linkwithin_img_13 div, div.linkwithin_img_13,
.linkwithin_img_14 div, div.linkwithin_img_14,
.linkwithin_img_15 div, div.linkwithin_img_15,
.linkwithin_img_16 div, div.linkwithin_img_16,
.linkwithin_img_17 div, div.linkwithin_img_17,
.linkwithin_img_18 div, div.linkwithin_img_18,
.linkwithin_img_19 div, div.linkwithin_img_19,
.linkwithin_img_20 div, div.linkwithin_img_20 {
-webkit-border-radius: 100px;
-moz-border-radius: 100px;
border-radius: 100px;

}
.linkwithin_title {
color: #242424 !important; /* Color for titles */
font-family: Cambria,Georgia,sans-serif;
font-size: 12px !important; /* Font size of posts titles */
line-height: 24px !important;
text-align:center;
text-decoration: none;
}
.linkwithin_title:hover {
color: #000 !important; /* Color of posts titles on mouseover */
}
After adding this CSS, the LinkWithin gadget will look like this:

linkwithin gadget, related posts widget, blogger widgets

If you don't want round thumbnails, remove the code in red. In green you can see the parts which can be customized - there you can apply more styles or change the background color, text size, etc.

After you've made the changes, click on the "Save Template" button. So this is how we can customize the LinkWithin related posts widget. Enjoy!

Setting up Google Analytics for a 2nd or later blog

This article is about how to set up Google Anaytics to work on subsequent Blogger sites, if you have already set it up for your first blog or website.


If you already have Google Analytics set up, then the process is a little different to setting it up for your first blog (which is nicely described by GreenLava over on BloggerSentral) - because you already have a Google Analytics account, which you must add a new web property to.

How to set up Google Analytics for a subsequent blog


Log into Analytics using the Google Account which you use for Analytics overall (ie which you used for your other blogs or websites).


Choose the Admin tab  (currently linked from near the right on the orange menu bar)


From the drop-menu under Property, choose Create a New Property


Choose Website (it's the default)


Choose whether to use Universal Analytics (currently still beta) or Classic Analytics.
(I've chosen Universal for the blog that I've just set up - will be interesting to see how it's different from classic for blogger).


Enter the
  • Sitename
  • Blog's URL
  • Industry category


Choose the Reporting Timezone:  I've left it on US / Pacific, because that's what my other blogs are based on.


Click Get Tracking ID.    The page that shows has your Tracking ID, it's like this (where the n's and m's are numbers):

      UA-100nnnnn-mm


  • nnnnnnn is your own number, identifying your account.
  • mm is the number of this analytics property - it is what makes your property ID unique.


Log in to Bogger using an account which has Administrator rights for the blog.


Put this Tracking ID into the    Settings > Other > Google Analytics >  Google Analytics Web Property ID  field.  


Click Save settings.


Wait 24 hours or so, for the code to activate.    If you're not seeing statistics after that, check if your blog really is getting visits (eg visit it yourself a couple of times)  - and ask for assistance in the Blogger Product forum.


Do you have Adsense on more than one site, including this one?

If you have AdSense on more than one website, and you are going to have it on this site, then you need to take some extra steps so that Analytics gets the AdSense data.    See here for more information.


Do you need to install the tracking code?

As well as your trackingID, Analytics also shows a block of code, with this header:
This is your tracking code. Copy and paste it into the code of every page you want to track.

The good news for Blogger users with newer Dynamic or Designer templates is that we can ignore this:   Blogger puts the code in for us.

But if you're using an older Layout or Classic template, or a Designer template that's older, you may need to install some code (not the Analytics tracking code, though) manually.

If you'e in doubt, edit your template in the usual way, and search for:
<b:include name='google-analytics' data='blog'/>
If you can find it, then do nothing, your blog already has the code you need, and your statistics should start flowing soon.

If you cannot find that line, then add it, just before the </body> tag.  (Search for   </body   and paste just before it).

Either way - don't install the tracking code from Analytics, because as Blogger operates now, this will not correctly count visits from mobile devices.


Related Articles:

How to edit your Blogger template

Using Google Analytics if you have AdSense on multiple websites.

Understanding Google accounts

Friday, 7 February 2014

Advanced Random posts widget for Blogger with image thumbnails and snippets

When your blog has too many posts, visitors don't always have the time or desire to go through all the posts written there in order to make an idea of the blog's content. Thus, a random posts widget that will allow visitors to find content more easily could be really useful. This tutorial will show you how to add a random posts widget to display a list of posts in a random order with thumbnails and excerpts.

random posts widget for blogger


Adding Random Posts with Thumbnails and Posts Summary on Blogger

Step 1. Login to your blogger account, select your blog and go to "Layout".

Step 2. Add new widget by clicking on the "Add a gadget" link and select "Html/JavaScript" from the popup window.
html javascript widget, blogger gadgets

Step 3. After adding the HTML/JavaScript, copy and paste the following script inside the empty Content box.
<style>
#random-posts img {
    border-radius: 10px;
    float: left;
    margin-right: 5px;
    width: 75px;
    height: 75px;
    background-color: #F5F5F5;
    padding: 3px;
    transition: all 0.2s linear 0s;
}

#random-posts img:hover {
    opacity: 0.6;
}

ul#random-posts {
    list-style-type: none;
    padding: 0px;
}

#random-posts a {
    font-size: 12px;
    text-transform: uppercase;
    padding: 0px auto 5px;
}

#random-posts a:hover {
    text-decoration: none;
}

.random-summary {
    font-size: 11px;
    background: none;
    padding: 5px;
    margin-right: 8px;
}

#random-posts li {
    margin-bottom: 10px;
    border-bottom: 1px solid #EEEEEE;
    padding: 4px;
}
</style>
<ul id='random-posts'>
<script type='text/javaScript'>
var randomposts_number = 5;
var randomposts_chars = 110;
var randomposts_details = 'yes';
var randomposts_comments = 'Comments';
var randomposts_commentsd = 'Comments Disabled';
var randomposts_current = [];
var total_randomposts = 0;
var randomposts_current = new Array(randomposts_number);

function randomposts(json) {
    total_randomposts = json.feed.openSearch$totalResults.$t
}
document.write('<script type=\"text/javascript\" src=\"/feeds/posts/default?alt=json-in-script&max-results=0&callback=randomposts\"><\/script>');

function getvalue() {
    for (var i = 0; i < randomposts_number; i++) {
        var found = false;
        var rndValue = get_random();
        for (var j = 0; j < randomposts_current.length; j++) {
            if (randomposts_current[j] == rndValue) {
                found = true;
                break
            }
        };
        if (found) {
            i--
        } else {
            randomposts_current[i] = rndValue
        }
    }
};

function get_random() {
    var ranNum = 1 + Math.round(Math.random() * (total_randomposts - 1));
    return ranNum
};
</script>
<script type='text/javaScript'>
function random_posts(json) {
    for (var i = 0; i < randomposts_number; i++) {
        var entry = json.feed.entry[i];
        var randompoststitle = entry.title.$t;
        if ('content' in entry) {
            var randompostsnippet = entry.content.$t
        } else {
            if ('summary' in entry) {
                var randompostsnippet = entry.summary.$t
            } else {
                var randompostsnippet = "";
            }
        };
        randompostsnippet = randompostsnippet.replace(/<[^>]*>/g, "");
        if (randompostsnippet.length < randomposts_chars) {
            var randomposts_snippet = randompostsnippet
        } else {
            randompostsnippet = randompostsnippet.substring(0, randomposts_chars);
            var whitespace = randompostsnippet.lastIndexOf(" ");
            randomposts_snippet = randompostsnippet.substring(0, whitespace) + "&#133;";
        };
        for (var j = 0; j < entry.link.length; j++) {
            if ('thr$total' in entry) {
                var randomposts_commentsnum = entry.thr$total.$t + ' ' + randomposts_comments
            } else {
                randomposts_commentsnum = randomposts_commentsd
            }; if (entry.link[j].rel == 'alternate') {
                var randompostsurl = entry.link[j].href;
                var randomposts_date = entry.published.$t;
                if ('media$thumbnail' in entry) {
                    var randompoststhumb = entry.media$thumbnail.url
                } else {
                    randompoststhumb = "https://blogger.googleusercontent.com/img/b/R29vZ2xl/AVvXsEgR2bMmH85yjxR6WYQiOFkDC1Eebws0L74hgGS-6h0r2KCSIrid40A4OJgnNoym6vU8yi-3zxRftySJB_hvz14ViNbS79KDE-DdUw2tk8b-y8Sjd_6VPgOwvoWAbZp9hfPz0bTnQ-06vlM/s1600/no_thumb.png"
                }
            }
        };
        document.write('<li>');
        document.write('<a href="' + randompostsurl + '" rel="nofollow"><img alt="' + randompoststitle + '" src="' + randompoststhumb + '"/></a>');
        document.write('<div><a href="' + randompostsurl + '" rel="nofollow">' + randompoststitle + '</a></div>');
        if (randomposts_details == 'yes') {
            document.write('<span><div  class="random-info">' + randomposts_date.substring(8, 10) + '.' + randomposts_date.substring(5, 7) + '.' + randomposts_date.substring(0, 4) + ' - ' + randomposts_commentsnum) + '</div></span>'
        };
        document.write('<br/><div class="random-summary">' + randomposts_snippet + '</div><div style="clear:both"></div></li>')
    }
};
getvalue();
for (var i = 0; i < randomposts_number; i++) {
    document.write('<script type=\"text/javascript\" src=\"/feeds/posts/default?alt=json-in-script&start-index=' + randomposts_current[i] + '&max-results=1&callback=random_posts\"><\/script>')
};
</script>
</ul>

Random Posts Options

  • Thumbnail dimensions: to change the size of the thumbnails in pixels, replace the 75px value.
  • Summary length: you can control the the length of the summary (in characters) by changing the 110 value from var randomposts_chars=110;
  • Post info: if you want to hide the post date and comment count change 'yes' from var randomposts_details='yes'; to 'no';
  • Font Size for Posts Titles and Summary: to modify the font size for the post snippet modify the 11px value and for the posts title, the 12px value;
Click on the "Save" button and View your blog. The sidebar will display a random posts widget on each of your blog pages.

Thursday, 6 February 2014

Swedish newssite compromised


Today a Swedish and well-visited newssite, AftonBladet (http://www.aftonbladet.se), was compromised and serving visitors a fake antivirus or rogueware.

There are two possibilities as to the cause:
  • A (rotating) ad where malicious Javascript was injected
  • AftonBladet itself had malicious Javascript injected

Whoever the cause, the injected script may haven been as simple as:
document.write('< script src=http://http://www.aftonbladet.se/article/mal.php');

When trying to reproduce, it appeared it already was cleaned up, fast actions there.

Thanks to my Panda Security colleague Jimmy from Sweden, I was able to obtain a sample.


File:    svc-ddrs.exe
Image icon:


Size:    1084416 bytes
Type:    PE32 executable for MS Windows (GUI) Intel 80386 32-bit
MD5:     be886eb66cc39b0bbf3b237b476633a5
SHA1:    36c3671f37f414ad6e0954e094a1a7bd0dcc34fc
ssdeep: 24576:M2xJbbGmTvmN9BfQ0lc4Bt4Xsk2QkibF5BOWe8JH0:M6bb3MQ0lc434n2Qhh5kWe8JU
Date:    0x52F1C3E1 [Wed Feb  5 04:53:53 2014 UTC]
EP:      0x5a8090 UPX1 1/3 [SUSPICIOUS]
CRC:     Claimed: 0x0, Actual: 0x10eeb0 [SUSPICIOUS]
Packers: UPX 2.90 [LZMA] -> Markus Oberhumer, Laszlo Molnar & John Reiser
VirusTotal: https://www.virustotal.com/en/file/ee2107d3d4fd2cb3977376b38c15baa199f04f258263ca7e98cb28afc00d2dd0/analysis/
Anubis: http://anubis.iseclab.org/?action=result&task_id=12dc4daced1762174cdfa58df0872aae2&format=html


When executing the sample

Windows Efficiency Master


Fake scanning results


Besides dropping the usual EXE file in the %appdata% folder, it also drops a data.sec file with predefined scanning results (all fake obviously). Here's a pastebin with the contents of data.sec:
http://pastebin.com/DCtDWEbi


It also performs the usual actions:
  • Usual blocking of EXE and other files
  • Usual  blocking of browser like Internet Explorer
  • Callback to 93.115.86.197 C&C
  • Stops several antivirus services and prevents them from running
  • Reboots initially to stop certain logging and monitoring tools
  • Uses mshta.exe (which executes HTML application files) for the usual payment screen
  • Packed with UPX, so fairly easy to unpack
  • Connects to http://checkip.dyndns.org/ to determine your IP

This rogueware or fake AV belongs to the Tritax family, which has been going around for quite some time and has lots and lots of different names, but the design, concept and initial social engineering attack are all the same.
@ydklijnsma made an excellent post on this family, which you can read here:
http://blog.0x3a.com/post/75474731248/analysis-of-the-tritax-fakeav-family-their-active


Prevention

In this case, no exploit -nor Java/Adobe, nor browser- was used. Only Javascript was injected.
  •     Install an antivirus and antimalware product and keep it up-to-date & running.
  •     Use NoScript in Firefox or NotScripts in Chrome.
  •     Block the above IP. (either in your firewall or host file)


Disinfection
  •  Perform a full scan with your installed antivirus and a scan with another antivirus or antimalware product. You can check on VirusTotal which antivirus applications already detect this malware.
  • If you are having issues doing this, reboot your machine in Safe Mode and remove the malware. For any other questions, don't hesitate to make a comment on this post or contact me on Twitter.


Conclusion

Remember the PHP.net compromise? Although maybe not as big, the AftonBladet is still a very busy and frequently visited website. This shows that any website may have issues with malware or injected Javascript(s).

Follow the tips above to stay protected.


Information for researchers:

PCAP file with traffic (click)


Samples:
Filename MD5
data.sec 2b55d02b2deed00c11fa7ddd25006cbc
svc-ddrs.exe  be886eb66cc39b0bbf3b237b476633a5
svc-ddrs.exe (unpacked) d667ffdd794fcc3479415ec57de35a58
svc-ejhy.exe (related) 803df2164a3432701aff3bbf0acd2bfe

Wednesday, 5 February 2014

Remediate VBS malware


I have developed a small tool that will aid you to remove VBS malware (and unhide your files) from a machine, external drive (USB eg.) or in a network. I created the tool some months ago when I saw quite a lot of these doing the rounds.

The tool is simple and pretty much self-explanatory:


Remediate VBS Worm 8.0.0


Instructions on using Rem-VBSworm

You should run the script in the following sequence, at least on a normal machine:
Plug in your infected USB (if any) and choose A (wait), then B (wait) and afterwards C.
After these steps, perform a full scan with your installed antivirus product or perform an online scan.

Instructions in other languages are also available, namely Dutch, French, German and Polish:
Security Tool Spotlight: Rem-VBSworm (Deutsch)
Remediate VBS Worm (français)
VBS malware verwijderen (Nederlands)
Infekcje z mediów przenośnych (Polski)

Some tips and tricks:


  • Using option A, the tool will attempt to clean the infection. It will also fix any registry changes made by the malware. (for example it will re-enable Task Manager should it be disabled).
  • ! When you use option B, be sure to type only the letter of your USB drive!
    So if you have a USB drive named G:\, you should only type G
    This option will eradicate any related malware on the USB drive, as well as unhide your files (make them visible again).
  • With option C you can download Panda USB Vaccine to prevent any other autorun malware entering your computer.
  • With option D you have the possibility to disable or re-enable the Windows Script Host (WSH), to prevent any malware abusing it. 
  • I advise to end the script with Q as to ensure proper logfile closing. A logfile will open automatically, but is also created by default on the C:\ drive. (C:\Rem-VBS.log)
  • When the tool is running, do not use the machine for anything else.
    (it takes about 30 seconds to run)
  • If VBS malware is found, it will be automatically removed and a copy will be placed at C:\Rem-VBSqt.
  • Accidentally used an option and want to exit the script? Use CTRL + C to stop it.


You can use this to remedy the following malware:

  • Bladabindi‬
  • Excedow
  • Jenxcus
  • Houdini/Dinihu
  • Autorun worms
  • Any other VBS (VBScript) or VBE malware
  • Any other malware that abuses the WSH (Windows Script Host)


Download

Download on BleepingComputer:
Rem-VBSworm 8.0.0 Download


File integrity check:

MD5: 4c37021f17e02fb9fdb7db3287906bd5
SHA1: 7fef4a43f70262710127051778e0a50ec7a94e64

Mirror:
Rem-VBSworm (ZIP file)


Changelog:

07/06/2016
- version 8.0.0:
FIXED: issue when executing from drive other than system drive (option A)
IMPROVED: detection of malicious scheduled tasks (option A)
IMPROVED: detection of certain autorun/VBS worms


11/03/2016 - version 7.0.0:
ADDED: detection of malicious scheduled tasks (option A)
ADDED: malware detected on USB now copied to quarantine (option B)
ADDED: usage information on top of the tool
FIXED: issue launching download of Panda USB Vaccine (option C)
IMPROVED: autorun.inf vaccination on NTFS formatted drives (option B)
IMPROVED: error handling
IMPROVED: log output (should be final now)

23/12/2015 - version 6.0.0:
ADDED: logging of USB device ID
CHANGED: Panda USB vaccine download (now on BleepingComputer)
IMPROVED: log output is now completely streamlined and cleaned
IMPROVED: disabling of WSH on Windows XP (option D)
IMPROVED: scanning time (option A)
IMPROVED: detection of certain autorun/VBS worms

21/10/2015 - version 5.0.0:
ADDED: logging of installed antivirus
ADDED: detection of malicious shortcut links in startup folders
ADDED: malicious VBS files now automatically copied to quarantine for research purposes (on C:\Rem-VBSqt)
IMPROVED: handling of files, resulting in a false positive rate of almost zero
IMPROVED: detection of certain malware variants using autorun to spread or hide files
(Fanny worm, Andromeda/Gamarue malware)
IMPROVED: minor code cleanup, minor log output cleanup - greater visibility

21/04/2015 - version 4.0.0.:
ADDED: removal of AutoIT autorun worms
ADDED: version number (in main window and log)
ADDED: option D will now allow you to disable or re-enable the WSH
FIXED: false negative
IMPROVED: option B will now detect if you try to execute on system drive
IMPROVED: log output is cleaned and more streamlined

03/03/2015  - versio 3.0.0.:
ADDED: more information about attached drives & system
ADDED: root contents of removable drive will now be listed
FIXED: false positive
IMPROVED: general improvements

23/04/2014 - version 2.0.0:
First public version
ADDED: detections & disinfections will now be logged
ADDED: all attached drives are now listed
FIXED: False positive on unrelated files
FIXED: Issue with Read-Only files
IMPROVED: Registry fixes
IMPROVED: Scanning time
IMPROVED: Disinfection mechanism for USB-drives

10/12/2013 - version 1.0.0:
Private use only
CREATION


Conclusion

In regards to autorun worms, you should follow these precautions:

  • Install all your Windows Updates.
  • Disable autorun. This should already be done by Windows Update, but if not you can use:
    • Panda USB Vaccine, download from CNET
    • Follow the steps in this Microsoft article (also for companies)
  • Don't simply insert a USB-drive in your machine without knowing who it is from. Found a USB-drive at your parking lot? Yeah, don't even think about it. You might want to read:
    Criminals push malware by 'losing' USB sticks in parking lots
  • You can install and run Script Defender along your antivirus/antimalware product:
    Script Defender by AnalogX
    This will effectively block the execution of malicious scripts like VBS, VBE, HTA, ...
  • If you aren't planning on ever using VBscripts at all, or you are not working on a company laptop (which may use scripts!), you can also simply disable the Windows Script Host. You can use option D in my tool.
  • For companies, take a look at this as well:
    Command line process auditing
  • Last but not least, install an Antivirus and update it regularly.