Showing posts with label Tips & Triks. Show all posts

Wednesday, 3 July 2013

How to Generate and Add XML Sitemap?

An XML, also called Google sitemap, is necessary for a blog or website which helps search engine crawlers to crawl and index content on your blog easily. Blogger blogs with .blogspot sub-domains contain an xml sitemap on them which is generated automatically and kept updated with your latest content. The sitemap of blogs with .blogspot sub-domain can be accessed athttp://yourblog.blogspot.com/sitemap.xml and you can submit it directly to Google Webmaster Tools or anywhere else, but when you add your custom domain to your Blogger blog, the xml sitemap couldn't be accessed anymore and thus you need to manually configure XML/Google sitemap for your Blogger blog. To do so, follow below simple steps:

1. Visit http://ctrlq.org/blogger/ and generate XML sitemap for your Blogger blog by entering your blog URL there
sitemap-generator-blogger
2. After the generator generates sitemap for your blog, copy the generated text from the box
add-xml-blogger-sitemap
3. Now go to Blogger dashboard, select your blog and then go to Search Preference section in Settings
blogger-search-preference
4. In search preference, select Yes in front of Enable custom robots.txt content? and paste the sitemap content in the box which you have generated in first step
custom-robots-blogger
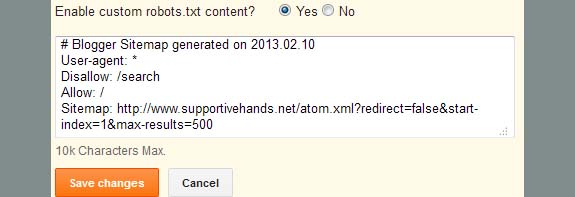
5. After pasting the content, Save changes

You are all done! Now whenever Google will crawl your blog, it will first look robots.txt file on your blog as it always do and then will crawl your entire blog. This XML sitemap doesn't need to be submitted in Google Webmaster Tools also and you don't need to update it after you generate and add it to your blog. All latest posts are fetched via atom.xml on your blog and your latest content is automatically suggested to Google bot. Thus your blog content will get indexed easily. Enjoy!

Additional: You can also use this free XML Sitemap Generator for sitemap generation.


Wednesday, 26 June 2013

RECENT COMMENTS USING BLOG FEED

Recent comments widget can be added to a Blogger blog using the feed URL as a work around for the lack of a recent comments widget by Blogger. The way to add is is to go your your Dashboard, click LAYOUT, then ADD A GADGET in the place you want it such as the sidebar. Then type in your blog feed URL such as http://YOURBLOG.blogspot.com making sure to replace YOURBLOG with the actual URL of your own blog as shown in the screenshot below:

Blogger feed URL widget

Then click CONTINUE and you will be presented with a CONFIGURE FEED popup. Then type in the title "Recent Comments" or any other title as you wish and tick the options you want as shown in the screenshot below:

Blogger feed widget

Click SAVE and you are done.

If you have a custom domain for your blog, you may also use the alternative feed URL such as http://www.YOURBLOG.com replacing YOURBLOG with the actual URL of your custom domain blog.

RECENT COMMENTS BY EDITING TEMPLATE


If you are comfortable with editing your blog template, you may also add this code to your template:

==============================
 <MainPage>
<h2 class="sidebar-title">Recent Comments</h2>
<ul>
<Blogger>
<BlogItemCommentsEnabled>
<BlogItemComments>

<li><$BlogCommentAuthor$> //
<a href="<$BlogCommentPermalinkURL$>">
<$BlogCommentDateTime$></a></li>

</BlogItemComments>
</BlogItemCommentsEnabled>
</Blogger>
</ul>
</MainPage>
=====================
How you find this blog leave a comment for this post

New Blogger contact form gadget

Blogger has recently added a third party CONTACT FORM gadget to its lists of gadgets. The contact form is fluid with width conforming to the width of the section to which it had been added so you don't need to worry over how wide your contact form should be:

blogger contact form gadget

There are only 3 fields (boxes) - Name, Email and Message.

To add a contact form, sign into Blogger (Dashboard), click the down arrow of the drop down menu on the extreme right side, select LAYOUT as shown in the screenshot below:

Blogger dashboard drop down menu to layout

At the popup, click MORE GADGETS on the left side, then select CONTACT FORM.

blogger more gadgets contact form

Now whenever anyone submits the contact form, you will receive a message in your email INBOX (the email which you used as a username for your Blogger account).

clear cache, cookies, browsing history

There may be times when you have made changes but don't see the changes when you view it with a browser. This may be because you are viewing a cached copies. What you need to do is to clear the cache memory.

This is how you can clear your cache memory for the following browsers:

Internet Explorer 7

Click "Tools" tab at the menu bar
Select "Internet Options"
Click on the "General" tab
Under "Browsing history", click on the "Delete" button
Click on "Delete files"
Click on "Delete cookies"
Click "Close" and "OK" to exit

Internet Explorer 8


Click "Tools" tab at the menu bar
Select "Internet Options"
Click on the "General" tab
Under "Browsing history", click on the "Delete" button
Uncheck "Preserve Favorites website data"
Ensure that both "Temporary Internet Files" and "Cookies" are checked
Click on the "Delete" button
Click "OK" to exit

Google Chrome 18+

Click on the tool icon on the top right hand corner
Select "History"
Click "Clear all browsing data"
Ensure that both "Empty the cache" and "Delete cookies and other site and plug-in data" are checked
Click on the "Clear browsing data" button

Mozilla Firefox 11+

Click "Tools" tab at the menu bar
Select "Options"
Click on the "Privacy" tab
Under "History", click on the "clear your recent history" hyperlink
Ensure that both "Cookies" and "Cache" are checked
Click on the "Clear Now" button

Safari 5+

Click on "Safari"
Select "Empty Cache"
Click "Empty"

Click on "Safari"
Select "Preferences"
Select "Privacy" tab
Click "Remove All Website Data"
Click "Remove Now"

HTML Code For Simple Links

Simple links

CODE:

<a href="choose your url">choose your link name</a>

EXAMPLE: 

<a href="http://khazana-soft.blogspot.com/">ultimate blogging tips and tricks</a>
- See more at: http://ultimate-blogging-tips-and-tricks.blogspot.com/#sthash.webNrLlZ.dpuf