Wednesday, 30 April 2014

Freeablo is that Diablo engine remake we've been wishing for, is currenly looking for contributors (and general ravings about Diablo. In fact, mostly that)

Freeablo engine in its early stages
Who doesn't love the original Diablo? When it was first released in 1996, this game set a notable landmark for making the RPG genre more accessible to a broader audience, while still keeping many gameplay aspects of classic Rogue-derived RPGs, that kept the game fresh and unique even after being completed several times. This bridge between classic and modern aspects combined with an incredible attention to detail, a uniquely crafted atmosphere that still gives me the creeps, and a gameplay pacing and length that is just the right balance between level progression and grinding, has helped making Diablo one of my all time favourite games. Well, that and Battlenet, of course, we can never forget how Diablo was one of the first to make it so easy to just go dungeon crawling with a couple of friends online.

There is, however, one thing that I don't like about Diablo. One thing that annoyed me all over these years of repeated runs and occasional multiplayer meetups. And that is how Blizzard itself decided to neglect its maintenance and compatibility completely and practically drop all active support for it, despite keeping the Battlenet servers online. Yes, you will have a tough time trying to buy a fresh copy of this game nowadays, because Blizzard cares so much about their legacy games they don't even sell 'em anymore in their official store. But even if there still are plenty of used copies available online for cheap, running the game on modern systems can be a whole a new quest, given that the last patch is dated from 2000, which means no performance maintenance, no improved graphics compatibility, in fact, not even additional screen resolutions, and certainly no stability updates whatsoever. 

The first Cathedral levels loaded and randomly generated in Freeablo
As a matter of fact, Blizzard has a whole tradition of being disrespectful to legacy fans. They refuse to let resellers touch their games (physical Diablo II and Starcraft copies still go by $25 nowadays, with no Steam or GOG versions in sight), they frequently discourage and hamper any type of mod support or mod attempts, other than whatever's produced under their little walled garden editor-type programs and, obviously, they never ever released the source code of any of their games, just to make sure us, the plebeian fans, would never touch their precious abandoned heritage with our filthy paws.

Luckily, this might just be about to change, with the coming of a bold, new engine remake project most aptly named Freeablo. This project aims to rebuild and expand upon the original Diablo engine, keeping it fully portable and compatible with modern systems, as well as making it adaptable and moddable for anyone willing to modify the game. All of this while still paying due respect to Blizzard and requiring the original game files in order to run the game. Now isn't this nice? 

As of the current 0.1 release, there is still much to be done, which is why the project is open to contributors of all sorts. Hopefully, with enough time and effort, we can all free Diablo one day from the clutches of proprietary software and greedy corporate execs who are still stuck in a 90s mentality on how to commercialize and support video games.

Code License: GPLv3

Assets License: Relies on original proprietary data files

Official Website
Source Code (Github)

Forex Bank Prediction resources

Whether you are a long term trader or a scalper you will always be curious about and would like to know what are the big players in the Forex market doing. What are their positions? Fortunately, certain websites do provide that kind of information. To be more precise I am talking about the positions that are held by the big banks and big hedge funds. 

The best websites with bank positions, or in my opinion, the most useful ones are:

1. eFXnews - it is Boston based financial media agency covering global FX markets. It provides the positions held my the biggest players in the market. Highly recommendable one.

2. PLTfx - it is FX trading advisory and Funds Management. Another great resource that provides bank Forex positions. It requires login.

3. Forex Quebec - it is global Forex trading portal that provides the bank positions under its bank forecasts section. It is a good resource though it is not providing the forecasts on daily basis.

4. Dukascopy TV - a Forex broker that is providing the information in video format on part-time basis.

5. Forex Street - another global Forex trading portal. It provides many positrons of a slightly less relevant players in the market. 

In short, it is always useful to know what are the biggest players in the market predicting before you enter your position. 

Saturday, 26 April 2014

Help visitors who arrive at your blog via a link to a deleted post

If you sometimes delete posts from your blog, then it's a good idea to provide some help to people who who arrive at your blog via links to those posts.

(Even if you don't have any links to those posts, it's likely that a search-engine somewhere will have some - and other people may have bookmarked or shared them, too.)

There are two options for doing this:


Post-specific redirects

Use these if you want to re-direct visitors who come to a particular previous post:

Go into Settings > Search Preferences, click Edit beside Custom Redirects.


Click New Redirect, to create instructions for what to do if a visitor tries to navigate to a specific post.

Put the address of the post that you want to make a re-direct for into the From field.

Put the address of the post that you want to visitors to be taken to into the To field.
For both addresses, the part you need to enter is the URL of the post from the first backslash on.  
Do not put in your blog-address
Do include the date-part of the URL and the backslash.
eg
for    http://blogger-hints-and-tips.blogspot.com/2013/01/changing-a-label-value-for-all-posts.html
use   /2013/01/changing-a-label-value-for-all-posts.html

Tick the Permanent check-box.

Click Save.

Click Save Changes.   (Yes, you need to do both Saves)


A generic page-not-found message

Use this if you do not want to set up post-specific re-directs, or if you cannot remember the URL of your deleted posts.

Go into Settings > Search Preferences, and edit the Custom Page Not Found option.

Put in some text welcoming the visitor, explaining that the page they were looking for is no longer available, and suggesting other places that they could try.

 This text can include links to other posts, so long as you hand-code them. (You might like to get code for this using the post editor).

Adding an RSS feed icon to your blog, using Feedburner

Feedburner's chicklets are used to add the standard "orange radar" button to your blog.  This lets readers to subscribe the RSS feed of your choice.   The information is targeted to Blogger users, but most of it applies to anyone who uses Feedburner.


What is a Chicklet, and why you need one:

Previously I've explained how to remove the (ugly and confusing) "Subscribe to Posts (atom)" link from your blog, and why RSS / Subscribe to Posts is important to your blog and how to create a Feedburner feed for it.

But an RSS feed is useless unless people subscribe to it.  So as well as making the feed, you also need to put something in your blog that lets your readers sign up for it.

A standard option for this is the orange square with "radar" markings on it, which many people call a "chicklet" (since it lets your viewer - the chicken? - have access to the feed you are providing).

Feedburner also has options for:
  • Using a custom icon from popular web aggregators
    I'm not sure that this is a great idea, because you don't know what feed-reader software your readers actually use, and the whole point of a feed is that you don't dictate how people see your blog.
  • Using an icon that promotes Feedburner.  This cute, but I've never seen anyone use it.

How to add a chicklet to your blog:


Log in to Feedburner, using the Google account that owns the feed.

Click on the name of the feed you want to provide a subscription tool for.

Choose the Publicize tab.

Choose the Chicklet Chooser option, from the left navigation bar.

Choose one of the options shown:  the default one is the standard-size RSS-radar-button.

Scroll to the bottom of the screen and either
  • Copy the HTML that is shown, and add it to your blog in the same way that you would add any other 3rd party HTML,

    OR  (note:  there have been some reports that the option below doesn't work any longer, as Blogger has changed but tools like Feedburner have not help up)
  • Choose Blogger from the drop down list beside "use as a widget in", and click Go

    This takes you to a Blogger screen where you can choose which blog you want to add the gadget to (if your current login has more than one), and what title to use for it. 

    When this is done, click Add Widget

    This takes you to the Design > Layout tab, where you can drag-and-drop the widget to wherever you want it.  
    (When I tried it just now, instead of the layout screen I got a "bad request" message.  However pressing Save and then View Blog brought up the blog with the gadget showing, and I was able to go back and edit the layout later on).


What your readers see:

Your readers will see an item, wherever you put it, that looks like this:

or something similar, depending on what option you chose from the Chicklet Chooser screen.

When someone clicks on one of these items, they are taken to either a screen where they choose which feed-reader software to add your site to (if you've used the first option), or to the specific feed-reader software.


Customising the widget code:

If you use the generic RSS button, then you may want to customise the widget code slightly:  It looks ugly not to have a space between the picture and the word "Subscribe" - and it's good to have the phrase "RSS" on the screen because that'ss what RSS-savvy people search for when they're looking at a website and want to find the subscribe option.  I also prefer if the subscribe action opens in a new tab/window, rather than taking the reader away from my blog.

This is quite easy to do, if you put a few line breaks in so you can see that
  • the code is actually two separate link statements
  • the first one has an image (the orange "radar bars" that it takes from Feedburner)
  • the second is a text link
  • both of them link to the RSS feed address

So it's quite easy to add a couple of extra spaces (shown as   ), change the text as I've done below, and add   target="_blank"   to both of the links
<a href="http://feeds.feedburner.com/Blogger-hints-and-tips" rel="alternate" type="application/rss+xml" target="_blank">
<img src="http://www.feedburner.com/fb/images/pub/feed-icon32x32.png" alt="" style="vertical-align:middle;border:0"/>
</a>

&nbsp; &nbsp; &nbsp;

<a href="http://feeds.feedburner.com/Blogger-hints-and-tips" rel="alternate" type="application/rss+xml" target="_blank">

Subscribe via RSS

</a>

I generally also put the option to subscribe to my blog by email and the Feedburner FeedCount item (which shows the number of subscribers) in the same area, to give people options, and to encourage them to subscribe.


Related Articles:

Using Feedburner to give your blog a Subscribe by Email option

Adding 3rd party HTML to your blog

Why RSS / Subscribe to Posts is important to your blog

How to create a Feedburner feed for your blog

Friday, 25 April 2014

Display Google Map using API V2 in android

Displaying Google Map in android using the API version 1 is deprecated now. Google introduce a lot of changes in displaying Google Map using API version 2. In this post i demonstrate how to display the Google Map using API Version 2.
Ads By Google


Step 1:
Install the Google Play Service SDK 
For displaying Map using API V2, you need the Google Play Services. So first step is to open your Android SDK manager and install the Google Play Services.

Step 2:
Add the Google Play Service as a library project into your android work-space. 
After the successful installation of Google Play Service SDK, you can find out the Google play service library project on the following location in your android SDK folder. 
                                           sdk-->Extras-->Google
Import the Google Play Services as a library project into the work-space. Don't forget to choose the options for copy the project into workspace. 
Step 3:
Add the Google play library project into your android project. 
Now you can add google play service-libraries into your project. Right click your project and choose its properties and choose the android option and click add button at the bottom of  the window. 
Step 4:
Generate the SHA-1 fingerprint Using the Java keytool. 
You need to generate the SHA-1 fingerprint using java keytool for obtaining the Map API key. Open your command prompt and type the following command. 
 keytool -list -v -keystore "%USERPROFILE%\.android\debug.keystore" -alias androiddebugkey -storepass android -keypass android  
After type the above command you got the certificates figerprints. Copy the SHA-1 fingerprints.

Step 5:
Obtain the Google Map API Key using the SHA-1 Fingerprint and your application package name from the Google console. 
Login into Google console  and at the left corner of the page choose the API's under API's & auth option. Now search for Google Maps Android API V2 and change its status from off to on
Now click Credentials at the left side of the page and click the CREATE NEW KEY button. Choose Android Key option from the dialog window. Now insert your SHA-1 fingerprint and your application package name into the text area of the newly generated dialog window and click create. Now you can see the newly created API KEY for android at the top of the web page. Copy that key. 

Step 6:
Specify the Google Play Service versions in the Manifest file.
Open your android Manifest file and add new Xml tag called meta-data between the Application tag. Specify your API Key as the value for the meta-data. 
 <meta-data  
android:name="com.google.android.maps.v2.API_KEY"
android:value="Enter your API Key Here">
</meta-data>

Step 7:
Add the required permissions in manifest file
We need to specify some permissions in manifest file  for displaying the Google Map. Following are the permissions and its usage. 

android.permission.INTERNET = "used to connect to the Google Map Servers for downloading the map tiles "
android.permission.ACCESS_NETWORK_STATE= "used by the API to check the status of the connection for downloading the data"
com.google.android.providers.gsf.permission.READ_GSERVICES = "Used by the API to access Google web based services".
android.permission.WRITE_EXTERNAL_STORAGE = "Used by the API to save the Map tile data into the external storage".
android.permission.ACCESS_COARSE_LOCATION = "Used by the API to access the WiFi or mobile data to find out the device current location".
android.permission.ACCESS_FINE_LOCATION = "Used by the API to access GPS for finding the current location ".
 <uses-permission android:name="android.permission.INTERNET"/>  
<uses-permission android:name="android.permission.ACCESS_NETWORK_STATE"/>
<uses-permission android:name="android.permission.WRITE_EXTERNAL_STORAGE"/>
<uses-permission android:name="com.google.android.providers.gsf.permission.READ_GSERVICES"/>
<uses-permission android:name="android.permission.ACCESS_COARSE_LOCATION"/>
<uses-permission android:name="android.permission.ACCESS_FINE_LOCATION"/>

Step 8:
Specify the OpenGL ES version in manifest. 
The google Map API V2 uses the OpenGL ES version 2 for rendering the Map on devices. 
  <uses-feature  
android:glEsVersion="0x00020000"
android:required="true"
/>

Step 9:
Add a fragment to the activity-main.xml file for display Map
 <?xml version="1.0" encoding="utf-8"?>  
<fragment xmlns:android="http://schemas.android.com/apk/res/android"
android:id="@+id/map"
android:layout_width="match_parent"
android:layout_height="match_parent"
android:name="com.google.android.gms.maps.MapFragment"/>

Since Google Map uses the Google play services, it is not possible to test the Google map app in an android virtual device. For testing this app you need to install the .apk file in a real device.

2 things i hate on Facebook Ad Manager and Power Editor

HATE! HATE!! HATE!!!
facebook ad manager
  1. You can't, under no circumstances, change the ad target url! You create an ad with website conversions objective. You create a bunch of them, the whole ad set with many different targeting options. Then you want just copy this ad set and point it to another target url. And you can't! You must click on EACH ad, then create a similar ad - only so you will be able to change ad target url.
  2. If you want hide your affiliate urls, this works ONLY if you create your ads each one new from scratch! If you create an ad with shorten url as target, then create similar ad and input as target url your next shorten url - you mean it would work? NO, damn! Facebook is smart enough to show in the ad body the original url. And it is funny enough to show the SHORTEN url, if you run with the mouse over the opriginal url. Is it not stupid?

Monday, 21 April 2014

Keep a backup copy of complicated gadget settings

This article explains why it's a good idea to keep a backup copy of settings for your gadget, in particular for HTML/Javascript gadgets that have complicated, hard-to-regenerate, code.


Blogger's backup tools let you take copies of:
  • your post-contents and (separately) 
  • your template. 

Some 3rd party backup tools (eg HTTRack) let you make backup copies of how your blog looks - including the consequences of displaying your gadgets.

But as far as i know, there is no way that you can back up the settings (ie parameters or configuration) that are stored inside the widgets on your blog.

This can be a problem if you accidentally remove a gadget, or if you have an HTML gadget and get the code wrong in it: Blogger is quite unforgiving sometimes, and the HTML/Javascript gadget editor simply removes any code that it doesn't understand.

In some cases, this isn't not a big problem  eg if you show a picture as a gadget, then it's generally easy enough to work out characteristics that you would need to enter to re-create the gadget.

But if you lose a complex gadget (eg your own customised set of subscription buttons), then re-creating it could be difficult and time-consuming.

So - for HTML/Javascript gadgets which have code which you think is complex, I recommend keeping a backup copy of the gadget code somewhere.

Personally I usually put it in a post in a private blog where I draft posts and keep the documentation for each blog - but you could use a range of other places, eg a text file on your computer or on Google Drive, or even any email message to yourself.


How to back up code from HTML/Javascript gadgets in a private blog post

Every time you edit a gadget that you want to keep a backup for, then just before you click Save:
  • Press Ctrl/a to select all the text in the gadget window.
  • Press ctrl/C to copy it
  • Switch to use Blogger in a different window
  • Open up the documentation blog, and navigate to the post where you keep the code for that gadget
  • Edit that post - or make a new one if you don't have one already.
  • Make sure that you're in Compose view, and the Options > Compose Mode setting is on "show HTML literally" (ie not on "interpret HTML")
  • Paste the gadget code into the post, and publish it.

Although this sounds tedious, it's really very quick to do. And losing complicated gadget code, even once, is a good incentive to remember to back it up every time.

Hint: Put a comment to remind yourself where to back this gadget at the top and/or bottom of the gadget code. This reduces the chance that you will forget. A comment is done in HTML like this:
<!-- DON'T FORGET TO BACK UP THIS GADGET CODE  -->


How to back up complicated non-code gadgets

If your gadget has complicated settings which aren't code, one option is to take a screen-shot and save it to your photo collection, or even just a text-file or documentation-blog post where you keep notes about what the settings are.

You won't be able to automatically restore your gadget settings from this, but it should be a good reminder of what you need to do (provided you can find the picture when you need it).

Unfortunately there's no easy way to pack up linked-list or blogroll gadgets at the moment. However making a copy of your site using HTTracker will show you the list, and what the items link to.

Or you could build your linked list code manually (using the same trick that that I recommend for getting picture code) and put it into a HTML/Javascript gadget, which is based up as described above. The code for a handcrafted linked-list gadget looks like this:
<ul>
<li>PUT THE TEXT HERE FOR YOUR FIRST LINK TEXT.</li>
<li>PUT THE TEXT HERE FOR YOUR SECOND LINK TEXT.</li>
<li>PUT THE TEXT HERE FOR YOUR THIRD LINK TEXT.</li>
<li>etc</li>
</ul>


Related Articles:

How to add a picture as a gadget in Blogger

Using the post-editor to build HTML code for gadgets

Prepare your blog-posts in private, using a documentation blog

Saturday, 19 April 2014

5 Tips On Using Google AdSense To Make You Money

Google AdSense can be an absolute goldmine for anyone who is willing to invest some time in learning how to use it effectively. A lot of people who start using Google AdSense tend to get turned off by it within the first couple of months because they just don’t seem to be making the money that they had expected.
Arm yourself against making the typical newbie mistakes and read our tips below so that you’ll know just how you can make some good cash off of AdSense.

1. Where Does AdSense Make Sense?

Perhaps the biggest mistake that those who use AdSense make is that they throw ads on every type of website imaginable. Don’t waste your time, effort and ads on sites that won’t be bringing in the cash.
Let’s take a tech info website for example. If you run a site that provides high level tech advice, then there’s a very low chance that anyone visiting your site will bother with your AdSense ads. Why? Because these people just don’t generally click on those types of ads. They know about AdSense, and they didn’t come to your website for anything but the information written on your site. They want answers to a problem, and then they want to get out.
Let’s say you have a website that’s more geared towards sales, however. This would be a better type of site to have ads on as people will be far more likely to click on the advertisements you put up.
It may take a bit of trial and error since some niches tend to do better than others when it comes to these types of ads, but generally speaking, if your blog or website is about selling things, then AdSense will work better for you.

2. “SmartPricing:” Anything But Smart

Whenever possible, you have to avoid Google’s “SmartPricing” scheme. With SmartPricing, Google gives advertisers a discount based on how popular or “valuable” your website is. They tend to base this on your site’s click through ratio.
So if your website has a high click through ratio, then the perceived value of your site is high so then the cost per ad click is higher. If your click through ratio is low, however, the value of your site is “low” so you get less money per click. The difference between a SmartPriced site and a non-SmartPriced site can be anywhere from a couple cents to several dollars in difference.
One way to avoid this is to post your AdSense ads only on your older posts. Why? Because anyone who regularly visits your site isn’t going to click on your ads. If you post them on your older posts however, you’ll be able to possibly keep your click through ratio pretty high. There are a lot of resources out there about how you can change the coding of your website or blog to keep your ads only on your older posts.
Another way to avoid the dreaded SmartPricing is to display your ads to those who have landed on your page through a search engine only. You can again tailor your blog using the “function” file to change where the ads are displayed.

3. Choose The Best Keywords

Google is all about keywords, so in order to make the biggest profit you need to choose the best CPC keywords out there. You can use a number of great tools out there to help identify what the high paying keywords for your niche are, and there are several lists supplied for free, such as www.rumler.com.
Keywords also determine what kind of ads are going to show up on your website or blog. Nothing’s worse than visiting a website that’s cluttered with ads that don’t even make sense. Target your keywords so that you’ll be able to “influence” what types of ads will show up on your blog or site. Make sure that these keywords are on your website or blog entry, but BE CAREFUL. If the keyword density is too high, you WILL be penalized by Google and can even be tossed out of their AdSense program.
TIP: Read Google’s terms of service. Once you’re out of the program, you’re pretty much out for good. Follow the terms of service, stay in their good graces, and write greatcontent so you’ll continue to get visitors who’ll click on your ads.

4. Choose Big Ads

AdSense advertisements come in a variety of formats, so you can tailor the formats to see which works best with your blog. Having an advertisement that looks good on your blog or site is important, but keep this in mind: the large 336×280 rectangle sized advertisements has long proven to give the best payout. Maybe this is because the ad is right in any visitors face, or maybe it’s because that size can display video ads (which are increasing in popularity). Either way, it may be a good idea to start out with an ad around that size.

5. Monitor Your Success

No matter what you do with your blog or website, you need to keep track of how successful your ads are doing. If you don’t monitor your ads, then you will ultimately fail. You’ll be able to pin point which ads work, which don’t, and over time you may discover that certain ads work best at certain times throughout the year while others work best at other times.
One of the best things that we can suggest is that you look at your top 1/5 of pages, and then you take a look at your bottom 1/5 of pages. Why are the top 1/5 of pages making more money? What are you doing right? Try to take what seems to be working with the top 1/5 of your pages and then incorporate those ideas and methods into the bottom 1/5.

You’ll also be able to quickly see whether or not your chosen keywords are making money. If your keywords aren’t working, change them up! You should always do a top keyword run at least once a week to make sure that your site is up to date and current.

ADDRESS AND PHONE VERIFICATION

What is address verification?
To protect the security of accounts, Google requires you to verify your address before we can send you any payments. To do so, we mail a Personal Identification Number (PIN) to your Payee Profile address. You'll then need to enter this PIN within your account.
When will my PIN arrive?
We'll print and send your PIN by standard mail several days after your account balance reaches the verification threshold for the first time. PINs typically arrive within 2-4 weeks, but may take longer depending on your location.
What does the PIN mailer look like?
We mail your PIN on a white postcard measuring 4.5 x 6 inch (11.4 x 15.2 cm). See an example
When do I need to enter my PIN?
You'll have 6 months from the date your first PIN is generated to enter it in your account. If you haven't entered it after 6 months, we will stop showing ads on your pages.
Where can I enter my PIN?
When you receive your PIN, enter it in your account following the instructions on the PIN mailer.
What if my PIN doesn't arrive?
We understand that due to postal service issues in your area your PIN can fail to reach you. That's why if you don't receive your first PIN, you can request 2 additional replacement PINs. Learn how to request a new PIN.
Can I send you a copy of my official identity document or domestic bill?
Only if you've requested your maximum of 3 PINs and haven't received any of them within 4 weeks of your last PIN request. In this case, sign in to your account and you'll see a notice on your Home page with further instructions on how to send us an official document proving your address through a 'Contact Us' form.

Choose or change my payment method

To choose or change your form of payment, follow these steps.
  1. Sign in to your account.
  2. Visit the Account settings page.
  3. In the Payment settings section, click "edit payment method".
  4. Choose the radio button for your preferred form of payment and click Continue.
  5. Follow any additional instructions to choose your form of payment, and save your changes.
Please be aware that you won't be able to select a form of payment if your earnings haven't reached the payment method selection threshold.

Monday, 14 April 2014

Best Samsung Galaxy S5 Cases: Pick Your Favorite

Samsung Galaxy S5 gets its Official reveal At MWC 2014 two months ago and enjoyed strong sales on launch day, which set a new record for Samsung Electronics for launch day sales beating the achievement of the Galaxy S4 by over 30%. Just bought a Samsung Galaxy S5 or planning on buying one? If so, you should not miss the best Samsung Galaxy S5 Cases we collected for you.
As all we know, Belkin always offers high-quality phone cases. And today I will still put it in the first position. Belkin 2-In-1 Wallet Folio Galaxy S5 Case comes in four different color combinations, including Azalea /Fiesta, Ink/Lavender, Black/Gravel and Lagoon/Ink. This folio can Snap your Galaxy S5 into the inner hard shell frame for full back protection and close the outer cover to protect the front. A soft microfiber inner lining keeps your screen safe from scratches, and the tab has a magnetic snap to keep everything in place.

The case also has three card slots, so if you need to, you can ditch your whole bag and only carry the essentials. In addition, they've added a vertical pocket for notes, cash or business cards.

Features:
  1. This high-quality case is compatible with Samsung Galaxy S5
  2. Simple design. Stylish, fashionable and Smart. Ultra-thin flip design gives you excellent experience;
  3. Extra-strong quality leather material; Built-in three card slots are convenient and practical to use.
  4. Protect your phone from Scratches, Dusts, Collisions and Abrasion;

This Samsung official case adds wireless charging to your phone’s arsenal of abilities and the intelligent S-View feature lets users read messages, answer calls, listen to music and take pictures without needing to open the case. This case is available in black and white.
Survivor Clear is crystal-clear polycarbonate married to tough, resilient TPE rubber at edges and corners, to give your S5 impact protection where it needs it most. And holding it feels great, thanks to a slightly curved silhouette. The company claims your Galaxy S5 can survive a 6-foot drop onto concrete without enduring any damage. Anyway, I don’t hope that happened in your real life.
There are also other Cases for Samsung Galaxy S5 and I will update it later. Now just choose your best one to protect and decorate your phone. 


Friday, 11 April 2014

Hello, My Dear Readers

Hello My Dear Readers,

Long time no see, isn't it? I'm pretty excited to announce that the samsung-center.blogspot.com will continue to offer you the latest news, tips and apps for Samsung/Android smartphone and tablets from today.

I feel that Blogger is still a great community and that’s why we choose continued to offer high-quality content to all of you. Any advice, shares and comments are welcomed.


A Big Thank You For All Your Support! 

Tuesday, 8 April 2014

android fragment example

In this post i am going to present a simple example about fragments in android. In this example there are  two fragments presents, and add them into the main activity using two separate relative layouts. There are two buttons on the main activity, first button is for open the first fragment and by clicking the second button user can open the second fragment.
Ads By Google


MainActivity.java
1:  public class MainActivity extends Activity {  
2: Button B1,B2;
3: @Override
4: protected void onCreate(Bundle savedInstanceState) {
5: super.onCreate(savedInstanceState);
6: setContentView(R.layout.activity_main);
7: B1 = (Button)findViewById(R.id.b1);
8: B2 = (Button)findViewById(R.id.b2);
9: B1.setOnClickListener(new OnClickListener() {
10: @Override
11: public void onClick(View arg0) {
12: FragmentManager FM = getFragmentManager();
13: FragmentTransaction FT = FM.beginTransaction();
14: FragmentOne F1 = new FragmentOne();
15: FT.add(R.id.fr1_id, F1);
16: FT.addToBackStack("f1");
17: FT.commit();
18: }
19: });
20: B2.setOnClickListener(new OnClickListener() {
21: @Override
22: public void onClick(View v) {
23: FragmentManager FM = getFragmentManager();
24: FragmentTransaction FT = FM.beginTransaction();
25: FragmentTwo F2 = new FragmentTwo();
26: FT.add(R.id.fr2_id, F2);
27: FT.addToBackStack("f2");
28: FT.commit();
29: }
30: });
31: }

FragmentOne.java
1:  public class FragmentOne extends Fragment{  
2: @Override
3: public View onCreateView(LayoutInflater inflater, ViewGroup container,
4: Bundle savedInstanceState) {
5: // TODO Auto-generated method stub
6: View v = inflater.inflate(R.layout.fragment_one_layout, container,false);
7: return v;
8: }
9: }

FragmentTwo.java
1:  public class FragmentTwo extends Fragment {  
2: @Override
3: public View onCreateView(LayoutInflater inflater, ViewGroup container,
4: Bundle savedInstanceState) {
5: // TODO Auto-generated method stub
6: View v = inflater.inflate(R.layout.fragment_two_layout, container,false);
7: return v;
8: }
9: }

fragments_in_android


Monday, 7 April 2014

CastleVille Legends Coins Hack


Free Download CASTLEVILLE LEGENDS COINS HACK No Survey,No password

About Castle Ville

CastleVille was a social network game made by Zynga's Dallas studio and was released on November 2011. It combined a number of elements from the company's other "Ville" range of games. On launch it had received a million "likes" on Facebook. By the end of its first month, it had become the fifth most popular game on Facebook with 26.5 million players. The game was a freemium game, meaning there is no cost to play but players have the option of purchasing premium content.

Gameplay

Set in a medieval world, the game allows players to build their land up with castle elements, and craft armor, art and trade items. The objective is to explore the unknown land around the starting territory and expand the player's empire into it. The character's avatar can be customized, and the world features peasants, pirates, princesses and Vikings. A new reputation system was developed to encourage players to be social within the game in order to unlock new items and actions such as trading.

Game resources

Energy = is vital to play the game because it helps you do actions in your Kingdom such as cutting grass or trees, mining rocks or taxing houses. The maximum limit is 25 energy, but you can increase it by crafting an Energy Totem with the Workshop. Consumable bottles of energy that increase the current amount of energy can be bought in the Market or gifted to friends. Energy also regenerates one every five minutes, or 50 minutes for the entire energy bar to fill up.
Coins = is the principal currency used on CastleVille. It helps you buy most items from the Market
Crowns = is the special currency that helps you finish quests faster or use to buy items, clothes, or buildings that are only available with Crowns, or are locked due to your level. You gain one every time you level up. You could also get Crowns by USD payment.
Reputation Hearts = are points that you obtain by helping your neighbors. It's another way to obtain items or clothes that coins can't buy.
Experience Points = are the blue stars that increases your level after reaching the required points. You always receive at least one XP point by doing anything in your Kingdom, but you could increase that number to receive two XP points every time you do something by completing the Stonehenge Limited Time Quest.
Alliance Points = are the points that you gain every time you do any action on your neighbors' kingdoms to create alliances. This helps unlock new buildings and items.
Castle Points = are the points that you obtain by constructing Royal Buildings. Increasing its number helps you open new land for your kingdom.

https://en.wikipedia.org/wiki/CastleVille


Tools Reqquired :

Cheat Engine

Download Cheat Engine Free


STEPS :

  1. OPEN YOUR GAME IN ANY BROWSER
  2. OPEN CHEAT ENGINE
  3. ATTACH TO CORRECT PROCESS
  4. WRITE COINS AMOUNT YOU HAVE
  5. CLICK FIRST SCAN
  6. NOW AGAIN COLLECT OR USE A LITTLE COINS
  7. NOW WRITE THE AMOUNT OF MONEY YOU HAVE
  8. CLICK NEXT SCAN
  9. NOW SELECT ALL RESULTS
  10. CLICK RED ARROW
  11. NOW SELECT ALL
  12. CHANGE VALUE TO 400000


Sunday, 6 April 2014

AUD/USD Forex Monthly Report 7th April 2014

 
AUD Primary & Monthly cycles
 
My view was that the AUD would continue lower, as part of the Dilernia Principle with the Primary cycles.
 However, it has done the opposite, and has broken out within the Monthly cycles in the last month of the Quarter, which suggests the trend will continue higher in the 2nd Quarter.
 
This suggests that the trend will continue up into the April highs, and into the 2014 Yearly 50% level @ .9449.


However, my view is that is will follow a similar pattern as GOLD (click the above link)
 
The current price action is following a retest pattern, where it retests last year''s breakout that often aligns with the Yearly 50% level. Once that completes, my view is that the AUD will resumes its downward trend towards the 2014 lows.


Saturday, 5 April 2014

Shortest URL Shortener ever!

As the title said, http://v.gd is the shortest URL shortener i ever seen (and it can techically exist). I find this service super comfortable and decided to make it even more comfortabler and share the results: restartless Firefox add-on and bookmarklet.

5.04.2014 UPDATE: my Firefox addon "Shortest URL Shortener ever" was even fully approved and now available for download at https://addons.mozilla.org/de/firefox/addon/shortest-url-shortener/ Download and enjoy!
Read full article »

Thursday, 3 April 2014

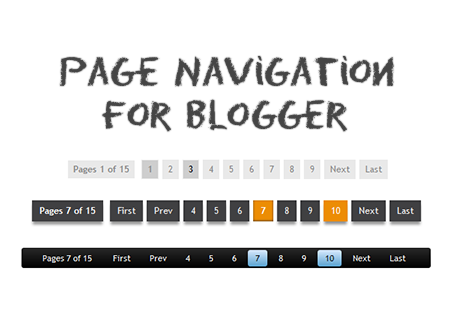
How to Add Numbered Page Navigation Widget for Blogger

In Blogger, we have the option to set the number of posts we want to display per page by going to the Settings menu > Posts and comments > Show at most ? posts. Once the number of total posts in our blog exceeds this number, we will see "Older Posts" and "Newer Posts" navigation links in our home page and archive pages footer as Blogger doesn't have any built-in function on page numbering. But page numbers instead of older and newer posts links could help our blog visitors to navigate quicker (jump from one page to another page or click on a specific page) and know the total number of posts published.

So this tutorial will show you how to add numbered page navigation using Javascript to a Blogger/ blogspot blog. You can select one of the 7 available styles below.

numbered page navigation widget

Adding Numbered Page Navigation to Blogger

You can add this widget in just two steps.
  1. Adding The CSS.
  2. Adding The Script.
Now let's see how to add the CSS style for page navigation.

1. Adding The CSS

Step 1. Go to Blogger Dashboard > "Template" > click on the "Edit HTML" button:

blogger template html

Step 2. Click anywhere inside the code area and press the CTRL + F keys to open the Blogger search box.


... type or paste the following tag inside the search box and hit Enter to find it:
]]></b:skin>
Step 3. Now choose one of the following numbered page navigation styles and copy the code just below it. Just above ]]></b:skin> paste the code of the style that you want to use:

Numbered Page Navigation on Gray

numbered page navigation style 1
 #blog-pager{clear:both;margin:30px auto;text-align:center; padding: 7px;}
.blog-pager {background: none;}
.displaypageNum a,.showpage a,.pagecurrent{padding: 3px 7px;margin-right:5px;background:#E9E9E9;color: #888;border:1px solid #E9E9E9;}
.displaypageNum a:hover,.showpage a:hover,.pagecurrent{background:#CECECE;text-decoration:none;color: #000;}
 .showpageOf{display:none!important}
#blog-pager .showpage, #blog-pager .pagecurrent{font-weight:bold;color: #888;}
 #blog-pager .pages{border:none;}

Black Numbered Page Navigation With Orange Current Page

numbered page navigation style 2
 #blog-pager{clear:both;margin:30px auto;text-align:center; padding: 7px;}
.blog-pager {background: none;}
.displaypageNum a,.showpage a,.pagecurrent{padding: 5px 10px;margin-right:5px; color: #F4F4F4; background-color:#404042;-webkit-box-shadow: 0px 5px 3px -1px rgba(50, 50, 50, 0.53);-moz-box-shadow:0px 5px 3px -1px rgba(50, 50, 50, 0.53);box-shadow: 0px 5px 3px -1px rgba(50, 50, 50, 0.53);}
.displaypageNum a:hover,.showpage a:hover, .pagecurrent{background:#EC8D04;text-decoration:none;color: #fff;}
#blog-pager .showpage, #blog-pager, .pagecurrent{font-weight:bold;color: #000;}
 .showpageOf{display:none!important}
#blog-pager .pages{border:none;-webkit-box-shadow: 0px 5px 3px -1px rgba(50, 50, 50, 0.53);-moz-box-shadow:0px 5px 3px -1px rgba(50, 50, 50, 0.53);box-shadow: 0px 5px 3px -1px rgba(50, 50, 50, 0.53);}

Dark Numbered Page Navigation With Blue Current Page

numbered page navigation style 3
 #blog-pager{clear:both;margin:30px auto; padding: 7px; text-align:center;font-size: 11px;background-image: -webkit-gradient(linear,left bottom,left top,color-stop(0, #000000),color-stop(1, #292929));background-image: -o-linear-gradient(top, #000000 0%, #292929 100%);background-image: -moz-linear-gradient(top, #000000 0%, #292929 100%);background-image: -webkit-linear-gradient(top, #000000 0%, #292929 100%);background-image: -ms-linear-gradient(top, #000000 0%, #292929 100%);background-image: linear-gradient(to top, #000000 0%, #292929 100%); padding: 6px;-webkit-border-radius: 3px;-moz-border-radius: 3px;border-radius: 3px;}
.blog-pager {background: none;}
.displaypageNum a,.showpage a,.pagecurrent{padding: 3px 10px;margin-right:5px; color: #fff;}
.displaypageNum a:hover,.showpage a:hover,.pagecurrent{background-image: -webkit-gradient(linear,left bottom,left top,color-stop(0, #59A2CF),color-stop(1, #D9EAFF));background-image: -o-linear-gradient(top, #59A2CF 0%, #D9EAFF 100%);background-image: -moz-linear-gradient(top, #59A2CF 0%, #D9EAFF 100%);background-image: -webkit-linear-gradient(top, #59A2CF 0%, #D9EAFF 100%);background-image: -ms-linear-gradient(top, #59A2CF 0%, #D9EAFF 100%);background-image: linear-gradient(to top, #59A2CF 0%, #D9EAFF 100%);text-decoration: none;color: #000;-webkit-border-radius: 3px;-moz-border-radius: 3px;border-radius: 3px;}
.showpageOf{display:none!important}.blog-pager-older-link, .home-link, .blog-pager-newer-link {background: transparent;}
a.blog-pager-older-link, a.home-link, a.blog-pager-newer-link {color: #fff;}
#blog-pager .pages{border:none;background: none;}

Gray Page Navigation With Blue Page Number

numbered page navigation style 4
#blog-pager{clear:both;margin:30px auto;text-align:center; padding: 7px;}
.blog-pager {background: none;}
.displaypageNum a,.showpage a,.pagecurrent{font-size: 14px;padding: 5px 12px;margin-right:5px; color: #666; background-color:#eee;}
.displaypageNum a:hover,.showpage a:hover, .pagecurrent{background:#359BED;text-decoration:none;color: #fff;}
#blog-pager .pagecurrent{font-weight:bold;color: #fff;background:#359BED;}
 .showpageOf{display:none!important}
#blog-pager .pages{border:none;}

Blogger Pagination on Green with Orange and Pink on Hover

numbered page navigation style 5
#blog-pager{clear:both;margin:30px auto;text-align:center; padding: 7px; }
.blog-pager {background: none;}
.displaypageNum a,.showpage a,.pagecurrent{font-size: 13px;padding: 5px 12px;margin-right:5px; color: #3E5801; background-color:#E0EDC1;}
.displaypageNum a:hover,.showpage a:hover, .pagecurrent{background:#FEF6DF;text-decoration:none;color: #E16800;}
#blog-pager .pagecurrent{font-weight:bold;color: #D25E71;background:#FFDEDF;}
 .showpageOf{display:none!important}
#blog-pager .pages{border:none;}

Orange Numbered Page Navigation Widget for Blogger

numbered page navigation style 6
#blog-pager{clear:both;margin:30px auto;text-align:center; padding: 7px; }
.blog-pager {background: none;}
.displaypageNum a,.showpage a,.pagecurrent{font-size: 13px;padding: 5px 12px;margin-right:5px; color: #AD0B00; background-color:#FAB001;}
.displaypageNum a:hover,.showpage a:hover, .pagecurrent{background:#DB4920;text-decoration:none;color: #fff;}
#blog-pager .pagecurrent{font-weight:bold;color: #fff;background:#DB4920;}
 .showpageOf{display:none!important}
#blog-pager .pages{border:none;}

Grey Paged Navigation for Blogger with Red Current Page

numbered page navigation style 7
#blog-pager{clear:both;margin:30px auto;text-align:center; padding: 7px; }
.blog-pager {background: none;}
.displaypageNum a,.showpage a,.pagecurrent{font-size: 12px;padding: 5px 12px;margin-right:5px; color: #222; background-color:#eee; border: 1px solid #EEEEEE;}
.displaypageNum a:hover,.showpage a:hover, .pagecurrent{background:#E5E5E5;text-decoration:none;color: #222;}
#blog-pager .pagecurrent{font-weight:bold;color: #fff;background:#DB4920;}
 .showpageOf{display:none!important}
#blog-pager .pages{border:none;}
Note: if you want to hide the "First" and "Last" buttons add this line below the CSS code:
.firstpage, .lastpage {display: none;}

2. Adding The Script

Step 4. Now find (CTRL + F) this tag:
</body>
UPDATED: Working version for more than 500 posts.

Step 5. Add the following script just above it:
<b:if cond='data:blog.pageType != &quot;item&quot;'>
<b:if cond='data:blog.pageType != &quot;static_page&quot;'>
<script type='text/javascript'>
  /*<![CDATA[*/
    var perPage=3;
    var numPages=3;
    var firstText ='First';
    var lastText ='Last';
    var prevText ='« Previous';
    var nextText ='Next »';
    var urlactivepage=location.href;
    var home_page="/";

if(typeof firstText=="undefined")firstText="First";if(typeof lastText=="undefined")lastText="Last";var noPage;var currentPage;var currentPageNo;var postLabel;pagecurrentg();function looppagecurrentg(pageInfo){var html='';pageNumber=parseInt(numPages / 2);if(pageNumber==numPages-pageNumber){numPages=pageNumber*2+1}
pageStart=currentPageNo-pageNumber;if(pageStart<1)pageStart=1;lastPageNo=parseInt(pageInfo / perPage)+1;if(lastPageNo-1==pageInfo / perPage)lastPageNo=lastPageNo-1;pageEnd=pageStart+numPages-1;if(pageEnd>lastPageNo)pageEnd=lastPageNo;html+="<span class='showpageOf'>Page "+currentPageNo+' of '+lastPageNo+"</span>";var prevNumber=parseInt(currentPageNo)-1;if(currentPageNo>1){if(currentPage=="page"){html+='<span class="showpage firstpage"><a href="'+home_page+'">'+firstText+'</a></span>'}else{html+='<span class="displaypageNum firstpage"><a href="/search/label/'+postLabel+'?&max-results='+perPage+'">'+firstText+'</a></span>'}}
if(currentPageNo>2){if(currentPageNo==3){if(currentPage=="page"){html+='<span class="showpage"><a href="'+home_page+'">'+prevText+'</a></span>'}else{html+='<span class="displaypageNum"><a href="/search/label/'+postLabel+'?&max-results='+perPage+'">'+prevText+'</a></span>'}}else{if(currentPage=="page"){html+='<span class="displaypageNum"><a href="#" onclick="redirectpage('+prevNumber+');return false">'+prevText+'</a></span>'}else{html+='<span class="displaypageNum"><a href="#" onclick="redirectlabel('+prevNumber+');return false">'+prevText+'</a></span>'}}}
if(pageStart>1){if(currentPage=="page"){html+='<span class="displaypageNum"><a href="'+home_page+'">1</a></span>'}else{html+='<span class="displaypageNum"><a href="/search/label/'+postLabel+'?&max-results='+perPage+'">1</a></span>'}}
if(pageStart>2){html+=' ... '}
for(var jj=pageStart;jj<=pageEnd;jj++){if(currentPageNo==jj){html+='<span class="pagecurrent">'+jj+'</span>'}else if(jj==1){if(currentPage=="page"){html+='<span class="displaypageNum"><a href="'+home_page+'">1</a></span>'}else{html+='<span class="displaypageNum"><a href="/search/label/'+postLabel+'?&max-results='+perPage+'">1</a></span>'}}else{if(currentPage=="page"){html+='<span class="displaypageNum"><a href="#" onclick="redirectpage('+jj+');return false">'+jj+'</a></span>'}else{html+='<span class="displaypageNum"><a href="#" onclick="redirectlabel('+jj+');return false">'+jj+'</a></span>'}}}
if(pageEnd<lastPageNo-1){html+='...'}
if(pageEnd<lastPageNo){if(currentPage=="page"){html+='<span class="displaypageNum"><a href="#" onclick="redirectpage('+lastPageNo+');return false">'+lastPageNo+'</a></span>'}else{html+='<span class="displaypageNum"><a href="#" onclick="redirectlabel('+lastPageNo+');return false">'+lastPageNo+'</a></span>'}}
var nextnumber=parseInt(currentPageNo)+1;if(currentPageNo<(lastPageNo-1)){if(currentPage=="page"){html+='<span class="displaypageNum"><a href="#" onclick="redirectpage('+nextnumber+');return false">'+nextText+'</a></span>'}else{html+='<span class="displaypageNum"><a href="#" onclick="redirectlabel('+nextnumber+');return false">'+nextText+'</a></span>'}}
if(currentPageNo<lastPageNo){if(currentPage=="page"){html+='<span class="displaypageNum lastpage"><a href="#" onclick="redirectpage('+lastPageNo+');return false">'+lastText+'</a></span>'}else{html+='<span class="displaypageNum lastpage"><a href="#" onclick="redirectlabel('+lastPageNo+');return false">'+lastText+'</a></span>'}}
var pageArea=document.getElementsByName("pageArea");var blogPager=document.getElementById("blog-pager");for(var p=0;p<pageArea.length;p++){pageArea[p].innerHTML=html}
if(pageArea&&pageArea.length>0){html=''}
if(blogPager){blogPager.innerHTML=html}}
function totalcountdata(root){var feed=root.feed;var totaldata=parseInt(feed.openSearch$totalResults.$t,10);looppagecurrentg(totaldata)}
function pagecurrentg(){var thisUrl=urlactivepage;if(thisUrl.indexOf("/search/label/")!=-1){if(thisUrl.indexOf("?updated-max")!=-1){postLabel=thisUrl.substring(thisUrl.indexOf("/search/label/")+14,thisUrl.indexOf("?updated-max"))}else{postLabel=thisUrl.substring(thisUrl.indexOf("/search/label/")+14,thisUrl.indexOf("?&max"))}}
if(thisUrl.indexOf("?q=")==-1&&thisUrl.indexOf(".html")==-1){if(thisUrl.indexOf("/search/label/")==-1){currentPage="page";if(urlactivepage.indexOf("#PageNo=")!=-1){currentPageNo=urlactivepage.substring(urlactivepage.indexOf("#PageNo=")+8,urlactivepage.length)}else{currentPageNo=1}
document.write("<script src=\""+home_page+"feeds/posts/summary?max-results=1&alt=json-in-script&callback=totalcountdata\"><\/script>")}else{currentPage="label";if(thisUrl.indexOf("&max-results=")==-1){perPage=20}
if(urlactivepage.indexOf("#PageNo=")!=-1){currentPageNo=urlactivepage.substring(urlactivepage.indexOf("#PageNo=")+8,urlactivepage.length)}else{currentPageNo=1}
document.write('<script src="'+home_page+'feeds/posts/summary/-/'+postLabel+'?alt=json-in-script&callback=totalcountdata&max-results=1" ><\/script>')}}}
function redirectpage(numberpage){jsonstart=(numberpage-1)*perPage;noPage=numberpage;var nameBody=document.getElementsByTagName('head')[0];var newInclude=document.createElement('script');newInclude.type='text/javascript';newInclude.setAttribute("src",home_page+"feeds/posts/summary?start-index="+jsonstart+"&max-results=1&alt=json-in-script&callback=finddatepost");nameBody.appendChild(newInclude)}
function redirectlabel(numberpage){jsonstart=(numberpage-1)*perPage;noPage=numberpage;var nameBody=document.getElementsByTagName('head')[0];var newInclude=document.createElement('script');newInclude.type='text/javascript';newInclude.setAttribute("src",home_page+"feeds/posts/summary/-/"+postLabel+"?start-index="+jsonstart+"&max-results=1&alt=json-in-script&callback=finddatepost");nameBody.appendChild(newInclude)}
function finddatepost(root){post=root.feed.entry[0];var timestamp1=post.published.$t.substring(0,19)+post.published.$t.substring(23,29);var timestamp=encodeURIComponent(timestamp1);if(currentPage=="page"){var pAddress="/search?updated-max="+timestamp+"&max-results="+perPage+"#PageNo="+noPage}else{var pAddress="/search/label/"+postLabel+"?updated-max="+timestamp+"&max-results="+perPage+"#PageNo="+noPage}
location.href=pAddress}

  /*]]>*/
</script>
</b:if>
</b:if>

How to Configure Numbered Page Navigation

After installing, you might want to change these default settings:
perPage: 7,
numPages: 6,
var firstText ='First';
var lastText ='Last';
var prevText ='« Previous';
var nextText ='Next »';
}
  1. perPage: how many posts will be shown in each page (i.e. 7). This value has to be the same as the number of posts on the main page. Otherwise, add the same number by going to "Settings" > "Formatting" and type it in the "Show at most" field, then click on the "Save Settings" button.
  2. numPages: how many pages will be shown in the page navigation (6).
  3. To replace the 'First', 'Last', "« Previous" and "Next »" texts, just type your own within the quotes.

Labels fix:

By default, Blogger will show 20 posts on label pages. To make this widget appear on label pages, we will have to cut down this down to the value that we gave for the perPage variable.

Find each occurrence of the following code snippet:
expr:href='data:label.url'
Replace it with this one below:
expr:href='data:label.url + "?&amp;max-results=7"'
Here 7 is the number of posts that will be displayed per page.

Step 8. Click on the "Save Template" button and we finished adding the number page navigation widget for Blogger. Enjoy!