Friday, 14 August 2015

How to Remove “Powered By Blogger” Attribution Widget ?

Today we can give you the easiest method that “How to Remove Powered By Blogger Attribution Widget from Blogger/Blogspot ?”. This is not a Difficult Stuff that How to Remove Powered by Blogger Attribution widget from Blogspot. We have seen many bloggers who were tired of/irritated from this because it is seen on the Blogger label that cause blog not Looking Professional. That is why they want to Remove it. One More thing to remember, In Blogger Layout the “remove” option is disable by default in all blogger templates. But now in Templates you can Remove this Widget by your Self. Lets do some practice guys:

Remove "Powered By Blogger" Attribution Widget ?

Step-1. Firstly Open you Blogger Account and Choose that Blog you want to Remove the Attribute Widget.

Step-2. Now Go to Template >> HTML In this Section you see “Jump to Widget” Option Click on it and Choose “Attribution1″ Widget and it will automatically Point to that Line.

Step-3. Now Press CTRL+F and Search for this Below Line.<b:widget id=’Attribution1′ locked=’true’ title=” type=’Attribution’>

Step-4. Now, Time to remove This. Just Replace ‘true’ with ‘false’ Like we Demonstrate in Above Screenshot.

Step-5. After this Your Code looks Like : <b:widget id=’Attribution1′ locked=’false’ title=” type=’Attribution’>.

Step-6. Save Your Template and Go To Blogger Dashboard >> Layout.

Step-7. See the Attribute Widget in Layout and Click Edit and Now Remove Option will Appear in Attribute Widget. Simply Click On Remove Button and remove Your “Powered By Blogger” Attribution Widget.

Now Click on View and Preview your Blog. Now you notice that “Powered by Blogger” Attribution is Removed. It is mainly set by Blogger in Default and in Disable Remove Permission for this Widget.

If this Article is Helpful for you, Please subscribe and share you Experience Below in Comments.

How to create Random posts widget with image thumbnails and snippets for Blogger

You know that Visitors to your website is very important. When your blog has too many posts, visitors don't always have much time or desire to through all the posts written there in order to make an idea of the blogs content. So, an advance Random Posts widget that will allow visitors to find content more easily could be really useful. This tutorial will show you how to add a random posts widget to display a list of posts in a random order with thumbnails and excerpts/snippets.
Adding RANDOM POSTS With Thumbnails And Posts Summary (Snippets) On Blogger:

Step-1. Login to your blogger account, select your blog and go to Layout.
Step-2. Add new widgets by clicking on the Add a gadget link and select Html/JavaScript from the popup window.
Step-3. After adding the Html/JavaScript you need to copy the following script and paste it in the Content box.
<style>
#random-posts img {
border: 1px #eeeeee;
float: left;
margin-right: 5px;
width: 50px;
height: 50px;
background-color: #F5F5F5;
padding: 3px;
transition: all 0.2s linear 0s;
}
#random-posts img:hover {
opacity: 0.6;
}
ul#random-posts {
list-style-type: none;
padding: 0px;
}
#random-posts a {
font-size: 10px;
text-transform: uppercase;
padding: 0px auto 5px;
}
#random-posts a:hover {
text-decoration: none;
}
.random-summary {
font-size: 11px;
background: none;
padding: 5px;
margin-right: 8px;
}
#random-posts li {
margin-bottom: 10px;
border-bottom: 1px solid #EEEEEE;
padding: 4px;
}
</style>
<ul id='random-posts'>
<script type='text/javaScript'>
var randomposts_number = 5;
var randomposts_chars = 50;
var randomposts_details = 'no';
var randomposts_comments = 'Comments';
var randomposts_commentsd = 'Comments Disabled';
var randomposts_current = [];
var total_randomposts = 0;
var randomposts_current = new Array(randomposts_number);
function randomposts(json) {
total_randomposts = json.feed.openSearch$totalResults.$t
}
document.write('<script type=\"text/javascript\" src=\"/feeds/posts/default?alt=json-in-script&max-results=0&callback=randomposts\"><\/script>');
function getvalue() {
for (var i = 0; i < randomposts_number; i++) {
var found = false;
var rndValue = get_random();
for (var j = 0; j < randomposts_current.length; j++) {
if (randomposts_current[j] == rndValue) {
found = true;
break
}
};
if (found) {
i--
} else {
randomposts_current[i] = rndValue
}
}
};
function get_random() {
var ranNum = 1 + Math.round(Math.random() * (total_randomposts - 1));
return ranNum
};
</script>
<script type='text/javaScript'>
function random_posts(json) {
for (var i = 0; i < randomposts_number; i++) {
var entry = json.feed.entry[i];
var randompoststitle = entry.title.$t;
if ('content' in entry) {
var randompostsnippet = entry.content.$t
} else {
if ('summary' in entry) {
var randompostsnippet = entry.summary.$t
} else {
var randompostsnippet = "";
}
};
randompostsnippet = randompostsnippet.replace(/<[^>]*>/g, "");
if (randompostsnippet.length < randomposts_chars) {
var randomposts_snippet = randompostsnippet
} else {
randompostsnippet = randompostsnippet.substring(0, randomposts_chars);
var whitespace = randompostsnippet.lastIndexOf(" ");
randomposts_snippet = randompostsnippet.substring(0, whitespace) + "&#133;";
};
for (var j = 0; j < entry.link.length; j++) {
if ('thr$total' in entry) {
var randomposts_commentsnum = entry.thr$total.$t + ' ' + randomposts_comments
} else {
randomposts_commentsnum = randomposts_commentsd
}; if (entry.link[j].rel == 'alternate') {
var randompostsurl = entry.link[j].href;
var randomposts_date = entry.published.$t;
if ('media$thumbnail' in entry) {
var randompoststhumb = entry.media$thumbnail.url
} else {
randompoststhumb = "https://blogger.googleusercontent.com/img/b/R29vZ2xl/AVvXsEgR2bMmH85yjxR6WYQiOFkDC1Eebws0L74hgGS-6h0r2KCSIrid40A4OJgnNoym6vU8yi-3zxRftySJB_hvz14ViNbS79KDE-DdUw2tk8b-y8Sjd_6VPgOwvoWAbZp9hfPz0bTnQ-06vlM/s1600/no_thumb.png"
}
}
};
document.write('<li>');
document.write('<a href="' + randompostsurl + '" rel="nofollow"><img alt="' + randompoststitle + '" src="' + randompoststhumb + '"/></a>');
document.write('<div><a href="' + randompostsurl + '" rel="nofollow">' + randompoststitle + '</a></div>');
if (randomposts_details == 'yes') {
document.write('<span><div class="random-info">' + randomposts_date.substring(8, 10) + '.' + randomposts_date.substring(5, 7) + '.' + randomposts_date.substring(0, 4) + ' - ' + randomposts_commentsnum) + '</div></span>'
};
document.write('<br/><div class="random-summary">' + randomposts_snippet + '</div><div style="clear:both"></div></li>')
}
};
getvalue();
for (var i = 0; i < randomposts_number; i++) {
document.write('<script type=\"text/javascript\" src=\"/feeds/posts/default?alt=json-in-script&start-index=' + randomposts_current[i] + '&max-results=1&callback=random_posts\"><\/script>')
};
</script></ul>
Random Post Option:

- Thumbnail Dimensions: to change the size of the thumbnails in pixels, replace the 50px value.
- Summary length: you can control the length of the summary (in characters) by changing the 50 value from var randomposts_chars=110;
- Post info: if you want to show the post date and comment count, change 'no' from var randomposts_details='no'; to 'yes';
- Font Size for Posts Titles and Summary: to modify the font size for the post snippet, modify the 11px value and for the posts title, the 10px value;

Click on the Save button and View your blog. The sidebar will display a random posts widget on each of your blog pages.

Enjoy !

Wednesday, 12 August 2015

How to Setup Google Sitemap Online

Basically, a sitemap is a page on your site that helps search engines find the content on your site. It’s kind of like it sounds; it’s a map of your site.

We are going to walk you through the different parts of the sitemap and explain what they mean.

All the way to the left, you have the URL section. That is just a list of URLs on your site that you want search engines to find.

Then you have the Priority area. That basically tells search engines which pages on your site are most important. In theory, pages that have a priority of 100 percent are more likely to be indexed than pages with a priority of 20 percent, although not everyone in SEO agrees that that’s the case.

Then, we have Change Frequency. This is how often you tend to update each of the pages on your website. Under Last Change, that tells search engines when the last time a significant change was made to that page.

How do you set up your site map, and how do you submit it to search engines? If you’re using WordPress, your first step is to install a plugin that would create a site map for you. Log in to your WordPress dashboard, hover over Plugins and click on Add New. Then, under Search, put in Google XML, and click on Search Plugins. Under Google XML Sitemaps, you want to install it. We’ve already installed it, obviously, but you would just click Install and activate it.

Once you do that, hover over Settings in the sidebar and click on XML Sitemap.

In general, you don’t want to make too many changes to the plugin, because the way it’s set up is actually how you want it. We are going to walk you through each section of the plugin, in case you do need to make any changes.

Under the top you have the URL of your sitemap, which is important to keep in mind. For most sites, it’s site.com/sitemap.xml. Then it tells you when it was last updated. If for some reason it was out of date, you can click the Rebuild the Sitemap button, and that will rebuild the site map based on the changes that you just made.

Under Basic Option, by default it writes it as a normal XML file, which is the standard language for sitemaps, so you do want to keep that the same. It also writes a gzip file, which just makes that page a little bit smaller.

Under Additional Pages, you can add pages to your sitemap manually that for one reason or another aren’t being added when you create the sitemap. If you have a subdirectory on your site, and it’s not being added to the sitemap, you can add that manually. Just click on Add New Page and include the URL, the priority from 10% to 100%, how often that page is updated, and then the date that it was last changed.

Under Post Priority, they actually prioritize your pages or posts based on how many comments it gets, which is one way to do it. It’s not the best, but there’s no perfect system for establishing priority so We usually leave this by default. Let’s say, if you don’t have a blog and you’re running WordPress for some different reason, and you don’t get comments, this obviously doesn’t make sense. You’d want to choose Do Not Use Automatic Priority Calculation. Because We are running a blog, We’ll keep it at Comment Count.

For the location of your sitemap file by default, like We’d said, it’s /sitemap.xml, but if for some reason you want to change that, you can choose Custom Location and add a URL that works better for you. We are going to keep it by default.

Under Sitemap Content, if there are pages or sections of your site that you really want indexed, let’s say you have a bunch of authors on your site and you want their pages to be indexed, you can include those author pages in the sitemap, and they’re more likely to be indexed by Google.

On the other hand, if you have excluded items, if you have pages on your site that you don’t want to get indexed like a membership area, or private pages for internal use, you can always create a category like Members Only or something like that. Click it here, and when you save your settings all the pages under that category won’t be added to the sitemap.

Once you have your sitemap set up like you want it, you want to note the URL of your sitemap. Then, head over to Google Webmaster Tools. Once you log in to Google Webmaster Tools, this is what you’ll see. This is important, because setting up your sitemap isn’t enough. You also want to submit it to Google to let them know that it’s there and to see if there are any issues.

Once you log into Webmaster Tools, click on Crawl, then click on Sitemaps, then click on Add Test Sitemap, and then put in the URL. We set it to sitemap.xml and click on Test Sitemap, then click on View Test Result.

Setup Google SITEMAP:

Below is done for you:
You will find various SITEMAP GENERATOR, beside that we used below - click on link.
Step-1. Go to SITEMAP GENERATOR here
Step-2. Enter required details for SITEMAP generation as shown below


Enter the full http address for your site, only the links within the starting directory will be included. LIKE - http://addictofblogging.blogspot.com, And then click on Start - By this Only maximum 500 pages will be indexed in your Sitemap.

Step-3. After this, it will take few minutes to generate sitemap. Now it will be seen like this -


Step-4. Once Sitemap is generated, just copy the Sitemap i.e. which is highlighted snapshot in Step-3.

Now you should have gmail account, if not don't worry - go here and Sign Up.Once you have created account in google, go here - google webmaster tool . As shown below;


Step-5. Next, you will reach at Google Webmaster Tool DASHBOARD


Step-6. 
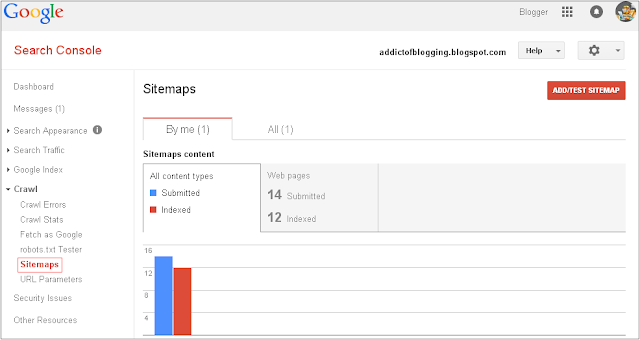
Reaching to DASHBOARD, just click on "Sitemaps" as shown below. Note: Our Blog's Sitemap was already indexed. Hence it has shown the Sitemap, Web pages - Submitted - 14 and Indexed - 12.


Step-7. Now move to right up corner, you will find (ADD/TEST SITEMAP)


Step-8. Just click on ADD/TEST SITEMAP


Step-9. Once you click on SUBMIT SITEMAP, the screen you need will appear


Hurray, now you have got what you need right ! To remember - it will take time to be indexed - In above screenshot, our blog's sitemap has already been Indexed. Web Pages submitted - 14 and Indexed - 12.

Once indexed, you are a Genius. Enjoy !

Secrets of Facebook Marketing You Probably Never Heard Before

Facebook might be the most versatile social media where you can promote your business to your target audience. However, its advertising platform, Facebook Ads, isn’t that easy to master. While the social media giant provide huge opportunities for reaching your target market, there are still plenty of secrets that even an experienced professional might not even heard of. These secrets point out to Facebook advertising techniques, and these will surely help you understand the essential steps which are necessary to promote your business through Facebook.

1. You Can Gain INSIGHTS About Your US-BASED Audience Through "AUDIENCE INSIGHTS++"

One particular Facebook’s secret is known as “Audience Insights++” which enables you to gather important data regarding your customers which are based in the US. Facebook has, in fact partnered with some of the reputable data aggregators in the US in order to provide audiences’ data to the advertisers.

This feature could actually provide you with essential information regarding your US-based audiences such as:
  • Your customers’ household size 
  • Online spending habits 
  • Vehicles currently in use 
  • Income range 
You can be able to use this information in plenty of ways, and you can even save a lot of cash, which you might have spent otherwise in searching for a range of audience.

2. Facebook's ADS Reporting Could Provide You With More Detailed Information:

As a marketer, you might be happy to find out that Facebook could provide you with detailed information regarding the people who see your ads. Other than that, you can even create a list of the total clicks or impressions which your ads receive. If done right, you can use this information against your current ad campaigns to track their performance using Facebook’s Ads Reporting feature.

This feature works by helping the advertisers in determining how an ad is performing by country, age and placement. Perhaps one of the most impressive features of this is that you can freely edit the information which you want to show in your report. The options you could choose from would include:
  • Gender 
  • Age 
  • Country 
  • Placement 
  • Destination 
  • Gender and age 
You can freely choose any of these options in order to get the results you are looking for. For example, if you chose “Gender” then your generated ad report would display the number of males and females who have clicked your ad.

3. Website Targeting Using FACEBOOK'S Custom Audience Feature

Facebook has released a new feature which would help advertisers retrofit their current audience. The feature which is known as Facebook’s Custom Audience enables you to find out who visited your website through your Facebook ad.

Facebook’s Custom Audience feature provides the following benefits for the advertisers:
  • It allows them to reach their customers through the customer’s list 
  • It allows them to match their current customer’s list with Facebook’s user list through the saved email addresses located in the list 
4. Find Out Which ADS Are Paying Off Through "Conversion Tracking"

If you would like your target audience to take action each time they see your ad campaigns, then your conversion tracking tool would inform you if your campaigns are paying off. Other than that, it provides help to businesses in terms of calculating the ROI of their Facebook ads through a detailed report regarding the actions which people take whenever they see your ads.

Upon setting up conversion pixels on your website, you can then view the option for tracking conversions in the pricing section. Once the conversions are tracked, you will then receive a report informing you of the actions which occurred as the outcome of your ad.

5. Create AD Variations Buttons Through "Power Editor" Feature

The latest Power Editor feature is actually a bulk ad creation and management tool which is created for advertisers who need control of their ad campaigns. This feature is located in the Ads Manager category. Once you have opened the Power Editor, you have to make sure to choose the ads on top. Once the data starts to accumulate, you will then see a new button known as “Generate Variations”. Once you click on this button, Facebook will then begin matching diverse ad variations depending on the types and placement of ads.

6. Audience Insights

The new “Audience Insights” feature is among the most important, yet hidden secrets of Facebook Ads. It works differently from Page Insights in a way that it searches for the latest trends regarding your current or potential customers.

This can be found in the “Ads Manager” category and reveals important information such as:
  • Page likes – the number of likes and comments on your posts together with the number of clicks on your ads 
  • Facebook usage – shows the platform or device used to access your page 
  • Demographics – displays your audience’s age and gender 
  • Language and location – tells about your audiences’ preferred languages and location 
  • Buy activity – includes audiences’ past shopping behavior along with their preferred method 
If you advertise your business on Facebook, make sure to consider these secret features to get the results you always wanted.
About the Author:
Vishal is the founder of WebyGeeks, a digital marketing and premier search engine company offering SEO and PPC services, Vishal has wide knowledge and 7 years of experience in the field of Search Engine Optimization.

How to Disable right click context menu on images

One of the most popular way to prevent images of your content of your blog from being stolen is Disabling right click or Context menu.

While it is effective to some extent in deterring casual image theft, it also frustrates honest readers by denying them access to many useful functions associated the right click such as going Back, page Reload, Bookmark and Open Link In New Window.


The better way would be to disable right click only on images. After all it’s the images they’re trying to protect, so this method is more appropriate to the task and more importantly it’s far less annoying to readers :). (It is impossible to keep people from stealing images posted on your blog or website, but hey this is better than doing nothing right?).

1. Disable Right Click On All Images:

Go to your template Edit HTML and paste the following script right after the</head> tag.
<script type="text/javascript">
//<![CDATA[
/* ^^^^^^^^^^^^^^^^^^^^^^^^^^^^^^^^^^^^^^^^^^^^^^^^^^^^^^^^^^^^^^
Disable context menu on images by Blogger Addict (http://addictofblogging.blogspot.com)
Version 1.0
You are free to copy and share this code but please do not remove this credit notice.
^^^^^^^^^^^^^^^^^^^^^^^^^^^^^^^^^^^^^^^^^^^^^^^^^^^^^^^^^^^^^^ */
function nocontext(e) {
var clickedTag = (e==null) ? event.srcElement.tagName : e.target.tagName;
if (clickedTag == "IMG") {
alert(alertMsg);
return false;
}
}
var alertMsg = "Image context menu is disabled";
document.oncontextmenu = nocontext;
//]]>
</script>
The script will disable the context menu and replace it with this alert box:
  1. You can replace the message with whatever you like in line var alertMsg="Image context menu is disabled"; 
  2. If you prefer not to show the alert box, just delete or comment out code line alert(alertMsg); and var alertMsg="Image context menu is disabled";. To comment out a line of Javascript, place two slashes "//" in front of the line, like this: //var alertMsg = "Image context menu is disabled";
Now you can click on any image in this post to see it in action. Enjoy !

2. Disable Right Click On A Single Image:

To disable context menu on a single image you need to add this piece of code (a context menu event handler) in the img tag:
oncontextmenu='alert("Image context menu is disabled"); return false;'
Open the post in post editor, switch to HTML mode, locate the img tag of the image you want to disable and then insert the code inside the tag.
An example:
This is the original image tag:
<imageborder="0"src="http://3.bp.blogspot.com/-MK7fhu_OMKA/SLWREIy96AI/AAAAAAAAAPo/d-w9hOxZkqU/s1600/2008_10260151.jpg" />
Once you added the context menu event handler, it should look like this:
<img oncontextmenu='alert("Image context menu is disabled");return false;'border="0"src="http://3.bp.blogspot.com/-MK7fhu_OMKA/SLWREIy96AI/AAAAAAAAAPo/d-w9hOxZkqU/s1600/2008_10260151.jpg" />
We hope this tutorial may have helped you in learning How to Disable right click context menu on images. Share this tutorial with your friends and don't forget to subscribe us.