Showing posts with label Social media. Show all posts

Wednesday, 28 November 2018

WhatsApp new update, features auto preview video in notification panel

WhatsApp is the best instant messaging app available on the playstore, it is the most used app in nowtimes. And it's regular updates make it more beneficial for users. Many of the features of updates are good for users but not so all. Some of the updates can create problems.


The new update of WhatsApp can make you feel embarrassed. Yes, it's true, the new update will allow the user to preview the video for some time in the notification panel. Now the problem arises here that sometimes you may receive sensitive content in videos which you want to keep private but it will automatically start getting play in the notification panel and if the notification are on, the video can also be viewable on the lockscreen by just tapping on it. But this can be prevented by disabling the auto download in the settings which will not download any type of the media sent to you without your permission.

In WAbetainfo reports, this feature is available for iOS user and it can also be available for the 2.18.102.5 version users.

Tuesday, 23 October 2018

Best ways to increase likes and followers on Instagram | 2018

After Facebook, Instagram has been the most popular app among all of us. Who doesn't want to become rockstar on social media, everyone wants thousands of likes on their images and wants to increase followers too. So we have sorted out the best tips to gain likes and followers on Instagram. Have a look at them-


1. Posting at the right time

Yes, posting at the right time will engage the audience to your feed. Before posting any update, you should have to know the time zone of your audience. Most of the users check their Instagram in morning and in their evenings. So try to post in these time zone which will easily help your audience to access to your feed.

2. Writing captions with questions

Your audience will only interact with you if you make them engaged with your feed and stories. With posting an update make sure that you use to write captions with asking questions. This will not only increase likes but comments also.

3. Hosting Giveaway contests

This has become one of the best way to gain
followers on Instagram. To gain followers, there must be a giveaway for your audience, it can be anything like headphones, earphones etc. This helps to engage the audience to your profile.

4. Using Instagram-must apps

Yes, these apps helps to make your profile look professionally and elegant. Many apps are available on the Google play store which can be simply downloaded. Like square ready apps this app cut a single pictures into 9 or 6 squares which can be posted simultaneously. This will help to make your profile look professionally.

5. Using hashtags

With the use of hashtags, one can easily viral his/her post on Instagram, which will help into gaining likes and many users will visits on such profile. But keep in mind, the hashtags that one will use, should be related to post.

6. Attractive insta-bio

Instagram-bio is the first thing that tell about your profile/product to the Audience. So bio should be attractive, everything should be explained properly about yourself, your product etc. This will help users to know what your profile is actually about. So keep the bio always ready.

Know your own tips, please drop down in comment section.

Sunday, 2 July 2017

Messenger Version 1.4.3(Window) Version 1.2.4(Mac)

Messenger Version 1.4.3(Window) Version 1.2.4(Mac)

While Facebook Messenger might be a breeze to access on your telephone or your program through the authority applications, utilizing it as a desktop customer has dependably been somewhat precarious. Flag-bearer for Desktop plans to takes care of this issue (in spite of the fact that this application is informal and not related with Facebook at all).

Talk without opening Facebook 

Delegate for Desktop is an informal customer that enables you to utilize Facebook's informing administration on your PC without being associated with the interpersonal organization (in spite of the fact that you need to login by means of the customer, obviously).

It has the very same choices as the Facebook Messenger portable applications: visit, stickers, and voice and video calling. Makes it additionally fascinating that you can get message warnings in the taskbar while the application is limited.

In the event that you consistently utilize the visit alternative on the Facebook site, you'll experience no difficulty utilizing Messenger for Desktop. The majority of the alternatives are in the very same place with similar symbols, while all the others are anything but difficult to recognize.

Send messages in full screen 

One of the issues with utilizing Facebook's talk alternative on the web is that it shows up in a little window. You can just expand it by tapping on one of your discussions, however this is somewhat burdensome and can lead you to accidentally close a tab on your program.

Dispatcher for Desktop takes care of this issue, as you can visit in full screen or resize the window to suit your requirements. This choice is especially helpful in case you're visiting at work and need to do it tactfully.

When you open and login to Messenger for Desktop, it imports every one of the alternatives from your Facebook profile so you can begin visiting instantly. The main choice you may need to design is whether to turn message warnings on or off.

As far as plan, Messenger for Desktop has a fundamentally the same as interface to Facebook.

Useful for clients of Facebook talk on the web 

On the off chance that you routinely client the visit alternative in the Facebook site, at that point Messenger for Desktop will be straight up your road. It's anything but difficult to utilize, doesn't hoard PC memory, and enables you to talk all the more watchfully without opening Facebook (like the different authority Messenger applications do).

Messenger Version 1.4.3(Window) Version 1.2.4(Mac)

Click Here to Mac
Click Here to Window 

IMO Video And Voice Call Software For Windows

IMO Video And Voice Call Software For Windows

Download IMO free video call programming most recent adaptation. Message and video talk with your loved ones for nothing, regardless of what gadget they are on. IMO is exceptionally valuable programming in nation. Thousand million individuals utilize this product. Its truly marvelous. Numerous clients utilize this product, since this product video quality is great. HD clear recordings.

In the time of social decision where applications, for example, Whats App, IMO and so on control our reality, the interest for video calls increments drastically. For this very reason the application, for example, IMO has turned out to be so prominent because of its tremendous components of giving free video calls and visit while expending less information and takes a shot at low end gadgets and low information packs which makes it emerge of the opposition of Whats application and Skype. Presently standing 21st century we are encompassed by a great many social talk media and it is unquestionably difficult to pick the privilege visiting and calling application.

The fame of a web-based social networking relies upon its updated highlight that can touch a mass of ordinary citizens. Video calling is an absolute necessity highlight nowadays in a social errand person. With this the application ought to likewise consume less storage space in the gadget. What's more, now we are here to declare such an application, to the point that has every one of these components in it and that is effortlessly available by anybody and everybody. The application we are talking is IMO which is new in showcase however its element are extremely alluring and valuable.

Offices

Message and video talk with your loved ones for nothing, regardless of what gadget they are on!

- Send boundless messages and make free video and voice brings over your 2G, 3G, 4G or Wi-Fi connection*

- Make top notch video and voice calls

- Group talk with companions, family, flat mates and others

- Share photographs and recordings

- Express yourself with several free stickers!

- Encrypted talks and calls

IMO Video And Voice Call Software For Windows

Click Here to Download

WHATSAPP FOR WINDOWS AND MAC

WHATSAPP FOR WINDOWS AND MAC

Regularly, the prominent informing application WhatsApp is just utilized on cell phones (Android, iOS, Windows Phone and Blackberry), however with the fresh out of the box new PC and Mac variant of the application, you can at long last utilize it from your desktop! You should just introduce the WhatsApp program so you can visit with your companions straight from your Mac or Windows PC. In spite of the fact that it appears to function admirably up until this point, it is a long way from consummate.

WhatsApp Web is currently a local application 

Perhaps you were at that point mindful of WhatsApp Web - the rendition you could use from inside your web program. WhatsApp for PC is precisely the same, in any case you don't have to open a program with a specific end goal to utilize it.

WhatsApp for PC is additionally fundamentally the same as the versatile adaptation of the application, so in case you're a day by day utilize, it surely won't take you long to get the hang of its capacities. This adaptation offers all that you would hope to see (just on a bigger screen), and offers the capacity to visit, send and get photographs, archives and notes, make and oversee gatherings, change your profile picture, and so forth.

Everything sounds rather awesome, however there are a few confinements to the application. For instance, it doesn't enable you to share you area, nor does it enable you to include new contacts.

Yes, in spite of the fact that WhatsApp for PC is a choice that makes life a tiny bit less demanding once in a while, it isn't something that will supplant your cell phone at any point in the near future.

Everything has a "however" 

Keeping in mind the end goal to begin utilizing the PC adaptation of the application, you have to first output the QR code utilizing your cell phone, similarly as you would with WhatsApp Web. On the off chance that you have any inquiries concerning this technique, click here for a total instructional exercise.

In the wake of checking the code, the WhatsApp account you have enlisted to your telephone will be related with the better and brighter one on your PC, and you can start visiting!

The choices in the desktop adaptation are perfectly masterminded (reminiscent of WhatsApp for Android). In all actuality it doesn't require much exertion from your part to discover anything you require and is basically a joy to visit at a considerably quicker pace on account of the console. In the event that you have a webcam as well as receiver, you likewise can send photographs/recordings/sound clasps.

Another extraordinary thing about utilizing the PC rendition is that web associations have a tendency to be speedier than those on versatile, in this manner information exchanges are significantly snappier and straight forward.

All things considered, WhatsApp for PC works fine and dandy, however it depends completely on your telephone. You can visit specifically from your PC, however your cell phone should be associated consistently. In view of this impediment, it puts it behind its opponents, for example, LINE and Telegram, who each have their own particular free desktop forms.

Is it accurate to say that it was justified regardless of the hold up? 

WhatsApp clients have been requesting a desktop adaptation for a long time, lastly they have it, in spite of not being 100% what they were anticipating. In spite of the fact that the rendition works to a great degree well and offers all an indistinguishable elements from the portable variant, it doesn't have a standout amongst the most essential – the capacity to work autonomously. We can dare to dream that Facebook, who procured the application in 2014 will see the defect and we may get a pleasant astonishment in the following refresh.

WHATSAPP FOR WINDOWS AND MAC

Click Here to Mac
Click Here to 64 bit For Window

Friday, 30 June 2017

SNAPCHAT FOR WINDOWS AND MAC

SNAPCHAT FOR WINDOWS AND MAC

Snapchat for PC is an exceptionally well known application among youths nowadays. It is an interesting application for sharing photographs to a man or a gathering of individuals. The pictures you shared are self wrecked or for all time erased after a specific time which is set by the client himself. Individuals likewise share pictures of writings which are not effectively meaningful on little cell phone screens so there is a requirement for this cool instrument where you can see the content on greater screen obviously. The application is winning a great many hearts and individuals need to utilize it on their desktop PCs and pcs.

For utilizing the product all you require is an android emulator. Android emulator empowers our PC to fill in as an Android gadget. Accordingly, Android applications deal with PC also. To utilize the PC form, an Android emulator named blue stacks is required which enables you to appreciate applications like snapchat on greater screens.

SNAPCHAT DOWNLOAD FOR PC 

jonathan May and Evan spiegel built up the product as a substantial photograph and informing application.

KEY FEATURES OF SNAPCHAT FOR PC 

  • It is a great deal more advantageous and solid to use as there is significantly greater capacity for other application. 
  • With the apparatus. you can appreciate all the photograph sharing and visit fun on a greater screen. 
  • It instantly dispatches the camera at whatever point you open the application; you can take snaps and offer them in run time. 
  • By utilizing your PC's camera, you can take better quality pictures and recordings and send them to your companions. 
  • You can alter your setting in light of whom you need to share your photographs with. 
  • It incorporates your contacts and educates you about your contacts that are as of now utilizing the device. 
  • You can make new companions and include them, share snaps with them and have a ton of fun. 
  • The remarks on shared snaps are evacuated consequently after a set time and therefore it transforms into a brief fun discussion. 
  • You can make little stories by including numerous pictures and offer them with your friends and family. 
  • It likewise gives sifting apparatuses to alter your snaps and to change the clock of pictures implosion. 
  • It counteracts different clients to impart your photos to another person consequently regard your security. It additionally tells you on the off chance that somebody takes a screenshot of your common snaps. 
  • Another new component included is video talking. You should simply sign into your snapchat account, have some content discussion with that individual and after that you will have the capacity to have a video visit with him. 
  • There is an element given by the designers which will empower you to explore here and there on your PC screens and see your companion's exercises, constant and in addition their past exercises. 
  • You need and Android emulator to utilize it. Another Android emulator which can used rather than blue stack is Andy 

Bolstered OS SNAPCHAT FOR PC 


  • Window xp 
  • Window Vista 
  • Window 7,8,8.1,10 
  • Macintosh 

Creator NOTE 

Rather than utilizing snapchat portable PC on your little dull versatile screens, now you can appreciate it on your PC with substantially more fun.

SNAPCHAT FOR WINDOWS AND MAC

Click Here to Download

Thursday, 29 June 2017

Skype Version 7.37.0.103

Skype Version 7.37.0.103

Despite the fact that there are VOIP choices available other than Skype, it has unmistakably remained the most well known. Along these lines, Skypes' system of clients is huge, making it likely that your future Skype contacts as of now have a record set up. This is one of the program's greatest favorable circumstances. Business and individual clients have a to a great degree general strategy for discussing in a split second with companions and customers, without getting them to join to any administration that they usually wouldn't. 

Because of Skype being totally versatile - on telephones and tablets, and in addition PCs, and with the capacity to make skype-to-telephone (counting landline) calls, and also sendingsend writings to all phones, it reallytruly is a get to all bit of interchanges innovation that the majority of us as of now have, and likely will keep on having admirably into what's to come. 

Video talk program that empowers you to keep in contact with your loved ones for nothing 

Skype is an application that empowers you to rapidly connect with collaborators, family, companions and others. You can likewise utilize it to send records and set up phone calls. Skype is easy to utilize and exceptionally dependable (accepting you have a decent web association), offering an extensive variety of choices to interface, including texting, voice calls and video calls. You can even set up screen sharing, making it an extremely helpful for work applications 

Skype is allowed to download and simple to introduce and set up. It can be utilized on a wide assortment of gadgets, including desktop PCs, portable PCs, tablets and cell phones. The renditions utilized for the diverse gadgets are completely incorporated and synchronized, which makes this administration exceptionally adaptable and helpful. 

As the most prominent VOIP program on the planet, Skype has a great many clients everywhere throughout the world his makes it likely that whoever it is you might want to contact through Skype as of now has a record. Skype is additionally allowed to use to contact other Skype clients, however you can likewise utilize ithas a paid administration used to call arrive lines and cell phones not associated with Skype. The last are charged through a charge framework called Skype Credit, with low rates and with the choice of picking between pay regularly scheduled installments or pay - as - you - go.

Skype Version 7.37.0.103

Click Here to Download

Flickr Uploadr Version 3.2.1

Flickr Uploadr Version 3.2.1

The Flickr Uploadr is an absolute necessity for anyone with a Flickr account. It maintains a strategic distance from you the agony of opening your program to transfer your photographs to your record. The application gives you a chance to make photosets and add labels to your photographs. You can likewise deal with the protection and wellbeing levels for each photographs, to permit everybody, or simply your companions or family to see them. 

The application transfers your photographs decently fast, in spite of the fact that that likewise relies on upon your data transmission measure. It will likewise tell you the amount of your month to month transfer restrain you've spent. In the event that we were truly meticulous we 'd say the program should naturally sign you into Flickr as opposed to opening a program window to give you access to your record. Notwithstanding, overall, Flickr uploadr is an extraordinary device that makes transferring your photographs to Flickr easy.

Flickr Uploadr Version 3.2.1

Click Here to Download

Twitter Version 1.1.0

Twitter Version 1.1.0

In the event that you just can hardly wait to open your program to perceive what's happening in your Twitter course of events, you'll value this free application. Desktop Twitter from Twitter Brooks guarantees to stay up with the latest with tweets from accounts you take after without going on the web.

Once introduced, you'll have to approve access to your Twitter account. Other than that you truly don't have to do anything. Desktop Twitter sits in the framework plate until enacted, simply sitting tight for tweets from your course of events. The minimal interface is plain however straightforward. It even has a similar blue shading plan and uses an indistinguishable wording from the person to person communication site. This form additionally gives both of you simple to-utilize additional items: the capacity to unfollow somebody and to duplicate a tweet to the clipboard. We additionally preferred that it is so natural to change to an alternate Twitter account, an element that power clients who have different records will appreciate. As guaranteed, new tweets are conveyed in a flash as they fly up in your record.

For the individuals who get a kick out of the chance to take after Twitter intently, Desktop Twitter is a convenient application that is as simple to use as the online networking webpage itself. We found that it didn't uninstall neatly and abandoned some Start Menu symbols, yet other than that, this free program filled in as guaranteed.

It is anything but difficult to oversee diverse records or post a tweet. Introduce and utilize this Twitter customer to get following advantages

- quick exchanging between various records

- moment demonstrating another tweet from your course of events

- simple new tweet posting

- totally free

Twitter Version 1.1.0

Click Here to Download

Wednesday, 28 June 2017

Facebook Version 1.3.5

Facebook Version 1.3.5

Facebook talk is one of numerous moment delivery person applications accessible out there, and keeping in mind that they are just the same old thing new, Facebook Chat DeskTop offers something other than what's expected to its all the more notable Facebook visit kin. Facebook talk gives you moment access to all you're existing companions, and in addition empowers you to attempt. The additional advantage of the DeskTop variant is that you don't need to be online with Facebook to utilize it. By introducing the application, and entering your Facebook username and secret key you can have visit open, and Facebook shut; incredible in the event that you have to stay in contact in places that dislike Facebook use -, for example, work. As while utilizing talk in Facebook you can see whether your companions are on the web and visit independently or in a gathering, yet now you can do as such from most forms of Microsoft Windows with no different diversions.

Facebook Version 1.3.5

Facebook Version 1.3.5

Facebook Version 1.3.5

Click Here to Download

Wednesday, 7 October 2015

How to Add Font Awesome Social Icons in Blogger

It's near impossible to find a blog or site these days without at least one social media account to their name. Be it Twitter or Facebook, Instagram or Pinterest, or all of those for that matter, what's become increasingly clear is that social media helps increase your online presence.

Gone are the days when you used to rely on good old search engine results alone. These days, maybe you don't rank well in results for your keyword on Google or any other search engine, but you can launch a social media campaign that can hopefully give you the results that you want.

Essentially, your site and social media need to co-exist. One cannot live without the other, if you want another way of putting it. Social media is one of the best drivers of traffic on the internet, and if you want to increase your chances of being seen, then you have got to get an account on one or more platforms as long as it fits with your brand's identity.

font awesome social icons

Spreading Awareness of Your Social Media Presence

Once you've set up your social media accounts, you don't just leave it there to be discovered. Sure, you can make use of hashtags and communicate with industry leaders, but that's not enough to bring awareness to your customers. To let them know you have a presence on Facebook, Twitter, Instagram, Vine or Pinterest, you have to make use of the real estate on your website.

How exactly do you do that, you ask? Well, by means of social icons.

Social icons are those little images you see that represent a symbol associated with a particular social network. For example, social icons for Twitter usually feature a blue bird. If not that, then a lowercase letter T.

The presence of these images remind your viewers that they have other ways of being up to date with whatever you put out. Social media use is pretty high these days thanks to the immediacy of the medium as well as the fun factor. And more likely than not, your audience would want to know whether you're on any social network.

If you're on the Blogger platform, you can add these social media representations through Font Awesome social icons.

What is Font Awesome?

Font Awesome "gives you scalable vector icons that can instantly be customized - size, color, drop shadow, and anything that can be done with the power of CSS". In essence, it functions as a toolkit where you get access to more than 500 icons for use on your site - free of charge.

Now, if you've used social media icons before, you know that there are non-vector varieties. But those offered by Font Awesome are scalable vector icons, and in the long run, they are the better option for your site.

Why is that the case?

Well, a very good reason would be that images take time to load. Yes, these images are tiny but the point still stands. Plus, images tend to lose their quality as computer resolution increases. In other words, if you want your icons to load faster and have a nice, crisp and clean look, then you're better off with using the collection of Font Awesome. Also, the chance to customize your icons accordingly is definitely an attractive factor too.

Why you should start using Font Awesome?

Of the many providers out there, why stick with Font Awesome?
  • Large collection of icons. You'll not only find social media icons here, but other traditional icons as well.
  • CSS support. With CSS, you can adjust the icons according to what suits your site best. You can tinker with the colors, size, shadows and other components. This is something sorely lacking with non-vector images because you're stuck with the icon you chose.
  • Speed. Vector images are lightweight and therefore load faster.
  • Free. You don't have to pay a single thing when you use Font Awesome.
So now you know the importance of icons on your site, it's time to learn how to add Font Awesome icons in Blogger.

Adding Font Awesome Social Icons in Blogger

The adding of icons to your Blogger isn't rocket science. In fact, the process is pretty straightforward.
Here's what you have to do:

Add Font Awesome Stylesheet into Blogger

Follow the steps below to get Font Awesome working with your blog:

1. Open your Blogger dashboard, go to Template and press the Edit HTML button.
2. Click anywhere inside the code area and press CTRL + F keys to open the search box.
3. Type the <head> tag inside the search box and press Enter to find it.

font awesome stylesheet

4. Add the following line of code referencing the location of the font-awesome.min.css stylesheet just below the <head> tag:
<link rel="stylesheet" href="https://maxcdn.bootstrapcdn.com/font-awesome/4.7.0/css/font-awesome.min.css" />

5. Click the 'Save template' button to save the changes and start playing with Font Awesome!

Using the Font Awesome Icons

After you get the steps in the previous section done, you're now ready to use Font Awesome in your blog. The first thing you need to do is add the social icons links to the HTML and delete the icons that you don't need anymore. This is a sample HTML that you can add:
<div id="fawesomeicons">
<a href="URL-HERE" title="Facebook" target="_blank" rel="nofollow"><i class="fa fa-facebook"></i></a>
<a href="URL-HERE" title="Google Plus" target="_blank" rel="nofollow"><i class="fa fa-google-plus"></i></a>
<a href="URL-HERE" title="Twitter" target="_blank" rel="nofollow"><i class="fa fa-twitter"></i></a>
<a href="URL-HERE" title="Pinterest" target="_blank" rel="nofollow"><i class="fa fa-pinterest"></i></a>
<a href="URL-HERE" title="Instagram" target="_blank" rel="nofollow"><i class="fa fa-instagram"></i></a>
<a href="URL-HERE" title="Bloglovin" target="_blank" rel="nofollow"><i class="fa fa-heart"></i></a>
<a href="URL-HERE" title="Tumblr" target="_blank" rel="nofollow"><i class="fa fa-tumblr"></i></a>
<a href="URL-HERE" title="RSS" target="_blank" rel="nofollow"><i class="fa fa-rss"></i></a>
</div>
In the above HTML code, we can see 8 separate social icons which can be recognized by looking at the link title attribute. For example, the first one is for Facebook.

To use the social icons, paste your URL where it says URL-HERE for each social icon you want to include. Put the link between the quotes and make sure to not remove any of the quotation marks.

If you want to remove a social icon, just delete that line of code starting with "<a href" and ending with "</a>".

Now, keep in mind that Font Awesome works anywhere with the <i> tag as it was designed to work with inline elements. Although you can use <span>, official documentation prefers the <i> option for brevity.

Font Awesome icons can be placed anywhere using the CSS prefix fa together with the name of the icon. For a list of social media icon names, you can refer to the official website of Font Awesome.

Let's say that you want to display a Youtube icon so you can link it to your official account on the platform. Find the Youtube icon on the list and click on it:

font awesome icon

That will bring you to a page for Youtube where you will see this code:

font awesome social icons

To include the icon within the list, copy any line starting with "<a href" and ending with "</a> from the code above, paste where you want it to appear and replace the code starting with "<i class="fa " and ending with "</i>" with that of your chosen icon.

Finally, after adding the icon, the list will look like this:
<div id="fawesomeicons">
<a href="URL-HERE" title="Facebook" target="_blank" rel="nofollow"><i class="fa fa-facebook"></i></a>
<a href="URL-HERE" title="Google Plus" target="_blank" rel="nofollow"><i class="fa fa-google-plus"></i></a>
<a href="URL-HERE" title="Twitter" target="_blank" rel="nofollow"><i class="fa fa-twitter"></i></a>
<a href="URL-HERE" title="Pinterest" target="_blank" rel="nofollow"><i class="fa fa-pinterest"></i></a>
<a href="URL-HERE" title="Instagram" target="_blank" rel="nofollow"><i class="fa fa-instagram"></i></a>
<a href="URL-HERE" title="Bloglovin" target="_blank" rel="nofollow"><i class="fa fa-heart"></i></a>
<a href="URL-HERE" title="Tumblr" target="_blank" rel="nofollow"><i class="fa fa-tumblr"></i></a>
<a href="URL-HERE" title="RSS" target="_blank" rel="nofollow"><i class="fa fa-rss"></i></a>
<a href="URL-HERE" title="Youtube" target="_blank" rel="nofollow"><i class="fa fa-youtube"></i></a>
</div>
Note: don't forget to change the title and add your URL between the quotes.

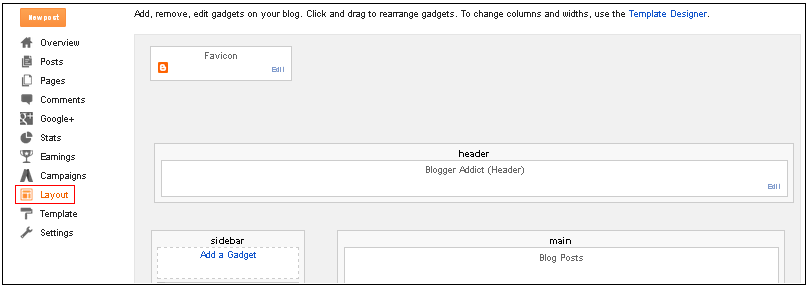
Once you've finished editing the icons, insert the code into a HTML/Javascript gadget by going to "Layout" and click on the "Add a gadget" link. If you're using WordPress, paste it in a Text widget.

Customize the Font Awesome Icons Using CSS

Suppose you want to make the icons a lot bigger than they currently are. That task is made simple with the use of CSS. Here's a sample code:
#fawesomeicons a {
    font-size: 16px;
    width: 30px;
    height: 30px;
    line-height: 30px;
}
To change the font size, increase or decrease the 16px value. Below are the values (30px) for the container's width and height which should always match. Increasing/decreasing these values, will increase/decrease the size of the container where is the font.

Here are some different styles for the font awesome social icons. In the CSS, look for the #background-color, #border-color, #font-color and #hover-color text so that you can know here to put the color codes. You can use this tool to generate the color code: Color Code Generator. If you don't know how to add CSS, follow this tutorial.

font awesome social icons

#fawesomeicons {
text-align: center;
}
#fawesomeicons a {
background: #background-color;
color: #font-color;
display: inline-block;
font-size: 16px;
width: 30px;
height: 30px;
line-height: 30px;
margin: 0 1px 6px;
}
#fawesomeicons a:hover{
background: #hover-color;
}

font awesome social icons

#fawesomeicons {
text-align: center;
}
#fawesomeicons a {
background: #background-color;
color: #font-color;
display: inline-block;
font-size: 16px;
width: 30px;
height: 30px;
line-height: 30px;
margin: 0 1px 6px;
-webkit-border-radius: 100%;
-moz-border-radius: 100%;
border-radius: 100%;
}
#fawesomeicons a:hover{
background: #hover-color;
}

font awesome social icons

#fawesomeicons {
text-align: center;
}
#fawesomeicons a {
border: 1px solid #border-color;
color: #font-color;
display: inline-block;
font-size: 16px;
width: 30px;
height: 30px;
line-height: 30px;
margin: 0 1px 6px;
}
#fawesomeicons a:hover{
background: #hover-color;
}

font awesome social icons

#fawesomeicons {
text-align: center;
}
#fawesomeicons a {
border: 1px solid #border-color;
color: #font-color;
display: inline-block;
font-size: 16px;
width: 30px;
height: 30px;
line-height: 30px;
margin: 0 1px 6px;
-webkit-border-radius: 100%;
-moz-border-radius: 100%;
border-radius: 100%;
}
#fawesomeicons a:hover{
background: #hover-color;
}

font awesome social icons

#fawesomeicons {
text-align: center;
}
#fawesomeicons a {
color: #font-color;
display: inline-block;
font-size: 23px;
margin: 0 6px 6px;
}
#fawesomeicons a:hover{
background: #hover-color;
}

Now, what if we want to change the background or font color of a specific icon? First, we need to identify the icon class which is just after the <i class="fa ..." and add it like this:
#fawesomeicons a .fa-facebook {
background: #background-color;
color: #font-color;
}
Here, we can change the background and color for the Facebook icon but we can do it for any icon you want. For example, let's add another rule for the twitter icon:
#fawesomeicons a .fa-facebook {
background: #background-color;
color: #font-color;
}
 #fawesomeicons a .fa-twitter {
background: #background-color;
color: #font-color;
}
To make the fonts bigger, we can add the CSS code like this:
#fawesomeicons {
text-align: center;
}
#fawesomeicons a .fa{
display: inline-block;
font-size: 16px;
width: 30px;
height: 30px;
line-height: 30px;
}
#fawesomeicons a .fa-facebook {
background: #background-color;
color: #font-color;
}
 #fawesomeicons a .fa-twitter {
background: #background-color;
color: #font-color;
}
To apply, copy the code above and add the CSS rule with the icon class that you wish to change.

Important: When adding the class for your icon, always put a dot (.) in front of it as you can see in the example above, otherwise it won't work.

And that's it! Hopefully, this tutorial helped you to add Font Awesome social icons in Blogger. If you're still in trouble adding them, please take a look at Examples page.

Tuesday, 18 August 2015

How to add Facebook Like/Fan Box to Blogger

Today we are going to talk about Facebook Like/Fan Box to Blogger. A Facebook Like Box or Fan Box is a great plugin that allows Blog visitors to subscribe to your blog updates via their Facebook accounts, without leaving your blog. Once subscribing (by pressing the like button), visitors will receive your most recent blog updates on their Facebook page. This box also displays faces of the "likers" on your blog.Before creating a Fan Box, you should already have a Facebook Fan Page. If you haven't yet created, just click here to learn How To Create a Facebook Fan Page.

To create a Facebook Like Box/Fan Box, just follow the below steps;

CREATE A FACEBOOK LIKE BOX

Step-1. Find out your Facebook Fan page URL by visiting your Facebook Fan page and copy the URL in the address-bar, now you can see how your URL should look like in below screenshot;


Step-2. Then visit this page: http://developers.facebook.com/docs/reference/plugins/like-box.

Now you can see that - LIKE BOX, With the release of Graph API v2.3, the Like Box plugin is deprecated. Please use the new Page Plugin instead. The Page Plugin allows you to embed a simple feed of content from a page into your websites.

If you do not manually upgrade to the Page Plugin, your like Box plugin implementation will automatically fall back to Page Plugin by June 23rd 2015.


Step-3. Go to Page Plugin. You can see the following screenshot;


Step-4. Now, put your page URL - like ours pages/Blogger-Addict/1534960050079169 on Facebook Page URL option;


Step-5. Once reloaded your Facebook Page URL, you will find a CODE. Shown as below;


Step-6.
Clicking on Get Code above, you will get the Codes which needs to be put on your site as instructed below and You are done;


A. Include the JavaScript SDK on your page once, ideally right after the opening <body> tag.<div id="fb-root"></div><script>(function(d, s, id) { var js, fjs = d.getElementsByTagName(s)[0]; if (d.getElementById(id)) return; js = d.createElement(s); js.id = id; js.src = "//connect.facebook.net/en_US/sdk.js#xfbml=1&version=v2.4"; fjs.parentNode.insertBefore(js, fjs);}(document, 'script', 'facebook-jssdk'));</script>
B. Place the Code for your Plugin wherever you want the plugin to appear on your page.<div class="fb-page" data-href="https://www.facebook.com/pages/Blogger-Addict/1534960050079169" data-small-header="false" data-adapt-container-width="true" data-hide-cover="false" data-show-facepile="true" data-show-posts="true"><div class="fb-xfbml-parse-ignore"><blockquote cite="https://www.facebook.com/pages/Blogger-Addict/1534960050079169"><a href="https://www.facebook.com/pages/Blogger-Addict/1534960050079169">Blogger Addict</a></blockquote></div></div>

IF ABOVE DOESN'T WORK, FOLLOW THE STEPS BELOW:

Step-1. Go to Blogger Layout -


Step-2. Click on ADD A GADGET, you will see below screenshot -


Step-3. Now click on HTML/JavaScript. You need to insert below Facebook Fan Box CODE given below. Remember you need to replace blue highlighted "pages/Blogger-Addict/1534960050079169 with your own Facebook Fan Page URL.
<iframe src="//www.facebook.com/plugins/likebox.php?href=https%3A%2F%2Fwww.facebook.com%2Fpages/Blogger-Addict/1534960050079169&amp;width=300&amp;height=900&amp;colorscheme=light&amp;show_faces=true&amp;header=true&amp;stream=false&amp;show_border=true" scrolling="no" frameborder="0" style="border:none; overflow:hidden; width:300px; height:210px;" allowtransparency="true"></iframe>

You are done, your Facebook Fan Box has been created successfully. Enjoy.

Hope it helped you to create a Facebook Fan Box. If you have any concern regarding above tutorial, please comment below. Like Us On Facebook as well. Enjoy!

Sunday, 16 August 2015

How to Add a Blogger Blog (Blogspot Blog) to Bing Webmaster Tools

Although Bing (formerly MSN Live Search) gets a fraction of search engine traffic compared to Google and Yahoo it is still worthwhile submitting your Blogger sitemap (Blogspot sitemap) and blog to Bing. The advantages of adding your blog to Bing is that you will learn more about how your site is crawled and what keywords visitors use to access your blog pages.

This Blogger tutorial covers the steps involved to add your Blogspot blog to Bing (MSN). Part One deals with how to add a site to Bing Webmaster Tools while part two takes you through the steps to add a Blogger sitemap to Bing Webmaster Tools. Both these tutorials are rated easy and can be performed by anyone using Blogger.

Add Blogger Blog (Blogspot Blog) To Bing Webmaster Tools

Step No. 1: Create an account or sign into Bing at MSN. If you have a hotmail account you will already have access to Bing Webmaster Tools .

Step No. 2: Navigate to the Bing Webmasters Tools page.
Step No. 3: Installing Skylight is purely optional. Silverlight is Microsoft's competitive product for Adobe Flash. Try it if you wish as it adds some extra functionality but for the purposes of this Blogger tutorial it is not necessary.
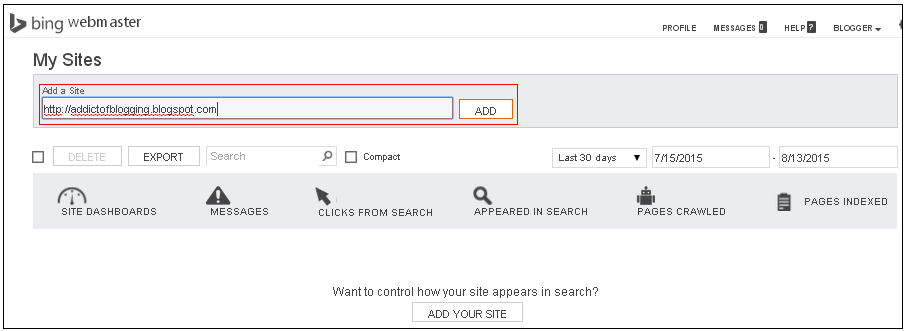
Step No. 4: From the Bing Webmaster home page click on 'Add Site'.
Step No. 5: Fill in the URL address of your Blogger blog eg. http://addictofblogging.blogspot.com

Step No. 6: Click on Submit.
Step No. 7: Your blog will now appear on the list of added sites under your Bing Webmaster account.
Step No. 8: Click the Verify Site link at the end of your blog.
Step No. 9: Choose Option 1. <meta name="msvalidate.01" content="F6A6E7BFBDAA07EFA89B25FA2F696856" /> or option 2 - Like as shown in Example above,
Step No. 10: Copy the meta tag code that appears in the dialog box by right clicking on it with your mouse and selecting copy. Keep the Bing Webmaster Tools window open as we will be returning.
Step No. 11: Login to your Blogger account if not already logged in using a different browser window.
Step No. 12: From the Dashboard go to Design > Edit HTML
Step No. 13: Paste the code below the <head> tag and before <b:skin> and as early as possible
For the new generation of default Blogger templates I suggest placing the code just below these two lines:
<head>
<meta content='IE=EmulateIE7' http-equiv='X-UA-Compatible'/>
For earlier generations of default Blog templates and custom templates I suggest you place the Bing Webmaster meta tag after these lines:
<head>
<b:include data='blog' name='all-head-content'/>
Step No. 14: Click on Save Template
Step No. 15: Return to Bing Webmaster and click on the Verify button
Step No. 16: If successful your Blogger blog will be added to the list of sites. Information about your blog will show not available as it takes at least 48 hours to activate.
Step No. 17: Click on your blog and you will be taken to the site information screen.

How To Add A Blogger SITEMAP (Blogspot SITEMAP) To BING Webmaster

Step No. 1: Sign in to Bing Webmaster if not already signed in.
Step No. 2: Click on your Blogger blog from the list of sites.
Step No. 3: Go to Dashboard on the left hand side.
Step No. 4: An Add Sitemap dialog box will be seen. Enter the following URL of the default posts feed of your Blogger blog eg.
http://yourblogname.blogspot.com/feeds/posts/default
Step No. 5: Replace the yourblogname with the name of your blog
Step No. 6: Click on the Submit button
Step No. 7: If you have entered the details of your sitemap correctly you will now be presented with a added sitemap success screen. Just go to Dashboard>>Configure My Site. Click on Sitemap, you will see the the status of your blog sitemap. Now the Status is success. Note that to indexed it may take up to 48 hrs. Yuppy mine took only few minutes. Cheers!

In this Blogger tutorial we have taken you through the steps involved in submitting a Blogger blog (Blogspot blog) to Bing Webmaster Tools (MSN). We have also shown you how to add a Blogger sitemap to Bing Webmaster Tools by using the default Blogger posts feed.

Enjoy!