Showing posts with label Tips/Tricks. Show all posts

Monday, 12 September 2016

Remove Or Hide Footer Link From Blogger Templates

Hello guys! After a long ... I am back again with an interesting topic. Yeah! Today I am going to give you some tips/tricks to Remove Footer Credit Link from your beautiful templates; i.e. obviously from the awesome free templates.

We see lots of cute, impressive and professional templates are available on the web in free of charge. But in the footer of the blog, you may notice that the template creator placed a credit link for their website. Most of the Template (or Theme) Designers keep a secret id (like 'mycontent') to their designed template for not to be pirated. Because template Designers had put their hard works to build a single template. If we try to remove them, then the site is automatically redirected to another site that is very irritating ... Doesn't it?

So, we can't use many of them because of this footer credit link. Don't worry! Hereafter you can use any free templates you want without templates owner's footer link.

You basically have 2 choices ... Either you can Hide the Credit Links or you can Remove it Permanently from the blogger templates (themes).

After that 'The Blog' is Ours and Credit Link too ...    

Way No. 1: Hide Blogger Credit Links Using CSS:

Step No. 1: Go to Blogger Dashboard>Template>Edit HTML.

Step No. 2: Use (CTRL + F) and search any of the following words within your html code.

"Designed By"/"Template By"/"Developed By"/(Or) similar words

Step No. 3: After you find one of the above similar words, Just Before "Designed By", copy and paste the following code;

<div style="visibility:hidden">

And close by </div> Like Our's - 

<div style="visibility:hidden">Designed by <a href='http://www.bloggertheme9.com/' id='credit'>Bloggertheme9</a></div>

See below screenshot:-

Step No. 4: Now press on "Save template". That's it, you are done. You hide the footer credit link from your awesome template.

Way No. 2: Removing Blogger Footer Links Using CDATA:

Step No. 1: Go to Blogger Dashboard>Template>Edit HTML.

Step No. 2: Use (CTRL + F) and search the code provided below within your html code.

" //<![CDATA[ "

Step No. 4: Now Search the word "mycontent" and change that word like The SEO Feed (your domain name).

Step No. 5: Now change the Credit Link as you wish and click on "Save template". You are done now. The footer has been permanently removable and you can put the Credit of your own. Cheers!

We hope you understand above 2 Ways to Hide Or Remove Footer Link Permanently from the Blogger Templates ... If you have any difficulties, don't hesitate to ask us. Or you can use the comment section below to drop your ideas, responses, difficulties, etc. Otherwise, use our contact form. Have a great day guys!

Sunday, 20 September 2015

How to Add Border around Post Images on Blogger/Blogspot

Everybody wants their websites and it's images a bit stylish and attractive. If you wish the same there should be some style to your blog images like drop shadow or borders. In this simple tutorial we will teach you to add borders around your post images on blogger using few simple CSS Code. Let's start to add a nice look on your images having colourful borders in your web pages !

How To Add Border Around Blog Images ?


Step-1. Go to Blogger >> Template >> Edit Html
Step-2. Now search for ]]></b:skin>
Step-3. Copy and Paste the following code just above ]]></b:skin>

/*--addictofblogging.blogspot.com--*/

.post img {
border:1px solid #e3e3e3;
border-radius:10px;
padding: 10px; }
Step-4. Save the template and you are done.
Step-5. Make following changes to change style, color or size of the border.
  • Increase 1px to increase the width of border 
  • Change solid to dotted or dashed to change style of border 
  • Replace #e3e3e3 to change border color 
  • Remove border-radius: 10px; to remove the radius around the corners
We hope you liked our tutorial on adding border around post images on blogger/blogspot. If it helped you, just subscribe and like us on facebook. Enjoy !

Sunday, 6 September 2015

How to Disable mouse Right Click and Hide Page Source

Newbie bloggers just surf Internet to compare the contents of different blogs. They Copy the contents of the Blogs they like. Being the New in blogging platform, they do not think how much time it had taken to write or make contents. This happens because they are new bloggers and want to become a successful blogger in no time. They are unknown that Google Adsense do not Approve the application having copy pasted contents. And when they fail in application they then came to know how much worse task they have done. You can say their blogs are dead, i.e. the fact is no more earnings from Google.

We actually are running more than 15 blogs around, when we were a new blogger earlier, we were the one of those who did copy and paste. And somehow with the passage of time we realize that our earlier blogs are now dead. So, we make up our mind that without copy pasting others contents, we will run our blog with Fresh/New contents. Now we are running more blogs and getting good response from Google Adsense. Therefore Guys, always write a new/fresh/unique contents to achieve pure goals and happy days comes, lol.

Hereafter, we have now new,fresh,unique contents in our Blogs. Our web page contents, we mean "page source" can be seen easily by doing mouse right click in blog/website. Viewing the page source others can steal your information from your Blog/Website. So, It's now headache to protect them from being copied/thept by other users. 

It's not possible to disable viewing a pages source. You can attempt to circumvent unaknowledgeable users from seeing the source, but it won't stop anyone who understands how to use menu's or shortcut keys. Your best bet is to develop your site in a manner that will not be compromised by someone seeing your source, If you're attempting to hide it for any other reason than to protect your intellectual property, then we would say you're doing something wrong.

Disadvantage of Disabling mouse right click:- 
  • Annoying Users 
  • Unprofessional 
  • Insulting to Users 
  • Pointless 
Lets come to the point - if you want to irritate Users playing with your blogs/websites, there are other, less controversial alternative solutions available to the problem protecting your images, contents, and source code.

Also Check:
  1. How to Disable right click context menu on images
  2. How to Prevent People From Copying Your Blog Contents

Disable mouse Right Click and Hide Page Source

To protect you contents, images, source code, etc, disable mouse Right Click and Hide Page Source. To do this, you require a HTMLJavaScript code which is given below;

<script language=javascript>
var message="Function Disabled!";
///////////////////////////////////
function clickIE4(){
if (event.button==2){
alert(message);
return false;
}
}
function clickNS4(e){
if (document.layers||document.getElementById&&!document.all){
if (e.which==2||e.which==3){
alert(message);
return false;
}
}
}
if (document.layers){
document.captureEvents(Event.MOUSEDOWN);
document.onmousedown=clickNS4;
}
else if (document.all&&!document.getElementById){
document.onmousedown=clickIE4;
}
document.oncontextmenu=new Function("alert(message);return false")
//
</script>
You will require above code later. Now follow below steps:
Step-1. Sign in your Blogger account
Step-2. Dashboard, go to Layout Option.
Step-3. In Layout Option, you will see "Add a Gadget", select it (See Demo below)


Step-4. After selecting "Add a Gadget", a popup window will be open (Add a Gadget window)
Step-5. Now Select "HTML/Javascript" Gadget. (See below Demo)


Step-6. Now add above HTML Script in Content Box. (See below Demo)


Step-7. Important Step - press the Save button. After saving you can drag the gadget wherever you want and click on Save Arrangement button.

Now you are done, check your blog Mouse right click function, it is now disabled. It will popup a message like below;


You are a genius. Yuppy...hurray !

Note: If you are irritated from above message being displayed and is annoying all the time when you do right click, to stop message displaying you should add below java script.

No right mouse click script !!! (no alert)

<script language=JavaScript>
<!--

//Disable right click script III- By Blogger Addict (addictofblogging.blogspot.com)
//For full source code, visit http://
addictofblogging.blogspot.com

var message="";
///////////////////////////////////
function clickIE() {if (document.all) {(message);return false;}}
function clickNS(e) {if
(document.layers||(document.getElementById&&!document.all)) {
if (e.which==2||e.which==3) {(message);return false;}}}
if (document.layers)
{document.captureEvents(Event.MOUSEDOWN);document.onmousedown=clickNS;}
else{document.onmouseup=clickNS;document.oncontextmenu=clickIE;}

document.oncontextmenu=new Function("return false")
// -->
</script>
We hope you liked our tutorial on Disabling mouse right click and hiding page source. If it helped just subscribe and like us on facebook. 

Enjoy ! 

Saturday, 5 September 2015

How to Add a Gadget Above the Header in Blogger

Blogger's Dashboard feature allows users to adjust the appearance of their blog with a few clicks of the mouse. Within the Dashboard, there is a " Layout " feature which lets bloggers add Gadgets such as RSS feeds, traffic counters, embedded media to their sites, adding beautiful widgets, showing notifications, pictures, etc.

Mainly by default in Blogger "Layout", you can see several places to add a Gadget. Such as:-

Right below the Title and above the posts, The Sidebars, The Footer, etc.

It is easy to identify them because all of them have a big linked title yelling " Add a Gadget ". Click on the link and you can choose the gadgets you want to add. After adding them, you can drag and rearrange them. You can also drag one from the side bar to the footer, above the post, below the post, etc.

Now, by editing your Blog's HTML code, you can allow for the addition of a Gadget above the header. Let's see some steps adding " Add a Gadget " icon above the header of your Blog.

Adding a Gadget Above the Header in Blogger

Step-1. Log into your Blogger account. Once logged in, you will be transported to your Dashboard.
Step-2. Select "Template", then click "Edit HTML".
Step-3. Scroll through the HTML code within the text box and locate this fragment:
<div id="header-wrapper">
Or you can press Ctrl+F and search below;
<div class="header-wrapper">
Step-4. Now you will find the detailed fragment. Just beneath the line <<div class='header-wrapper'> you will see below;


<b:section class='header' id='header' maxwidgets='1' showaddelement='no'> 
From above change maxwidgets='1' to maxwidgets='5'.
Step-5. Just next to maxwidgets - in showaddelement='no', change 'no' to 'yes'.
Step-6. This is an important step - Hit the "Save" button, lol.
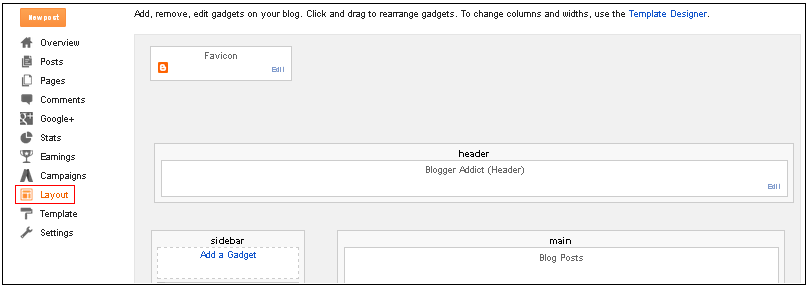
Step-7. After saving return to your Dashboard. Select "Layout". Above your header, there will be a link titled "Add a Gadget". Click this and add the Gadget of your choice.
Step-8. Save your changes and view your blog to ensure the widget was added correctly.

Hope this tutorial helped you. If you like our posts, share to your friends and comment below if you have any concern. Do not forget to subscribe us.

Enjoy !

Friday, 4 September 2015

How to List the Post Titles of all POSTS from your Blogger/Blogspot Blog [Tutorial]

In this Tutorial, we will show you how to list the Titles of your blog's more than 500 recent posts. If you are looking for an alternative to Blogger's gadget, then this might be very useful to you.

As we experienced, to retrieve the posts of a blog, you can use the URL like this:

http://***.blogspot.com/feeds/posts/default?alt=json&callback=mycallbackfunc&start-index=1&max-results=100

However, it does not work if your blog has more than 500 posts and you want to list them all. Our experiment showed that even you supplied a big number like (e.g.-10000) for max results, only up to 500 posts would return. To retrieve the list of more than 500 posts, we need a loop to do that. The following is how we implemented it for our several blogs.
We can also label all posts in a single page in another way, i.e. SITEMAP/Table Of Contents shows post titles with separated labels and a New! text with recently published posts.
Go through this link How to create a Sitemap/Table of Contents in Blogger to create a page of All Posts Titles for your information/use.
Click here >> SITEMAP to see our Sitemap / Table Of Contents.
Now lets come to the point,

Code goes here :-
<div><ul id="postList12"></ul></div>
<script type="text/javascript">
var startIndex = 1;
var maxResults = 100;
function sendQuery12()
{
var scpt = document.createElement("script");
scpt.src = "/feeds/posts/summary?alt=json&callback=processPostList12&start-index=" + startIndex + "&max-results=" + maxResults;
document.body.appendChild(scpt);
}
function processPostList12(root)
{
var elmt = document.getElementById("postList12");
if (!elmt)
return;
var feed = root.feed;
if (feed.entry.length > 0)
{
for (var i = 0; i < feed.entry.length; i++)
{
var entry = feed.entry[i];
var title = entry.title.$t;
for (var j = 0; j < entry.link.length; j++)
{
if (entry.link[j].rel == "alternate")
{
var url = entry.link[j].href;
if (url && url.length > 0 && title && title.length > 0)
{
var liE = document.createElement("li");
var a1E = document.createElement("a");
a1E.href = url;
a1E.textContent = title;
liE.appendChild(a1E);
elmt.appendChild(liE);
}
break;
}
}
}
if (feed.entry.length >= maxResults)
{
startIndex += maxResults;
sendQuery12();
}
}
}
sendQuery12();
</script>
Now you can put above code in two different ways anywhere in your blogger/blogspot blog. We would recommend to put the code in sidebars - left/right, that's the first way and you can put code in a html page which we can used it as a Sitemap of a blog or Archive or List of All post in a Single page.
Lets see how we can insert above given code in blogger/blogspot blog.

First Method: Putting the List in a Gadget

Inserting code in sidebars - left right, of a Blog.
Step:1. Go to Dashboard>>Layout
Step:2. Select add a Gadget Link
Step:3. Select HTML/Javascript gadget
Step:4. Enter the Title of your Widget, e.g. All Posts List
Step:5. Copy above code and paste the code inside the content box
Step:6. Now save and view your blog.

Second Method: Putting the List in a Page

Inserting code in a Page.
Step:1. Go to Dashboard>>Layout
Step:2. Select Page
Step:3. To create page click on New Page button
Step:4. Click Edit HTML tab to switch to HTML mode
Step:5. Copy and paste the code into the Editor
Step:6. Now publish and view your post. The list should appear inside the page.

We hope this Tutorial helps you to align list of all posts in sidebars and in a page as a content of table/sitemap. If you think this helped, subscribe us.
Enjoy !

Sunday, 23 August 2015

How to Add Contact Form on a Blogger/Blogspot BLOG

If you have a BLOG/WEBSITE, it is very important that you should have a CONTACT page on it. It is how visitors, brands, and companies can reach you and it’s something that every blogger should have. If sharing your email address on your blog is not your cup of tea, a contact form can serve as an easy way for others to get in touch.

If you do go the route of using a contact form, we do suggest that you also include an email address on the Contact page as well. You can set one up specifically for your blog if you don’t want your personal email address to be seen. The reason we believe this is so important to offer both options is because most brands and companies will not fill out a contact form to contact you. They usually want to email you through their own email client and add you to their contacts.
To add a Contact Form to Blogger/Blogspot can be done with a few coding tweaks. Blogger/Blogspot actually offers a Free Contact Form for your blog, unfortunately they’ve made it as a Gadget and placed it on the Layout page so that it is added to your sidebar. It is shown below;

Not the ideal place for a contact form, if you ask us ! It should be situated on its own page. Here is how our contact form looks like - BLOGGER ADDICT's Contact Us Form.

So we would like to show you how to set it up in following simple Steps;

Adding a Contact Form to Blogger:

Step 1. – First, go to the Layout page in Blogger and click an Add a Gadget link. From the popup, choose More Gadgets in the sidebar and then select Contact Form and add it. It doesn’t matter where it ends up in your sidebar right now, since we are going to modify that and make it look nice!


Step-2. Now, visit your Dashboard to the left, Template >> Edit HTML page.

Click inside of the editor text area and press CTRL+F (CMD+F on a Mac) and in the search bar type ContactForm then hit enter.

It should find the code below. Click the black down arrow to the left of:

<b:widget id='ContactForm1' locked='false' title='Contact Form' type='ContactForm'>
then click the down arrow again beside:

<b:includable id='main'>
if they are not already open.

Step-3. You will see this code:

<b:includable id='main'>
 
<b:if cond='data:title != &quot;&quot;'>
    <h2 class='title'><data:title/></h2>
  </b:if>
  <div class='contact-form-widget'>
    <div class='form'>
      <form name='contact-form'>
        <p/>
        <data:contactFormNameMsg/>
        <br/>
        <input class='contact-form-name' expr:id='data:widget.instanceId + &quot;_contact-form-name&quot;' name='name' size='30' type='text' value=''/>
        <p/>
        <data:contactFormEmailMsg/> <span style='font-weight: bolder;'>*</span>
        <br/>
        <input class='contact-form-email' expr:id='data:widget.instanceId + &quot;_contact-form-email&quot;' name='email' size='30' type='text' value=''/>
        <p/>
        <data:contactFormMessageMsg/> <span style='font-weight: bolder;'>*</span>
        <br/>
        <textarea class='contact-form-email-message' cols='25' expr:id='data:widget.instanceId + &quot;_contact-form-email-message&quot;' name='email-message' rows='5'/>
        <p/>
        <input class='contact-form-button contact-form-button-submit' expr:id='data:widget.instanceId + &quot;_contact-form-submit&quot;' expr:value='data:contactFormSendMsg' type='button'/>
        <p/>
        <div style='text-align: center; max-width: 222px; width: 100%'>
          <p class='contact-form-error-message' expr:id='data:widget.instanceId + &quot;_contact-form-error-message&quot;'/>
          <p class='contact-form-success-message' expr:id='data:widget.instanceId + &quot;_contact-form-success-message&quot;'/>
        </div>
      </form>
    </div>
  </div>
  <b:include name='quickedit'/>
</b:includable>
Delete everything shown in red so you should just be left with:

<b:includable id='main'></b:includable>
Step-4. Now, do a new search, this time just look for ]]></b:skin> and paste the below provided code directly before it:

/*CUSTOM CONTACT FORM BY ICANBUILDABLOG.COM */
.contact-form-widget {
margin-left:auto;
margin-right:auto;
width: 600px;
max-width: 100%;
padding: 0px;
color: #000;
}
.fm_name, .fm_email {
float:left;
padding:5px;
width:48%
}
.fm_message {
padding:5px;
}
.contact-form-name, .contact-form-email {
width: 100%;
max-width: 100%;
margin-bottom: 10px;
height:40px;
padding:10px;
font-size:16px;
}
.contact-form-email-message {
width:100%;
max-width: 100%;
height:100px;
margin-bottom:10px;
padding:10px;
font-size:16px;
}
.contact-form-button-submit {
border-color: #C1C1C1;
background: ##f6f6f6;
color: #585858;
width: 20%;
max-width: 20%;
margin-bottom: 10px;
height:30px;
font-size:16px;
}
.contact-form-button-submit:hover{
background: ##f6f6f6;
color: #000000;
border: 1px solid #FAFAFA;
}
Step-5. Save the template then go to Pages to create a new Contact page if you haven’t got one already. In the page editor, switch to HTML mode and paste the following:

<div class="widget ContactForm" id="ContactForm1">
<div class="contact-form-widget">
<div class="form">
<form name="contact-form">
<div class="fm_name">
Your Name:
<input class="contact-form-name" id="ContactForm1_contact-form-name" name="name" size="30" type="text" value="" /></div>
<div class="fm_email">
E-mail Address *:
<input class="contact-form-email" id="ContactForm1_contact-form-email" name="email" size="30" type="text" value="" /></div>
<div style="clear:both">
</div>
<div class="fm_message">
Message *:
<textarea class="contact-form-email-message" cols="25" id="ContactForm1_contact-form-email-message" name="email-message" rows="5"></textarea>
<input class="contact-form-button contact-form-button-submit" id="ContactForm1_contact-form-submit" type="button" value="Submit" />
<div class="contact-form-error-message" id="ContactForm1_contact-form-error-message">
</div>
<div class="contact-form-success-message" id="ContactForm1_contact-form-success-message">
</div>
</div>
</form>
</div>
</div>
</div>
 
Step-6. Save your page and view your new contact form ! It should look like this, you can customize as your own:


Since this uses the Blogger Gadget interface, the emails sent using this form will be sent to the email associated with your account. You can change this email address in the Admin settings of your blog.

We hope this tutorial may have helped you in learning How to Add Contact Form on a Blogger/Blogspot BLOG. Share this tutorial with your friends and don't forget to subscribe us. Enjoy !

Friday, 21 August 2015

How to Recover Deleted BLOG

When you can't recover Deleted Blogger Blog ?

The blogger blog which has been deleted for participating in hacking, malware and spam host can't be recovered.

You can't recover blog if recovery period of 90 days are over.

Accidentally deleted your blogger blog? Don't worry because blogger platform helps you to recover your deleted blog with just one click. All the deleted blogger post,comment, pages event which happens due to bog delete will be undone with just one click.Provided you blogger blog should not be deleted for more then 89 day's because once 90 days of blogger blog deletion period is over then it's impossible to recover your blog. Even the sub domain of your blogspot blog will be deleted from your account and will be available for other blogger to register it.If your delete blogger blog is under recovery period then only you can recover it.
Bloggers are increasing across the world in a huge number in daily basis. Most of the blogs are violating copyrights, Only few blogs are running genuinely. The blogs, Which are running with Copied content, illegal material..etc., will be deleted due to DMCA.

Google only deletes the blogs, which are violating Blogger and DMCA terms permanently without any Notification. Most of the blogs are deleted in a monthly basis, sometimes genuinely and sometimes mistakenly. If you are sure that, your blog is deleted mistakenly, don't worry ! you can recover your blog easily. If your blog is deleted due to copyright violation, your blog will not be back. Be patience, there are several ways to get your blog back, if your blog is deleted mistakenly. Just follow below steps:

Step-1. Contact Blogger Team

Send a counter notice to Blogger team and mention everything about your blog in a peaceful manner. You have to submit your Name, Email, Phone Number, Blog Address (Not custom domain, Provide your blogspot address) and signature in the following form.
Contact Blogger Team

Step-2. Send a Spam Appeal

If you have not received any response by contacting Blogger Team, Then submit an appeal by using this Secret form.
Request Blogger team to take you seriously

Step-3. Post a thread at Blogger Help Forums

Post your appeal in a peaceful manner with exact details at Blogger Help Forums. Click the following link and make a thread there.
Blogger Help Forums

Step-4. Visit Google Customer Service Center

You can consult GCSC (Google Customer Service Center) office located at your local town or city. If you are running your blog officially with huge number of followers, Consult a GCSC office which is located nearer to your area. All GCS Centers across the world are located in the below page.
List of Google Customer Services Centers across the world

Why a Blog Deletes, even though the Blog is running Genuinely ?

Every day, Google receives a big number of DMCA complaint reports. Blogger team verifies their level the best and takes an action against the infringed URL. Some of hackers sends false claims with neat presentations to confuse Blogger team. If blogger team confuses, Then your content will deletes. If you are sure that, Your content is legal, Then you can re-appeal to Blogger team from the mail, Which you receives after the deletion of the content. If your blog receives many false claims at a time and Blogger team confuses, Then your blog will deletes.

So, Blogger giving an opportunity for genuine bloggers to restore their blogs back. Just follow the above steps. If you ran your blog officially, without violating Blogger terms, Your blog will definitely backs.

Doubts ?

After submitting an appeal to Blogger Team, Give at least 24-48 hours to google. If your blog is not restored, Then only go to step 2. Many people restored their little baby without any loss. If your blog is not back from all the three steps, Go to the fourth step. Then you can know the full details. Please note that, Don't make any false claims. That will lead to suspension of your Blogger account!

If you have still any doubts regarding this, Feel free to ask below by adding a comment.

How To Make Blogger Comments Links Do-Follow

Search engines bots always search for links in every web page.When bot found the link, it will follow that link and go there.Then search engines index these links and show there users in results.Search engine bots only search for do-follow links.Search engines don't check no-follow links.Do-follow links in your website or blog means that you are saying to search engines bots that follow the links and index them.We hope now it is clear that what are the no-follow and do-follow links.By default, all links in blogger blog are no-follow.No-follow attribute is used for low quality links that you would not like to index them in search engines.Today we are going to show you how to change blogger blogs comments links no-follow attribute to do-follow.But before making your blog do-follow, you should know the pros and cons of having do-follow comment section.
If your blog have do-follow comment section, your blog will be called a do-follow blog.That means do-follow directories will add your blog into their list.Your blog can get lots of backlinks and traffic from do-follow directories.

You blog comments also increase because of some backlinks lovers.Having more comments in your blog is good for your blog reputation.

Having relevant links to blog niche can make your blog page rank better.

Disadvantages Of Making Do-Follow Comment Section:

Do-follow links means you are sharing your blog page rank juice with others.If quality of links in your comments are bad, your blog page rank will be affected.

Some spammers can fill up your comment section with spammy links.So, you have to give lots of your time to manage your blog comments.

How To Make Blogger Comments Links Do-Follow OR How To Make A Blogger Blog Do-Follow:

Login to your blogger.com account and go to Your Blog Dashboard>>Templates>>Edit HTML.

After that search for the following code in your blog HTML[ Use Ctrl+F to search].

<a expr:href='data:comment.authorUrl' rel='nofollow'><data:comment.author/></a>


From the above code remove rel='nofollow' or replace it with rel='dofollow'.Now your code looks something like below code.

<a expr:href='data:comment.authorUrl' rel='dofollow'><data:comment.author/></a>

Now save your template by clicking on save template button.

That's it, now your blog comment section comments are do-follow.

Note : Please read the pros and cons before making your blog do-follow.

Congratulation, you have successfully made you blog do-follow.We recommend you to keep your blog comments no-follow but if you want to make it do-follow, you can make it final decision is yours.Please share your suggestions,ideas and problems below in comments.And please share this article with your social friends.

How to install Google Analytics on a Blogger blog


Google Analytics (GA) is a free service that generates detailed statistics about the traffic and visitors to a website or blog. In addition to the usual traffic metrics ( page views, visits, unique visitors, bounce rate, time on site, etc. ). Google Analytics also provides comprehensive statistics on blog/website audience, traffic sources, content, keywords and more.

Adding Google Analytics to a Blogger blog is easy, and it doesn't even involve copy-pasting JavaScripts.

Creating an Account with Google Analytics:

Step-1. Go to Google Analytics, click the Sign-Up Now link on top right corner of the page and sign in to your Google Account.

Step-2. On the page, click the Sign Up button.

Step-3. Next supply all the necessary details; like, account name, blog URL you wish to track, time zone, data sharing preferences, and your country or territory.


Step-4. Read the terms of service and tick the "Yes, I agree to the above terms and conditions" check box.

Step-5. Click Create Account button and you will be taken to Tracking Code Configuration Tab.

Step-6. The next step is to find the Web Property ID (a.k.a UA number) - a Unique ID given to the account which you have created. Disregard all other items in the tabs provided, the only thing you need is the UA number.


Step-7. Copy the UA number as you will need to paste it later on.

Installing Google Analytics on your blog:

This is a two-step process. First you need to register the Web Property ID with Blogger, and then import the tracking code into your template.

Now let just start how to add Google Analytics ID to your Blog -

Step-1. If you are using the new Blogger interface, click the dropdown menu next to the name of your blog you wish to track and navigate to settings >> Other >> Google Analytics. (For old interface, go to Settings >> Basic >> Google Analytics Web Property ID).


Step-2. Paste the previous copied UA number into the Google Analytic Web Property ID text box as shown above screenshot.

Step-3. Now, click Save settings, you are done.

Adding your Tracking code:

The following <include> tag will import your GA tracking code into your blog:

<b:include name='google-analytics' data='blog'/>

If you are using a latest Layout or Dynamic Views template from Template Designer gallery, you can skip the following steps because it already has the <include> tag built-in. The same applies to mobile templates.

But if you are using older Layout template or a third party template you might need to add it into your template manually. Here is how you can do:

Step-1. Go to Template >> Edit HTML (For old interface it's Design >> Edit HTML) and locate the </body> tag.

Step-2. Insert the code right above the tag (if the code isn't already there).

Step-3. Save your template.

It could take 24 hours before your first data to appear in your account. This is because Google Analytics updates reports every 24 hours. Come back to Google Analytics Dashboard the next day and if everything is in order you will see your stats !

If you like our post, just subscribe us. Enjoy !

Wednesday, 19 August 2015

Create Shadow and Round Border with Simple CSS

By creating shadow and round border (border radius) is quite useful to decorate your site template, and also it is easy to do that. You can see how it looks in blockquote and ads banners from this site for the example.

For specific example, We'll give example how to create shadow and round border in blockquote.

Open your CSS from your site template and replace the existing code or opened with the CSS style below (you can customize the size, color, etc, to match your template later):

blockquote{width:90%;background:#FFF;padding:5px 15px; margin:5px;color:#555;
line-height:150%;font-size:12px;border:1px solid #eee;
-webkit-box-shadow:8px 8px 16px 4px rgba(0,0,0, 0.4);
-moz-box-shadow: 8px 8px 16px 4px rgba(0,0,0, 0.4);
box-shadow: 8px 8px 16px 4px rgba(0,0,0, 0.4);
-webkit-border-radius: 10px;
-moz-border-radius: 10px;
border-radius: 10px;}
Save your template and you will see the changes of your blockquote like the one used in this blog (if you don't change anything), but offcourse you can customize it yourself.

If you prefer to use separate style of shadow and round border, here is the code you can use:

/*CSS code to create box shadow*/
border:1px solid #eee;
-webkit-box-shadow:8px 8px 16px 4px rgba(0,0,0, 0.4);
-moz-box-shadow: 8px 8px 16px 4px rgba(0,0,0, 0.4); box-shadow:8px 8px 16px 4px rgba(0,0,0, 0.4);

/*CSS code to create round border*/
-webkit-border-radius: 10px;
-moz-border-radius: 10px; border-radius: 10px;}
REMEMBER: This code can also be used for any other part of your template. Not only on blockquote, but also image border, banners, image caption and so on.

Tuesday, 18 August 2015

How to add Facebook Like/Fan Box to Blogger

Today we are going to talk about Facebook Like/Fan Box to Blogger. A Facebook Like Box or Fan Box is a great plugin that allows Blog visitors to subscribe to your blog updates via their Facebook accounts, without leaving your blog. Once subscribing (by pressing the like button), visitors will receive your most recent blog updates on their Facebook page. This box also displays faces of the "likers" on your blog.Before creating a Fan Box, you should already have a Facebook Fan Page. If you haven't yet created, just click here to learn How To Create a Facebook Fan Page.

To create a Facebook Like Box/Fan Box, just follow the below steps;

CREATE A FACEBOOK LIKE BOX

Step-1. Find out your Facebook Fan page URL by visiting your Facebook Fan page and copy the URL in the address-bar, now you can see how your URL should look like in below screenshot;


Step-2. Then visit this page: http://developers.facebook.com/docs/reference/plugins/like-box.

Now you can see that - LIKE BOX, With the release of Graph API v2.3, the Like Box plugin is deprecated. Please use the new Page Plugin instead. The Page Plugin allows you to embed a simple feed of content from a page into your websites.

If you do not manually upgrade to the Page Plugin, your like Box plugin implementation will automatically fall back to Page Plugin by June 23rd 2015.


Step-3. Go to Page Plugin. You can see the following screenshot;


Step-4. Now, put your page URL - like ours pages/Blogger-Addict/1534960050079169 on Facebook Page URL option;


Step-5. Once reloaded your Facebook Page URL, you will find a CODE. Shown as below;


Step-6.
Clicking on Get Code above, you will get the Codes which needs to be put on your site as instructed below and You are done;


A. Include the JavaScript SDK on your page once, ideally right after the opening <body> tag.<div id="fb-root"></div><script>(function(d, s, id) { var js, fjs = d.getElementsByTagName(s)[0]; if (d.getElementById(id)) return; js = d.createElement(s); js.id = id; js.src = "//connect.facebook.net/en_US/sdk.js#xfbml=1&version=v2.4"; fjs.parentNode.insertBefore(js, fjs);}(document, 'script', 'facebook-jssdk'));</script>
B. Place the Code for your Plugin wherever you want the plugin to appear on your page.<div class="fb-page" data-href="https://www.facebook.com/pages/Blogger-Addict/1534960050079169" data-small-header="false" data-adapt-container-width="true" data-hide-cover="false" data-show-facepile="true" data-show-posts="true"><div class="fb-xfbml-parse-ignore"><blockquote cite="https://www.facebook.com/pages/Blogger-Addict/1534960050079169"><a href="https://www.facebook.com/pages/Blogger-Addict/1534960050079169">Blogger Addict</a></blockquote></div></div>

IF ABOVE DOESN'T WORK, FOLLOW THE STEPS BELOW:

Step-1. Go to Blogger Layout -


Step-2. Click on ADD A GADGET, you will see below screenshot -


Step-3. Now click on HTML/JavaScript. You need to insert below Facebook Fan Box CODE given below. Remember you need to replace blue highlighted "pages/Blogger-Addict/1534960050079169 with your own Facebook Fan Page URL.
<iframe src="//www.facebook.com/plugins/likebox.php?href=https%3A%2F%2Fwww.facebook.com%2Fpages/Blogger-Addict/1534960050079169&amp;width=300&amp;height=900&amp;colorscheme=light&amp;show_faces=true&amp;header=true&amp;stream=false&amp;show_border=true" scrolling="no" frameborder="0" style="border:none; overflow:hidden; width:300px; height:210px;" allowtransparency="true"></iframe>

You are done, your Facebook Fan Box has been created successfully. Enjoy.

Hope it helped you to create a Facebook Fan Box. If you have any concern regarding above tutorial, please comment below. Like Us On Facebook as well. Enjoy!

Monday, 17 August 2015

How to Create SEO Friendly Permalinks For a Blogger Posts

Permalinks are the permanent links to a post page. Blogger automatically generates a permalink based on the title of your post. Permalinks provide information to the viewer about the kind of content being pointed to.

Permalinks create permanent links to your Blogger posts which are indexed by search engines such as Google. Search engines use permalinks to categorize posts. Browsers use permalinks to help navigate to your posts. When you hover over a permalink in your browser you can read the post name in the status bar.
The permalink for this article is:
http://addictofblogging.blogspot.com/2015/08/How-to-Create-SEO-Friendly-Permalinks-For-a-Blogger-Posts.html


Tips For Working With PERMALINKS In BLOGGER

While other blogging software such as Wordpress allows the user to edit permalinks Blogger has no such feature. For this reason care needs to be taken when creating titles for your posts as the permalink generated from the title can't be changed later. While your article is in draft form you can continue to change the title as many times as you like. However, once the permalink is assigned at the point that the post is published it remains the same no matter how many times you change the title of your post.

Before in Blogger, you had only AUTOMATIC PERMALINKS which allowed you to add character less than 35-40 automatically. For an instance a Long Title such as the one below would result in a shortened permalink which would lose the important fact that this post is related to working with Blogger:
Example:
http://addictofblogging.blogspot.com/2015/08/How-to-Create-SEO-Friendly-Permalinks

Should be like this !
http://addictofblogging.blogspot.com/2015/08/How-to-Create-SEO-Friendly-Permalinks-For-a-Blogger-Posts
Fortunately now Blogger recently has a facility of adding longer Title detail (more than 35-40 characters) as a permalink. It is a CUSTOM PERMALINK. You can add Title characters manually as many as you want.

Once the post is published you can change the title "How to Create SEO Friendly Permalinks For Your Blogger Posts." as many times as you like. The permalink, however has remained the same even though the title has changed.

You can use this trick to create eye catching and memorable titles. It will also ensure that the permalink reflects a concise title and that unnecessary details in the permalink are removed. Creating concise permalinks is important for Search Engine Optimization. Read more about Search Engine Optimization in the blog tutorial Tips for Search Engine Optimization.

Share it if it helped you. Also like us on facebook too. Enjoy!

Remove All Web History from Google

You may don't know that Google is Tracking your search keyword you hit on Google. If you open your google account when you search anything on Google Search Engine, secretly Google track your all of search term you hit on Google. If you don't stop the Web history it can be automatically saved in your Google Web History. It track data from all Google Products. So, take a minute to read this Post and remove all web history from Google that in fut Google won't able to track your data from Google Porducts.

We already know that Google is the Top Ranked site over the Internet world at the time with High rated Services like Youtube, Adsense and Adwords, etc. Google also have a feature to record your Web History like what Keyword you search on Google. If your Google Web History is on, it means your search Keywords is tracked by Google and save into your Google Web History. You can also download your entire Google web history and also delete entire history at one click. If you want to off this feature or remove all of your Web history from Google web history, you can apply below steps.

Steps To Remove All GOOGLE Web History:

Step-1. Login to your Google Account and go to Google History PAGE HERE.

Step-2. On Right Top corner, you can see the option MENU. Clicking on it, you will found a list of options - Delete Options, Settings, Download Searches, Help and Send Feedback. In Setting option, you can find - a, Manage Activity and b, Show More Controls. Clicking on Show More Control, you can manage all these options - YOUR SEARCHES AND BROWSING ACTIVITY, PLACES YOU GO (PAUSED), INFORMATION FROM YOUR DEVICES (PAUSED), YOUR VOICE SEARCHES AND COMMANDS (PAUSED), VIDEOS YOU SEARCH ON FOR ON YOUTUBE, VIDEOS YOU WATCH ON YOUTUBE, ETC.
Step-3. Select Delete Option, You will get below screenshot;
Step-4. Now select Advanced option from above screenshot and click on delete. A pop box will appear as below;
Step-5. You Drop down Menu, just select drop down menu of your need. Click on DELETE button.
Step-6. Once deleted you will be promp to login again.
Step-7. After inserting Password your All web history from Google will be deleted and the deleted data can't be recovered back. Please see below screenshot.