This article is about how you can stop Google from automatically "enhancing" pictures that are loaded in Blogger - even if you do not have a Google+ account.Google has started automatically "fixing" new pictures as they are added to your blog
In May 2013 Google added the Auto-Enhance and Auto-Awesome features to Google+ Photos. These are meant to make your pictures look better, ie more like those which are taken by professional photographers.
These features are turned "on" by default. And because:
- Photos loaded using Blogger are stored in Picasa-web-albums, and
- Picasa-web-albums and as Google+ Photos actually have the same collection of photos - yes, even for accounts that do not use G+,
the effect is that
auto-enhance and auto-awesome are applied to all images loaded through Blogger's post-editor, header-picture loading tool and gadget-picture loading too;.Why is this a problem
In many cases, these features work as they are intended to, and the illustration that is shown on your blog is more attractive than the one you uploaded - it's brighter, clearer and loads faster.
But there are some situations where the effect of the auto-enhancement is not good. These include:
- Pictures with some transparency - which is auto-corrected to either light grey or black
- Pictures that are intended to be dull / dark / shady - these are automatically lightened.]
- Pictures that are loaded at a certain photo quality - are automatically downgraded to a lower quality (which is fine for viewing on screen, but not so fine if you actually want to use your blog to share high-quality photos).
Blogger users who have a non-white background, and who deliberately upload images with a transparent background so their blog background will "show through" the image have been particularly annoyed by this. And I have been less than impressed by the faint grey "wash" added to the background of some of my diagrams - for example:
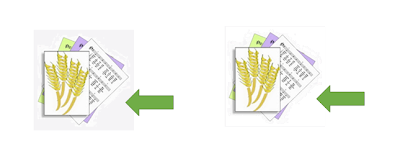 |
| The left-hand picture was auto-enhanced, the right hand one was not |
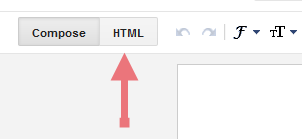
How to turn off photo auto-enhance if you use Google+
If your blog - and the account you use to post to the blog - is linked to your Google+ profile, then you can stop your photos from being changed by:
- Opening the Google Plus settings tab.
- In the "Photos" section, un-ticking "Automatically enhance new photos"
This stops the auto-enhance and auto-awesome tools being applied to any new photos that you upload from now onwards using Google+ Photos, Picasa-web-albums or any Blogger feature that lets you load a picture (the post-editor, the header widget settings, the picture gadget settings).
Alternatively, you can turn off the auto-enhance and auto-awesome changes that are made to specific pictures by by finding them in Google+ photos and un-ticking "Auto-enhance" in the "More" menu.
How to turn off photo auto-enhance if you do not use Google+
There is currently no option in Piscasa-web-albums to turn off the auto-enhance feature.
This means that if you load photos to either Blogger or Picasa-web-albums, using a Google / Blogger account that is not linked to a Google+ profile, you cannot stop auto-enhance from happening.
Some people have suggested that the way around this is to:
- Temporarily link the blog to a Google+ profile (either your own one, or one that you create just for the purpose - eg "Mr John Smith")
- Turn off the auto-enhance feature using the Google+ procedure listed above
- Fix up the damage to any pictures that you loaded through Blogger or Picasa-web-albums between mid May 2013 and today by finding them in Google+ photos and un-ticking "Auto-enhance" in the "More" menu.
- Unlink the blog from the Google+ profile.
However
I do not believe that this is entirely correct: my tests suggest that whether or not photos are auto-enhanced is controlled by
the settings on the Google+ account that is used to upload the pictures,
no matter whether the blog is attached to a Google+ profile or not.
(I've been testing this a lot because I have a number of blogs that are linked to Google+ Pages that are in my personal profile, but which I generally post to using a different Google account that has a more generic name like "Editor, Table Quiz Helper", and it's own separate set of Picasa-web-albums: I want to be able to hand these accounts on to my successor when I leave the community groups that they are for.)
Previously, the main options that I identified and recommend were:
However another option, which I now think is better, is to:
- Make a Google+ Page for the blog
- Give that Page it's own login-name and password - effectively turning it into a separate new Google account
- Give that new Google account administrator rights to the blog
- Make the setting change described above in "How to turn off photo auto-enhance if you use Google+" while you are logged in as the new Google account
- Use the new Google account to load photos to the blog: this will mean that the photos are placed in the Google+ Photos album associated with the page, and so you can access them using either Picasa-web-albums or Google+ Photos.
Other Options
If you really don't want to use even a minimal Google-plus account, then your options are limited.
Use another picture host
You could load the pictures that you want to use in your blog to another picture-hosting service (eg Flickr) - however doing this means that you posts will not have a
thumbnail image.
Minimise the damage
If you make sure that pictures which you load have a white background (or whatever colour background your blog has) instead of being transparent, then the impact of auto-enhance will be a lot less. I have found that if you use a .png file rather than a .jpg, the background is white instead of transparent. (This is fine for me, because I use white blog backgrounds.)
Wait for things to change
A very simple fix would be for Picasa-web-albums to use default values of "No" instead of "Yes" for auto-enhance and auto-awesome, or to set these up as settings in the PWA profile.
Another option is that Google may improve the enhancement algorithms (ie rules which control how pictures are "touched up").
Fingers crossed, one of these will happen soon.
Related Articles:
Giving another Google account Administrator rights to your blogTurning a Google+ Page into a separate Google accountPost.snippet and post.thumbnail - how they are derived from your blog postHow to add a picture to your blog, using the picture gadgetMaking a Google+ profile for the Google account that you use to upload the pictures,