Monday, 31 March 2014

30 cheat sheats for successful SEO

cheat sheets for successful seo

What a SEO needs to know?

The web is flooded with infografics and cheat sheets. Somebody meant once, such giveaways are good for SEO as linkbuilding assets and now everybody makes some. At least as copy and share. I will not speculate about whether or how many of them bring real value, imo most of them are redundant, but my personal biggest problem with them was - THE cheat sheet was NEVER present, if it was really needed (at least for me). Indeed, the sense and the convenience of cheat sheets is if they are there just in time, at the moment, whem one needs them. So i decided to create a collection of all cheat sheets i ever used on my SEO activities and share it. This cheat sheets suite is an evergreen knowledge, hints and tricks, which will be always helpful. Surely this knowledge isn't enough to call oneself an expert, but for somebody who does SEO, specially technical SEO and Onpage SEO, these cheat sheets will render a great service. And for somebody who learns SEO at the moment, they will give a great summary of things which must be learned. These cheat sheets cover already all essential knowledge segments a SEO brings daily into action. Befor publishing i reviewed all cheat sheets to find eventuallya fresher version - for some of them i finded one indeed.
Read full article »

How to practice guest blogging successfully without penalty fear

Guest blogging tip
There are hard times for guest bloggers and guest blogging platforms. Google's top spam officer  means, guest blogging is done. Even was penalized one of the most successful guest blogging brokers. There is a big chaos and panic in the webmarketing environment. "Guest blogging is dead" is one of the most searchable phrases. But in my opinion there is a kind of doing guest blogging, which allows the successful valuable guest blog practice. Lets look on what exactly hates Google on guest blogging, what exactly drives a guest blogger into penalty and how the common sense and semantic markup help us to spread our guest blog articles and get valuable backlinks for it without penalty fear.
Read full article »

Friday, 28 March 2014

How to change Labels on more than one post at a time

This article shows how to edit the name of an existing Label value in blogger, without editing each individual post that it's applied to.

Blogger and Labels


Previously, I've explained that labels are tags you can use to categorize your blog posts, and that the are the raw material of putting your posts into pages.

But what happens if you want to change the value of a label? For example, if you have a lot of posts that are labelled "Colour", but you find that most of your visitors are from the US and think you have poor spelling!

It would be nice if Blogger had a feature that said "change all X labels to Y labels" - but it doesn't (at moment, anyway).

One option is to edit each post individually, removing the old label and adding a new one. This works, but can be time consuming.

A better option is to use the bulk-labelling tools. This is a lot easier, though not quite as easy as you might think.


Blogger's Post-Dashboard labelling tools

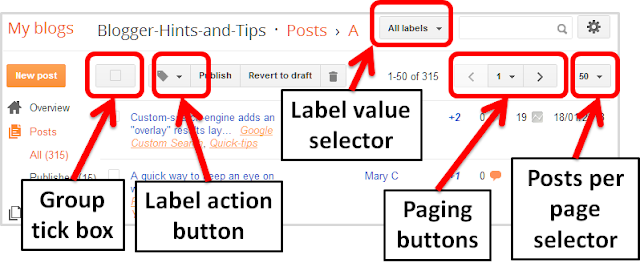
This picture shows the tools that you can use to work with labels (outside of the post-editor).  They are all found on the Dashboard when you are looking at the Posts tab.


The Group tick box either selects or un-selects all the posts you can currently see on the Dashboard > Posts tab (depending on whether they're selected or not at the moment - it works like a toggle-switch).


The Label action button applies an action to all the posts that are currently selected.   You can:
  • Make a new label and add it to the selected posts
  • Add an existing label to posts that don't currently have that label  (by just choosing the label) and are currently selected
  • Delete an existing label from posts that do currently have that label  (by just choosing the label) and are currently selected
Example Label Action Button values


The Label value selector lets you see a list of just posts with a label.


The Posts-per-page selector is where you select how many of your posts are listed in the Dashboard > Posts tab.


The Paging buttons let you move through the list of displayed posts.


How to change a label name

1   Close Blogger, and re-open it again.    (see below for an explanation of this step).


2   On the Dashboard > Posts screen, make sure that you are viewing 50 posts per screen  (or less if you don't have many posts)
Do this with the Posts-per-page selector near the top-right corner. You need to do it because Blogger's bulk-label tools will only let you work with 50 or less posts at a time.


3   Select the label that you want to rename from the Label value selector drop-down list.
This restricts the list to only posts with that label.
If you have more than 50 posts with the label, then there will be more than one screen-full of posts. You can see this in the Paging-buttons at the top right of the screen.


4   For each screen-full of posts that is shown:
  • Use the group-tick box at the top of the list of posts to select all posts that are currently on your screen.
  • Either choose the new value from the  Label action button drop-down menu - or use the New Label ... option in the first screenful of posts.   This will attach the new label name to the posts you have selected.
  • Choose the label value from the Label action button drop-down menu to Remove the old label from the posts you have selected.
  • Use the group-tick box at the top of the list of posts again, this time to unselect all posts that are currently on your screen.

After you have done this for all the screens of posts that currently have the old label value:
  • You should be left on the Dashboard > Posts screen, with a message saying that there are no posts with your old label. 
  • The old label will not be attached to any posts, and will not be visible in the Label-value-selector. 
  • If you displaying labels with your posts, then visitors to your blog who use a web-browser will not be able to see the old label value any more, and it will not be listed in any Label gadgets you have used.


What was the catch?

The approach described here deals with two "twitches" with how Blogger works.

Firstly, closing and re-starting Blogger before you start makes sure that absolutely none of your posts are selected initially: I've found that sometimes if a post is selected, and then you page up or down, that post is still selected. And sometimes a post is selected immediately after you have edited it. It can be quite hard to find these (because there is currently no feature to list "selected posts only"), so the re-start is the safest approach.

Secondly, there is a maximum of 50 posts per label action. This is a pain: it means that if you want to re-name the label on 300 posts, you need to do it in 6 groups of 50 each times. I can sympathise with Blogger about making sure that actions like this don't take "too long" - but the 50 posts limit does seem very low.


Is the old label gone for good?

This is an interesting question.  Blogger has set a limit of a maximum of 5000 labels per blog. Once you have replace a label value is the way described above, I'm not sure if it will be removed totally, or if it still counts towards the 5000 even though it's no longer in use. (And I'm not about to manually give a blog 5000 labels just to test it to find out!)


Related Articles:

Putting your posts into pages

Using Labels to categorize posts

How to edit a post that you have already published

Using Feedburner to Tweet your posts lets you include labels as hashtags

Solution for "Your post was not shared. Please try again" and how to post to multiple communities

Your post was not shared. Please try again
As i was a bloody rookie at Google+ i was affected many times by the "Your post was not shared. Please try again" error. This error alert rises from time to time if one tries to post something in any community. After some researches i guess to determine the problem's cause. The cause of this issue is BTW related to the wish and try to post to multiple communities. Updated at 1.07.2014. Updated at 8.07.2014
Read full article »

Thursday, 27 March 2014

Oftener and deeper into Knowledge Graph? - Become better entity at Wikidata!

create entity to come into knowledge graph
Well my dear entity owners, i realize with pleasure, you really like becoming entity! You maked such stormy run on my previous topic about becoming entity with creating Freebase topic, that i decided to write a follow-up to tell more detailed about a further possibility of entity enriching and chaining of entities. I mean, as more structured and linked data we provide publicly, as more cause we give to the search algorythmus to interrelate us with our creative works, products and the like. Establishing and reinforcing of such interrelations gains firstly our author and trust rank, secondly it enhances our influence grad and our pubications authority. I see these interrelations like a relations between left and right brain hemisphere: the more synaptic relations are established (thickness of Corpus Callosum), the higher is creativity and intelligence. Then let's our entities interrelation as thick as possible, to achive such amount as it was by Einstein's brain;) Now we create our new entity at Wikidata, and then connect this new entity to our already existing.
Read full article »

Wednesday, 26 March 2014

Find an angle that lets you write some blog-posts quickly

This is a post from the Weekly Blogging Tips series.

The posts on your blog don't all have to be of the same quality or type.

If the topics you usually write about are complex and in-depth, needing a lot of research, then it's good to look for one aspect you can write about that is quick and easy, and to commit to making a post like this on a regular schedule.   Some ideas for posts like this:
  • Notes about changes in other products
  • Reviews of or congratulations on posts on other blogs in your niche
  • A round-up of all the other posts you have made in the last month
  • A recap or summary of your posts on a popular topic
  • Clarifications of instructions in the official help-pages for a related product.

Or,  if you really don't want to put "small" posts onto your blog's RSS feed, another option is to at least edit one of your existing posts every (day / week / fortnight - whatever works for you ), and share news about your update on which-ever social networks you are using on conjunction with your blog.

Either way, this lets your readers (and their RSS and social media subscriptions) know you're still out there, and it gives you the satisfaction of hitting the Publish button regularly, even if it's weeks, or months between your substantial posts.

Tuesday, 25 March 2014

Introducing Weekly Blogger Tips: A new type of post from Blogger-HAT

Blogger-hints-and-tips was originally where I kept my own notes about how my solutions to problems with Blogger

But then I found other people were visiting - because they were looking for solutions to the same problems!   And looking back, I was embarrassed about how low-quality the original posts  were.  So I made a commitment to only publish properly researched articles, and I started keeping a private blog with post-ideas that I haven't researched fully (which now has 200+ posts in it).

Then in Sept 2012, I started posting "Quick Tips" - very quick posts about changes in other products that are people tend to use with their blogs, which I didn't have the time or ability research fully, but which I really wanted to share with my readers quickly.

Recently, however, the number of  Quick-tips has decreased: as Blogger and the other tools have become more mature, there just haven't been the same number of changes.

And at the same time, other projects have been taking more time and I often don't have the capacity to do the in-depth research for the quality articles that I want to publish here.

But one thing I that noticed on another project is that I get a lot of satisfaction from publishing regularly:   in one niche, there's a type of post that I can write in about 20 minutes, and this is great for my motivation and satisfaction, as well as for the blog's traffic levels.

So, between now and December this year, I've set myself a target of publishing at least one short post here once a week.   This won't be a fully researched article.  Instead it will be a short hint about some aspect of either Blogger or blogging in general- in short a Weekly Blogging Tip.

To start with, I've made a list of potential topics, but I'd love hear your suggestions about aspects of blogging where a quick post would be helpful - you know where to find the comments box ....

How to become an entity? Create Freebase topic!

create freebase topic
What? Are we individuals not already a kind of entity? Sure, but... Google would say - not enough, it lacks something important. Yes, if you not forget about rel="author", if you publish something, you are on the good way to become a real machine-readable entity. It remains just a little step to be affiliated in the community of the Knowledge Graph entities: yes, i mean your entry in Freebase.
Read full article »

Saturday, 22 March 2014

5 Easy Ways to Improve the SEO of a blog & Boost Traffic

5 easy ways to improve the SEO of a blog

A blogger needs to know at least the basics of SEO. For this, you don't need to be an SEO expert but you need to know the minimum so that your posts are well indexed in the search engines.

The phrase "Content is King" is one of the widest spread Internet memes being used by so many bloggers with the idea that you should focus on having quality content, while the rest isn't that important. This is not true. Quality content is essential, but bloggers shouldn't focus only on this matter. Besides producing quality content, your text needs to be optimized for the search engines.

improve seo, seo tips, boost traffic
Boost traffic & increase SERP visibility with SEO

5 Easy Ways to Improve the SEO of a Blog

Now, let's get to know the basics that any blogger needs to learn about SEO, as well as other simple SEO techniques. Below are 5 easy tips to improve the SEO of your blog:

1. Define the keyword

When you write a post, it is recommended to choose the right SEO keyword for your text. Your purpose is to make this keyword - or term - to be searched on Google, and then get your post among the top. For this, you need to use this keyword a few times in the text.

For example, here the keyword could be SEO, but this term is too common and I could hardly get in the top for this search. Then, I'll work with a phrase or a long tail keyword, so that this post will rank for the term "easy ways to improve the SEO of a blog". I will use this keyword a few times, but without overdoing it.

2. Use the keyword in the post title

Now that I have defined the keyword, I will use it in the post title. This step is very important, and certainly will help you to get a better SEO rank. For instance, the post title contains the easy ways to improve the SEO of a blog keyword, along with other words to form an attractive and optimized title for SEO.

3. Use the keyword in H2 tags

You must also use heading tags (h2, h3) in your posts. Here, we added the "easy ways to improve the SEO of a blog" keyword in a H2 heading. Do this always as it will help you rank well in the search results. If you don't know or don't understand what are the heading tags, I would suggest to do a further research on this topic.


4. Use the keyword in the text

Include the chosen keywords throughout the text. Especially in the first paragraph (please note that I have repeated the title in italics in the first sentence). But be careful when doing this, there is a maximum and minimum limit for that. A good keyword density is between 1.5% to 4.5% for best results. Less than that will have no effect and more can alert the search engines and your text might be considered spam.

5. Publish Posts with 300 words or more

Posts under 300 words have little chance to be among the top results in search engines. Of course, you will be able to rank for multiple keywords that are less popular with less than 300 words, but for the most competitive keywords that have the potential to bring a greater number of visits, it will be nearly impossible.

Thus, it is recommended to write posts with more than 300 words. It's not hard when you really understand the topic you're talking about.

Conclusion

As you can see, with some simple SEO techniques you can improve the traffic coming to your blog from the search engines. I hope you enjoyed these 5 easy ways to improve the SEO of a blog!

What is the difference between padding and margins?

For those who would like to know more about HTML and CSS, in this post we will learn the differences between margin and padding CSS properties that are used to add space between the HTML elements, thus preventing the elements from getting 'stuck' together.

Although both have similar functions, each work in a different way.
  1. Padding determines the inner margins, being used for changing the distance between the content of a given element and its border.
  2. Margin is the space outside of an element affecting how far the element is away from other elements.
For a better understanding of how the padding and margin work, take a look at the picture below:

padding and margin, css proprieties
Difference between margin and padding

Just as you have the option to define the borders for each side of your HTML elements (eg. borders for the sidebar), you can do the same with the margin and padding properties. All you need to to do is to change the top, right, bottom and left values​​.

The values that you can use include: pixels (px), centimeters (cm), millimeters (mm). em units (em), x-height (ex), inches (in), picas (pc) and point sizes (pt).

When using margin and padding, you need to add a value for each 4 corners of an element, as follows: top, right, bottom, left. Each value must refer to the each side of the HTML element. The first value is for the top, and they follow a clockwise direction, so the value would be close to the right, then bottom, and finally, left.

Example 1:
padding:5px 15px 5px 15px;
  • top padding is of 5px 
  • right padding is of 15px 
  • bottom padding is of 5px 
  • left padding is of 15px
margin: 10px 5px 10px 5px;
  • top margin is of 10px
  • right margin is of 5px
  • bottom margin is of 10px
  • left margin is of 5px
If you define a single value (instead of 4), the distance applies on the all sides, i.e. it will be applied on the 4 sides of the HTML element that you want to modify.

Example 2:
padding: 5px (top and bottom) 15px (left and right);
margin: 10px (top and bottom) 5px (left and right);

If it helps you visually, think of an A4 page of type inside a picture frame. The margin is the space between the edge of the sheet of paper and the other elements (the parts of the frame), while the padding would be the space between the edge of the sheet and where the type starts on the page. The border would be the edge of the sheet of paper.

It's probably easier to understand if you have borders, then it also becomes obvious which one to use. Do you want "space" after the border (outside the element = margin) or before the border (inside the element = padding).

Friday, 21 March 2014

Solution for "Rich snippets not showing"

Rich snippets not showing
During my microdata coding i quite accidentally realized, that "rich snippets are not showing" doesn't always mean "rich snippets not working"! My research was about nesting and inheritance of Schema.org's classes, and, playing with the Google's structured data testing tool, i detected a case where my microdata markup was correctly validated and worked properly, but rich snippets of this code weren't showing. After some tests i got to know about two causes of not shown rich snippets:
Read full article »

Authorship markup: how to combine correctly several kinds of it?

Yes, exactly, how to correctly combine them? More: why is it useful and needful to use several authorship markup and whether it produces any SEO-profit?

Some SEOs dispute about differences of using author and publisher properties, another SEOs advice to use only rel="author"... I say: use all you might use simultaneously! (it's needless to say, don't use something, what doesn't fit your context and could be ranked as e.g. rich snippets spam etc ).
Read full article »

How to use Picasa-web-albums with your Google+ Page's photos

This article shows how to manage your Google+ Page's photo collection using Picasa-web-albums.


Recently I described how to always use Picasa-web-albums, rather than Google+ photos, to work with the images that are stored in your Google account.

One issue was that there was no way to use PWA to work with the photo's uploaded to a Google+ Page, rather than an individual Google+ profile.

And this was highlighted when Google introduced an auto-enhancement feature which could be disabled using Picasa-web-albums, but not using Google+ Photos.

However a new feature introduced to Google+ Pages means that you can work around this.


How to access Google+ Page photo albums using Picasa-web-albums

Set up a separate password for your Google+ Page..

Log out of Google / Blogger / Picasa-web-albums (if you log out of one, you are generally removed from the others too).

Log back in again, but this time using your newly created Google+ Page account.

Point your web-browser to Picasa-web-albums, using the do-not-re-direct address:   https://picasaweb.google.com/lh/myphotos?noredirect=1


Job Done!    

You can now use Picasa-web-albums  like normal, including access to features like:

And of course you still have access to the Google+ Photos features, like editing pictures without changing their URL.


Disadvantages / Issues

There's always one!

In this case, it's that you need to be logged into Google using a different account from the one that's the underlying Page owner.   You can use any of the other Google tools   (Maps, Blogger, probably even AdSense) - but it will be with the Google account that was created for your page, rather than with your personal account.

And if you manage multiple pages, you will need to think carefully about exactly how each one is set up, and what account you need to use to work with it.


Related Articles

Understanding Picasa and Picasa-web-albums

Editing photos on-line using Google+ Photos

How to set up a separate password for your Google+ Page

Stop Google from auto-enhancing your images

Sharing photos from your Google+ Photos albums outside of Google+

Thursday, 20 March 2014

How to give a Google+ page its own password and login-name

This article is about setting up a Google+ page so that it is a stand-alone thing, and can log in to Google services without needing your personal Google+ profile.


When Google first introduced Google+ pages, they were totally linked to a Google+ personal profile.

Now, however, you can turn them into stand-alone entitles by giving them a separate login-id (chosen by Google) and password (chosen by you).

This means you can share your Google+ page with other people (eg employees, committee members), without either giving them your Google account password or forcing them to sign up for Google+ themselves.

This is a significant advantage of Google+ over Facebook


How to set up a separate password for a Google+ page


Firstly, set up the Google+ page, using an existing Google+ personal account (aka Google+ profile).


If you have logged out since, then log in to your Google account again (by logging into any one of Adsense, Gmail, Blogger, etc, or just by logging in to Google+).


In the top left corner, choose Pages from the Google+ menu.


In the list of pages that is shown, navigate to the Page that you want to work on, and click Manage this Page.   This opens the Dashboard for your page.


In the top right corner, click the Google+ Page icon.   This used to look like gear-wheel, but now (for me anyway) is a small circle with some of the Page's logo on it.

Choose Settings in the menu box.  


When the settings page opens, scroll down until you find the Third-Party Tools.   Underneath it, click Set a Password.


You may be asked to re-enter your own Google account password, just to double-check that you are you.


The Google Plus Page password assignment screen will open:


Enter and re-enter the password that you want to use, and click Confirm.


You will then see a confirmation page, telling you that
You've set a username and password for [your page]

And you will get an email telling you that:
Your Google+ page [page-name] now has a username (geeky-name-for-your-page-nnnn@pages.plusgoogle.com) and password.


Job done!

You can now log out of your personal Google+ account, and log in to use your Google+ page using its own account, rather than yours.


Who will get notifications about the page?

Google's confirmation page says that they will
...send notifications and other communication about this page to [the email address of the Google+ account that set up the page]. This page’s username can’t be used to send and receive email.

How to change the password

Other important information in the page-password confirmation email includes how to change the password, and what to do if it wasn't you who set the password.

The links provided are customized, so I'm not going to just copy-and-paste them from my own email.   But hopefully I will work out the generic versions and past them here soon.


Related Articles:


Understanding Google accounts  (this article is currently out of age, focussing on Blogger vs Google Classic)

Google+ now has pages

How to set up a Google+ profile for an existing Blogger account

Monday, 17 March 2014

Optimizing of Blogger load time

Insert scripts properly into Blogger template's head

There are many how-to's for implementing of third-part scripts into Blogger templates, mostly custom css and javascripts. I personally use Syntaxhighlighter and Google Analytics. But the most how-to's advice users to insert scripts into the template's head. This approach is against all best practices for optimizing of site's load times. If scripts are inserted into the head, the whole site's content will not load and wait till all scripts are fully loaded. This influences negatively the whole site's load time, which, as you know is an important ranking signal. The there is a strong dependency: more scripts in the head - longer load time - poorer ranking.

My advice for you (i tested it myself without any issue): insert scripts into the body's bottom, just befor closing tag. If something doesn't work, you could still move scripts one by one into the head.

Sunday, 16 March 2014

How to SEO Joomla? - advanced SEO extensions and workarounds

From all free PHP web CMS i like Joomla more than all other. Why? I can work with it very effectively and get done alone enterprise level projects, which would need e.g. with Drupal or Typo3 about 3 working persons. I started to use Joomla as it was called Mambo and use it still on some projects. With the time it become more and more pleasant to work with - the structure becomes mature and MVC, usability makes fun, extensions repository grows and contains fantastic extensions. And there are too some wonderful tools and workarounds for accomplishing Joomla SEO tasks, speciall OnPage. Some extensions, which i use extensively myself i will introduce below. I will talk only about free or extremely lowcost extensions.
Read full article »

Friday, 14 March 2014

Blink text in HTML for all Browser (No Javascript) 100% Working

I have tried several methods to blink text on my website. Some of them include CSS methods or Java Scripts. But none of them is 100% functional in all browsers. Especially Java Script method doesn't work if scripts are turned off in any browser. So here i have found an interesting trick to blink text by using simple HTML. most of you might have used this thing but never utilized it in this way.


Blink Text in HTML


There is an example below to show how we can blink text by using simple HTML. First i have written the HTML code and the below is its output.

HTML


<table border="0" cellspacing="0" style="width: 200px;"><tbody>
<tr><td>
<marquee style="height:20;width:200" scrollamount="200" scrolldelay="500">Blinking Text!</marquee>
</td></tr>
</tbody></table>

Output


Blinking Text!

The code shown above is just a marquee to work in such a way that you feel like that the text is blinking. If you have ever done programming then might find this code interesting and you will understand it to a greater extent.

Note: In the code above with of the table, width of marquee and scroll amount should be same. You may change the other things in the code to make it look better.

How to make Hyperlink on Blinking Text


If you want to put a hyperlink on the blinking text then use the <a> tag as we use in simple HTML, but use it outside <marquee> . If you use it inside <marquee> then hyperlink will go off and on with text.

How to decorate the Blinking Text


Just use the simple HTML tags around the blink text to decorate it. For example

HTML


<table border="0" cellspacing="0" style="width: 300px;"><tbody>
<tr><td>
<marquee style="height:50;width:300" scrollamount="300" scrolldelay="500"><font color="Red">
<span style="font-size:25px;"><b>Blinking Text!</b></span></font></marquee>
</td></tr>
</tbody></table>

Output


Blinking Text!

Monday, 10 March 2014

Tools Dragon City Maret 11 2014 Tools Exp Dragon City


Update Tools Dragon City, Maret 11 2014, Tools Exp Dragon City, Cheat Exp Dragon City Free No Survey

Link : Here

Dragon City Hack Gem Permanent


Collect Dragon City Gem with Hack (Pemanent) for free, with this hack you can get gem for free. UPDATE : Dragon City Hack Gem Permanent Update, Maret 11, ‎2014. Update Link Dragon City 50 Gems By Phucvinh, 50 Gems/Day and 5 Gems/Week.


About Dragon City

Dragon City is a social network game developed by Social Point which was launched for play on Facebook in May 2012 and for download on iOS in 2013. In August 2014 the aforementioned developer made the game available for download on Intel Atom tablets for Android. The game targets mid-core players, allowing them to raise their own dragons and create a Dragon City on floating islands. In December 2012 The Next Web ran an article announcing that Dragon City was ranked #2 in Facebook's 25 top rated games that year. Dragon city can be connected with Facebook (giving players a reward of an exclusive dragon and 10 gems).
https://en.wikipedia.org/wiki/Dragon_City

How to get 50 gems/day and 5 gems/week for free:

  1. Log in to your facebook account and play Dragon City
  2. Find your facebook id and session id, to how to find facebook id and session id you can see in the video below.
  3. After that open this site:

    Dragon City 63 Gems/Submit 
    Dragon City 15 Gem/1 Submit by Vu
    Dragon City 50Gem/day, 5gems/week, 18Gems/Submit
    Dragon City 5 Gem weekly by Vu 
  4. you will be asked to fill out facebook id and session id, fill with your facebook id and session id
  5. Then click submi
  6. Reload Dragon City Game


NOTE: Use this tool when you DID NOT open daily bonus cards. This tool will get 50 gems for free but if you reached high level it take you more time .

    Drago City Hack Free Gold Update


    Drago City Hack Free Gold Update, the following tutorial will teach us about how to get a lot of free gold in Dragon City Game. We do not need to use tools like Cheat Engine or others, that we need is a browser and internet connection.

    Info Update :
    Dragon City Hack Up to 100M Gold per Submit Update , ‎Marct 11, ‎2014 - No Proxy(Update Link)

    What are the steps? The steps are like this:
    1. log in to your facebook account then open game Dragon City
    2. After that, open this site:

      Free Dragon City Gold Tools link 1

      Free Dragon City Gold Tools link 2

      Free Dragon City Gold Tools link 3
    3. Then input your Facebook ID and Your Session ID
    4. Then click Submit

    Sunday, 9 March 2014

    Add a Custom jQuery Lightbox To Blogger

    If you are not satisfied with the default Lightbox set up by Blogger, here's another cool way to show off your pictures. In case you missed it, I have already shown in one of my posts how to customize the Blogger Lightbox by changing the background color, borders or the text color. This tutorial will show you how to replace it entirely with a cool jQuery Lightbox plugin that is very popular among bloggers.

    What this Lightbox does is to display a larger versions of the images that will pop-up into a larger box once we click on them, and allows us to easily navigate through that set of photos by using the previous and next buttons.

    jquery lightbox, blogger plugins
    To see how it works, visit the demo blog and click on any picture to enlarge it.


    Adding jQuery Lightbox to Blogger

    Step 1. From your Blogger Dashboard, click on "Theme" > "Edit HTML".

    blogger edit html

    Step 2. Click anywhere on the code area and press the CTRL + F keys to open the search box, then paste the following tag inside the search box and hit Enter to find it:
    ]]></b:skin>
    Step 3. Choose one of the Lighbox styles from below and paste the CSS code just above the ]]></b:skin> tag:

    Custom Blogger Lightbox with Light Background

    jquery lightbox white
    #jquery-overlay{position:absolute;top:0;left:0;z-index:90;width:100%;height:500px;}
    #jquery-lightbox{position:absolute;top:10%;left:0;width:100%;z-index:100;text-align:center;line-height:0;}
    #jquery-lightbox a,#jquery-lightbox a:hover{border:none;}
    #jquery-lightbox a img{border:none;}
    #lightbox-container-image-box{position:relative;background-color:#fff;max-width: 960px;max-height: 560px;margin:0 auto;}
    #lightbox-container-image{padding:10px;}
    img#lightbox-image {max-height: 540px;max-width: 940px;}
    #lightbox-loading{position:absolute;top:40%;left:0%;height:25%;width:100%;text-align:center;line-height:0;}
    #lightbox-nav{position:absolute;top:0;left:0;height:100%;width: 100%;z-index:10;}
    #lightbox-container-image-box > #lightbox-nav{left:0;}
    #lightbox-nav a{outline:none;}
    #lightbox-nav-btnPrev,#lightbox-nav-btnNext{width:49%;height:100%;zoom:1;display:block;}
    #lightbox-nav-btnPrev{left:10%;float:left;}
    #lightbox-nav-btnNext{right:10%;float:right;}
    #lightbox-container-image-data-box{font:10px Verdana,Helvetica,sans-serif;background-color:#fff;margin:0 auto;line-height:1.4em;overflow:auto;max-width: 940px;;padding:0 10px 0;position:relative;z-index:999;}
    #lightbox-container-image-data{padding:0 10px;color:#555;}
    #lightbox-container-image-data #lightbox-image-details{width:70%;float:left;text-align:left;}
    #lightbox-image-details-caption{font-weight:bold;}
    #lightbox-image-details-currentNumber{display:block;clear:left;padding-bottom:1.0em;}
    #lightbox-secNav-btnClose{width:66px;float:right;padding-bottom:0.7em;}

    Custom Blogger Lightbox with Dark Background:

    jquery lightbox dark
    #jquery-overlay{position:absolute;top:0;left:0;z-index:90;width:100%;height:500px;}
    #jquery-lightbox{position:absolute;top:10%;left:0;width:100%;z-index:100;text-align:center;line-height:0}
    #jquery-lightbox a,#jquery-lightbox a:hover{border:none}
    #jquery-lightbox a img{border:none;}
    #lightbox-container-image-box{position:relative;background-color:#000;max-width: 960px;max-height: 560px;margin:0 auto}
    #lightbox-container-image{padding:10px;}
    img#lightbox-image {max-height: 540px;max-width: 940px;}
    #lightbox-loading{position:absolute;top:40%;left:0%;height:25%;width:100%;text-align:center;line-height:0}
    #lightbox-nav{position:absolute;top:0;left:0;height:100%;width: 100%;z-index:10}
    #lightbox-container-image-box > #lightbox-nav{left:0;}
    #lightbox-nav a{outline:none}
    #lightbox-nav-btnPrev,#lightbox-nav-btnNext{width:49%;height:100%;zoom:1;display:block}
    #lightbox-nav-btnPrev{left:10%;float:left}
    #lightbox-nav-btnNext{right:10%;float:right}
    #lightbox-container-image-data-box{font:10px Verdana,Helvetica,sans-serif;background-color:#000;margin:0 auto;line-height:1.4em;overflow:auto;max-width: 940px;;padding:0 10px 0;position:relative;z-index:999;}
    #lightbox-container-image-data{padding:0 10px;color:#fff}
    #lightbox-container-image-data #lightbox-image-details{width:70%;float:left;text-align:left}
    #lightbox-image-details-caption{font-weight:bold}
    #lightbox-image-details-currentNumber{display:block;clear:left;padding-bottom:1.0em}
    #lightbox-secNav-btnClose{width:66px;float:right;padding-bottom:0.7em}

    Step 4. Now find the following tag and just above it, add one of the scripts below:
    </head>

    Script for Lightbox with Light Background:

    <script src='http://ajax.googleapis.com/ajax/libs/jquery/1/jquery.min.js' type='text/javascript'/>
    <script type='text/javascript'>
    //<![CDATA[
    (function(a){a.fn.lightBox=function(p){p=jQuery.extend({overlayBgColor:"#000",overlayOpacity:0.9,fixedNavigation:false,imageLoading:"https://blogger.googleusercontent.com/img/b/R29vZ2xl/AVvXsEioNfc8MrkfZDCodNiFXlnpi_68NlcQ_2UA4Q_fCcy1XKTaklF2KlxkuULhC5Fx3yj6QjLDBa5LymIIGeF9P9GoZSKzTYk_jdm5ipFMWGX-o8CSUofL9XwpnrZ3mhN98kM51MsGQMcyS1s/s1600/loading.gif",imageBtnPrev:"https://blogger.googleusercontent.com/img/b/R29vZ2xl/AVvXsEihK9YMpBH9FgZ4M4ADz8qCvanrKVlwtJLvkeemI_QubHNrwpmifU4BYdP1mNBtaOcOuYU19EkiO0I8jB5UiVbteJq26OHSTW2xQXb1YCdMA3UWR1Mbhv77bf75DJXRVGURQ1nF_lbKRTw/s1600/prev-image.gif",imageBtnNext:"https://blogger.googleusercontent.com/img/b/R29vZ2xl/AVvXsEgoa3Ic-b5JCJ7owg1pRO0gh0Kx1AvhqtP1q9SxFMgUv5iXfgUPkftpb9wszj4eWtNzl1yKN7VITcJxJeFNYjU_UqStRrJO9ut4q0LG5mrAldToMn-zgN2q_xdO_xfy7nOJcgR4HNV_AvQ/s1600/next-image.gif",imageBtnClose:"https://blogger.googleusercontent.com/img/b/R29vZ2xl/AVvXsEhGHgQeyDhz8-v9ZZSHvhH-fXYutF5kY5hOXKG2JCdOYf_hP_IvHNp3AuGxyf2Iq-jq6kNBSgPu1iXkPV3s1o9uVf8zMjQ60hD3GCEqspTMtoGY_Wo4IGndEIbJtTQbDyLq99WmMsvqv1I/s1600/close-image.gif",imageBlank:"https://blogger.googleusercontent.com/img/b/R29vZ2xl/AVvXsEj5hrUG4Uj-jteSXgzIL_rhIpFTiVtlq857fqf7T4Wc90GyCj1bAwL7k53RqkxhiKReGrowRXZyO77bvBer-PdkO4vvgNuWectkUXg6r9TKk4G6gPr0P253oJXPPg-KBj3x77S7CmHbpPc/s1600/blank.gif",containerBorderSize:10,containerResizeSpeed:400,txtImage:"Image",txtOf:"of",keyToClose:"c",keyToPrev:"p",keyToNext:"n",imageArray:[],activeImage:0},p);var i=this;function r(){o(this,i);return false}function o(v,u){a("embed, object, select").css({visibility:"hidden"});c();p.imageArray.length=0;p.activeImage=0;if(u.length==1){p.imageArray.push(new Array(v.getAttribute("href"),v.getAttribute("title")))}else{for(var t=0;t<u.length;t++){p.imageArray.push(new Array(u[t].getAttribute("href"),u[t].getAttribute("title")))}}while(p.imageArray[p.activeImage][0]!=v.getAttribute("href")){p.activeImage++}l()}function c(){a("body").append('<div id="jquery-overlay"></div><div id="jquery-lightbox"><div id="lightbox-container-image-box"><div id="lightbox-container-image"><img id="lightbox-image"><div style="" id="lightbox-nav"><a href="#" id="lightbox-nav-btnPrev"></a><a href="#" id="lightbox-nav-btnNext"></a></div><div id="lightbox-loading"><a href="#" id="lightbox-loading-link"><img src="'+p.imageLoading+'"></a></div></div></div><div id="lightbox-container-image-data-box"><div id="lightbox-container-image-data"><div id="lightbox-image-details"><span id="lightbox-image-details-caption"></span><span id="lightbox-image-details-currentNumber"></span></div><div id="lightbox-secNav"><a href="#" id="lightbox-secNav-btnClose"><img src="'+p.imageBtnClose+'"></a></div></div></div></div>');var t=f();a("#jquery-overlay").css({backgroundColor:p.overlayBgColor,opacity:p.overlayOpacity,width:t[0],height:t[1]}).fadeIn();var u=h();a("#jquery-lightbox").css({top:u[1]+(t[3]/10),left:u[0]}).show();a("#jquery-overlay,#jquery-lightbox").click(function(){b()});a("#lightbox-loading-link,#lightbox-secNav-btnClose").click(function(){b();return false});a(window).resize(function(){var v=f();a("#jquery-overlay").css({width:v[0],height:v[1]});var w=h();a("#jquery-lightbox").css({top:w[1]+(v[3]/10),left:w[0]})})}function l(){a("#lightbox-loading").show();if(p.fixedNavigation){a("#lightbox-image,#lightbox-container-image-data-box,#lightbox-image-details-currentNumber").hide()}else{a("#lightbox-image,#lightbox-nav,#lightbox-nav-btnPrev,#lightbox-nav-btnNext,#lightbox-container-image-data-box,#lightbox-image-details-currentNumber").hide()}var t=new Image();t.onload=function(){a("#lightbox-image").attr("src",p.imageArray[p.activeImage][0]);j(t.width,t.height);t.onload=function(){}};t.src=p.imageArray[p.activeImage][0]}function j(w,z){var t=a("#lightbox-container-image-box").width();var y=a("#lightbox-container-image-box").height();var x=(w+(p.containerBorderSize*2));var v=(z+(p.containerBorderSize*2));var u=t-x;var A=y-v;a("#lightbox-container-image-box").animate({width:x,height:v},p.containerResizeSpeed,function(){g()});if((u==0)&&(A==0)){if(a.browser.msie){n(250)}else{n(100)}}a("#lightbox-container-image-data-box").css({width:w});a("#lightbox-nav-btnPrev,#lightbox-nav-btnNext").css({height:z+(p.containerBorderSize*2)})}function g(){a("#lightbox-loading").hide();a("#lightbox-image").fadeIn(function(){k();s()});q()}function k(){a("#lightbox-container-image-data-box").slideDown("fast");a("#lightbox-image-details-caption").hide();if(p.imageArray[p.activeImage][1]){a("#lightbox-image-details-caption").html(p.imageArray[p.activeImage][1]).show()}if(p.imageArray.length>1){a("#lightbox-image-details-currentNumber").html(p.txtImage+" "+(p.activeImage+1)+" "+p.txtOf+" "+p.imageArray.length).show()}}function s(){a("#lightbox-nav").show();a("#lightbox-nav-btnPrev,#lightbox-nav-btnNext").css({background:"transparent url("+p.imageBlank+") no-repeat"});if(p.activeImage!=0){if(p.fixedNavigation){a("#lightbox-nav-btnPrev").css({background:"url("+p.imageBtnPrev+") left 15% no-repeat"}).unbind().bind("click",function(){p.activeImage=p.activeImage-1;l();return false})}else{a("#lightbox-nav-btnPrev").unbind().hover(function(){a(this).css({background:"url("+p.imageBtnPrev+") left 15% no-repeat"})},function(){a(this).css({background:"transparent url("+p.imageBlank+") no-repeat"})}).show().bind("click",function(){p.activeImage=p.activeImage-1;l();return false})}}if(p.activeImage!=(p.imageArray.length-1)){if(p.fixedNavigation){a("#lightbox-nav-btnNext").css({background:"url("+p.imageBtnNext+") right 15% no-repeat"}).unbind().bind("click",function(){p.activeImage=p.activeImage+1;l();return false})}else{a("#lightbox-nav-btnNext").unbind().hover(function(){a(this).css({background:"url("+p.imageBtnNext+") right 15% no-repeat"})},function(){a(this).css({background:"transparent url("+p.imageBlank+") no-repeat"})}).show().bind("click",function(){p.activeImage=p.activeImage+1;l();return false})}}m()}function m(){a(document).keydown(function(t){d(t)})}function e(){a(document).unbind()}function d(t){if(t==null){keycode=event.keyCode;escapeKey=27}else{keycode=t.keyCode;escapeKey=t.DOM_VK_ESCAPE}key=String.fromCharCode(keycode).toLowerCase();if((key==p.keyToClose)||(key=="x")||(keycode==escapeKey)){b()}if((key==p.keyToPrev)||(keycode==37)){if(p.activeImage!=0){p.activeImage=p.activeImage-1;l();e()}}if((key==p.keyToNext)||(keycode==39)){if(p.activeImage!=(p.imageArray.length-1)){p.activeImage=p.activeImage+1;l();e()}}}function q(){if((p.imageArray.length-1)>p.activeImage){objNext=new Image();objNext.src=p.imageArray[p.activeImage+1][0]}if(p.activeImage>0){objPrev=new Image();objPrev.src=p.imageArray[p.activeImage-1][0]}}function b(){a("#jquery-lightbox").remove();a("#jquery-overlay").fadeOut(function(){a("#jquery-overlay").remove()});a("embed, object, select").css({visibility:"visible"})}function f(){var v,t;if(window.innerHeight&&window.scrollMaxY){v=window.innerWidth+window.scrollMaxX;t=window.innerHeight+window.scrollMaxY}else{if(document.body.scrollHeight>document.body.offsetHeight){v=document.body.scrollWidth;t=document.body.scrollHeight}else{v=document.body.offsetWidth;t=document.body.offsetHeight}}var u,w;if(self.innerHeight){if(document.documentElement.clientWidth){u=document.documentElement.clientWidth}else{u=self.innerWidth}w=self.innerHeight}else{if(document.documentElement&&document.documentElement.clientHeight){u=document.documentElement.clientWidth;w=document.documentElement.clientHeight}else{if(document.body){u=document.body.clientWidth;w=document.body.clientHeight}}}if(t<w){pageHeight=w}else{pageHeight=t}if(v<u){pageWidth=v}else{pageWidth=u}arrayPageSize=new Array(pageWidth,pageHeight,u,w);return arrayPageSize}function h(){var u,t;if(self.pageYOffset){t=self.pageYOffset;u=self.pageXOffset}else{if(document.documentElement&&document.documentElement.scrollTop){t=document.documentElement.scrollTop;u=document.documentElement.scrollLeft}else{if(document.body){t=document.body.scrollTop;u=document.body.scrollLeft}}}arrayPageScroll=new Array(u,t);return arrayPageScroll}function n(v){var u=new Date();t=null;do{var t=new Date()}while(t-u<v)}return this.unbind("click").click(r)}})(jQuery);$(document).ready(function(){$('a[href$=jpg]:has(img)').lightBox();$('a[href$=jpeg]:has(img)').lightBox();$('a[href$=png]:has(img)').lightBox();$('a[href$=gif]:has(img)').lightBox();$('a[href$=bmp]:has(img)').lightBox();});
    //]]>
    </script>

    Script for Lightbox with Dark Background:

    <script src='http://ajax.googleapis.com/ajax/libs/jquery/1/jquery.min.js' type='text/javascript'/>
    <script type='text/javascript'>
    //<![CDATA[
    (function(a){a.fn.lightBox=function(p){p=jQuery.extend({overlayBgColor:"#000",overlayOpacity:0.9,fixedNavigation:false,imageLoading:"https://blogger.googleusercontent.com/img/b/R29vZ2xl/AVvXsEh6su7xrNhalWboZIWreqE23laHr6ze0Jxq4kDlP2UWkhSDH_h2k1RS1iSREAXHV-4DeSMdrij5MzlrfCFBiOa_XuK1YHMdSGaF5G95dznkLz-6gLtD9N-zOsYEXYkaJZ_Eauk5hoKJHWg/s1600/loading-black.gif",imageBtnPrev:"https://blogger.googleusercontent.com/img/b/R29vZ2xl/AVvXsEgwWTrhdZEcZ4AYq6s0Hi4g-bpD-d2Cmtds3b3FRUfau6i8PBF29DaZzVi_NYqwBJZjBTaY2ulYH6nipwIVrIXv-B6ksor_2x85u3gVFYqBM1GnaVbQJ1Z8pKhSXfQFESWDnuHXVZLQmyE/s1600/prev-image-black.gif",imageBtnNext:"https://blogger.googleusercontent.com/img/b/R29vZ2xl/AVvXsEij7-CcH2dU3dolQgaRC_e-yuGIMRapvcQWb0dFq1dhtpMfr014ZilhUhOD3O0tDmQ8UV2m7uX1sDb0q7GtMV6bqVMEDuxIPK_wlKXiCm5RChh1pdELCfGanAOhcQrw3OnhTaxsbtMfxLY/s1600/next-image-black.gif",imageBtnClose:"https://blogger.googleusercontent.com/img/b/R29vZ2xl/AVvXsEjd9xJz8kUJllQMHFmun2_XMSU1AT-H24FhL_M7OU5r3WCPNQqFMRa2kSDiz_qilFsSathHrbOsumQ97ODYrnvLi_O4G6yKsBK6x7ztF7E_MLIr0KuUqDZHgCROLLtUXWCaWWErHbSd1z0/s1600/close-image-black.gif",imageBlank:"https://blogger.googleusercontent.com/img/b/R29vZ2xl/AVvXsEj5hrUG4Uj-jteSXgzIL_rhIpFTiVtlq857fqf7T4Wc90GyCj1bAwL7k53RqkxhiKReGrowRXZyO77bvBer-PdkO4vvgNuWectkUXg6r9TKk4G6gPr0P253oJXPPg-KBj3x77S7CmHbpPc/s1600/blank.gif",containerBorderSize:10,containerResizeSpeed:400,txtImage:"Image",txtOf:"of",keyToClose:"c",keyToPrev:"p",keyToNext:"n",imageArray:[],activeImage:0},p);var i=this;function r(){o(this,i);return false}function o(v,u){a("embed, object, select").css({visibility:"hidden"});c();p.imageArray.length=0;p.activeImage=0;if(u.length==1){p.imageArray.push(new Array(v.getAttribute("href"),v.getAttribute("title")))}else{for(var t=0;t<u.length;t++){p.imageArray.push(new Array(u[t].getAttribute("href"),u[t].getAttribute("title")))}}while(p.imageArray[p.activeImage][0]!=v.getAttribute("href")){p.activeImage++}l()}function c(){a("body").append('<div id="jquery-overlay"></div><div id="jquery-lightbox"><div id="lightbox-container-image-box"><div id="lightbox-container-image"><img id="lightbox-image"><div style="" id="lightbox-nav"><a href="#" id="lightbox-nav-btnPrev"></a><a href="#" id="lightbox-nav-btnNext"></a></div><div id="lightbox-loading"><a href="#" id="lightbox-loading-link"><img src="'+p.imageLoading+'"></a></div></div></div><div id="lightbox-container-image-data-box"><div id="lightbox-container-image-data"><div id="lightbox-image-details"><span id="lightbox-image-details-caption"></span><span id="lightbox-image-details-currentNumber"></span></div><div id="lightbox-secNav"><a href="#" id="lightbox-secNav-btnClose"><img src="'+p.imageBtnClose+'"></a></div></div></div></div>');var t=f();a("#jquery-overlay").css({backgroundColor:p.overlayBgColor,opacity:p.overlayOpacity,width:t[0],height:t[1]}).fadeIn();var u=h();a("#jquery-lightbox").css({top:u[1]+(t[3]/10),left:u[0]}).show();a("#jquery-overlay,#jquery-lightbox").click(function(){b()});a("#lightbox-loading-link,#lightbox-secNav-btnClose").click(function(){b();return false});a(window).resize(function(){var v=f();a("#jquery-overlay").css({width:v[0],height:v[1]});var w=h();a("#jquery-lightbox").css({top:w[1]+(v[3]/10),left:w[0]})})}function l(){a("#lightbox-loading").show();if(p.fixedNavigation){a("#lightbox-image,#lightbox-container-image-data-box,#lightbox-image-details-currentNumber").hide()}else{a("#lightbox-image,#lightbox-nav,#lightbox-nav-btnPrev,#lightbox-nav-btnNext,#lightbox-container-image-data-box,#lightbox-image-details-currentNumber").hide()}var t=new Image();t.onload=function(){a("#lightbox-image").attr("src",p.imageArray[p.activeImage][0]);j(t.width,t.height);t.onload=function(){}};t.src=p.imageArray[p.activeImage][0]}function j(w,z){var t=a("#lightbox-container-image-box").width();var y=a("#lightbox-container-image-box").height();var x=(w+(p.containerBorderSize*2));var v=(z+(p.containerBorderSize*2));var u=t-x;var A=y-v;a("#lightbox-container-image-box").animate({width:x,height:v},p.containerResizeSpeed,function(){g()});if((u==0)&&(A==0)){if(a.browser.msie){n(250)}else{n(100)}}a("#lightbox-container-image-data-box").css({width:w});a("#lightbox-nav-btnPrev,#lightbox-nav-btnNext").css({height:z+(p.containerBorderSize*2)})}function g(){a("#lightbox-loading").hide();a("#lightbox-image").fadeIn(function(){k();s()});q()}function k(){a("#lightbox-container-image-data-box").slideDown("fast");a("#lightbox-image-details-caption").hide();if(p.imageArray[p.activeImage][1]){a("#lightbox-image-details-caption").html(p.imageArray[p.activeImage][1]).show()}if(p.imageArray.length>1){a("#lightbox-image-details-currentNumber").html(p.txtImage+" "+(p.activeImage+1)+" "+p.txtOf+" "+p.imageArray.length).show()}}function s(){a("#lightbox-nav").show();a("#lightbox-nav-btnPrev,#lightbox-nav-btnNext").css({background:"transparent url("+p.imageBlank+") no-repeat"});if(p.activeImage!=0){if(p.fixedNavigation){a("#lightbox-nav-btnPrev").css({background:"url("+p.imageBtnPrev+") left 15% no-repeat"}).unbind().bind("click",function(){p.activeImage=p.activeImage-1;l();return false})}else{a("#lightbox-nav-btnPrev").unbind().hover(function(){a(this).css({background:"url("+p.imageBtnPrev+") left 15% no-repeat"})},function(){a(this).css({background:"transparent url("+p.imageBlank+") no-repeat"})}).show().bind("click",function(){p.activeImage=p.activeImage-1;l();return false})}}if(p.activeImage!=(p.imageArray.length-1)){if(p.fixedNavigation){a("#lightbox-nav-btnNext").css({background:"url("+p.imageBtnNext+") right 15% no-repeat"}).unbind().bind("click",function(){p.activeImage=p.activeImage+1;l();return false})}else{a("#lightbox-nav-btnNext").unbind().hover(function(){a(this).css({background:"url("+p.imageBtnNext+") right 15% no-repeat"})},function(){a(this).css({background:"transparent url("+p.imageBlank+") no-repeat"})}).show().bind("click",function(){p.activeImage=p.activeImage+1;l();return false})}}m()}function m(){a(document).keydown(function(t){d(t)})}function e(){a(document).unbind()}function d(t){if(t==null){keycode=event.keyCode;escapeKey=27}else{keycode=t.keyCode;escapeKey=t.DOM_VK_ESCAPE}key=String.fromCharCode(keycode).toLowerCase();if((key==p.keyToClose)||(key=="x")||(keycode==escapeKey)){b()}if((key==p.keyToPrev)||(keycode==37)){if(p.activeImage!=0){p.activeImage=p.activeImage-1;l();e()}}if((key==p.keyToNext)||(keycode==39)){if(p.activeImage!=(p.imageArray.length-1)){p.activeImage=p.activeImage+1;l();e()}}}function q(){if((p.imageArray.length-1)>p.activeImage){objNext=new Image();objNext.src=p.imageArray[p.activeImage+1][0]}if(p.activeImage>0){objPrev=new Image();objPrev.src=p.imageArray[p.activeImage-1][0]}}function b(){a("#jquery-lightbox").remove();a("#jquery-overlay").fadeOut(function(){a("#jquery-overlay").remove()});a("embed, object, select").css({visibility:"visible"})}function f(){var v,t;if(window.innerHeight&&window.scrollMaxY){v=window.innerWidth+window.scrollMaxX;t=window.innerHeight+window.scrollMaxY}else{if(document.body.scrollHeight>document.body.offsetHeight){v=document.body.scrollWidth;t=document.body.scrollHeight}else{v=document.body.offsetWidth;t=document.body.offsetHeight}}var u,w;if(self.innerHeight){if(document.documentElement.clientWidth){u=document.documentElement.clientWidth}else{u=self.innerWidth}w=self.innerHeight}else{if(document.documentElement&&document.documentElement.clientHeight){u=document.documentElement.clientWidth;w=document.documentElement.clientHeight}else{if(document.body){u=document.body.clientWidth;w=document.body.clientHeight}}}if(t<w){pageHeight=w}else{pageHeight=t}if(v<u){pageWidth=v}else{pageWidth=u}arrayPageSize=new Array(pageWidth,pageHeight,u,w);return arrayPageSize}function h(){var u,t;if(self.pageYOffset){t=self.pageYOffset;u=self.pageXOffset}else{if(document.documentElement&&document.documentElement.scrollTop){t=document.documentElement.scrollTop;u=document.documentElement.scrollLeft}else{if(document.body){t=document.body.scrollTop;u=document.body.scrollLeft}}}arrayPageScroll=new Array(u,t);return arrayPageScroll}function n(v){var u=new Date();t=null;do{var t=new Date()}while(t-u<v)}return this.unbind("click").click(r)}})(jQuery);$(document).ready(function(){$('a[href$=jpg]:has(img)').lightBox();$('a[href$=jpeg]:has(img)').lightBox();$('a[href$=png]:has(img)').lightBox();$('a[href$=gif]:has(img)').lightBox();$('a[href$=bmp]:has(img)').lightBox();});
    //]]>
    </script>
    Step 5. Click on the "Save theme" button to save the changes.

    The final step is to disable the original Blogger Lightbox so that it doesn't interfere with this one that we just added: go to "Settings" > "Posts and comments" and you will see the "Showcase images with Lightbox" section on the right side > select "No" and click on the "Save settings" button on the upper right side.

    disable blogger lightbox

    Now, view your blog and click on any image to see the Custom jQuery Lightbox for Blogger in action. Enjoy!

    How to Use Cookies in Javascript

    Each time we visit a website, cookies can be stored to 'remember' things that we do while browsing a page. This may happen, for example, when we visit a page where we have to login with an username and a password. In this case, after verifying that the login is correct, usually a cookie is stored on our computer.

    An example would be the popular page of Google. This search engine allows users to choose how many search results they want to see on each page. Thanks to a cookie, this configuration remains unchanged for each computer, even after rebooting several sessions. Despite this, it is good to remove them from time to time because although some will expire being erased automatically after a while, some of them will never do so.
    cookies with javascript, blogger tricks

    Like many other things, cookies may suffer a poor use and hence, their bad reputation. For instance, some websites can store and study the browsing habits of a user without their knowledge. This is why most browsers already include a system to filter them and can decide if they will provide some privacy or not.

    If you want to see a live example of how a cookie works, please visit this page and refresh it a few times. You should get an alert window telling you about how many times you visited the page.

    Script source: javascriptkit.com

    There could be other ways to use cookies but a server could do this with JavaScript. Below we have a simple script that can be used as many times we want, even for different purposes. Basically, what the following script does is to create three functions: the first one is to set a cookie, the second one is to read it, and the last one is to erase it. We can apply it in Blogger by accessing the template HTML and add it just before the </head> tag:
    <script type='text/javascript'>
    //<![CDATA[

    // Set cookie
    function setCookie(name, value, expires, path, domain, secure) {
    document.cookie = name + "=" + escape(value) +
    ((expires == null) ? "" : "; expires=" + expires.toGMTString()) +
    ((path == null) ? "" : "; path=" + path) +
    ((domain == null) ? "" : "; domain=" + domain) +
    ((secure == null) ? "" : "; secure");
    }

    // Read cookie
    function getCookie(name){
    var cname = name + "=";
    var dc = document.cookie;
    if (dc.length > 0) {
    begin = dc.indexOf(cname);
    if (begin != -1) {
    begin += cname.length;
    end = dc.indexOf(";", begin);
    if (end == -1) end = dc.length;
    return unescape(dc.substring(begin, end));
    }
    }
    return null;
    }

    //delete cookie
    function eraseCookie (name,path,domain) {
    if (getCookie(name)) {
    document.cookie = name + "=" +
    ((path == null) ? "" : "; path=" + path) +
    ((domain == null) ? "" : "; domain=" + domain) +
    "; expires=Thu, 01-Jan-70 00:00:01 GMT";
    }
    }

    //]]>
    </script>
    Once done, in order to set a cookie, we only need to put the name and the value in quotes when we call the function. Additionally, we will set the expiry date by getting the current Time (in milliseconds) and add the required number of minutes (in milliseconds):
    var expiration = new Date();
    expiration.setTime(expiration.getTime() + 10000); //Expire after 10 seconds
    setCookie("cookiename","hello",expiration);
    }
    The above code sets a cookie called cookiename, with the hello value and set its expiry date to 10 seconds after it has been set (10000 milliseconds = 10 seconds). If we want to restore the value of this cookie, then we should use the second function with the cookie name:
    var checkCookie = getCookie("cookiename");
    By adding this code below the <body> taag, we created a cookie with the value 'hello' which can be shown on the screen if we want to. The cookie will disappear after 10 seconds:
    <script type='text/javascript'>
    var expiration = new Date();
    expiration.setTime(expiration.getTime() + 10000);
    setCookie("cookiename","hello",expiration);
    var checkCookie = getCookie("cookiename");
    document.write(checkCookie);
    </script>
    The erase function is used in the same way as the one for reading just by clicking on the name of the cookie. The setCookie values for 'domain' and 'secure' are not used. Use 'domain' on the JavaScript cookie if you are using it on a subdomain, where the cookie is set on the widgets subdomain, but you need it to be accessible over the whole yoursite.com domain.

    The combination of these three functions will allow us to handle cookies for specific purposes, as we will see in the near future.

    Saturday, 8 March 2014

    How to Add CSS code To Blogger using Template Designer

    If you are having difficulties adding the CSS codes in a Blogger template, here's a short guide that will show you a more practical and fast way to add CSS (Cascading Style Sheets) so that it will be easier for you to customize your blog.

    Some users have complained that when they had to add the CSS codes to install some feature in Blogger, they found it difficult to locate the ]]></b:skin> tag. So, I decided to make this quick tutorial to show you another way of adding the CSS without having to access the Blogger HTML editor.

    Adding CSS via the Blogger Template Designer

    Step 1. Log in to your Blogger account and select the blog that you want to customize.

    Step 2. From the Blogger dashboard, choose "Template" and click on the "Customize" button.


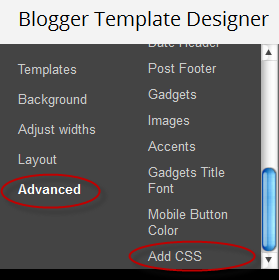
    Step 3. Click on the "Advanced" tab.

    Step 4. Now just add your CSS code inside the "Add CSS" tab (if you have more options, you may need to scroll down the list). Here you can add any CSS code each time you want to apply a new style to your template.


    Step 5. Once added, click on the "Apply to blog" button to save the changes.

    Following this method, you can't edit the existing CSS styles already added in your template which will require to access the template's HTML and make the modifications there. Here, you can only add new styles and edit the existing styles added through the Blogger Template Designer panel.

    Please note that when adding the CSS styles, there's no need to put the <style type="text/css"> ... </style> style tags, which usually would go above the </head> tag in the template's HTML code. Adding these tags may result in an error.

    If you change the template, the CSS added here will be removed. The same goes for any other additions or CSS customizations made ​​through the template HTML editor. So this is how we can easily add CSS code to Blogger using Template Designer without having to search the ></b:skin> tag.