Friday, 4 September 2015

How to List the Post Titles of all POSTS from your Blogger/Blogspot Blog [Tutorial]

In this Tutorial, we will show you how to list the Titles of your blog's more than 500 recent posts. If you are looking for an alternative to Blogger's gadget, then this might be very useful to you.

As we experienced, to retrieve the posts of a blog, you can use the URL like this:

http://***.blogspot.com/feeds/posts/default?alt=json&callback=mycallbackfunc&start-index=1&max-results=100

However, it does not work if your blog has more than 500 posts and you want to list them all. Our experiment showed that even you supplied a big number like (e.g.-10000) for max results, only up to 500 posts would return. To retrieve the list of more than 500 posts, we need a loop to do that. The following is how we implemented it for our several blogs.
We can also label all posts in a single page in another way, i.e. SITEMAP/Table Of Contents shows post titles with separated labels and a New! text with recently published posts.
Go through this link How to create a Sitemap/Table of Contents in Blogger to create a page of All Posts Titles for your information/use.
Click here >> SITEMAP to see our Sitemap / Table Of Contents.
Now lets come to the point,

Code goes here :-
<div><ul id="postList12"></ul></div>
<script type="text/javascript">
var startIndex = 1;
var maxResults = 100;
function sendQuery12()
{
var scpt = document.createElement("script");
scpt.src = "/feeds/posts/summary?alt=json&callback=processPostList12&start-index=" + startIndex + "&max-results=" + maxResults;
document.body.appendChild(scpt);
}
function processPostList12(root)
{
var elmt = document.getElementById("postList12");
if (!elmt)
return;
var feed = root.feed;
if (feed.entry.length > 0)
{
for (var i = 0; i < feed.entry.length; i++)
{
var entry = feed.entry[i];
var title = entry.title.$t;
for (var j = 0; j < entry.link.length; j++)
{
if (entry.link[j].rel == "alternate")
{
var url = entry.link[j].href;
if (url && url.length > 0 && title && title.length > 0)
{
var liE = document.createElement("li");
var a1E = document.createElement("a");
a1E.href = url;
a1E.textContent = title;
liE.appendChild(a1E);
elmt.appendChild(liE);
}
break;
}
}
}
if (feed.entry.length >= maxResults)
{
startIndex += maxResults;
sendQuery12();
}
}
}
sendQuery12();
</script>
Now you can put above code in two different ways anywhere in your blogger/blogspot blog. We would recommend to put the code in sidebars - left/right, that's the first way and you can put code in a html page which we can used it as a Sitemap of a blog or Archive or List of All post in a Single page.
Lets see how we can insert above given code in blogger/blogspot blog.

First Method: Putting the List in a Gadget

Inserting code in sidebars - left right, of a Blog.
Step:1. Go to Dashboard>>Layout
Step:2. Select add a Gadget Link
Step:3. Select HTML/Javascript gadget
Step:4. Enter the Title of your Widget, e.g. All Posts List
Step:5. Copy above code and paste the code inside the content box
Step:6. Now save and view your blog.

Second Method: Putting the List in a Page

Inserting code in a Page.
Step:1. Go to Dashboard>>Layout
Step:2. Select Page
Step:3. To create page click on New Page button
Step:4. Click Edit HTML tab to switch to HTML mode
Step:5. Copy and paste the code into the Editor
Step:6. Now publish and view your post. The list should appear inside the page.

We hope this Tutorial helps you to align list of all posts in sidebars and in a page as a content of table/sitemap. If you think this helped, subscribe us.
Enjoy !

Thursday, 3 September 2015

Devcorner: Macros Are Evil

The joys of programming - hours spent scratching one's head whilst trying to figure out why the seemingly correct code does not produce correct results.

Hi, Charlie here. I used to post often.

Where was I? Ah, yes, this nugget of brain fudgery from the VDrift forums posted by NaN:
So I've spent some time today try to figure out why cars are still flying off in random directions when hitting curbs sometimes.

It turns out it is a bug in Bullet, to be more specific in the SIMD_DEGS_PER_RAD macro.

Code:

#define SIMD_PI           btScalar(3.1415926535897932384626433832795029)
#define SIMD_2_PI         btScalar(2.0) * SIMD_PI
#define SIMD_HALF_PI      (SIMD_PI * btScalar(0.5))
#define SIMD_RADS_PER_DEG (SIMD_2_PI / btScalar(360.0))
#define SIMD_DEGS_PER_RAD  (btScalar(360.0) / SIMD_2_PI)

The first one to spot it gets a virtual cookie.

For the answer visit the thread, I won't spoil it here. Instead, I'll post a screenshot, also sourced from said forums and taken by Stunt Rally author CrystalH.


For those who don't know, Stunt Rally is a friendly fork of VDrift.

Sunday, 30 August 2015

Xonotic 0.8.1 released & related news

For those that are not keeping up to the latest development branch (via the autobuilds), the Xonotic developers have released a new version with various smaller changes and new official maps.

From the user "Antibody" (known for his duel commentary videos) comes this nice video overview of the new features:

(please note that due to video capture performance reasons the graphic settings are pretty low, and the game can look much nicer with different settings)

On the longer term horizon of Xonotic development, there is the very exiting news that they are currently porting their game to run on the same engine that Unvanquished uses. With this the future of Xonotic is indeed much brighter, as their current engine has not seem much development lately. See more details in this thread.

Oh and while we are talking about FOSS arena FPS: A short while ago Red Eclipse also released a new version. Changes include updated to the AI Bots and a build in universal updater to easily follow the latest releases.

Saturday, 29 August 2015

How to Use Any Trial Software Forever Free Using Time Stopper


Time Stopper
You always wanted to use any trial software for free, but for that you had to find a Crack for it on internet, but if you failed then you weren’t able to use the trial software any more. But now, it’s possible !!
Time Stopper let you run Trial Softwares forever without expiration.If you don’t have enough trial period of any trial version software you can extend the trial period using Time Stopper.
How it Works ?
Function of the time stopper is to change the date and time by entering into the software. For this reason time stopper will extend the trial period of the program for an unlimited amount of time.
Time Stopper will not modify the time and date of the operating system.
RUN AS DATE will not convert your trial version software to full version but it will let you use your trial version software lifetime.
BUT We recommend you to buy the software which you like.
Time Stopper at a glance
  • Time Stopper is a free software.
  • It is easily installable.
  • Time Stopper are not damaging any file.
  • It will not modify the time and date of the operating system.
  • Run trial software without expiration.
  • Anti virus can’t detect or blocked Time Stopper 4.0 as a virus.
How to Use ?
  1. User left click on “Browse… (push button)” in “Time Stopper”. Browse your installed trial version software in –> windows drive >> Program Files         >> then find out your installed trial version software and choose that .exe file which will run your program.
  2. Now choose a date.This new date should include within trial period of the trial version software. We recommend to select tomorrow as the date.
  3. Now you will able to create a desktop shortcut for future use. To create a desktop shortcut type the shortcut name and click on create desktop shortcut and use these shortcut to open the trial version software.
Note: After patching the trial version software by using Time Stopper, you must always use the desktop shortcut which created by Time Stopper to open that software otherwise the trial will end instantly.
Screenshot
Downloads

Wednesday, 26 August 2015

Microsoft Releases Updates To Spy On Windows 7, 8 and 8.1 Users


But wait, you can’t run after the creators of Microsoft to criticise or complain for stealing your data because you agreed to the Windows 10 terms and conditions, where Microsoft has clearly stated “we will access, disclose and preserve personal data.
Now are you worried much? You are not alone. Many Windows users are unhappy with Microsoft’s choice to spy on its users and many privacy conscious users even opted to not to update to Windows 10 and stick with older version of Windows i.e. Windows 7, Windows 8 or Windows 8.1.
But now it seems like Microsoft’s goal to snoop on its users is so strong that they have now released several updates for their older versions of Windows that provides them with a capability to spy on Windows 7, 8 and 8.1 users too.
The two recent Windows updates having the identification number, KB3075249 and KB3080149, grants a capability to Windows to capture and send your data to company’s servers.
Here’s how Microsoft has described these two updates:
KB3075249 – This update adds telemetry points to the User Account Control (UAC) feature to collect information on elevations that come from low integrity levels.
KB3080149 – This package updates the Diagnostics and Telemetry tracking service to existing devices. This service provides benefits from the latest version of Windows to systems that have not yet upgraded. The update also supports applications that are subscribed to Visual Studio Application Insights.
So once both of these updates are installed on your computer then Microsoft may possibly spy on you in a similar way Microsoft Windows 10 does, and all your data will be sent to Microsoft servers.
That is not all. Privacy-conscious users of Windows have pointed out that there are numerous other updates released by Microsoft that either grant the company an access to your data or forcefully updates your existing version of Windows 7, 8 or 8.1 to the latest operating system release, Windows 10.
If you want to stick to Windows 7, 8 or 8.1 and want to remain untracked then we will recommend you to stay away from the following updates:
KB2876229 SKYPE, IF YOU WANT SKYPE THEN INSTALL IT.
KB2923545 RDP
KB2970228
KB3035583
KB2990214
KB3021917
KB3068708 TELEMETRY
KB2592687
KB2660075
KB2506928
KB2952664 X2
KB3050265
KB2726535
KB2994023
KB3022345 REPLACED BY KB3068708 TELEMETRY
KB3022345 CAUSED FALSE SFC RESULT
KB2545698 (IE9)
KB3065987
If you are still using Windows 7 or Windows 8 and want to keep your data away from the access of Microsoft then we will highly recommend you to stay away from the above-mentioned updates.
But you must be curious to find out if the above updates are installed on your computer. Don’t worry, head over to the next section where we have a step by step guide to finding out whether these updates were installed on your computer, and if they are then how to uninstall them.
HOW TO SEARCH FOR SNOOPING WINDOWS UPDATES
First, we will find whether any of the above-mentioned updates is installed on your Windows 7 or Windows 8 system. To do so follow the below guide:
DISCLAIMER:
rexsniper.blogspot.com will not be held responsible for any kind of loss or damage to your system caused by the following steps. Proceed at your own risk!
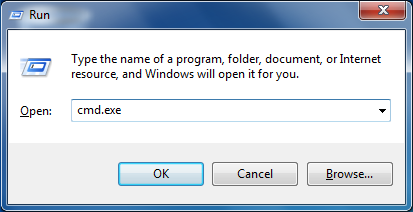
Step #1 – Launch Command Prompt using ‘Windows’ + ‘R’ keys on your keyboard.
Step #2 – In the Command Prompt box, type cmd or cmd.exe and press ‘Enter’ key on your keyboard.
Search for Windows Update - Step #2
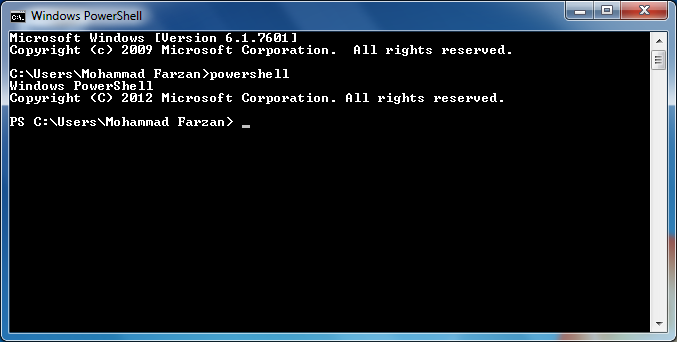
Step #3 – A new window will open. Now type PowerShell and press ‘Enter’ key to enter Windows PowerShell mode.
Search for Windows Update - Step #3
Now there are two methods to check whether any of the snooping updates has been installed on your system or not.
If you want to check for updates one-by-one then use Step #4a,
Else, if you want to speed up the searching processes then use Step #4b.
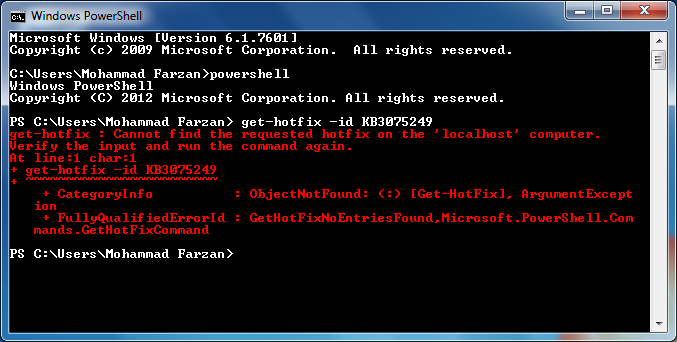
Step #4a – Run the following command to check for a single update. Just change the update code to search for another update.
get-hotfix -id KB3075249
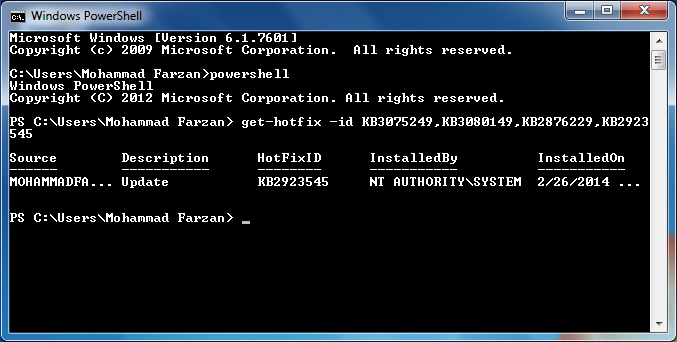
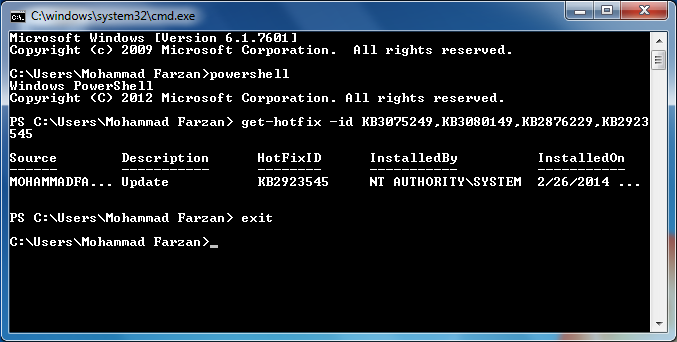
Step #4b – Run the following command to check for multiple updates. You can separate each update with a comma and add as many update numbers that you want to check. Here is an example command to check for four updates:
get-hotfix -id KB3075249,KB3080149,KB2876229,KB2923545
Search for Windows Update - Step #4b
Once the above command is processed successfully and if any update is found then the command prompt will return some information about the update like its source, description, ID and installation date. As shown in the screenshot above.
And in case no update is found on the system then the command prompt will return with some errors written in a red colored text. The error message should read, “Cannot find the requested hotfix.” This shows that the searched update number is not installed on the system. As shown in the below screenshot.
Search for Windows Update - Step #4a
Step # 5 – When you are done with the searching process, type exit and press ‘enter’key to exit from the Windows PowerShell mode.
Search for Windows Update - Step #5
HOW TO REMOVE/UNINSTALL SNOOPING WINDOWS UPDATES
If you want to uninstall any update from your system then use the following guide:
DISCLAIMER:
rexsniper.blogspot.com will not be held responsible for any kind of loss or damage to your system caused by the following steps. Proceed at your own risk!
Step #1 – Launch Command Prompt using ‘Windows’ + ‘R’ keys on your keyboard.
Step #2 – In the Command Prompt box, type cmd or cmd.exe and press ‘Enter’ key on your keyboard.
Uninstall Windows Update - Step #2
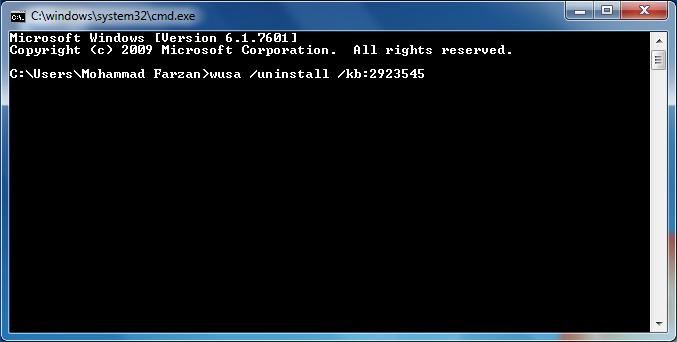
Step #3 – A new window will open. Execute the following command to uninstall any update from your system. Just change the update number you want to uninstall.
wusa /uninstall /kb:2923545
Uninstall Windows Update - Step #3
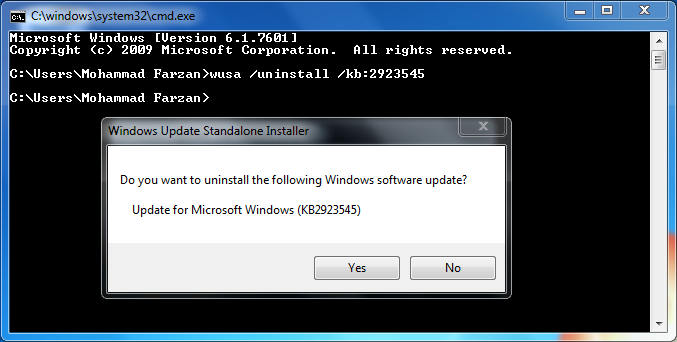
Step #4 – A new Windows Update Standalone Installer prompt will pop up, asking you if you want to uninstall the following Windows update.
Uninstall Windows Update - Step #4