Thursday, 4 June 2015

SB Game Hacker APK


SB Game Hacker
The easiest and most powerful Game Modifier.SBgameHacker is the MOST EASY TO USE Android game modifying app. It is small, fast, green, free, no ads. This app modifies the game by modifying the memory data of the running game, money, blood, score, props, and the number of parameter values​​. Simple and practical.It Will Help You Get Unlimited Ammo,Live,Gold,Money,etc.
FEATURES
  • The accurately Search: search the value of the games you can see, practical vast majority of cases;
  • Fuzzy search: do not enter a specific value (blank), according to data variation (larger smaller unchanged) data screening;
  • Floating-point (decimal): Game data is not an integer, you can not directly search data, belonging to a fuzzy search;
  • Data filtering: to determine the size of the data range, and improve efficiency.
HOW TO INSTALL APK ?
  1. Download and Extract “SB Game Hacker.apk”From below.
  2. Install “SB Game Hacker.apk”
  3. You are Done.
  4. Start Changing Values!!!!

NOTE : IT REQUIRES ROOT

DOWNLOADS

SB Game Hacker.apk (971 KB) / Mirror

HOW TO USE WHATSAPP IN GOOGLE CHROME


Whatsapp Web
We all Know that we Can Use Whatsapp on our Windows PC using Android Emulators like Bluestacks. That is an old story Right? But Now you can Use Your favorite Messaging app on your Google Chrome Browser too.
Before Proceeding, ensure these
  • Latest Version of whatsapp installed in your Android.
  • Google Chrome Browser Installed on your PC.
  • Internet Connection in your Phone & PC.
How to use Whatsapp in Google Chrome?
  1. First click here.
  2. You will see QR Code which you will have to Scan from your Phone, So open Whatsapp on your Android, Go to Menu > Whatsapp Web and Scan that QR Code on your Computer Screen. (If you don’t see Whatsapp Web option then you need to Update your Whatsapp.)
  3. Thats it you just need to Scan that QR Code to pair Whatsapp on your Phone and Whatsapp Web Client. If everything goes Right, then now you will be able to see your Messages on your Web Client in Google Chrome.
Screenshot


Note
Remember to have an up to dated Version of Whatsapp on your Phone and also keep in mind that your phone needs to be connected to be connected to internet in order to send and receive messages in your Web Client.
Link
WhatsApp Web (Official)

ePSXe for Android v1.9.28 Cracked APK


ePSXe for Android
ePSXe for Android is a Playstation emulator (PSX and PSOne). It is a port of the famous ePSXe for PC. ePSXe provides very high compatibility (>99%), good speed, and accurate sound. It is designed for smartphones and tablets, (for 1-4 players) including a fun 2 players option with split screen mode. It includes virtual touchscreen pad support, hardware buttons mapping (Xperia Play, phones with keyboard or gamepad, external gamepads bluetooth or USB such as WiiMote, Sixaxis, Xbox 360, Moga, Ipega) and analog sticks. ePSXe supports OpenGL HD enhanced graphics thanks to the Peopsxgl Plugin, cheat codes as well as savestates and memcards compatibility with the PC version. ePSXe includes native support for ARM and Intel Atom X86.
IMPORTANT: ePSXe doesn’t include games, Games must be provided by user.
How to install?
  1. Download the apk file.
  2. Install Normally .
  3. Done !

Downloads

ePSXe for Android v1.9.28 APK (3.3 Mb) | Mirrors

Tuesday, 2 June 2015

Blogger and Google Photos - what's changed, and what hasn't (yet)

This article gives a brief introduction to Google Photos, and how it relates to both Blogger and Google+ Photos.


Google's recent announcement of Google Photos opens the door for Blogger to make some improvements to how it works with pictures.

Why? Well Google+Photos simply wasn't a way forward.   Too many Blogger users chose not to "upgrade" their Google accounts to Google+ accounts, so it wasn't possible for Blogger to force Google+ features on everyone. And that was even after they removed the rule about one G+ account per person, and allowed Google+ Pages to be turned into stand alone accounts with their own passwords.

However Google Photos is basically Google+ Photos, without the need to have a "plus" account, and with some other nice features, like

  • Free picture and video storage (any number of pictures, provided they aren't "too big"), 
  • Image recognition and search
  • Sorting pictures by date, but giving options for you to group them into albums

Read more about these Google Photos options here.  

This means it will be possible for Google to replace Picasa-web-albums features with Google Photos features at some time in the future, even if they're not ready to do this yet.


What's changed - and what hasn't (yet)?

So far, I haven't noticed any changes to the photo-upload or image-choice features in Blogger.

There's still an upload option, there's still a tab to choose photos from Picasa and one for your phone - and I don't know what the criteria for showing photos in the latter tab is, but it's certainly not listing all the photos I've taken from my phone.


I am expecting they will change to become more Google-Photos-esque, sooner or later.

But for now, though, not that much has changed.

Your Google account still only has one collection of pictures.

Your pictures may be photographs you have taken or other image files that you have created and uploaded (eg like the thumbnail picture that I constructed for this post).

As well as the various mobile phone applications (official ones for iOS and Android, unofficial ones from various other companies), there is now one more (to make six) pieces of desktop software or websites from Google that you can use to manage (aspects of) your picture collection:

Note:   Even though you only have one photo collection, each tool may need to build it's own "index" (or whatever it calls it) to work with your photos.  Making all your photos (especially the historic ones) available in each tool might take a while to do: For example, not all my photos are visible on Drive yet: when I scroll to the bottom of the display I get a message saying "Stay tuned, your older photos are coming soon" - and looking at what is displayed, it's only photos that I have posted from my current smartphone (not the old one) to one particular blog.


And the tools don't all do the same things. In particular, there are features like albums and slideshows are still best done from Picasa (more info here: http://picasageeks.com/2015/05/google-photos-announcementthis-is-big/) - and  Picasa Desktop's photo editing tools are still vastly better.


edits you can do in Picasa dessktop but not on-line
Example of a photo editing effect which is possible in Picasa Desktop, but not in Google Photos


Where to find more information


Monday, 1 June 2015

Use Google Takeout to back up all your blogs at once

This article shows how to use Google's Takeout service to make a copy of the contents of all your blogs at the same time.


A backup is a copy that you can use to restore from if something goes wrong.  For your personal compter, you may have a backup copy of the files on your hard-drive, so that if you lose the machine, you can get the files back, usually with a little work.

In blogging terms, a backup of your blog is a copy that you can use if you accidentally delete a post, or lose control of your blog, or perhaps even a copy of a blog that you have deleted but still want some last-chance access to.

Unfortunately Blogger does not offer a complete solution for backing up our blogs.    Instead, we need to take separate actions to back up our gadget settings, our template when it is being edited, and our post-contents.

You can back up the posts from one content from the Settings > Other > Blog Tools tab.  If you choose the Export Blog link, Blogger makes an xml file containing a copy of your posts and pages, and puts it onto your computer (typically in your Downloads folder), without affecting your blog in any way

This approach is fine if you only have a few blogs.   But if you have several blogs it can get tedious:   for example, for each blog that I run, I also have another one or two private blogs for preparing posts and keeping documentation.

Luckily the Google Take-out service takes the pain away, by backing up all your blogs (and other Google product contents too, if your choose) at the same time.


How to back up using Google Takeout

Log in to your Google account, and go to the Takeout home-page at     www.google.com/settings/takeout

In the 
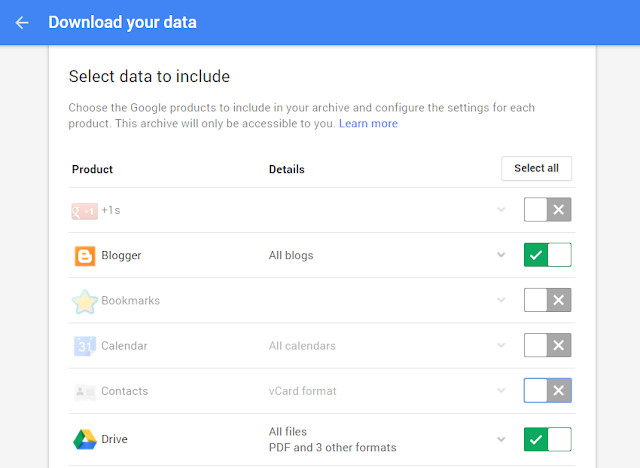
Select Data to Include section, make sure that Blogger stays ticked - but turn off the other types of content that you do not want.
  • I usually leave Drive ticked, because a good number of the files on my Google Drive relate to my blog.
  • You may also want to leave Google Photos ticked, if a lot of your pictures relate to your blog.


Click Next (bottom left of the screen - there's a long way to scroll down.)
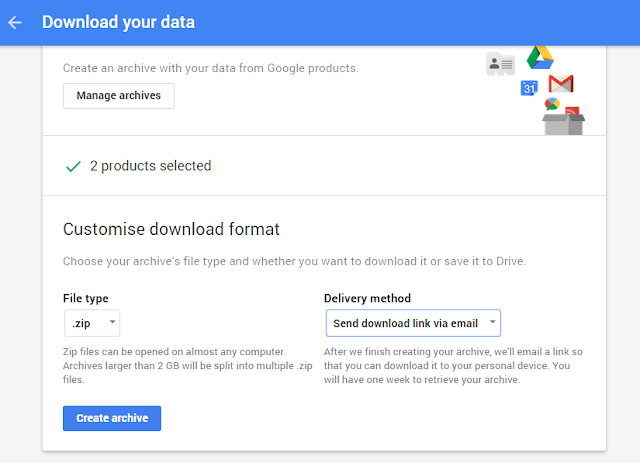
Choose the file type that you want your backup file to be saved in.
  • Currently the options are zip, tbz and tgz.   If you are not sure, and are using a Windows computer, then just leave it on .zip.

Choose how you want to manage the backup file which Takeout makes:
  • If you choose Send download link via email then Google will send you an email message with a link to the file - click on this link, and save the file to your computer etc.  You need to do this within one week of doing the backup, because after that Google delete it.
  • If you choose Add to Drive, then Google will put the the file on your Google Drive, and send you an email to tell you that it's there.  This approach works well, but the szie of the archive file counts towards your storage qoute, and of course it's only useful if you don't lose access to your account.


Click Create Archive.
Google will make an archive file, using the settings you have provided.   They show a progress monitor, and this can take some time.    When the process is finished, they send your and email, and show a link to your archive file on the screen.


Job Done!     You now have made a backup file, containing the posts from all of your blogs.   When you look at this file, you will find that it contains one sub folder for each of your blogs (and possibly others too, if you included other services in your backup.


Restoring from your archive file

You may have noticed at the start of this article that I said that a backup is "a file you can use to recover from".   This is important - a copy that you do not know you can use might make you feel secure, but really it may be a waste of space.

How exactly you restore depends on where you saved the file, and what file type it is.   But I highly recommend:
  • Downloading the file to your computer
  • Extracting it
  • Checking that the extract has one file in its Blogger folder for each of your blogs
  • Saving this file for one of your blogs
  • Opening a private test blog, and using the Settings > Other > Blog Tools > Import blog function. 

This will set you see the effect of restoring from this file made from Takeout, reassure you that the file you have really is a backup, and let you see what other items you need to back up.


Limits to backing up and restoring a blog from an archive file

Pictures and videos

Blogger does not actually store videos or pictures that you have put into your posts inside your blog.   Instead it stores links to them in YouTube, Picasa web-albums / Google Photos, or whatever other stoage service you have used.

Your backup will have these links, too, not the original pictures.    And if you do back up the pictures separately and then restore them, they will not have the same URL, so the links in your blog posts may not work.

Pages

The export and import function does include the content of Pages, so these will be available in your restored blog.   (Tested to check that this is working, 1 June 2015).

Comments

Comments will be included in your backup and in blogs that are restored from it.

Menus, templates, gadget, themes etc

None of these are included in your blog posts, so they are not included in your backup file, no matter whether you make it individually or through Takeout.

The only exception is gadgets that you have put inside posts:  because these are inserted using HTML, they will be included.

Draft and scheduled posts

Post status (Published, Draft, Scheduled) is not retained in your backup:   if you choose to automatically restore all posts when you were importing to the recovery blog, then all the posts will be published.    If not, then they will all be draft.


Related Articles:

Backing up the settings for your gadgets

How to put a gadget into a blog post

How to back up and then edit your Blogger template

Getting posts right in private, before publishing them

How to put a picture into a blog-post