Sunday, 2 March 2014

Understanding the Page Elements of a Blogger Layout

When following a tutorial on how to add a gadget/widget or make some customizations in a Blogger blog, some new users may not know the meaning of certain terms, and it may be harder to locate them. As for the gadgets, usually it is required to access the blog's layout in order to add or arrange any of the page elements.

For a better understanding, here are some basic explanations about the Page Elements located in the Layout section of a Blogger dashboard.

What are the Page Elements?

Page Elements is, basically, the body of our blog. To access the Page Elements, we need to click on the "Layout" option in the Blogger dashboard.


Understanding the Page Elements sections

The Blogger Layout is made of sections and elements. The sections mark certain areas of a page. Every section is represented by the <b:section> tag and has an unique "ID" that names its element which is followed by a CSS "class" selector. Each section has some attributes and through these, we can determine the number of elements allowed in the section and if this section gives the option to add a "page element".


Let's take a look to an example of the default code related to the header section found in the HTML of a Blogger template:
<b:section class='header' id='header' maxwidgets='1' showaddelement='no'>
<-- rest of the code -->
</b:section>
Breaking apart the code above:
  1. <b:section is the opening tag of the section.
  2. class='header' - describes the existing group inside the "header" element
  3. id='header' - identifies and specifies the header as a single element.
  4. maxwidgets='1' - determines the number of elements allowed in the "header"; here we have the number of gadgets that we can include in the header section. In this example, '1' means that this section allows us to add only a gadget.
  5. showaddelement='no' - the 'no' attribute means that the header will not show the "Add a gadget" link or we won't be able to move any Page Elements. To activate this option so that we can add new Page Elements (Add a gadget), we should change 'no' to 'yes'. By setting the "showaddelement" attribute to 'yes', we'll be able to arrange the elements as we like, just click on the element that you want to move and drag & drop it wherever you want.
The spaces reserved for adding elements in the existing sections are called Gadgets (or Widgets). You can easily add various Page Elements by clicking on the "Add a Gadget" link. This will open a pop-up window for you to pick and choose which elements should be added. Just click on the Gadget's title or on the blue plus sign symbol to add it to your blog's layout.


After you have added a page element, gadgets can be moved up, down or sideways. You can put them wherever you want. Of all the existing gadgets, the most used is the "HTML/JavaScript". Inside this gadget (widget) you can insert any code, as long as it is in the HTML or JavaScript language.

Each time you decide to add a new gadget, click on the "Add a gadget" link in the area where you want to add it. For example, if you want to add a JavaScript code and want it to appear in the sidebar, you should click on the "Add a gadget" link in the "Sidebar" section, choose the "HTML/JavaScript" option and paste the code in there.

Once you have added new gadgets (widgets), it is recommended to check the changes by clicking on the Preview button before saving anything. So, if something went wrong, you simply click on "Clear" and everything that was not saved will return to its previous state. If the position of any Page Elements (Gadgets) has been rearranged, you will need to click on the Save arrangement button in order to see the changes.

Saturday, 1 March 2014

POTM March 2014 winner announced

Quite close outcome this time for the Project of the Month 2014 vote over at linuxgameawards.org. But there has to be a winner:


Here is a closer look that which project got how many votes:


Congratulations to the winner Battle for Wesnoth!


Thursday, 27 February 2014

How to Add Neat CSS3 Dropdown Menu in Blogger

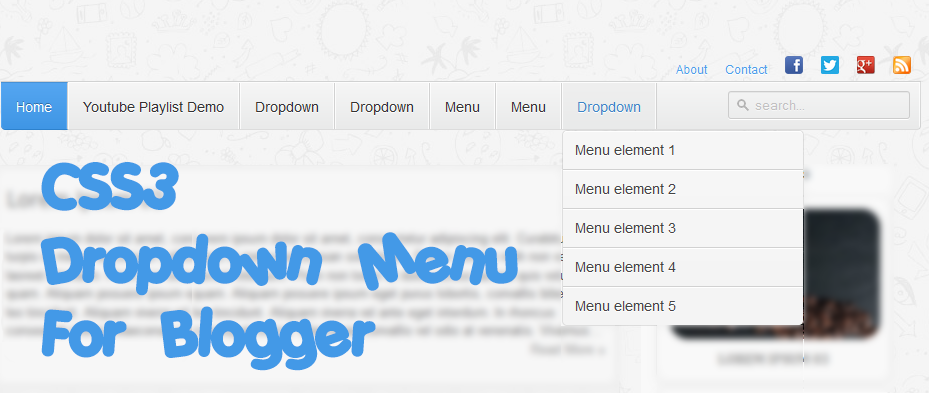
Here's another simple yet amazing dropdown menu with pure CSS3 made by Andrew from script-tutorials.com with some slight modifications so that it can be easily adapted to our Blogger template.

In the upper right side of this menu, we have the contact links and social media icons for Facebook, Twitter, Google Plus and RSS feed. Below these links, there is the drop-down navigation menu and on the left side, the search form.

To achieve a better user interface and interaction, the CSS dropdown menu features sub categories that appear with a nice touch of CSS3 box-shadow, text-shadow and a cool transition once the parent link is activated by a hover selector.

dropdown menu


Adding the CSS dropdown navigation menu in Blogger

Step 1. Access your Blogger Dashboard and go to "Template", then click on the "Edit HTML" button


Step 2. Next, click anywhere inside the code area and press the CTRL + F keys to open the search box. Type the tag below inside the search box and hit Enter to find it.
</header>
Step 3. Just below </header> add the HTML structure of the dropdown menu:
<div id='contact-links'>
    <div id='my-links'>
        <a href='#'>About</a>
        <a href='#'>Contact</a>
                <a href='#'><img height='18px' src='https://blogger.googleusercontent.com/img/b/R29vZ2xl/AVvXsEgOIyyCTna-6FWInGXLvOpALM3U4-YCRBH_wkVp_aR6F1aq-UvJAGwID9tzsAgmUe9pXOy5Ov6qSumz9JwOpK7kEKhC_nwDgrjAquM-izQxKywO_w1SZi-guXXqPfx3gtJGtyX7CS0bsEra/s1600/facebook-icon.png' title='Facebook' width='18px'/></a>
<a href='#'><img height='18px' src='https://blogger.googleusercontent.com/img/b/R29vZ2xl/AVvXsEjUmfn6Kwteh_xY0PZ49nHvW6ZZLlSb4gEqbgZBbhZhZKYi-YTz1X9d8q2oGj6ocvpk8td1ma_U6IObeakP9qFnOWN30pyYdqQmIL78KLdLn9fApeBhyphenhyphen06Rq9sN-_oBU9PramQGXUz-7U8r/s1600/twitter.png' title='Twitter' width='18px' /></a>
        <a href='#'><img height='18px' src='https://blogger.googleusercontent.com/img/b/R29vZ2xl/AVvXsEinnjSwwBMj6cAuAhH6h4vz7VGcKHApw0W1Bi9mB3nmdV6IJ_ewnCA7U5SmxKaOjZjtM3TMNPASiKl3g25cAk4xXCl1-g2VzPWeadT18cluE7FGwylXvguNezh0rJf7QNgJQQdLcToJMOJP/s1600/google-plus-icon.png' title='Google' width='18px'/></a>
        <a href='#'><img height='18px' src='https://blogger.googleusercontent.com/img/b/R29vZ2xl/AVvXsEgLjiCvRI0q_TwFR7Z_eena2JOrPREPlWbybSMCV5pudzTUUTauzEIxvVrjhTUsuw8LsFJ2e1fDh85KTGBlot3qQH1dN1CLfF5e0BYl11c9wNcrPQuFdjvTZHGBBbocXswQE3v-Va1Roi-r/s1600/rss-icon.png' title='RSS Feed' width='18px'/></a>
    </div>

    <div id='menu-container'>
        <nav id='neat-menu'>
            <ul>
              <li class='active'><a href='/'>Home</a></li>
                <li><a href='#'>Dropdown</a>
                    <ul>
                        <li><a href='#'>Menu element 1</a></li>
                        <li><a href='#'>Menu element 2</a></li>
                        <li><a href='#'>Menu element 3</a></li>
                        <li><a href='#'>Menu element 4</a></li>
                        <li><a href='#'>Menu element 5</a></li>
                    </ul>
                </li>
                <li><a href='#'>Single Menu</a></li>
                <li><a href='#'>Single Menu</a></li>
                <li><a href='#'>Dropdown</a>
                    <ul>
                        <li><a href='#'>Menu element 1</a></li>
                        <li><a href='#'>Menu element 2</a></li>
                        <li><a href='#'>Menu element 3</a></li>
                        <li><a href='#'>Menu element 4</a></li>
                        <li><a href='#'>Menu element 5</a></li>
                    </ul>
                </li>
            </ul>
        </nav>

        <!-- menu-search form -->
        <div id='menu-search'>
          <form method='get' action='/search'>
                <input autocomplete='off' name='q' placeholder='search...' type='text' value=''/>
            </form>
        </div>
    </div>
</div>

How to Set up the Dropdown Menu

  • Replace the # symbols with the URLs of your links and replace the texts in blue with the titles that you want to appear in the menu.
  • To change the social media icons, add the links of your icons instead of the ones in blue. For more help, please see this tutorial on how to upload and get the URL of an image.
  • If you want to remove the sub categories, remove the code within the tags highlighted in yellow, including the ul tags. To remove only a menu element, remove the part that starts with <li> and ends with </li>
Step 4. Now, let's add the CSS styling for the menu. Search for the following tag:
]]></b:skin>
Step 5. Just above the ]]></b:skin> tag, add this CSS code:
#contact-links{text-shadow:0 -1px 0 rgba(0,0,0,0.3);margin:auto;position:relative;width:100%}#contact-links a{color:#4C9FEB}#contact-links a:hover{color:#3D85C6}#my-links{float:right;font-size:12px;margin:4px 10px;overflow:hidden;text-shadow:0 1px 0 #FFF}#my-links a{margin-left:7px;padding-left:8px;text-decoration:none}#my-links a:first-child{border-width:0}#menu-container{background:-webkit-linear-gradient(#f6f6f6,#e9eaea) repeat scroll 0 0 transparent;background:-moz-linear-gradient(#f6f6f6,#e9eaea) repeat scroll 0 0 transparent;background:linear-gradient(#f6f6f6,#e9eaea) repeat scroll 0 0 transparent;filter:progid:DXImageTransform.Microsoft.gradient(startColorstr='#f6f6f6',endColorstr='#e9eaea',GradientType=0);border-radius:0 0 4px 4px;border:1px solid rgba(0,0,0,0.1);box-shadow:-1px 1px 0 rgba(255,255,255,0.8) inset;clear:both;height:46px;padding-top:1px}#neat-menu{float:left}#neat-menu a{text-decoration:none}#neat-menu ul{list-style:none;margin:0;padding:0}#neat-menu > ul > li{float:left;padding-bottom:12px}#neat-menu ul li a{box-shadow:-1px 0 0 rgba(255,255,255,0.8) inset,1px 0 0 rgba(255,255,255,0.8) inset;border-color:#D1D1D1;border-image:none;border-style:solid;border-width:0 1px 0 0;color:#333;display:block;font-size:14px;height:25px;line-height:25px;padding:11px 15px 10px;text-shadow:0 1px 0 #FFF}#neat-menu ul li a:hover{background:-webkit-linear-gradient(#efefef,#e9eaea) repeat scroll 0 0 transparent;background:-moz-linear-gradient(#efefef,#e9eaea) repeat scroll 0 0 transparent;background:linear-gradient(#efefef,#e9eaea) repeat scroll 0 0 transparent;filter:progid:DXImageTransform.Microsoft.gradient(startColorstr='#efefef',endColorstr='#e9eaea',GradientType=0)}#neat-menu > ul > li.active > a{background:-webkit-linear-gradient(#55A6F1,#3F96E5) repeat scroll 0 0 transparent;background:-moz-linear-gradient(#55A6F1,#3F96E5) repeat scroll 0 0 transparent;background:linear-gradient(#55A6F1,#3F96E5) repeat scroll 0 0 transparent;filter:progid:DXImageTransform.Microsoft.gradient(startColorstr='#55A6F1',endColorstr='#3F96E5',GradientType=0);border-bottom:1px solid #2D81CC;border-top:1px solid #4791D6;box-shadow:-1px 0 0 #55A6F1 inset,1px 0 0 #55A6F1 inset;color:#FFF;margin:-1px 0 -1px -1px;text-shadow:0 -1px 0 rgba(0,0,0,0.3)}#neat-menu > ul > li.active > a:hover{background:-webkit-linear-gradient(#499FEE,#3F96E5) repeat scroll 0 0 transparent;background:-moz-linear-gradient(#499FEE,#3F96E5) repeat scroll 0 0 transparent;background:linear-gradient(#499FEE,#3F96E5) repeat scroll 0 0 transparent;filter:progid:DXImageTransform.Microsoft.gradient(startColorstr='#499FEE',endColorstr='#3F96E5',GradientType=0)}#neat-menu > ul > li:first-child > a{border-radius:0 0 0 5px}#neat-menu ul ul{background:-webkit-linear-gradient(#F7F7F7,#F4F4F4) repeat scroll 0 0 padding-box transparent;background:-moz-linear-gradient(#F7F7F7,#F4F4F4) repeat scroll 0 0 padding-box transparent;background:linear-gradient(#F7F7F7,#F4F4F4) repeat scroll 0 0 padding-box transparent;filter:progid:DXImageTransform.Microsoft.gradient(startColorstr='#F7F7F7',endColorstr='#F4F4F4',GradientType=0);border-radius:5px 5px 5px 5px;border:1px solid rgba(0,0,0,0.1);box-shadow:0 1px 0 #FFF inset;height:0;margin-top:1px;opacity:0;overflow:hidden;width:240px;padding:0;position:absolute;visibility:hidden;z-index:1;-webkit-transition:all .5s;-moz-transition:all .5s;-ms-transition:all .5s;-o-transition:all .5s;transition:all .5s}#neat-menu ul li:hover ul{margin-top:0\2;height:auto;opacity:1;visibility:visible}#neat-menu ul ul a{border-right-width:0;border-top:1px solid #D1D1D1;box-shadow:0 1px 0 #FFF inset;color:#444;height:24px;line-height:24px;padding:7px 12px;text-shadow:0 1px 0 #FFF}#neat-menu ul ul a:hover{background:-webkit-linear-gradient(#55A6F1,#3F96E5) repeat scroll 0 0 transparent;background:-moz-linear-gradient(#55A6F1,#3F96E5) repeat scroll 0 0 transparent;background:linear-gradient(#55A6F1,#3F96E5) repeat scroll 0 0 transparent;filter:progid:DXImageTransform.Microsoft.gradient(startColorstr='#55A6F1',endColorstr='#3F96E5',GradientType=0);border-top:1px solid #4791D6;box-shadow:-1px 0 0 #55A6F1 inset,1px 0 0 #55A6F1 inset;color:#FFF;text-shadow:0 -1px 0 rgba(0,0,0,0.3)}#neat-menu ul ul li:first-child a{border-top-width:0}#menu-search{margin:8px 10px 0 0;float:right}#menu-search form{background:url(https://blogger.googleusercontent.com/img/b/R29vZ2xl/AVvXsEiSvYOYoH82UBhgKkD7MMFlvR3Eprqy5pesUJNTqRkOEd2Ky8lcW_Q4ykXeEXsYI-0x3hDiuTS9fy-CcTaD8KOeAqjVpLNYafVo4l9fiFirGX85Jos-WIvgLOFKnW3wHy4oHjBsM3-GlLqk/s1600/menu-search.gif) no-repeat scroll 5% 50% transparent;border:1px solid #CCC;border-radius:3px 3px 3px 3px;box-shadow:0 1px 0 rgba(0,0,0,0.05) inset,0 1px 0 #FFF;height:26px;padding:0 25px;position:relative;width:130px}#menu-search form:hover{background-color:#F9F9F9}#menu-search form input{color:#999;font-size:13px;height:26px;text-shadow:0 1px 0 #FFF;background:none repeat scroll 0 0 transparent;border:medium none;float:left;outline:medium none;padding:0;width:100%}#menu-search form input.placeholder,#menu-search form input:-moz-placeholder{color:#C4C4C4}
Step 6. Click on the "Save template" button to save the changes and you're done!

Hope you like this CSS3 dropdown menu for Blogger and if you enjoyed the tutorial, please share and subscribe.

Wednesday, 26 February 2014

GSoC 2014 mentoring organisations announced, review and apply!


After sorting through almost 400 applications of mentoring projects, Google has announced this year's list of projects students can contribute to.

There aren't too many FOSS gaming related projects this time though.
These are the relevant ones:

If you are not into game developer but would still like to contribute your programming skills I recommend you to have a look at these other selected projects (totally subjective and unsorted list):  Non-profit accounting, Mifos, Mixxx, Freifunk, OSGeo, Sahana & ProjectTox.

Tuesday, 25 February 2014

Share Blog Posts in Social Media using AddThis

AddThis is the most complete social sharing service allowing you to share your posts in more than 270 different social networks. If you want to use the AddThis widget and get the AddThis sharing buttons, this tutorial will show you how to register and add this feature on your blog. Plus, you will get to know some of the customization options of these buttons. So let's get started!

Getting the AddThis share buttons code

Step 1. Visit the https://www.addthis.com/get/sharing page.

Step 2. To get the sharing buttons and to access the AddThis sharing stats to find out how many people shared your post by using the AddThis feature, click on the "Create account" button.

create addthis account

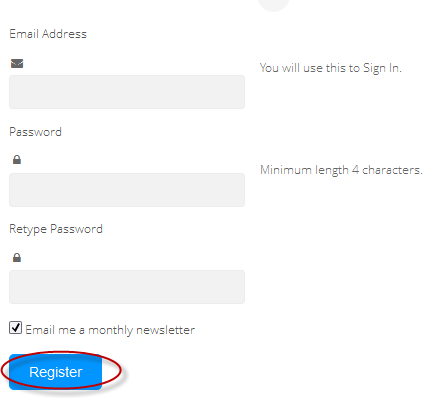
The site will ask you to make a small registration. Fill out the information to register. It's quick, simple and it's free. To finish the registration, click on the Register button.

register addthis

Step 3. After you've been logged in, right below the "Get sharing buttons for", choose the "A website" option.

addthis share buttons

Step 4. In the "Select style" section, choose the buttons style that you think would look the best on your site/blog. Please note that on the right side you can see a preview of these buttons.

addthis sharing buttons

Step 5. After you have chosen the style, the site will provide a code - click on the "Grab it" button to copy it.

addthis code

The code provided will look like this:
<!-- AddThis Button BEGIN -->
<div class="addthis_toolbox addthis_default_style ">
<a class="addthis_button_facebook_like" fb:like:layout="button_count"></a>
<a class="addthis_button_tweet"></a>
<a class="addthis_button_pinterest_pinit" pi:pinit:layout="horizontal"></a>
<a class="addthis_counter addthis_pill_style"></a>
</div>
<script type="text/javascript">var addthis_config = {"data_track_addressbar":true};</script>
<script type="text/javascript" src="//s7.addthis.com/js/300/addthis_widget.js#pubid=ra-XXXXXXXXXXX"></script>
<!-- AddThis Button END -->
Now that you have selected and set up your AddThis sharing buttons, let's add them in the footer of the posts.

Adding the AddThis sharing buttons on Blogger

Step 1. Access your Blogger Dashboard and go to "Template", then click on the "Edit HTML" button on the right side:

blogger template

Step 2. Click anywhere inside the code area and press the CTRL + F keys to open the search box.

Step 3. Type the following line inside the search box and try to find the second occurrence of it - hit Enter:
<div class='post-footer'>
Step 4. Just above this line, add the code for the AddThis social sharing buttons.

Note: If you want to add at the beginning of your posts, add the code below the second:
<div class='post-header'>

How to add more AddThis buttons

To add more buttons, simply choose the button for that social network and add the code just before the </div> tag (refer to the step 5 from above).

Some examples:
<a class="addthis_button_linkedin"></a> /* linkedin button */
<a class="addthis_button_google_plusone" g:plusone:size="medium"></a> /*gplus button */
<a class="addthis_button_digg"></a> /* digg button */
<a class="addthis_button_stumbleupon"></a> /* stumbleupon button */
<a class="addthis_button_print"></a> /* print button */

CSS3 AddThis Share Buttons

You can add just a single button, so that when the reader hovers over it, a menu will open with the options of social networks to share the post.

css3 share buttons, addthis

Visit this page for a demo.

Step 1. Go to "Template" > click on the "Edit HTML" button > press the CTRL + F keys and search:
<div class='post-footer'>
Just above this line, paste the following code:
<style type='text/css'>
.addthis_share_btn a, .addthis_share_btn a:visited {
background: #FF5C00; /* background color of the button */
display: inline-block;
padding: 6px 12px;
font-family: arial,helvetica,lucida,verdana,sans-serif;
font-size: 12px;
line-height: 1em;
color: #fff;
text-decoration: none;
-moz-border-radius: 5px;
-webkit-border-radius: 5px;
-moz-box-shadow: 0 1px 3px rgba(0,0,0,0.5);
-webkit-box-shadow: 0 1px 3px rgba(0,0,0,0.5);
border-radius: 5px;
box-shadow: 0 1px 3px rgba(0,0,0,0.5);
text-shadow: 0 -1px 1px rgba(0,0,0,0.25);
border-bottom: 1px solid rgba(0,0,0,0.25);
position: relative;
cursor: pointer;
}
.addthis_share_btn a:hover {
background: #D45500; /* background color on mouse hover */
color: #fff;
}
.addthis_share_btn a:active { top: 1px; }

.addthis_share_btn a span, .addthis_share_btn:visited a span {
background: url(http://www.addthis.com/cms-content/images/gallery/icon-addthis.gif) no-repeat left;
padding: 1px 0 1px 18px;
}
</style>
<!-- AddThis Share Button -->
<div class='addthis_toolbox addthis_share_btn'>
<a class='addthis_button_compact' href='http://addthis.com/bookmark.php'>
<span>Share</span></a>
</div>
<script src='http://s7.addthis.com/js/250/addthis_widget.js' type='text/javascript'/>
<!-- End AddThis Share Button -->

Customization

  • To change the color of the button according to the colors of your template, modify the color value in red.
  • If you want to change the "Share" text, replace the text in blue.
Step 2. Save the changes by clicking on the "Save template" button and you're done!