
Sunday, 3 November 2013
Friday, 1 November 2013
AUS/USD 2nd November 2013 Monthly Report

AUD Primary cycles
AUD Primary cycles and breakout patterns (Dilernia Principles) suggests the AUD will continue down towards the 2014 yearly lows.
We've just recently seen Secondary support come into play around .8870 and swing back up into the 50% level @ .9730 (#3)....
My view is that the Primary cycles will now come into play and push the AUD downward, as part of a Primary break & extend pattern.
Finding the co-ordinates of a place in the new Google Maps
This article explains how to get the co-ordinates for a particular location in the new and old Google Maps interfaces.
 In mid 2013, Google started rolling out a new version of Google Maps, which even now (Nov 2013) is still in Beta-testing and only works with Chrome and Firefox on desktop (ie not mobile) devices. It's related to Google Maps Engine Lite - a better tool for creating custom map - not not exactly the same product.
When I looked at Maps Engine Lite, one of the things I noticed is that there are a number of features which are missing from the new tool- and the lack of a right-click feature on map-positions means that lots of functions are accessed in a different, possibly non-intuitive, way.
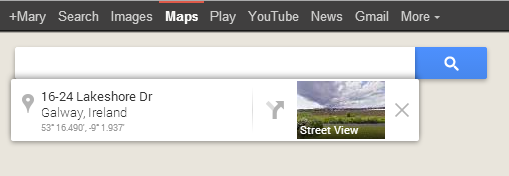
Left click on the exact place that you want co-ordinates for.
Notice that there is a small circle which radiates at that place, or the nearest on-street place. It's a little this, except that it a white/light shade, rather than grey:

In the top left of the map, a small display box appears, showing the nearest street address and a pair of latitude / longitude co-ordinates.

For both the street-address and the co-ordinates:
 Note that if the place you originally clicked on is an on-street address, then the address and and co-ordinates will point to the same place. But they are not necessarily the same. (I think this is a mistake on Google's part: if they show an address with co-ordinates immediately under it, most people will assume that the two relate to the same place, but that's not true at the moment. It may change soon-enough though.)
Right click on the location that you want to find the co-ordiantes for.
Choose "What's here" from the pop-up menu.

At this point, Google Maps will:
So of course you can copy-and-paste the co-ordinates from the search box.

(The pictures in this article above barely look like maps because I'm led to believe that one of the Terms and Conditons for Google Maps is that we cannot put screenshots of the mapping data into how-to articles. So I've kept the places particularly zoomed-in, to avoid any distinguishing features.)
Google Maps Engine Lite - a better tool for creating custom maps
New vs old Google Maps

When I looked at Maps Engine Lite, one of the things I noticed is that there are a number of features which are missing from the new tool- and the lack of a right-click feature on map-positions means that lots of functions are accessed in a different, possibly non-intuitive, way.
How to find the co-ordinates of a particular place in the new Google Maps
Left click on the exact place that you want co-ordinates for.
Notice that there is a small circle which radiates at that place, or the nearest on-street place. It's a little this, except that it a white/light shade, rather than grey:

In the top left of the map, a small display box appears, showing the nearest street address and a pair of latitude / longitude co-ordinates.
For both the street-address and the co-ordinates:
- You can copy / paste these as text.
- If you hover your mouse over them, then inside the maps a small circle radiates out from that spot.
- They are links: if you click on them, then the map zooms and centres at that place, with a large red marker and the street-address name or co-ordinates displayed beside it.

How to find the co-ordinates of a particular place in the existing Google Maps
Right click on the location that you want to find the co-ordiantes for.
Choose "What's here" from the pop-up menu.

At this point, Google Maps will:
- Show the latitude and longitude co-ordinates in the maps search box
- Put a green arrow showing the exact location that you clicked into the map itself
- Put the street address on the nearest on-street location into the maps search-result list, along with a marker to this location on the maps.
So of course you can copy-and-paste the co-ordinates from the search box.

(The pictures in this article above barely look like maps because I'm led to believe that one of the Terms and Conditons for Google Maps is that we cannot put screenshots of the mapping data into how-to articles. So I've kept the places particularly zoomed-in, to avoid any distinguishing features.)
Related Articles:
How to embed a Google custom map into your blog or websiteGoogle Maps Engine Lite - a better tool for creating custom maps
Malware spreading via Skype
Malware spreads via Skype. Just sends the file to all your contacts, nothing more, nothing less. (no message to invite you to check out "photos", no call, ...)
### Analysis ###
Known MD5's:
293cc1f379c4fc81a7584c40f7c82410
66def80d6f87f6f79156557172f9f295
Callback to IP's:
88.150.177.162
Callback to domains:
Random & partial DGA(1) - Pattern:
http://%random%.aingo.cc
Persistence:
Creates key in:
HKEY_CURRENT_USER\Software\Microsoft\Windows\CurrentVersion\Run
Injects into:
explorer.exe
Sets Proxy:
Yes
Type of malware: Caphaw - Banking malware
Technical details ~~
Meta-data
================================================================================
File: /home/remnux/samples/invoice_171658.pdf.exe_
Size: 360448 bytes
Type: PE32 executable for MS Windows (GUI) Intel 80386 32-bit
MD5: 293cc1f379c4fc81a7584c40f7c82410
SHA1: 7bb5b71513e01c2095d37f42c64982a3edb523b5
ssdeep: 3072:fkrImDVQFgEHQPqviUBSnk92oKMcs3JVJXnGcYHmZ52ZgMed1pJ8t/Jpm3dDlnx/:MkpCEwCvi2b92NMxBnUmyZ9o1z8tL
Date: 0x52739069 [Fri Nov 1 11:28:41 2013 UTC]
EP: 0x401270 .text 0/4
CRC: Claimed: 0x5eb47, Actual: 0x5eb47
Resource entries
================================================================================
Name RVA Size Lang Sublang Type
--------------------------------------------------------------------------------
RT_CURSOR 0x532b0 0x134 LANG_RUSSIAN SUBLANG_RUSSIAN data
RT_BITMAP 0x536c0 0x1eec LANG_RUSSIAN SUBLANG_RUSSIAN data
RT_BITMAP 0x555b0 0x4e8 LANG_RUSSIAN SUBLANG_RUSSIAN data
RT_ICON 0x55a98 0x128 LANG_RUSSIAN SUBLANG_RUSSIAN GLS_BINARY_LSB_FIRST
RT_ICON 0x55bc0 0xea8 LANG_RUSSIAN SUBLANG_RUSSIAN data
RT_ICON 0x56a68 0x568 LANG_RUSSIAN SUBLANG_RUSSIAN GLS_BINARY_LSB_FIRST
RT_ICON 0x56fd0 0x10a8 LANG_RUSSIAN SUBLANG_RUSSIAN data
RT_ICON 0x58078 0x468 LANG_RUSSIAN SUBLANG_RUSSIAN GLS_BINARY_LSB_FIRST
RT_GROUP_CURSOR 0x533e8 0x14 LANG_RUSSIAN SUBLANG_RUSSIAN Lotus 1-2-3
RT_GROUP_ICON 0x584e0 0x4c LANG_RUSSIAN SUBLANG_RUSSIAN MS Windows icon resource - 5 icons, 16x16, 16-colors
RT_VERSION 0x53400 0x2c0 LANG_RUSSIAN SUBLANG_RUSSIAN data
Sections
================================================================================
Name VirtAddr VirtSize RawSize Entropy
--------------------------------------------------------------------------------
.text 0x1000 0xee6 0x1000 5.764246
.rdata 0x2000 0x49ce2 0x4a000 5.440947
.data 0x4c000 0x619c 0x6000 0.012147 [SUSPICIOUS]
.rsrc 0x53000 0x5530 0x6000 3.693765
Version info
================================================================================
LegalCopyright: gex Copright ls soft
InternalName: jex MUWEfess dlle
FileVersion: 13, 13, 201, 1241
ProductName: jox Weaex Apps
ProductVersion: 13, 13, 21, 153
FileDescription: jex dllx
OriginalFilename: lexlse.exe
Translation: 0x0419 0x04b0
~~
### Prevention ###
* Check your Skype settings. Only allow contacts to send you messages/files & contact you
* Don't download and run unknown files, especially PE(2) files
### Disinfection ###
* Run a full scan with your installed antivirus product
* Look for suspicious Run keys and delete the associated file(s)
* Run a full scan with another antivirus and/or antimalware product
* Change your Skype password
* Change your proxy to the original one(3) (usually none)
* Change ALL your other passwords
* Call your bank to ensure there was no unauthorized withdrawal or transaction
* When in doubt, seek advise on a professional malware removal forum(4)
### Conclusion ###
* Follow above prevention tips
* Use common sense & do not click on or run anything you encounter
* When in doubt, check the file on VirusTotal for example
# Links #
(1) http://en.wikipedia.org/wiki/Domain_generation_algorithm
(2) http://en.wikipedia.org/wiki/Portable_Executable
(3) http://www.wikihow.com/Change-Proxy-Settings
(4) http://www.bleepingcomputer.com/forums/f/22/virus-trojan-spyware-and-malware-removal-logs
Monday, 28 October 2013
How to Add a Tiny jQuery Circleslider to Blogger
Tiny Circleslider is a small jQuery plugin generating a circular carousel of images that we can slide infinitely (circular). When clicking on the red dot, the main picture moves to the left and another set of images will slide out.
There is nothing complicated about using this type of carousel, however when it is about customizing it, we need to use a bit of arithmetic. All these details can be found in the author's homepage, so I'll just limit myself to show you the basics.
To see it in action, please visit the below demo blog and just drag the red dot:

Step 1. Log in to your Blogger account > select your blog
Step 2. Go to "Template" and hit the "Edit HTML" button:

Step 3. Click anywhere on the code area and search by using the CTRL + F keys for this tag:

Step 4. Just above the </head> tag, add the following scripts:
Step 5. Now, let's add the CSS styles above the same </head> tag:
Step 6. Save the changes by clicking the "Save Template" button
And here's the HTML that has to be added to where we want to display the carousel. To add it inside a post, click the "New post" button on the left side of your dashboard and paste the below code in the "HTML" box of your post:
Replace the imageURL text with the URL of your images.
Some other options that could be added, separated by commas:
There is nothing complicated about using this type of carousel, however when it is about customizing it, we need to use a bit of arithmetic. All these details can be found in the author's homepage, so I'll just limit myself to show you the basics.
To see it in action, please visit the below demo blog and just drag the red dot:
Adding the Tiny CircleSlider to a Blogger Blog
In order to make it work, first task is to add the javascript jQuery library in the template:Step 1. Log in to your Blogger account > select your blog
Step 2. Go to "Template" and hit the "Edit HTML" button:
Step 3. Click anywhere on the code area and search by using the CTRL + F keys for this tag:
</head>
Step 4. Just above the </head> tag, add the following scripts:
<script src='http://ajax.googleapis.com/ajax/libs/jquery/1.10.2/jquery.min.js' type='text/javascript'/>
<script>
//<![CDATA[
/*! Tiny Circleslider - v2.0.8 - 2015-08-08
* http://www.baijs.com/tinycircleslider
*
* Copyright (c) 2015 Maarten Baijs <wieringen@gmail.com>;
* Licensed under the MIT license */
!function(a){"function"==typeof define&&define.amd?define(["jquery"],a):"object"==typeof exports?module.exports=a(require("jquery")):a(jQuery)}(function(a){function b(b,e){function f(){return k(),w.append(x.first().clone()).css("width",B.width*(x.length+1)),g(),r(0),v.move(v.options.start,v.options.interval),v}function g(){G&&(b[0].ontouchstart=u,b[0].ontouchmove=q,b[0].ontouchend=s),y.bind("mousedown",u);var c=function(b){return b.preventDefault(),b.stopImmediatePropagation(),v.stop(),v.move(a(this).attr("data-slide-index")),!1};G&&b.delegate(".dot","touchstart",c),b.delegate(".dot","mousedown",c)}function h(a){E=setTimeout(function(){v.move(v.slideCurrent+1,!0)},a?50:v.options.intervalTime)}function i(a){return a*(Math.PI/180)}function j(a){return 180*a/Math.PI}function k(){var c=document.createDocumentFragment();z.remove(),x.each(function(b,d){var e=null,f=parseInt(a(d).attr("data-degrees"),10)||360*b/v.slidesTotal,g={top:-Math.cos(i(f))*v.options.radius+A.height/2-D.height/2,left:Math.sin(i(f))*v.options.radius+A.width/2-D.width/2};z.length>0&&(e=z.clone(),e.addClass(a(d).attr("data-classname")).css(g),c.appendChild(e[0])),v.dots.push({angle:f,slide:d,dot:e})}),v.dots.sort(function(a,b){return a.angle-b.angle}),a.each(v.dots,function(b,c){a(c.dot).length>0&&a(c.dot).addClass("dot-"+(b+1)).attr("data-slide-index",b).html("<span>"+(b+1)+"</span>")}),b.append(c),z=b.find(".dot")}function l(a,b){var c,d,e;return a>b?(c=a-b,d=-(b+360-a)):(c=a+360-b,d=-(b-a)),e=c<Math.abs(d)?c:d,[e,d,c]}function m(b){var c=9999,d=9999,e=9999,f=0,g=0,h=0;return a.each(v.dots,function(a,i){var j=l(i.angle,b);Math.abs(j[0])<Math.abs(e)&&(e=j[0],h=a),Math.abs(j[1])<Math.abs(c)&&(c=j[1],f=a),Math.abs(j[2])<Math.abs(d)&&(d=j[2],g=a)}),[[h,f,g],[e,c,d]]}function n(a){return 0>a?360+a%-360:a%360}function o(a,b,c){var d=a,e=!1;Math.abs(a)>Math.abs(b)?(d=-b,e=!0):I?requestAnimationFrame(function(){o(d,b+a)}):F=setTimeout(function(){o(d,b+a,.9*c)},c),v.angleCurrent=n(v.angleCurrent-d),r(v.angleCurrent,e)}function p(a){return{x:H?a.targetTouches[0].pageX:a.pageX||a.clientX,y:H?a.targetTouches[0].pageY:a.pageY||a.clientY}}function q(a){var c=b.offset(),d={left:p(a).x-c.left-A.width/2,top:p(a).y-c.top-A.height/2};return v.angleCurrent=n(j(Math.atan2(d.left,-d.top))),I||r(v.angleCurrent),!1}function r(a,c){closestSlidesAndAngles=m(a),closestSlides=closestSlidesAndAngles[0],closestAngles=closestSlidesAndAngles[1],w.css("left",-(closestSlides[1]*B.width+Math.abs(closestAngles[1])*B.width/(Math.abs(closestAngles[1])+Math.abs(closestAngles[2])))),y.css({top:-Math.cos(i(a))*v.options.radius+(A.height/2-C.height/2),left:Math.sin(i(a))*v.options.radius+(A.width/2-C.width/2)}),c&&b.trigger("move",[x[v.slideCurrent],v.slideCurrent])}function s(b){return a(b.target).hasClass("dot")?!1:(v.dragging=!1,b.preventDefault(),a(document).unbind("mousemove mouseup"),y.unbind("mouseup"),v.options.dotsHide&&z.stop(!0,!0).fadeOut("slow"),v.options.dotsSnap&&v.move(m(v.angleCurrent)[0][0]),void 0)}function t(){v.dragging&&(r(v.angleCurrent),requestAnimationFrame(function(){t()}))}function u(b){return b.preventDefault(),H="touchstart"==b.type,v.dragging=!0,a(b.target).hasClass("dot")?!1:(v.stop(),a(document).mousemove(q),a(document).mouseup(s),y.mouseup(s),v.options.dotsHide&&z.stop(!0,!0).fadeIn("slow"),I&&t(),void 0)}this.options=a.extend({},d,e),this._defaults=d,this._name=c;var v=this,w=(b.find(".viewport"),b.find(".overview")),x=w.children(),y=b.find(".thumb"),z=b.find(".dot"),A=(x.find("a"),{width:b.outerWidth(!0),height:b.outerHeight(!0)}),B={width:x.first().outerWidth(!0),height:x.first().outerHeight(!0)},C={width:y.outerWidth(!0),height:y.outerHeight(!0)},D={width:z.outerWidth(),height:z.outerHeight()},E=null,F=null,G="ontouchstart"in window,H=!1,I="requestAnimationFrame"in window;return this.dots=[],this.slideCurrent=0,this.angleCurrent=0,this.slidesTotal=x.length,this.intervalActive=!1,this.start=function(a){return v.options.interval&&(v.intervalActive=!0,h(a)),v},this.stop=function(){return v.intervalActive=!1,clearTimeout(E),v},this.move=function(a){var b=Math.max(0,isNaN(a)?v.slideCurrent:a);b>=v.slidesTotal&&(b=0);var c=v.dots[b]&&v.dots[b].angle,d=l(c,v.angleCurrent)[0],e=d>0?-2:2;return v.slideCurrent=b,o(e,d,50),v.start(),v},f()}var c="tinycircleslider",d={interval:!1,intervalTime:3500,dotsSnap:!1,dotsHide:!0,radius:140,start:0};a.fn[c]=function(d){return this.each(function(){a.data(this,"plugin_"+c)||a.data(this,"plugin_"+c,new b(a(this),d))})}});
//]]>
</script>
Please note that if you already have another version of jQuery, you will need to remove the line in red.<script>
//<![CDATA[
/*! Tiny Circleslider - v2.0.8 - 2015-08-08
* http://www.baijs.com/tinycircleslider
*
* Copyright (c) 2015 Maarten Baijs <wieringen@gmail.com>;
* Licensed under the MIT license */
!function(a){"function"==typeof define&&define.amd?define(["jquery"],a):"object"==typeof exports?module.exports=a(require("jquery")):a(jQuery)}(function(a){function b(b,e){function f(){return k(),w.append(x.first().clone()).css("width",B.width*(x.length+1)),g(),r(0),v.move(v.options.start,v.options.interval),v}function g(){G&&(b[0].ontouchstart=u,b[0].ontouchmove=q,b[0].ontouchend=s),y.bind("mousedown",u);var c=function(b){return b.preventDefault(),b.stopImmediatePropagation(),v.stop(),v.move(a(this).attr("data-slide-index")),!1};G&&b.delegate(".dot","touchstart",c),b.delegate(".dot","mousedown",c)}function h(a){E=setTimeout(function(){v.move(v.slideCurrent+1,!0)},a?50:v.options.intervalTime)}function i(a){return a*(Math.PI/180)}function j(a){return 180*a/Math.PI}function k(){var c=document.createDocumentFragment();z.remove(),x.each(function(b,d){var e=null,f=parseInt(a(d).attr("data-degrees"),10)||360*b/v.slidesTotal,g={top:-Math.cos(i(f))*v.options.radius+A.height/2-D.height/2,left:Math.sin(i(f))*v.options.radius+A.width/2-D.width/2};z.length>0&&(e=z.clone(),e.addClass(a(d).attr("data-classname")).css(g),c.appendChild(e[0])),v.dots.push({angle:f,slide:d,dot:e})}),v.dots.sort(function(a,b){return a.angle-b.angle}),a.each(v.dots,function(b,c){a(c.dot).length>0&&a(c.dot).addClass("dot-"+(b+1)).attr("data-slide-index",b).html("<span>"+(b+1)+"</span>")}),b.append(c),z=b.find(".dot")}function l(a,b){var c,d,e;return a>b?(c=a-b,d=-(b+360-a)):(c=a+360-b,d=-(b-a)),e=c<Math.abs(d)?c:d,[e,d,c]}function m(b){var c=9999,d=9999,e=9999,f=0,g=0,h=0;return a.each(v.dots,function(a,i){var j=l(i.angle,b);Math.abs(j[0])<Math.abs(e)&&(e=j[0],h=a),Math.abs(j[1])<Math.abs(c)&&(c=j[1],f=a),Math.abs(j[2])<Math.abs(d)&&(d=j[2],g=a)}),[[h,f,g],[e,c,d]]}function n(a){return 0>a?360+a%-360:a%360}function o(a,b,c){var d=a,e=!1;Math.abs(a)>Math.abs(b)?(d=-b,e=!0):I?requestAnimationFrame(function(){o(d,b+a)}):F=setTimeout(function(){o(d,b+a,.9*c)},c),v.angleCurrent=n(v.angleCurrent-d),r(v.angleCurrent,e)}function p(a){return{x:H?a.targetTouches[0].pageX:a.pageX||a.clientX,y:H?a.targetTouches[0].pageY:a.pageY||a.clientY}}function q(a){var c=b.offset(),d={left:p(a).x-c.left-A.width/2,top:p(a).y-c.top-A.height/2};return v.angleCurrent=n(j(Math.atan2(d.left,-d.top))),I||r(v.angleCurrent),!1}function r(a,c){closestSlidesAndAngles=m(a),closestSlides=closestSlidesAndAngles[0],closestAngles=closestSlidesAndAngles[1],w.css("left",-(closestSlides[1]*B.width+Math.abs(closestAngles[1])*B.width/(Math.abs(closestAngles[1])+Math.abs(closestAngles[2])))),y.css({top:-Math.cos(i(a))*v.options.radius+(A.height/2-C.height/2),left:Math.sin(i(a))*v.options.radius+(A.width/2-C.width/2)}),c&&b.trigger("move",[x[v.slideCurrent],v.slideCurrent])}function s(b){return a(b.target).hasClass("dot")?!1:(v.dragging=!1,b.preventDefault(),a(document).unbind("mousemove mouseup"),y.unbind("mouseup"),v.options.dotsHide&&z.stop(!0,!0).fadeOut("slow"),v.options.dotsSnap&&v.move(m(v.angleCurrent)[0][0]),void 0)}function t(){v.dragging&&(r(v.angleCurrent),requestAnimationFrame(function(){t()}))}function u(b){return b.preventDefault(),H="touchstart"==b.type,v.dragging=!0,a(b.target).hasClass("dot")?!1:(v.stop(),a(document).mousemove(q),a(document).mouseup(s),y.mouseup(s),v.options.dotsHide&&z.stop(!0,!0).fadeIn("slow"),I&&t(),void 0)}this.options=a.extend({},d,e),this._defaults=d,this._name=c;var v=this,w=(b.find(".viewport"),b.find(".overview")),x=w.children(),y=b.find(".thumb"),z=b.find(".dot"),A=(x.find("a"),{width:b.outerWidth(!0),height:b.outerHeight(!0)}),B={width:x.first().outerWidth(!0),height:x.first().outerHeight(!0)},C={width:y.outerWidth(!0),height:y.outerHeight(!0)},D={width:z.outerWidth(),height:z.outerHeight()},E=null,F=null,G="ontouchstart"in window,H=!1,I="requestAnimationFrame"in window;return this.dots=[],this.slideCurrent=0,this.angleCurrent=0,this.slidesTotal=x.length,this.intervalActive=!1,this.start=function(a){return v.options.interval&&(v.intervalActive=!0,h(a)),v},this.stop=function(){return v.intervalActive=!1,clearTimeout(E),v},this.move=function(a){var b=Math.max(0,isNaN(a)?v.slideCurrent:a);b>=v.slidesTotal&&(b=0);var c=v.dots[b]&&v.dots[b].angle,d=l(c,v.angleCurrent)[0],e=d>0?-2:2;return v.slideCurrent=b,o(e,d,50),v.start(),v},f()}var c="tinycircleslider",d={interval:!1,intervalTime:3500,dotsSnap:!1,dotsHide:!0,radius:140,start:0};a.fn[c]=function(d){return this.each(function(){a.data(this,"plugin_"+c)||a.data(this,"plugin_"+c,new b(a(this),d))})}});
//]]>
</script>
Step 5. Now, let's add the CSS styles above the same </head> tag:
<style>
#rotatescroll { /* is the rectangle container */
height: 300px;
position: relative;
width: 300px;
}
#rotatescroll .viewport { /* is the rectangle containing the images */
height: 300px;
position: relative;
margin: 0 auto;
overflow: hidden;
width: 300px
}
#rotatescroll .overview { /* is the list with the images */
left: 0;
list-style: none;
margin: 0;
padding: 0;
position: absolute;
top: 0;
}
#rotatescroll .overview li { /* each item of the list */
float: left;
height: 300px;
position: relative;
width: 300px;
}
#rotatescroll .overlay { /* the image with the circle overlapping the list */
background: transparent url(https://blogger.googleusercontent.com/img/b/R29vZ2xl/AVvXsEg1VSAxaiLkrWNJK7ZeGj-nUzg3rPB_Xs6m__UhHrEZmwAD821Iqn4A1Vn79AMgAF3q2F6-wR0VWomVen_ua752jbosJaSPnHiLL2VpfdWTTq2STjTP64SCHtphEUHjxtFJXPWLZLXCV5jB/s1600/bg-rotatescroll.png) no-repeat 0 0;
height: 300px;
left: 0;
position: absolute;
top: 0;
width:300px;
}
#rotatescroll .thumb { /* the red circle that allows us to navigate */
background:transparent url(https://blogger.googleusercontent.com/img/b/R29vZ2xl/AVvXsEgl4gJnxJiZAKAx2jHHpTVNQnSPiH91BCa0Hcn9p_tiwJuD9h2Dz7LSUexYq6WPf4aAT3sLlMvOvYtrUHkuoyHj47miJBxSRutdz-yGJsRZO67_qPEZqF7b-4XMbVFjleBO9Ch-1WDzn7ZL/s1600/bg-thumb.png) no-repeat 0 0;
cursor: pointer;
height: 26px;
left: 137px;
position: absolute;
top: -3px;
width: 26px;
z-index: 200;
}
#rotatescroll .dot { /* the points indicating the position of each image */
background: transparent url(https://blogger.googleusercontent.com/img/b/R29vZ2xl/AVvXsEjOr8PRzmipyah0q98vs9iaiA_BqM_fKe_GOXGIBceVdtSh_QVMMXCLaCT22ibDdc5iZ3X7Bh8mHndm_TvdEAAGdBaUPb0hiTLIGiU1-MmTmOwhM1VXEL_msiz7fdsUSNieN5pA4j1cHeLs/s1600/bg-dot.png) no-repeat 0 0;
display: none;
height: 12px;
left: 155px;
position: absolute;
top: 3px;
width: 12px;
z-index: 100;
}
#rotatescroll .dot span { /* are hidden by default */
display: none;
}
#rotatescroll .viewport ul.overview li img {
width: 300px;
min-height: 300px;
object-fit: cover;
padding:0;
border:0;
}
</style>
 |
| Screenshot |
And here's the HTML that has to be added to where we want to display the carousel. To add it inside a post, click the "New post" button on the left side of your dashboard and paste the below code in the "HTML" box of your post:
<div id="rotatescroll">
<div class="viewport">
<ul class="overview">
<li><img src="imageURL" /></li>
<li><img src="imageURL" /></li>
<li><img src="imageURL" /></li>
<li><img src="imageURL" /></li>
<li><img src="imageURL" /></li>
</ul>
</div>
<div class="dot"></div>
<div class="overlay"></div>
<div class="thumb"></div>
</div>
<script type="text/javascript">
$(document).ready(function(){
$('#rotatescroll').tinycircleslider({
interval: true,
snaptodots: true
});
});
</script>
 |
| Adding HTML inside a Blogger post |
Replace the imageURL text with the URL of your images.
Some other options that could be added, separated by commas:
- snaptodots: false if you want no dots to be shown when dragging them
- hidedots: false if you want to display the internal points (by default is true)
- intervaltime - is the time between slides (by default 3500)
- radius - defines the size of the circle (by default is 140)
Subscribe to:
Posts (Atom)