Sunday, 20 October 2013

Redirect Blogger 404 Error (Page Not Found) To Homepage

A 404 error page tells you and search engines that a page is not found by displaying a text similar to "Sorry, the page you were looking for in this blog does not exist.". This may happen because you have changed your URLs over time, either removed a few pages when you overhauled your design, or a visitor may have accidentally misspelled an URL nonexistent in your blog, so it automatically redirects to the 404 error page (page not found).

Most likely, this will not make a good impression on the potential users of our blog. So, before the visitor clicks the back button or close the window/browser's tab, thus leaving our site forever, we may want to redirect 404 error in Blogger to a page, so that the visitor will continue reading our blog.
how to redirect blogger 404 error to homepage


One of the most used methods is the "meta refresh" but the problem with this method is that it breaks navigation (doesn't allow to return back). In this case, the best method is to use JavaScript about which I will go into more detail below.

Redirect Blogger 404 Error with JavaScript

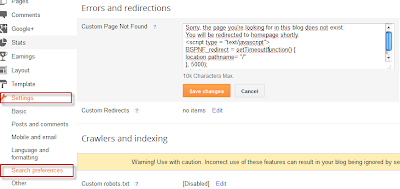
Go to your Blogger dashboard, select your blog and click the Settings menu item > Search preferences > Custom Page Not Found.

redirect 404 error page in blogger to homepage

Copy and paste the following code inside the empty box:
Sorry, the page you're looking for in this blog does not exist.
You will be redirected to homepage shortly.
<script type = "text/javascript">
PNF_redirect = setTimeout(function() {
location.pathname= "/"
}, 5000);
</script>
The text which is going to be displayed can be modified as you want. If you are willing to redirect the 404 error page to another page other than home page, just replace pathname to href and / with the url of your page. Finally, the number 5000 which is the delay expressed in milliseconds, can be changed to other value if this is more convenient.

Next thing to do is to 'Save changes' and do a little test to check if the code works well. You can verify the 404 error page functionality by adding a random text at the end of your blog address - after pressing Enter, you should see the error page followed by a redirection after 5 seconds. That's it!

How to Copy Filenames from Folder to Excel, Text or Word File

Have you ever felt this need ? Today i was preparing a database of files in a folder in an Excel Sheet. It is a hectic job if i right click on each file, go to rename, copy its file name and then paste it in excel. I found an easier way to do it. This trick will work on Windows platform by using command prompt.Follow the following steps to copy filenames from a folder to a text file:
  • Copy the folder to C Drive. However it can be done in any folder but as now we will work in DOS and it will be easier to write a shorter path.
  • Run DOS (Command Prompt). You can do it by typing "cmd" in Run.
  • Now type the following command
              dir "C:\folder_name" > C:\folder_name\output.txt /b /o   
  • Now Close DOS (Command Prompt).
  • Go to the folder. There you will find a next file in it named "output.txt". Open it. It will have a complete list of files present in that folder (including output.txt).
Now you can use the content in that text file anywhere you need. You can paste it in excel. Each filename will be pasted in next cell. You can easily use this information in Word file as well and any text editing software.
If you need complete file names including path then you can also do it using some text editing softwares or excel. I am big fan of MS Excel and like to play with it. However there are ways to get filenames (including path) in a folder using command prompt. Will Get it for you very soon. 

4 Alternatives to Google AdWords

Many think that Google AdWords is the only tool dedicated and available to perform a study such as a keyword search, but it isn't so, today I refute this idea by collecting some alternatives that, although are not equal to Google AdWords, at least encourage us to make good keyword analysis for the SEO of our website.

alternatives to google adwords

Going back a bit, for those unfamiliar with the main features and tools of Google AdWords, we can find a very simple interface yet complete in every sense.

- AdWords appearance has changed, however there is a chance of returning to the old design;
- allows you to place a phrase or keyword, a web site and use the categories;
- for a better keywords search, you can apply filters such as location, language and add custom fields (competition, local or global monthly searches, CPC, Ad share, etc.);
- displays keyword ideas in columns with the amount of local and global monthly searches and approximate CPC;
- you can download keyword ideas, search results in a format to open with Excel.

Having recalled and refreshed the memory a little with the characteristics of AdWords, now it is time to learn about other options both free and paid.

Google AdWords Alternatives


Bing Webmaster Tools: Bing may not be the tool that we had first thought of, however it wants to provide the best conditions for studying keywords.


After we register, to access the tool, go to Diagnostics & Tools and click on the second option on the list: Keyword Research.

SEMRush: Other freemium alternative that displays a very complete report of a particular keyword or website. However, it has limitations and if you opt for a PRO recurring plan you need to pay a monthly membership from $69.95 per month.

Ubersuggest: This nice and simple online tool searches keywords suggestion as well as potential titles for an article. Personally, I recommend it 100%.

Keyword Eye: If you are looking to perform a keyword research on a particular region, Keyword Eye will be your help. It also has the option of requesting the display of search volume or AdWords competition and a full report of anchor text, keywords and domain.

At first it offers a free plan with limitations and to enjoy all other benefits, we have to pay $9.99 per month.

How to Add Google Analytics to Blogger

Google Analytics is a platform created with the purpose of helping us to track the number of visits and page views on our blog, which also uses several filters to check exactly from where the visitors are coming via standard or custom reports.

Google Analytics is the leading free tool that has a good relationship with the internet marketing and offers suggestions and improvements or benefits for our website.

As Analytics is part of the variety of Google tools like Blogger, many bloggers still don't know if it is possible to add the tracking code in Blogger. Implementing analytics in Blogger is very quick and easy, so you don't need to be experts or web developers. Here's a small guide for placing the Google Analytics tracking ID on our blog.

google analytics

Implementing Google Analytics on Blogger


1. Do you have a Google Analytics account? Then it's perfect. If you don't have one, please Register.
2. Within the account, we'll go to Admin and in the Property column, click the menu, then click Create new property, where we enter the information from the website.

create new property in google analytics

3. Click on "Get Tracking ID" and it will provide a box with a code, select and copy the code (CTRL + C).

get google analytics tracking id

4. Now let's go to our Blogger account.
5. Look for your blog and click on it, then go to Template > click the Edit HTML button and paste the code previously generated in Analytics before the </head> tag (CTRL + F in order to find it).

And this would be the entire procedure. Within about 24 hours, we shall see the first statistics of our blog in Google Analytics, otherwise check the following:

- Double check that the code has no spaces or characters.
- Doesn't have errors in the configuration
- There are no poor implementation of the filters.
- The Flash plugin is working or javascript is enabled.
- You will have minor issues if you are receiving visits from China (this conflict is not yet solved, according to Google).

Saturday, 19 October 2013

How to set up a Google+ profile for an existing Blogger account

This article is about how to set up a Google Plus profile for a Blogger account which already exists.  It looks at the history of Blogger and Google accounts, how to make a Google+ profile for a Blogger account, and what the consequences of this might be.


Google+ and Blogger accounts

Once upon a time, you could sign up to use Blogger without using Google at all.

Then Google purchased Blogger, and over time the two types of accounts were slowly combined - and everyone who had an old "Blogger-only" account was asked to convert it to a Google account, which also gave them access to other features like Picasa-web-albums, Analytics, etc. People who signed up to Gmail first found that this made them a Google account that had access to email (via a gmail address), and Blogger, PWA, etc.

More recently, Google introduced Google+.

Today, people who sign-up to use Blogger are asked for their real name during the registration process, and are automatically set up with a Google+ account at the same time. But it is possible to opt out of this and not use Google+ with the Google/Blogger account. And there are many people - and organisations - who have Google accounts which were created before Google+ was launched and which do not currently have a Google+ profile.   This is is not a problem until the owner finds there is some feature in Google+ which affects how Blogger operates, eg the auto-enhance features in Picasa-web-albums / Google+ Photos.

Luckily it's very easy to set up a Google+ profile for an existing Blogger or Google account.   And doing this does not force you to actually use Google+ for anything:   it's possible to set up the Google Plus account, use it for whatever you need to, and then never use it again.


How to set up a Google+ account for an existing Blogger account


Log in to Blogger using the Google account that you use to edit / administer your blog at the moment.


In another tab or window in the same browser, to go www.plus.google.com


If your Google account is not already set up for Google+, then the Google Plus registration screen will open, with some details automatically filled in from your Blogger/Google account profile.


Check these details, enter a gender and date of birth, tick the "I understand the Picasa" changes box, and press Upgrade.


Depending on how Google has interpreted your name from your Google / Blogger profile, you may get an error message like this:
The name you entered doesn't seem to meet our Names Policy. Check it over and try again.
Did we mess up? Click here to submit an appeal (usually processed in 24 hours).
If so, you can either submit an appeal (by clicking the button) or change the name that Google suggested from your Blogger profile - for example by removing any hyphens from it..   Notice that they don't actually ask for your real name - even though this is what Google Plus is supposed to have.


Once you have resolved any problems with the name etc, your Google Plus profile will be created.


Customizing your Google+ Profile - or not

After your profile is created, the sign-up tool takes you through two more screens where you can connect to other people, and to choose people or pages to follow.  

If you want to use your Google+ profile, then it is a good idea to do this.

And if you don't connect to any people, you will get a message telling you that you might be lonely - just click Continue Anyway, unless this concerns you.


Has this linked your blog to Google+?

Absolutely not.  

The procedure described above simply creates a Google+ profile for the Google account that you are using.    It does not change your blog settings in any way, and any Blogger posts that you make will still be attached to your Blogger profile, not to the Google+ profile.

If you want to attach your blog to your Google+ profile, then you can change this by clicking the Get Started button on the Google+ tab, and accepting the changes.    But this is not compulsory - and it may not be a good idea on if you are an administrator of any team blogs, because this switch affects all your blogs.


Terms and Conditions

Notice that you were not asked to agree to any Terms and Conditions at any point in the Google+ account creation process - apart from agreeing that you understood the impact on your Picasa-web-albums.

However there are, of course, some.   You can read them here.  There is also a Names Policy, which says that:
Google+ profiles are for individuals. If you want to use Google+ to represent someone or something other than yourself -- like your business, your band, your family, or your pet -- you should create a Google+ page instead.

So if your Blogger account represents something other than you (eg I have one for my choir, and one for a local parents group), and you convert it to a Google+ profile, then you will be breaking Google's rules - even though they did not point this out to you during the conversion process, and even though there are some aspects than you cannot set for a Google+ page.

So you need to be aware of this, and weigh up whether the benefits of having a non-compliant Google+ account are worth the risks involved.

At the moment, it's just not clear how much Google are viewing this as a problem, and whether they will do things like delete Google+ profiles that break the rules in this way.    By comparison, Facebook do this.   But the Google+ situation is a little different because of the historic nature of the separate accounts.


Related Articles:

Understanding Google accounts

Ways to let other people contribute to your blog