For those that are not keeping up to the latest development branch (via the autobuilds), the Xonotic developers have released a new version with various smaller changes and new official maps.
From the user "Antibody" (known for his duel commentary videos) comes this nice video overview of the new features:
(please note that due to video capture performance reasons the graphic settings are pretty low, and the game can look much nicer with different settings)
On the longer term horizon of Xonotic development, there is the very exiting news that they are currently porting their game to run on the same engine that Unvanquished uses. With this the future of Xonotic is indeed much brighter, as their current engine has not seem much development lately. See more details in this thread.
Oh and while we are talking about FOSS arena FPS: A short while ago Red Eclipse also released a new version. Changes include updated to the AI Bots and a build in universal updater to easily follow the latest releases.

Sunday, 30 August 2015
Saturday, 29 August 2015
How to Use Any Trial Software Forever Free Using Time Stopper

Time Stopper
You always wanted to use any trial software for free, but for that you had to find a Crack for it on internet, but if you failed then you weren’t able to use the trial software any more. But now, it’s possible !!
Time Stopper let you run Trial Softwares forever without expiration.If you don’t have enough trial period of any trial version software you can extend the trial period using Time Stopper.
How it Works ?
Function of the time stopper is to change the date and time by entering into the software. For this reason time stopper will extend the trial period of the program for an unlimited amount of time.
Time Stopper will not modify the time and date of the operating system.
RUN AS DATE will not convert your trial version software to full version but it will let you use your trial version software lifetime.
Time Stopper will not modify the time and date of the operating system.
RUN AS DATE will not convert your trial version software to full version but it will let you use your trial version software lifetime.
BUT We recommend you to buy the software which you like.
Time Stopper at a glance
- Time Stopper is a free software.
- It is easily installable.
- Time Stopper are not damaging any file.
- It will not modify the time and date of the operating system.
- Run trial software without expiration.
- Anti virus can’t detect or blocked Time Stopper 4.0 as a virus.
How to Use ?
- User left click on “Browse… (push button)” in “Time Stopper”. Browse your installed trial version software in –> windows drive >> Program Files >> then find out your installed trial version software and choose that .exe file which will run your program.
- Now choose a date.This new date should include within trial period of the trial version software. We recommend to select tomorrow as the date.
- Now you will able to create a desktop shortcut for future use. To create a desktop shortcut type the shortcut name and click on create desktop shortcut and use these shortcut to open the trial version software.

Note: After patching the trial version software by using Time Stopper, you must always use the desktop shortcut which created by Time Stopper to open that software otherwise the trial will end instantly.
Screenshot

Downloads
Wednesday, 26 August 2015
Microsoft Releases Updates To Spy On Windows 7, 8 and 8.1 Users

But wait, you can’t run after the creators of Microsoft to criticise or complain for stealing your data because you agreed to the Windows 10 terms and conditions, where Microsoft has clearly stated “we will access, disclose and preserve personal data.”
Now are you worried much? You are not alone. Many Windows users are unhappy with Microsoft’s choice to spy on its users and many privacy conscious users even opted to not to update to Windows 10 and stick with older version of Windows i.e. Windows 7, Windows 8 or Windows 8.1.
But now it seems like Microsoft’s goal to snoop on its users is so strong that they have now released several updates for their older versions of Windows that provides them with a capability to spy on Windows 7, 8 and 8.1 users too.
The two recent Windows updates having the identification number, KB3075249 and KB3080149, grants a capability to Windows to capture and send your data to company’s servers.
Here’s how Microsoft has described these two updates:
KB3075249 – This update adds telemetry points to the User Account Control (UAC) feature to collect information on elevations that come from low integrity levels.
KB3080149 – This package updates the Diagnostics and Telemetry tracking service to existing devices. This service provides benefits from the latest version of Windows to systems that have not yet upgraded. The update also supports applications that are subscribed to Visual Studio Application Insights.
So once both of these updates are installed on your computer then Microsoft may possibly spy on you in a similar way Microsoft Windows 10 does, and all your data will be sent to Microsoft servers.
That is not all. Privacy-conscious users of Windows have pointed out that there are numerous other updates released by Microsoft that either grant the company an access to your data or forcefully updates your existing version of Windows 7, 8 or 8.1 to the latest operating system release, Windows 10.
If you want to stick to Windows 7, 8 or 8.1 and want to remain untracked then we will recommend you to stay away from the following updates:
KB2876229 SKYPE, IF YOU WANT SKYPE THEN INSTALL IT.KB2923545 RDPKB2970228KB3035583KB2990214KB3021917KB3068708 TELEMETRYKB2592687KB2660075KB2506928KB2952664 X2KB3050265KB2726535KB2994023KB3022345 REPLACED BY KB3068708 TELEMETRYKB3022345 CAUSED FALSE SFC RESULTKB2545698 (IE9)KB3065987
If you are still using Windows 7 or Windows 8 and want to keep your data away from the access of Microsoft then we will highly recommend you to stay away from the above-mentioned updates.
But you must be curious to find out if the above updates are installed on your computer. Don’t worry, head over to the next section where we have a step by step guide to finding out whether these updates were installed on your computer, and if they are then how to uninstall them.
HOW TO SEARCH FOR SNOOPING WINDOWS UPDATES
First, we will find whether any of the above-mentioned updates is installed on your Windows 7 or Windows 8 system. To do so follow the below guide:
DISCLAIMER:
rexsniper.blogspot.com will not be held responsible for any kind of loss or damage to your system caused by the following steps. Proceed at your own risk!
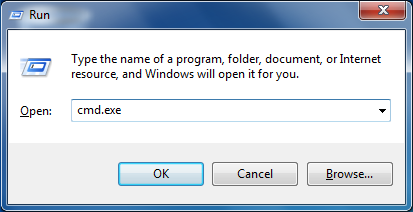
Step #1 – Launch Command Prompt using ‘Windows’ + ‘R’ keys on your keyboard.
Step #2 – In the Command Prompt box, type cmd or cmd.exe and press ‘Enter’ key on your keyboard.
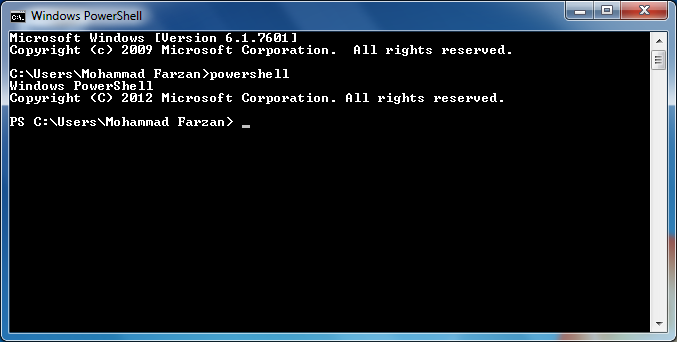
Step #3 – A new window will open. Now type PowerShell and press ‘Enter’ key to enter Windows PowerShell mode.
Now there are two methods to check whether any of the snooping updates has been installed on your system or not.
If you want to check for updates one-by-one then use Step #4a,
Else, if you want to speed up the searching processes then use Step #4b.
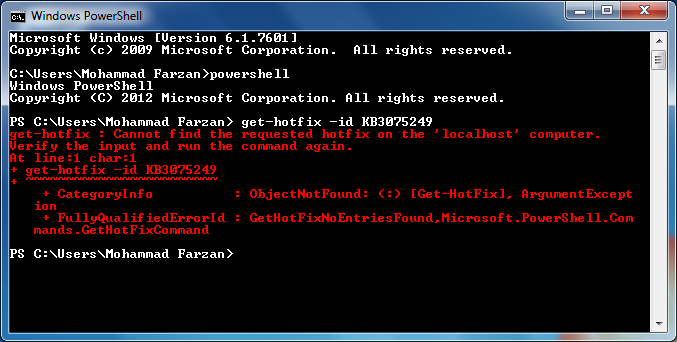
Step #4a – Run the following command to check for a single update. Just change the update code to search for another update.
get-hotfix -id KB3075249Step #4b – Run the following command to check for multiple updates. You can separate each update with a comma and add as many update numbers that you want to check. Here is an example command to check for four updates:
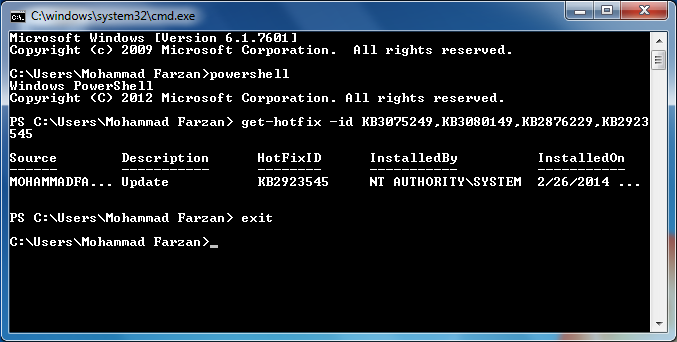
get-hotfix -id KB3075249,KB3080149,KB2876229,KB2923545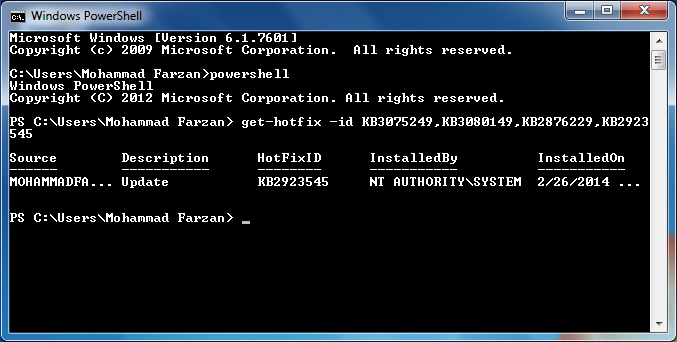
Once the above command is processed successfully and if any update is found then the command prompt will return some information about the update like its source, description, ID and installation date. As shown in the screenshot above.
And in case no update is found on the system then the command prompt will return with some errors written in a red colored text. The error message should read, “Cannot find the requested hotfix.” This shows that the searched update number is not installed on the system. As shown in the below screenshot.
Step # 5 – When you are done with the searching process, type exit and press ‘enter’key to exit from the Windows PowerShell mode.
HOW TO REMOVE/UNINSTALL SNOOPING WINDOWS UPDATES
If you want to uninstall any update from your system then use the following guide:
DISCLAIMER:
rexsniper.blogspot.com will not be held responsible for any kind of loss or damage to your system caused by the following steps. Proceed at your own risk!
Step #1 – Launch Command Prompt using ‘Windows’ + ‘R’ keys on your keyboard.
Step #2 – In the Command Prompt box, type cmd or cmd.exe and press ‘Enter’ key on your keyboard.
Step #3 – A new window will open. Execute the following command to uninstall any update from your system. Just change the update number you want to uninstall.
wusa /uninstall /kb:2923545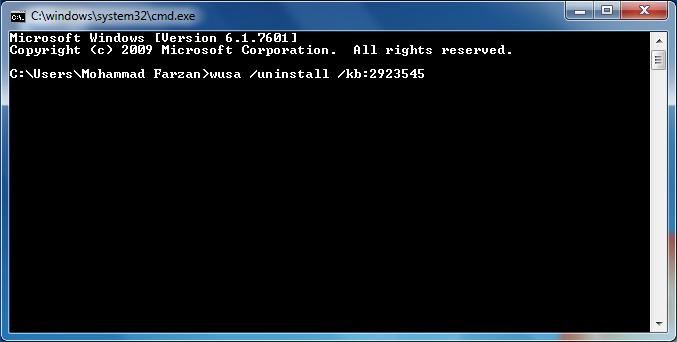
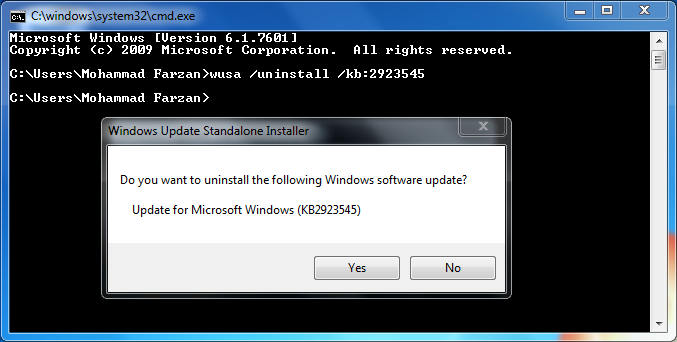
Step #4 – A new Windows Update Standalone Installer prompt will pop up, asking you if you want to uninstall the following Windows update.
VMware Workstation 12 Pro Serial Key

VMware Workstation 12
VMware Workstation 12 Pro continues VMware’s tradition of delivering leading edge features and performance that technical professionals rely on every day when working with virtual machines. With support for the latest version of Windows and Linux, the latest processors and hardware, and the ability to connect to VMware vSphere and vCloud Air, it’s the perfect tool to increase productivity, save time and conquer the cloud.
VMware Workstation 12 Pro is the easiest, fastest and most reliable way to evaluate new operating systems, software applications and patches, and reference architectures in an isolated and safe virtualized environment. No other desktop virtualization software offers the performance, reliability, and cutting edge features of Workstation Pro.
Features
- Built for Microsoft Windows 10 and More
- Display Powerful 3D Graphics
- Ready for High Resolution Displays
- Create Powerful Virtual Machines
- Ready for the Latest Hardware
- Enhanced Connectivity
- Build Virtual Networks
- Leverage the Power of vSphere and vCloud Air
- Take Productivity to the Next Level
- Awesome User Interface
- Protect Your Work and Save Time
- Run Restricted Virtual Machines
- Expiring Virtual Machines
- Virtual Machine Cross Compatibility
What’s New
- Ready for Microsoft Windows 10, Ubuntu 15.04, RHEL 7.1, Fedora 22
- Microsoft DirectX 10 Support
- OpenGL 3.3 Support
- 4K Monitor Support
- Host multi monitor support with different DPI settings
- Automatic VM suspend upon host shutdown
- IPv6 NAT Support Yes Tear Away Tabs
- vCloud Air Power Operations (On, Off, Suspend, Resume)
- P2V – Migrate Windows 10 PC to VM
- USB 3.0 Support in Windows 7
- Over 39 new features
How To Activate ?
- Download and Install VMware Workstation 12 From The Links Given Below
- Download and Open Serial Key File
- Use the Serial Key Given in the File
- Done, Enjoy VMware Workstation Pro 12
Screenshot

Downloads
Sunday, 23 August 2015
AUD/USD 24th August 2015 Report

AUD/USD Primary & Weekly cycles
There's still a trend bias to move down into .71 cents (SUPPORT)
How to Add Contact Form on a Blogger/Blogspot BLOG

If you do go the route of using a contact form, we do suggest that you also include an email address on the Contact page as well. You can set one up specifically for your blog if you don’t want your personal email address to be seen. The reason we believe this is so important to offer both options is because most brands and companies will not fill out a contact form to contact you. They usually want to email you through their own email client and add you to their contacts.
To add a Contact Form to Blogger/Blogspot can be done with a few coding tweaks. Blogger/Blogspot actually offers a Free Contact Form for your blog, unfortunately they’ve made it as a Gadget and placed it on the Layout page so that it is added to your sidebar. It is shown below;
Not the ideal place for a contact form, if you ask us ! It should be situated on its own page. Here is how our contact form looks like - BLOGGER ADDICT's Contact Us Form.
So we would like to show you how to set it up in following simple Steps;

Step-2. Now, visit your Dashboard to the left, Template >> Edit HTML page.
Click inside of the editor text area and press CTRL+F (CMD+F on a Mac) and in the search bar type ContactForm then hit enter.
It should find the code below. Click the black down arrow to the left of:

Not the ideal place for a contact form, if you ask us ! It should be situated on its own page. Here is how our contact form looks like - BLOGGER ADDICT's Contact Us Form.
So we would like to show you how to set it up in following simple Steps;
Adding a Contact Form to Blogger:
Step 1. – First, go to the Layout page in Blogger and click an Add a Gadget link. From the popup, choose More Gadgets in the sidebar and then select Contact Form and add it. It doesn’t matter where it ends up in your sidebar right now, since we are going to modify that and make it look nice!
Step-2. Now, visit your Dashboard to the left, Template >> Edit HTML page.
Click inside of the editor text area and press CTRL+F (CMD+F on a Mac) and in the search bar type ContactForm then hit enter.
It should find the code below. Click the black down arrow to the left of:
<b:widget id='ContactForm1' locked='false' title='Contact Form' type='ContactForm'>then click the down arrow again beside:<b:includable id='main'>if they are not already open.Step-3. You will see this code:
<b:includable id='main'>
<b:if cond='data:title != ""'>
<h2 class='title'><data:title/></h2>
</b:if>
<div class='contact-form-widget'>
<div class='form'>
<form name='contact-form'>
<p/>
<data:contactFormNameMsg/>
<br/>
<input class='contact-form-name' expr:id='data:widget.instanceId + "_contact-form-name"' name='name' size='30' type='text' value=''/>
<p/>
<data:contactFormEmailMsg/> <span style='font-weight: bolder;'>*</span>
<br/>
<input class='contact-form-email' expr:id='data:widget.instanceId + "_contact-form-email"' name='email' size='30' type='text' value=''/>
<p/>
<data:contactFormMessageMsg/> <span style='font-weight: bolder;'>*</span>
<br/>
<textarea class='contact-form-email-message' cols='25' expr:id='data:widget.instanceId + "_contact-form-email-message"' name='email-message' rows='5'/>
<p/>
<input class='contact-form-button contact-form-button-submit' expr:id='data:widget.instanceId + "_contact-form-submit"' expr:value='data:contactFormSendMsg' type='button'/>
<p/>
<div style='text-align: center; max-width: 222px; width: 100%'>
<p class='contact-form-error-message' expr:id='data:widget.instanceId + "_contact-form-error-message"'/>
<p class='contact-form-success-message' expr:id='data:widget.instanceId + "_contact-form-success-message"'/>
</div>
</form>
</div>
</div>
<b:include name='quickedit'/>
</b:includable>Delete everything shown in red so you should just be left with:<b:includable id='main'></b:includable>Step-4. Now, do a new search, this time just look for ]]></b:skin> and paste the below provided code directly before it:/*CUSTOM CONTACT FORM BY ICANBUILDABLOG.COM */
.contact-form-widget {
margin-left:auto;
margin-right:auto;
width: 600px;
max-width: 100%;
padding: 0px;
color: #000;
}
.fm_name, .fm_email {
float:left;
padding:5px;
width:48%
}
.fm_message {
padding:5px;
}
.contact-form-name, .contact-form-email {
width: 100%;
max-width: 100%;
margin-bottom: 10px;
height:40px;
padding:10px;
font-size:16px;
}
.contact-form-email-message {
width:100%;
max-width: 100%;
height:100px;
margin-bottom:10px;
padding:10px;
font-size:16px;
}
.contact-form-button-submit {
border-color: #C1C1C1;
background: ##f6f6f6;
color: #585858;
width: 20%;
max-width: 20%;
margin-bottom: 10px;
height:30px;
font-size:16px;
}
.contact-form-button-submit:hover{
background: ##f6f6f6;
color: #000000;
border: 1px solid #FAFAFA;
}Step-5. Save the template then go to Pages to create a new Contact page if you haven’t got one already. In the page editor, switch to HTML mode and paste the following:<div class="widget ContactForm" id="ContactForm1">
<div class="contact-form-widget">
<div class="form">
<form name="contact-form">
<div class="fm_name">
Your Name:
<input class="contact-form-name" id="ContactForm1_contact-form-name" name="name" size="30" type="text" value="" /></div>
<div class="fm_email">
E-mail Address *:
<input class="contact-form-email" id="ContactForm1_contact-form-email" name="email" size="30" type="text" value="" /></div>
<div style="clear:both">
</div>
<div class="fm_message">
Message *:
<textarea class="contact-form-email-message" cols="25" id="ContactForm1_contact-form-email-message" name="email-message" rows="5"></textarea>
<input class="contact-form-button contact-form-button-submit" id="ContactForm1_contact-form-submit" type="button" value="Submit" />
<div class="contact-form-error-message" id="ContactForm1_contact-form-error-message">
</div>
<div class="contact-form-success-message" id="ContactForm1_contact-form-success-message">
</div>
</div>
</form>
</div>
</div>
</div> Step-6. Save your page and view your new contact form ! It should look like this, you can customize as your own:
Since this uses the Blogger Gadget interface, the emails sent using this form will be sent to the email associated with your account. You can change this email address in the Admin settings of your blog.
We hope this tutorial may have helped you in learning How to Add Contact Form on a Blogger/Blogspot BLOG. Share this tutorial with your friends and don't forget to subscribe us. Enjoy !
Friday, 21 August 2015
How to Recover Deleted BLOG

The blogger blog which has been deleted for participating in hacking, malware and spam host can't be recovered.
You can't recover blog if recovery period of 90 days are over.
Accidentally deleted your blogger blog? Don't worry because blogger platform helps you to recover your deleted blog with just one click. All the deleted blogger post,comment, pages event which happens due to bog delete will be undone with just one click.Provided you blogger blog should not be deleted for more then 89 day's because once 90 days of blogger blog deletion period is over then it's impossible to recover your blog. Even the sub domain of your blogspot blog will be deleted from your account and will be available for other blogger to register it.If your delete blogger blog is under recovery period then only you can recover it.
Bloggers are increasing across the world in a huge number in daily basis. Most of the blogs are violating copyrights, Only few blogs are running genuinely. The blogs, Which are running with Copied content, illegal material..etc., will be deleted due to DMCA.
Google only deletes the blogs, which are violating Blogger and DMCA terms permanently without any Notification. Most of the blogs are deleted in a monthly basis, sometimes genuinely and sometimes mistakenly. If you are sure that, your blog is deleted mistakenly, don't worry ! you can recover your blog easily. If your blog is deleted due to copyright violation, your blog will not be back. Be patience, there are several ways to get your blog back, if your blog is deleted mistakenly. Just follow below steps:
Step-1. Contact Blogger Team
Contact Blogger TeamPost your appeal in a peaceful manner with exact details at Blogger Help Forums. Click the following link and make a thread there.
If you have still any doubts regarding this, Feel free to ask below by adding a comment.
Step-2. Send a Spam Appeal
If you have not received any response by contacting Blogger Team, Then submit an appeal by using this Secret form.
Request Blogger team to take you seriouslyStep-3. Post a thread at Blogger Help Forums
Blogger Help ForumsYou can consult GCSC (Google Customer Service Center) office located at your local town or city. If you are running your blog officially with huge number of followers, Consult a GCSC office which is located nearer to your area. All GCS Centers across the world are located in the below page.
Step-4. Visit Google Customer Service Center
List of Google Customer Services Centers across the worldEvery day, Google receives a big number of DMCA complaint reports. Blogger team verifies their level the best and takes an action against the infringed URL. Some of hackers sends false claims with neat presentations to confuse Blogger team. If blogger team confuses, Then your content will deletes. If you are sure that, Your content is legal, Then you can re-appeal to Blogger team from the mail, Which you receives after the deletion of the content. If your blog receives many false claims at a time and Blogger team confuses, Then your blog will deletes.
So, Blogger giving an opportunity for genuine bloggers to restore their blogs back. Just follow the above steps. If you ran your blog officially, without violating Blogger terms, Your blog will definitely backs.
Why a Blog Deletes, even though the Blog is running Genuinely ?
So, Blogger giving an opportunity for genuine bloggers to restore their blogs back. Just follow the above steps. If you ran your blog officially, without violating Blogger terms, Your blog will definitely backs.
Doubts ?
After submitting an appeal to Blogger Team, Give at least 24-48 hours to google. If your blog is not restored, Then only go to step 2. Many people restored their little baby without any loss. If your blog is not back from all the three steps, Go to the fourth step. Then you can know the full details. Please note that, Don't make any false claims. That will lead to suspension of your Blogger account!If you have still any doubts regarding this, Feel free to ask below by adding a comment.
How To Make Blogger Comments Links Do-Follow

If your blog have do-follow comment section, your blog will be called a do-follow blog.That means do-follow directories will add your blog into their list.Your blog can get lots of backlinks and traffic from do-follow directories.
You blog comments also increase because of some backlinks lovers.Having more comments in your blog is good for your blog reputation.
Having relevant links to blog niche can make your blog page rank better.
Disadvantages Of Making Do-Follow Comment Section:
Do-follow links means you are sharing your blog page rank juice with others.If quality of links in your comments are bad, your blog page rank will be affected.Some spammers can fill up your comment section with spammy links.So, you have to give lots of your time to manage your blog comments.
How To Make Blogger Comments Links Do-Follow OR How To Make A Blogger Blog Do-Follow:
Login to your blogger.com account and go to Your Blog Dashboard>>Templates>>Edit HTML.After that search for the following code in your blog HTML[ Use Ctrl+F to search].
<a expr:href='data:comment.authorUrl' rel='nofollow'><data:comment.author/></a>

From the above code remove rel='nofollow' or replace it with rel='dofollow'.Now your code looks something like below code.
<a expr:href='data:comment.authorUrl' rel='dofollow'><data:comment.author/></a>
Now save your template by clicking on save template button.
That's it, now your blog comment section comments are do-follow.
Note : Please read the pros and cons before making your blog do-follow.
Congratulation, you have successfully made you blog do-follow.We recommend you to keep your blog comments no-follow but if you want to make it do-follow, you can make it final decision is yours.Please share your suggestions,ideas and problems below in comments.And please share this article with your social friends.
How to install Google Analytics on a Blogger blog

Google Analytics (GA) is a free service that generates detailed statistics about the traffic and visitors to a website or blog. In addition to the usual traffic metrics ( page views, visits, unique visitors, bounce rate, time on site, etc. ). Google Analytics also provides comprehensive statistics on blog/website audience, traffic sources, content, keywords and more.
Adding Google Analytics to a Blogger blog is easy, and it doesn't even involve copy-pasting JavaScripts.
Creating an Account with Google Analytics:
Step-1. Go to Google Analytics, click the Sign-Up Now link on top right corner of the page and sign in to your Google Account.Step-2. On the page, click the Sign Up button.
Step-3. Next supply all the necessary details; like, account name, blog URL you wish to track, time zone, data sharing preferences, and your country or territory.

Step-4. Read the terms of service and tick the "Yes, I agree to the above terms and conditions" check box.
Step-5. Click Create Account button and you will be taken to Tracking Code Configuration Tab.
Step-6. The next step is to find the Web Property ID (a.k.a UA number) - a Unique ID given to the account which you have created. Disregard all other items in the tabs provided, the only thing you need is the UA number.

Step-7. Copy the UA number as you will need to paste it later on.
Installing Google Analytics on your blog:
This is a two-step process. First you need to register the Web Property ID with Blogger, and then import the tracking code into your template.Now let just start how to add Google Analytics ID to your Blog -
Step-1. If you are using the new Blogger interface, click the dropdown menu next to the name of your blog you wish to track and navigate to settings >> Other >> Google Analytics. (For old interface, go to Settings >> Basic >> Google Analytics Web Property ID).

Step-3. Now, click Save settings, you are done.
Adding your Tracking code:
The following <include> tag will import your GA tracking code into your blog:<b:include name='google-analytics' data='blog'/>
If you are using a latest Layout or Dynamic Views template from Template Designer gallery, you can skip the following steps because it already has the <include> tag built-in. The same applies to mobile templates.
But if you are using older Layout template or a third party template you might need to add it into your template manually. Here is how you can do:
Step-1. Go to Template >> Edit HTML (For old interface it's Design >> Edit HTML) and locate the </body> tag.
Step-2. Insert the code right above the tag (if the code isn't already there).
Step-3. Save your template.
It could take 24 hours before your first data to appear in your account. This is because Google Analytics updates reports every 24 hours. Come back to Google Analytics Dashboard the next day and if everything is in order you will see your stats !
If you like our post, just subscribe us. Enjoy !
How To Start A Niche Blog (And Why You Should)?

These categories represent two conscious decisions that bloggers can make: I'm going to write about everything, or I'm going to write about one thing.
Niche blogs are when you write about one thing, and one thing only. They are a blog with a one-track mind, having one purpose, one goal.
Why in the world would you ever consider something as unfun as a niche blog ? Because niche blogging is where real traction and traffic happen for a blog.
Why you should start a Niche Blog ?
As a blog reader I like variety, but when it comes to save a blog's RSS feed in Feedly for reading and sharing later, I much prefer niche blogs.
Niche blogs save me time. They fit into a specific category and I know that when I want to read on a certain topic, the posts will stay true to the category. I will find content on the topic I'm looking for and nothing else.
For lifestyle blogs, I end up dumping them into a category I call "Random Interesting" (yes, I really call it that) and I only venture in there when I have time to kill. It's not that I don't enjoy reading those blogs (I actually do), but when I am pressed for time I don't always have the option to shift through content to find something that might be useful in the moment. I turn to categories that I know it will give me what I'm looking for.
In other words, when it comes time to share content, niche blogs are the workhorse readers turn to.
That's great that niche blogs give me, the content curator, an easier day. But what benefits do you, the blogger, get from a niche blog ?

1. Niche Blogs Keep You On Track:
Focus is hard enough when you blog. This is especially true on days when you don't have ideas and are tempted to write about your favorite sports team just this one time. When you have a defined niche, it's pretty easy to say "no, the NFL doesn't have anything to do with my pastry blog."
By knowing the specific topic you are writing about, you actually have more tools available to help get you out of an idea rut. Techniques to break writer's block, like brainstorming or a headline storm, are easier when you have boundaries that define where you should operate. Let's consider an example of how the two compare.
" I have a lifestyle blog and I can't think of anything to write about. "
- Has anything interesting happened to me lately ?
- Have I observed anything interesting about life in general I think people might like to hear about ?
- Have I read anything lately that caught my attention that I could write about for my readers ?
- I can go to my RSS reader and get ideas on my niche topic that are trending right now.
- I can see which of my old posts are most popular and repurpose them.
- I can do Google keyword research on shoe-related phrases.I can set up a Google Alert on different shoe-related topics.
2. Niche Blogs Give You A Reliable Audince:
I have several personal blogs; a few are niche and a few are without boundaries whatsoever. My main blog is mainly personal, and I'll write on any topic that strikes my fancy. My core readers are those who connect with my personality and as an individual, and not with a specific topic. While that is valid, it isn't a reliable audience that you can build a huge email list or serious traffic on (unless you're already famous). The average blogger isn't generally going to be a mini-star with a huge following that clings to them no matter what they write.
A great example is a viral blog post I had recently. The topic of the posts was on food and health, and I picked up a lot email subscribers who were interested in that topic. The next week's email came out and most of those subscribers went away. Why ? Because they thought I was a food blog, and that's what they wanted.
A niche blog will give you an audience that you understand, and that understands you. They are less prone to churn.
3. Niche Blogs Make It Easier To Monetize Your Blog:
Perhaps you've decided you'll use advertising on your blog to earn income. Once again, niche blogs for the win.
If your blog is about everything, what ads will you sell ? It'll be hit and miss to guess what ads will actually be the most successful. You don't know which topic makes your audience show up and read and therefore, you don't know which ads will interest them. It's also a hard sell to advertisers. They want to know what your blog is about. How do you sell an ad when your blog is "about me" ?
The same can be said for ebooks, training, and other items that people use to make money through a blog. How will you choose a topic for an ebook, or training, and know that your readers will buy it, if you're not writing a niche blog ? You have no idea what they'd spend money on or like to learn. All you know is that they are willing to come to your blog to hear your random thoughts on all kinds of topics for free.
4. Niche Blogs Expand Your Own Knowledge:
Blogs that aren't niche blogs don't generally do in-depth coverage on a particular topic. Their lifeblood is the variety, and sometimes topic coverage is a bit like skipping stones. Each post glances at the surface of the topic and then moves on to the next topic.
Niche blogs, however, encourage in-depth coverage of topics. They have to. You're only writing about one specific topic and you'll naturally dig in deeper and cover details as much as you can because there isn't another topic to bounce on to.
For example, if you have a food blog, you wouldn't write just one blog post about whether you should use cold or room temp butter for making a cake and call it done, never to revisit butter temperature again. Instead, you might do a series on how to properly use butter, and that might lead you to do features on more individual ingredients and how they affect your baking.
With niche blogs, you don't have to come up with 1000 new ideas. You can start with three and approach them from every angle possible before moving on. A niche blog allows you to do that, but on a general lifestyle blog, you are just going to be seen as strangely obsessive about butter.
How To Start A Niche Blog
The difference between starting a niche blog and any other blog isn't particularly magical or unusual.It involves research and planning before you jump in and start writing. It involves more than just the decesion to "start a blog". It requires you to decide to "start a blog about ___". If you are looking for your niche blog to bring in money, you will want to be even more conscientious in your selection of a niche topic.
1. Know Your Passion
If you hate vegetables, deciding to write a niche blog about vegetables is a terrible idea. Even if you like vegetables well enough, it still might not be enough. Remember, you are going to be writing heavily about a very focused topic. That's going to be difficult enough. At least make it easy on yourself and have a serious passionate and interest in your niche.
Otherwise, it's going to be a very short-lived blog.
2. Decide On Short Or Long Term
Trend niche blogs won't last, but they can be profitable for a while.
For example, your niche blog might capitalize on a TV show or movie. Once the show is no longer on the air, or the movie buzz has faded, your blog won't be the traffic horse it once was. But that doesn't mean you shouldn't do it. As long as you know, going in, that you are going to be in a bit of a pressure cooker to build traffic quickly, and are ready to capitalize on absolutely every last drop of it before it fades, go ahead. It's the way your entire blog exists by capitalizing on a trend.
3. Decide If And How You Will Monetize Your Site
Perhaps you are writing your niche blog for the absolute love of the topic and don't care about bringing in money. Fair enough. Most people create a niche blog in the hopes of bringing in money, because niche blogs are uniquely able to handle advertising and affiliate marketing very well.
Let's say you do want to use affiliate marketing. You will need to pick a niche topic where good affiliate marketing programs and products are available, and you'll get paid a decent commission. You will need to research available affiliate programs and find a reputable one that fits what you need best.
Or may be you want to use advertising. Again, you will need a blog whose topic attracts a specific audience that has advertisers eager to market to them. And, you will need to build up traffic to a certain level before some advertising programs will even consider your blog.
Remember to comply with the FTC and disclose on your blog if you decide to use affiliate marketing or paid reviews.
4. Find Your Keyword Niche
You have decided you will write about coffee for your niche blog. But "coffee" is still pretty broad-are you talking about growing coffee? roasting coffee? brewing coffee? fair trade coffee? coffee culture? buying coffee? cooking with coffee? You need to find specific keywords if you want niche blog to bring in money and traffic.
Google's Keyword Planner is the most popular tool, and even though there is no shortage of blog posts telling you how to find the best keywords, you might consider Google's own instructions on using Keyword Planner, too.
Which site will be easier to target with affiliate marketing, advertising, and keywords: A niche blog about photography, or a niche blog about Nikon cameras? Sometimes the extreme niche blog is the way to go when you are looking to monetize your site and find precise keywords that do the heavy lifting. When it comes to traffic and monetizing your blog, the more focused your audience is, the better.
5. Tighten Up Your Current Blog
May be your current blog went off track and became a blog about everything. How do you turn your blog into niche blog?
- Look at your categories. You will notice that a blog off track often has category and tag bloat. Which category do you seem to write in the most? That's a good hint at where your passion and interest for blogging lies.
- Look at your stats. Which of your posts tend to get the most traffic? This is an indicator of why people come to your blog, and it is also an indicator of a post that has done well in search. Dissect the post. What's the topic? How did you write it? What brings the search engines? Make more posts like this on the most popular topic.
- Do some pruning. You might consider removing posts that are completely off-topic. If you absolutely must write on more than one topic, why not start a personal blog elsewhere and rehab your current blog into a niche blog? If your blog has been around a while, build on that traffic and following while you regain focus as a niche.
- Resist that spontaneous post. If you catch yourself feeling like you just have to post a photo and story about your dog and the cute thing he did today, stop. Don't put it on your blog. That is more appropriate for social media, or your personal lifestyle blog. Again, if you must have this outlet, create a personal blog to do it on. Keep your niche blog purely on topic, always.
Ready, Get Set....Go !
A niche blog is a purposeful blog, one that has a specific reason for existing. If you can't envision writing at least 100 articles on your chosen topic, it may not be the route to go. But a niche blog isn't some kind of joyless thing. It is exciting to watch what happens to your blog when you are purposeful about content and audience.Not sure if you can be a niche blogger?
If you must have the freedom to write about other things outside of your niche, by all means, keep a personal blog or use your Google+ profile to be that outlet.
Subscribe to:
Comments (Atom)