Pelle Miljoona was a Finnish punkrock band which was founded in 1979 and disbanded in 1983. The band is (along with Pelle Miljoona & 1980) the most famous of Pelle Miljoona’s bands. They released a lot of singles and LP's and so this two CD collection gives a pretty view of the creative life of this extraordinary band by Petri Samuli Tiili (so the real name from Mr.Pelle). Disc one contains early recordings and the songs are short, punk and just plain cool, and even here already rocking numbers represented. I think the versatility which present the band their goodies is very nice and with a total running time of almost two hours makes listening to both CD's never boring. On the second disc are the songs on average much playing time with three minutes longer, topped with poppy keyboards and ska elements, so that is a pleasure to listen here too. All in all, the 36 songs slip comfortably into any bloodstream. So if you have the opportunity to buy this record, do this without hesitation.
Monday, 1 October 2018
Sunday, 30 September 2018
AUD/USD Forex Report 1st October 2018
AUD Primary & Weekly Cycles
As noted in the previous reports, the major support level in the Primary cycle is .7140 in 2018
Even though there's an expectation that 2019 will push lower, as part of the 2nd wave in Bear trend, there's always a possibility there will be a Secondary counter-trend move against the Primary trend.
Resistance - October 50% level & Weekly highs
Down target .7013
Secondary counter-trend move .7533 (major resistance)
Evilginx 2 - Next Generation of Phishing Attack and Bypass 2FA written in Go
About Evilginx 2 - Next Generation of Phishing Attack and Bypass 2FA written in Go
Evilginx2 is a Man-In-The-Middle Attack Framework used for phishing login credentials along with session cookies, which in turn allows to bypass Two-Factor Authentication protection.
This tool is a successor to Evilginx, released in 2017, which used a custom version of nginx HTTP server to provide man-in-the-middle functionality to act as a proxy between a browser and phished website. Present version is fully written in GO as a standalone application, which implements its own HTTP and DNS server, making it extremely easy to set up and use.
Phishing 2.0?
What if it was possible to lure the victim not only to disclose his/her username and password, but also to provide the answer to any 2FA challenge that may come after the credentials are verified? Intercepting a single 2FA answer would not do the attacker any good. Challenge will change with every login attempt, making this approach useless.
After each successful login, website generates an authentication token for the user's session. This token (or multiple tokens) is sent to the web browser as a cookie and is saved for future use. From that point, every request sent from the browser to the website will contain that session token, sent as a cookie. This is how websites recognize authenticated users after successful authentication. They do not ask users to log in, every time when page is reloaded.
This session token cookie is pure gold for the attacker. If you export cookies from your browser and import them into a different browser, on a different computer, in a different country, you will be authorized and get full access to the account, without being asked for usernames, passwords or 2FA tokens.
This is what it looks like, in Evilginx 2, when session token cookie is successfully captured:
Now that we know how valuable the session cookie is, how can the attacker intercept it remotely, without having physical access to the victim's computer?
Common phishing attacks rely on creating HTML templates which take time to make. Most work is spent on making them look good, being responsive on mobile devices or properly obfuscated to evade phishing detection scanners.
Evilginx takes the attack one step further and instead of serving its own HTML lookalike pages, it becomes a web proxy. Every packet, coming from victim's browser, is intercepted, modified and forwarded to the real website. The same happens with response packets, coming from the website; they are intercepted, modified and sent back to the victim. With Evilginx there is no need to create your own HTML templates. On the victim side everything looks as if he/she was communicating with the legitimate website. User has no idea idea that Evilginx sits as a Man-In-The-Middle, analyzing every packet and logging usernames, passwords and, of course, session cookies.
You may ask now, what about encrypted HTTPS connection using SSL/TLS that prevents eavesdropping on the communication data? Good question. Problem is that the victim is only talking, over HTTPS, to Evilginx server and not the true website itself. Evilginx initiates its own HTTPS connection with the victim (using its own SSL/TLS certificates), receives and decrypts the packets, only to act as a client itself and establish its own HTTPS connection with the destination website, where it sends the re-encrypted packets, as if it was the victim's browser itself. This is how the trust chain is broken and the victim still sees that green lock icon next to the address bar, in the browser, thinking that everyone is safe.
When the victim enters the credentials and is asked to provide a 2FA challenge answer, they are still talking to the real website, with Evilginx relaying the packets back and forth, sitting in the middle. Even while being phished, the victim will still receive the 2FA SMS code to his/her mobile phone, because he/she is talking to the real website (just through a relay).
After the 2FA challenge is completed by the victim and the website confirms its validity, website generates the session token, which it returns in form of a cookie. This cookie is intercepted by Evilginx and saved. Evilginx determines that authentication was a success and redirects the victim to any URL it was set up with (online document, video etc.).
At this point the attacker holds all the keys to the castle and is able to use the victim's account, fully bypassing 2FA protection, after importing the session token cookies into his web browser.
Be aware that: Every sign-in page, requiring the user to provide their password, with any form of 2FA implemented, can be phished using this technique!
Disclaimer about Evilginx 2
Kuba Gretzky very much aware that Evilginx can be used for nefarious purposes. This work is merely a demonstration of what adept attackers can do. It is the defender's responsibility to take such attacks into consideration and find ways to protect their users against this type of phishing attacks. Evilginx should be used only in legitimate penetration testing assignments with written permission from to-be-phished parties.
Video demo about Evilginx 2 - Next Generation of Phishing Attack and Bypass 2FA written in Go:
Write-up about Evilginx 2
If you want to learn more about this phishing technique, I've published an extensive blog post about evilginx2 here:
Evilginx 2 - Next Generation of Phishing 2FA Tokens
Phishlet Masters - Hall of Fame
Please thank the following contributors for devoting their precious time to deliver us fresh phishlets! (in order of first contributions)
@cust0msync - Amazon, Reddit
@white_fi - Twitter
Install and Run Evilginx 2:
You can either use a precompiled binary package for your architecture or you can compile Evilginx 2 from source.
You will need an external server where you'll host your Evilginx 2 installation. I personally recommend Digital Ocean and if you follow my referral link, you will get an extra $10 to spend on servers for free.
Evilginx 2 runs very well on the most basic Debian 8 VPS.
Installing from source
You have install Go-lang first: sudo apt install go-lang
In order to compile from source, make sure you have installed GO of version at least 1.10.0 (get it from here) and that $GOPATH environment variable is set up properly (def. $HOME/go).
After installation, add this to your ~/.profile, assuming that you installed GO in /usr/local/go:
export GOPATH=$HOME/go
export PATH=$PATH:/usr/local/go/bin:$GOPATH/bin
Then load it with source ~/.profiles.
Now you should be ready to install Evilginx 2. Follow these instructions:
sudo su
apt-get install git make
go get -u github.com/kgretzky/evilginx2
cd $GOPATH/src/github.com/kgretzky/evilginx2 && make
You can now either run Evilginx 2 from local directory like:
sudo ./bin/evilginx -p ./phishlets/
or install it globally:
sudo make install
sudo evilginx
Instructions above can also be used to update Evilginx 2 to the latest version.
Using Evilginx 2 - Next Generation of Phishing Attack and Bypass 2FA written in Go
IMPORTANT! Make sure that there is no service listening on ports TCP 443, TCP 80 and UDP 53. You may need to shutdown Apache or Nginx and any service used for resolving DNS that may be running. Evilginx 2 will tell you on launch if it fails to open a listening socket on any of these ports.
By default, Evilginx 2 will look for phishlets in ./phishlets/ directory and later in /usr/share/evilginx/phishlets/. If you want to specify a custom path to load phishlets from, use the -p <phishlets_dir_path> parameter when launching the tool.
Usage of ./evilginx:
-debug
Enable debug output
-developer
Enable developer mode (generates self-signed certificates for all hostnames)
-p string
Phishlets directory path
You should see Evilginx 2 logo with a prompt to enter commands. Type help or help <command> if you want to see available commands or more detailed information on them.
Getting started with Evilginx 2:
To get up and running, you need to first do some setting up.
At this point I assume, you've already registered a domain (let's call it d0ma1n.com) and you set up the nameservers (both ns1 and ns2) in your domain provider's admin panel to point to your server's IP (e.g. 10.0.0.1):
ns1.d0ma1n.com = 10.0.0.1
ns2.d0ma1n.com = 10.0.0.1
Set up your server's domain and IP using following commands:
config domain d0ma1n.com
config ip 10.0.0.1
Now you can set up the phishlet you want to use. For the sake of this short guide, we will use a LinkedIn phishlet. Set up the hostname for the phishlet (it must contain your domain obviously):
phishlets hostname linkedin my.phishing.hostname.d0ma1n.com
And now you can enable the phishlet, which will initiate automatic retrieval of LetsEncrypt SSL/TLS certificates if none are locally found for the hostname you picked: phishlets enable linkedin
Your phishing site is now live. Think of the URL, you want the victim to be redirected to on successful login and get the phishing URL like this (victim will be redirected to https://www.google.com):
phishlets get-url linkedin https://www.google.com
Running phishlets will only respond to tokenized links, so any scanners who scan your main domain will be redirected to URL specified as redirect_url under config. If you want to hide your phishlet and make it not respond even to valid tokenized phishing URLs, use phishlet hide/unhide <phishlet> command.
You can monitor captured credentials and session cookies with: sessions
To get detailed information about the captured session, with the session cookie itself (it will be printed in JSON format at the bottom), select its session ID: sessions <id>
The captured session cookie can be copied and imported into Chrome browser, using EditThisCookie extension.
Important! If you want Evilginx 2 to continue running after you log out from your server, you should run it inside a screen session.
How to protect yourself?
There is one major flaw in this phishing technique that anyone can and should exploit to protect themselves - the attacker must register their own domain.
By registering a domain, attacker will try to make it look as similar to real, legitimate domain as possible. For example if the attacker is targeting Facebook (real domain is facebook.com), they can, for example, register a domain faceboook.com or faceb00k.com, maximizing their chances that phished victims won't spot the difference in the browser's address bar.
That said - always check the legitimacy of website's base domain, visible in the address bar, if it asks you to provide any private information. By base domain I mean the one that precedes the top-level domain.
As an example, imagine this is the URL and the website, you arrived at, asks you to log into Facebook:
https://en-gb.facebook.cdn.global.faceboook.com/login.php
The top-level domain is .com and the base domain would be the preceeding word, with next . as a separator. Combined with TLD, that would be faceboook.com. When you verify that faceboook.com is not the real facebook.com, you will know that someone is trying to phish you.
As a side note - Green lock icon seen next to the URL, in the browser's address bar, does not mean that you are safe!
Green lock icon only means that the website you've arrived at, encrypts the transmission between you and the server, so that no-one can eavesdrop on your communication. Attackers can easily obtain SSL/TLS certificates for their phishing sites and give you a false sense of security with the ability to display the green lock icon as well.
Figuring out if the base domain you see is valid, sometimes may not be easy and leaves room for error. It became even harder with the support of Unicode characters in domain names. This made it possible for attackers to register domains with special characters (e.g. in Cyrillic) that would be lookalikes of their Latin counterparts. This technique recieved a name of a homograph attack.
As a quick example, an attacker could register a domain facebooĸ.com, which would look pretty convincing even though it was a completely different domain name (ĸ is not really k). It got even worse with other Cyrillic characters, allowing for ebаy.com vs ebay.com. The first one has an Cyrillic counterpart for a character, which looks exactly the same.
Major browsers were fast to address the problem and added special filters to prevent domain names from being displayed in Unicode, when suspicious characters were detected.
If you are interested in how it works, check out the IDN spoofing filter source code of the Chrome browser.
Now you see that verifying domains visually is not always the best solution, especially for big companies, where it often takes just one employee to get phished and allow attackers to steal vast amounts of data.
This is why FIDO Alliance introduced U2F (Universal 2nd Factor Authentication) to allow for unphishable 2nd factor authentication.
In short, you have a physical hardware key on which you just press a button when the website asks you to. Additionally it may ask you for account password or a complementary 4 digit PIN. The website talks directly with the hardware key plugged into your USB port, with the web browser as the channel provider for the communication.
What is different with this form of authentication, is that U2F protocol is designed to take the website's domain as one of the key components in negotiating the handshake. This means that if the domain in the browser's address bar, does not match the domain used in the data transmission between the website and the U2F device, the communication will simply fail. This solution leaves no room for error and is totally unphishable using Evilginx method.
Citing the vendor of U2F devices - Yubico (who co-developed U2F with Google):
With the YubiKey, user login is bound to the origin, meaning that only the real site can authenticate with the key. The authentication will fail on the fake site even if the user was fooled into thinking it was real. This greatly mitigates against the increasing volume and sophistication of phishing attacks and stops account takeovers.
It is important to note here that Markus Vervier (@marver) and Michele Orrù (@antisnatchor) did demonstrate a technique on how an attacker can attack U2F devices using the newly implemented WebUSB feature in modern browsers (which allows websites to talk with USB connected devices). It is also important to mention that Yubico, the creator of popular U2F devices YubiKeys, tried to steal credit for their research, which they later apologized for.
Coinciding with the release of Evilginx 2, WebAuthn is coming out in all major web browsers. It will introduce the new FIDO2 password-less authentication standard to every browser. Google Chrome, Mozilla Firefox and Microsoft Edge are about to receive full support for it.
Credits: Huge thanks to Simone Margaritelli (@evilsocket) for bettercap and inspiring me to learn GO and rewrite the tool in that language!
License: Evilginx 2 is made by Kuba Gretzky (@mrgretzky) and it's released under GPL3 license.
And have something to say about GitHackTools or Evilginx 2? Comment below or share this post from GitHackTools Facebook, GitHackTools Twitter and GitHackTools Google Plus.
Labels:forex, iqoption, pubg Hacked
linux
Evilginx 1.1.0 - Phishing Attack Framework with Two-Factor Authentication Bypass written in Python
About Evilginx 1.1.0 - Phishing Attack Framework with Two-factor Authentication Bypass
Evilginx is a Man-In-The-Middle Attack Framework used for phishing credentials and session cookies of any web service. It's core runs on Nginx HTTP server, which utilizes proxy_pass and sub_filter to proxy and modify HTTP content, while intercepting traffic between client and server.
You can learn how it works and how to install everything yourself on author's blog post:
* First post slightly outdated now: Evilginx - Advanced Phishing With Two-factor Authentication Bypass
* Evilginx 1.0 Update: Evilginx 1.0 Update - Up Your Game in 2FA Phishing
* Evilginx 1.1 Update: Evilginx 1.1 Update
How Evilginx 1.1.0 works?
1, Attacker generates a phishing link pointing to his server running Evilginx: https://accounts.notreallygoogle.com/ServiceLogin?rc=https://www.youtube.com/watch?v=dQw4w9WgXcQ&rt=LSID
Parameters in the URL stand for:
rc = On successful sign-in, victim will be redirected to this link e.g. document hosted on Google Drive.
rt = This is the name of the session cookie which is set in the browser only after successful sign-in. If this cookie is detected, this will be an indication for Evilginx that sign-in was successful and the victim can be redirected to URL supplied by rc parameter.
2, Victim receives attacker's phishing link via any available communication channel (email, messenger etc.).
3, Victim clicks the link and is presented with Evilginx's proxied Google sign-in page.
4, Victim enters his/her valid account credentials, progresses through two-factor authentication challenge (if enabled) and he/she is redirected to URL specified by rc parameter. At this point rd cookie is saved for notreallygoogle.com domain in victim's browser. From now on, if this cookie is present, he/she will be immediately redirected to rc URL, when phishing link is re-opened.
5, Attacker now has victim's email and password, as well as session cookies that can be imported into attacker's browser in order to take full control of the logged in session, bypassing any two-factor authentication protections enabled on victim's account.
Let's take few steps back and try to define main obstacles in traditional phishing efforts.
First and major pain with phishing for credentials is Two-Factor Authentication. You can create the best looking template that yields you dozens of logins and passwords, but you will eventually get roadblocked when asked for verification token that arrived via SMS. Not only will it stop you from progressing further, but it will also tip off the account owner, when they receive login attempt alert.
Second issue with phishing templates is, they must allow to accept any login and password, as they have no means of confirming their validity. That will, at times, leave you with invalid credentials.
Third issue is having to create phishing templates. Kuba Gretzky don't know about you, but for him the process of copying site layout, stripping javascript, fixing CSS and writing my own replacements for stripped javascript code to make the login screen behave as the original, is extremely annoying. It feels bad to recreate something, which has already been done.
In past several months Kuba Gretzky has worked on his own ettercap-like HTTP proxy software written in C++, using Boost::Asio library for maximum efficiency. Kuba Gretzky implemented SSLstrip, DNS spoofing and HSTS bypass. This solution worked perfectly in Local Area Network, but he wondered if same ideas could be repurposed for remote phishing, without a need to use custom-made software.
Kuba Gretzky (the author) had a revelation when he read an excellent blog post by @i_bo0om. @i_bo0om used Nginx HTTP server's proxy_pass feature and sub_filter module to proxy the real Telegram login page to visitors, intercepting credentials and session cookies on-the-fly using Man-In-The-Middle attacks. This article made me realize that Nginx could be used as a proxy for external servers and it sparked the idea of Evilginx. The idea was perfect - simple and yet effective.
Allow Kuba Gretzky to talk a bit on Evilginx's research process, before him focus on installation and usage.
Disclaimer about Evilginx 1.1.0 - Phishing Attack Framework with Two-factor Authentication Bypass
I am aware that Evilginx can be used for very nefarious purposes. This work is merely a demonstration of what adept attackers can do. It is the defender's responsibility to take such attacks into consideration, when setting up defenses, and find ways to protect against this phishing method. Evilginx should be used only in legitimate penetration testing assignments with written permission from to-be-phished parties.
Contributors Hall of Fame: @poweroftrue
Install and Run Evilginx 1.1.0:
sudo su
git clone https://github.com/kgretzky/evilginx
cd evilnigx
bash install.sh
python evilnigx.py
Using Evilginx 1.1.0
Enable or disable site configurations for use with Nginx server, using supplied Evilginx templates from sites directory.
usage: evilginx.py setup [-h] [-d DOMAIN] [-y]
(-l | --enable ENABLE | --disable DISABLE)
optional arguments:
-h, --help show this help message and exit
-d DOMAIN, --domain DOMAIN
Your phishing domain.
-y Answer all questions with 'Yes'.
-l, --list List available supported apps.
--enable ENABLE Enable following site by name.
--disable DISABLE Disable following site by name.
List available site configuration templates:
python evilginx.py setup -l
Listing available supported sites:
- dropbox (/root/evilginx/sites/dropbox/config)
subdomains: www
- google (/root/evilginx/sites/google/config)
subdomains: accounts, ssl
- facebook (/root/evilginx/sites/facebook/config)
subdomains: www, m
- linkedin (/root/evilginx/sites/linkedin/config)
subdomains: www
Enable google phishing site with preregistered phishing domain not-really-google.com:
python evilginx.py setup --enable google -d not-really-google.com
Disable facebook phishing site: python evilginx.py setup --disable facebook
Parse
Parse Nginx logs to extract intercepted login credentials and session cookies. Logs, by default, are saved in logs directory, where evilginx.py script resides. This can be done automatically after you enable auto-parsing in the Setup phase.
usage: evilginx.py parse [-h] -s SITE [--debug]
optional arguments:
-h, --help show this help message and exit
-s SITE, --site SITE Name of site to parse logs for ('all' to parse logs
for all sites).
--debug Does not truncate log file after parsing.
Parse logs only for google site: python evilginx.py parse -s google
Parse logs for all available sites: python evilginx.py parse -s all
Generate URL
Generate phishing URLs that you can use in your Red Team Assessments.
usage: evilginx.py genurl [-h] -s SITE -r REDIRECT
optional arguments:
-h, --help show this help message and exit
-s SITE, --site SITE Name of site to generate link for.
-r REDIRECT, --redirect REDIRECT
Redirect user to this URL after successful sign-in.
Generate google phishing URL that will redirect victim to rick'roll video on successful login:
python evilginx.py genurl -s google -r https://www.youtube.com/watch?v=dQw4w9WgXcQ
Generated following phishing URLs:
: https://accounts.not-really-google.com/ServiceLogin?rc=0aHR0cHM6Ly93d3cueW91dHViZS5jb20vd2F0Y2g_dj1kUXc0dzlXZ1hjUQ
: https://accounts.not-really-google.com/signin/v2/identifier?rc=0aHR0cHM6Ly93d3cueW91dHViZS5jb20vd2F0Y2g_dj1kUXc0dzlXZ1hjUQ
Video demo of Evilginx 1.1.0 - Phishing Attack Framework with 2FA Bypass:
And have something to say about GitHackTools or Evilginx 1.1.0? Comment below or share this post from GitHackTools Facebook, GitHackTools Twitter and GitHackTools Google Plus.
Labels:forex, iqoption, pubg Hacked
linux
Saturday, 29 September 2018
How to Crack a Windows 7 password [Laptop & Desktop]
You start your Windows 7 computer, type in password on welcome screen... and an error message pops up saying the password is incorrect. Mmm... you forgotten the login password. Fortunately, you're able to regain access to the system. The instructions I've put together here will walk you through a number of troubleshooting options to crack the password on Windows 7 computer.
Crack Password: Use a Password Reset Disk
When you set up a computer, Microsoft provides a guide to help you create a Windows 7 password reset disk in case you have come across the need to bypass the lost password and login to your computer. So if you’ve already done so and have the disc in hand, resetting (cracking) Windows 7 password right on the lock screen is fairly simple and all you really need is just a few clicks.Before you start, make sure you have the password reset disk inserted into your PC.
- On Windows 7 lock screen, click Reset password option under password field. Click Next.
- Click the drop-down menu, and select the drive your password reset disk is located in. Click Next.
- Type in a new password and password hint.
- Click Finish and restart your computer.
Crack Password: Use Windows 7 Password Cracker
Aside from using a password reset disk you've made previously to bypass the lock screen, there're other ways to crack the password for Windows 7. And one of the most efficient ways is utilize a Windows 7 password cracker tool, which is specifically designed to reset or unlock lost user and administrator passwords used to log onto Windows operating systems.While the web is full of paid and free Windows 7 password cracking programs available, we prefer using a utility named Spower Windows Password Reset. It's simple and straightforward, letting you create a password reset disc and crack a forgotten password for Windows in a fast way. It works with both 32-bit 64-bit versions of Windows, including XP, Vista, 7, 8, and Windows 10.
- The following I'm going to explain how to use it.
- Download and install the program on an accessible computer.
- Run it and insert a blank CD/DVD disc or USB drive to computer.
- Click the "USB device" or "CD/DVD" button on the interface to create a password reset disk.
- When it's done, take it out and insert into your Windows 7 machine which you try to crack the password on.
- Start the locked computer and boot from it to get the process started. If you're new to it or have issues, you can follow this article about how to set BIOS to boot from CD/DVD or USB drive in Boot Priority.
- Once this Windows 7 password cracker program starts, you should be presented with its screen like the image below.
- Choose Windows 7 from the list, and then select the account you want to unlock lost password.
- Click the Reset button, wait until the tool resets the password to blank (no password).

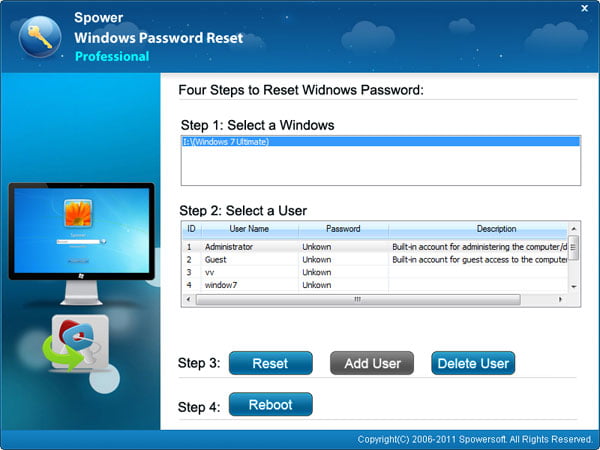
Done! Just remove the disc from the computer and click the Reboot button. Now you're able to access the system without password.
Crack Password: Use Windows 7 installation Disc
Another way to crack a forgotten password to Windows 7 laptop or desktop is making use of a Windows 7 installation DVD.- Insert your Windows 7 installation DVD into your computer and restart the machine.
- Wait until your computer boot from it, click Next on the screen with your language and keyboard choices.
- Click on the Repair your computer link.
- Select Windows 7 from the list and then click the Next button.
- From System Recovery Options, choose Command Prompt.
- When a Command Prompt opens, type in the following two commands.
- When comes to Overwrite question, answer with Yes.
- Remove the disc and then restart your computer.
- Once the Windows 7 login screen appears, click the little icon that looks like a pie on the bottom-left of the screen.
- In opening Command Prompt window, execute the net user command as shown, replacing exampleusername and examplepassword with whatever you want in account:
- Close the Command Prompt window.
- Log in with your new password!
copy c:\windows\system32\utilman.exe c:\
copy c:\windows\system32\cmd.exe c:\windows\system32\utilman.exe
net user exampleusername examplepassword
Crack Password: Reinstall the Windows 7 system
So what if all methods provided above are not working? how can you get into your computer? In this case, a clean install may be the only option. Although this removes the current operating system and user files during the installation process, it at least get you back to computer and return everything to normal.These two articles may help you finish a clean install.
Lifewire: How to Clean Install Windows 7
Microsoft: Clean Reinstall Windows 7
Conclusion
Forgetting a password can be one of the more frustrating things to deal with, the good news is you can bypass Windows 7 password that you lost by trying a number of effective options. To avoid the disaster happened again in the future, creating a password reset disk would be a wise choice. The best part about the password reset disk is that you only have to create it once, and it will work forever without the need to update it.
Labels:forex, iqoption, pubg Hacked
Windows 7 Password Crack
Location:
United States
Subscribe to:
Posts (Atom)