Showing posts with label linux. Show all posts

Tuesday, 26 February 2019

SniffAir - An Open-source Wireless Security Framework

About SniffAir
   SniffAir is an open-source wireless security framework which provides the ability to easily parse passively collected wireless data as well as launch sophisticated wireless attacks. SniffAir takes care of the hassle associated with managing large or multiple pcap files while thoroughly cross-examining and analyzing the traffic, looking for potential security flaws. Along with the prebuilt queries, SniffAir allows users to create custom queries for analyzing the wireless data stored in the backend SQL database. SniffAir is built on the concept of using these queries to extract data for wireless penetration test reports. The data can also be leveraged in setting up sophisticated wireless attacks included in SniffAir as modules.

   SniffAir is developed by @Tyl0us and @theDarracott.

Install and run SniffAir
   git clone https://github.com/Tylous/SniffAir
   cd SniffAir
   sudo bash setup.sh
   pip install -r requirements.txt
   sudo python SniffAir.py

Start with SniffAir
   First create or load a new or existing workspace using the command workspace create <workspace> or workspace load <workspace> command. To view all existing workspaces use the workspace list command and workspace delete <workspace> command to delete the desired workspace:

>>  [default]# workspace
     Manages workspaces
 Command Option: workspaces [create|list|load|delete]
>>  [default]# workspace create demo
[+]  Workspace demo created

Load data into a desired workplace from a pcap file using the command offline_capture <the full path to the pcap file>. To load a series of pcap files use the command offline_capture_list <the full path to the file containing the list of pcap name> (this file should contain the full patches to each pcap file). Use the live_capture <interface name> command to capture live wireless traffic using a wireless interface.

>>  [demo]# offline_capture /root/sniffair/demo.pcapdump
[+] Importing /root/sniffair/demo.pcapdump
\
[+] Completed
[+] Cleaning Up Duplicates
[+] ESSIDs Observed

Show Command
   The show command displays the contents of a table, specific information across all tables or the available modules, using the following syntax:

 >>  [demo]# show table AP
+------+-----------+-------------------+-------------------------------+--------+-------+-------+----------+--------+
|   ID | ESSID     | BSSID             | VENDOR                        |   CHAN |   PWR | ENC   | CIPHER   | AUTH   |
|------+-----------+-------------------+-------------------------------+--------+-------+-------+----------+--------|
|    1 | HoneyPot  | c4:6e:1f:##:##:## | TP-LINK TECHNOLOGIES CO. LTD. |      4 |   -17 | WPA2  | TKIP     | MGT    |
|    2 | Demo      | 80:2a:a8:##:##:## | Ubiquiti Networks Inc.        |     11 |   -19 | WPA2  | CCMP     | PSK    |
|    3 | Demo5ghz  | 82:2a:a8:##:##:## | Unknown                       |     36 |   -27 | WPA2  | CCMP     | PSK    |
|    4 | HoneyPot1 | c4:6e:1f:##:##:## | TP-LINK TECHNOLOGIES CO. LTD. |     36 |   -29 | WPA2  | TKIP     | PSK    |
|    5 | BELL456   | 44:e9:dd:##:##:## | Sagemcom Broadband SAS        |      6 |   -73 | WPA2  | CCMP     | PSK    |
+------+-----------+-------------------+-------------------------------+--------+-------+-------+----------+--------+
 >>  [demo]# show SSIDS
---------
HoneyPot
Demo
HoneyPot1
BELL456
Hidden
Demo5ghz
---------

   The query command can be used to display a unique set of data based on the parememters specificed. The query command uses sql syntax.

Inscope: The inscope <SSID> command can be used to add a SSID to the inscope tables, loading all related data to the inscope_AP, inscope_proberequests and inscope_proberesponses tables. To view a summary of all inscope SSIDS run the SSID_Info command.

Modules
   Modules can be used to analyze the data contained in the workspaces or perform offensive wireless attacks using the use <module name> command. For some modules additional variables may need to be set. They can be set using the set command set <variable name> <variable value>:

 >>  [demo]# show modules
Available Modules
=================
[+] Auto EAP - Automated Brute-Force Login Attack Against EAP Networks
[+] Auto PSK - Automated Brute-Force Passphrase Attack Against PSK Networks
[+] AP Hunter - Discover Access Point Within  a Certain Range Using a Specific Type of Encrpytion
[+] Captive Portal - Web Based Login Portal to Capture User Entered Credentials (Runs as an OPEN Network)
[+] Certificate Generator - Generates a Certificate Used by Evil Twin Attacks
[+] Exporter - Exports Data Stored in a Workspace to a CSV File
[+] Evil Twin - Creates a Fake Access Point, Clients Connect to Divulging MSCHAP Hashes or Cleartext Passwords
[+] Handshaker - Parses Database or .pcapdump Files Extracting the Pre-Shared Handshake for Password Guessing (Hashcat or JTR Format)
[+] Mac Changer - Changes The Mac Address of an Interface
[+] Probe Packet - Sends Out Deauth Packets Targeting SSID(s)
[+] Proof Packet - Parses Database or .pcapdump Files Extracting all Packets Related to the Inscope SSDIS
[+] Hidden SSID - Discovers the Names of HIDDEN SSIDS
[+] Suspicious AP - Looks for Access Points that: Is On Different Channel, use a Different Vendor or Encrpytion Type Then the Rest of The Network
[+] Wigle Search SSID - Queries wigle for SSID (i.e. Bob's wifi)
[+] Wigle Search MAC - Queries wigle for all observations of a single mac address
 >>  [demo]# 
 >>  [demo]# use Captive Portal
 >>  [demo][Captive Portal]# info
Globally Set Varibles
=====================
 Module: Captive Portal
 Interface: 
 SSID: 
 Channel: 
 Template: Cisco (More to be added soon)
 >>  [demo][Captive Portal]# set Interface wlan0
 >>  [demo][Captive Portal]# set SSID demo
 >>  [demo][Captive Portal]# set Channel 1
 >>  [demo][Captive Portal]# info
Globally Set Varibles
=====================
 Module: Captive Portal
 Interface: wlan0
 SSID: demo
 Channel: 1
 Template: Cisco (More to be added soon)
 >>  [demo][Captive Portal]# 

   Once all varibles are set, then execute the exploit or run command to run the desired attack.

Export: To export all information stored in a workspace’s tables using the Exporter module and setting the desired path.

Acknowledgments: Sniffiar contains work from the following repoisoties:

Wednesday, 30 January 2019

EvilTwinFramework - A Framework for Pentesters to Perform Evil Twin attacks

About EvilTwinFramework
   EvilTwinFramework is a framework for pentesters that facilitates evil twin attacks as well as exploiting other wifi vulnerabilities.

   It uses hostapd-wpe to create the access point, so it is highly configurable.
   It uses dnsmasq to run the dhcp and dns services.
   It uses apache with help of dnsmasq to launch spoofed webpages as well as captive portals!
   Packet sending and receiving is all done via Scapy!

Install EvilTwinFramework
   You can watch full tutorials in here: Evil Twin Framework Tutorials

Motivation
   The EvilTwinFramework is meant to replace all existing Wi-Fi hacking tools by integrating all features necessary for Wi-Fi penetration testing in one framework. The 3 core features needed are:
    * Packet Sniffing
    * Packet Injection
    * Access Point Creation

   All Wi-Fi attacks can be implemented with one or a combination of these core features. By having this platform it will always be possible to contribute with new Wi-Fi attacks that depend on these features.

Features of EvilTwinFramework
   All Forms of Evil Twin AP:
      The Evil Twin Framework, with the help of hostapd can mimick any type of Wi-Fi Network. And by using the hostapd-wpe patch it is easy to get WPA-EAP credentials.
      One can configure it as a catch-all honeypot to find out the encryption type of a network that was probed for.
      One can even create a karma attack and mimick many networks with different ssids on the same Wi-Fi card (as long as it supports ap-mesh mode). This can be done manually, if you want different encryption types for different networks, or automatically. The automation works by sniffing for popular probe requests and then creating the most popular one according to how many virtual access points you Wi-Fi card supports.

   Handshake and Credential Logging:
      As said before, with the help of hostapd-wpe WPA-EAP credential sniffing is easy!
      You can also spoof DNS with dnsmasq and even create captive-portals to force browsers to your webpage!
      You can sniff for WPA-Handshakes and even Half-WPA-Handshakes for ap-less password cracking!

   Integrated Man-In-The-Middle:
      An Evil-Twin is nothing without a proper MITM arsenal!
      The framework uses the mitmproxy library to create a local proxy capable of custom Level3 packet manipulation! Some fun ones have already been implemented such as beef hook injection into someones webpage, download content replacement with other files (idea stolen from the Wi-Fi Pumpkin Project). And my favorite: .exe file infection with PEInjector. PEInjector does a great job by seemlessly injecting a payload into an exe file without changing its size while at the same time obfuscating the payload to pass AV software.
      You can easily contribute and/or make your own custom MITM packet manipulation and add it to the framework. More information will be in the wiki.

   Wi-Fi Reconossaince: The framework is able to sniff for access points, probe requests and responses and associating them to Wi-Fi clients. You can also log all of this information.

   Packet Injection:
      Packet Sniffing and Injection is all done via Scapy. This makes it possible to contribute with any feature that involves packet sniffing and custom packet assembly and injection.
      For now the only packet injection feature is deauthentication packets since it is a nice thing to have when trying to catch WPA-Handshakes.

   Spawners:
      Spawners are a great and easy way to use your custom tools in conjunction with the framework. Some tools have already been added since they make a lot of sense: Ettercap, Beef, MITMFramework and SSLStrip.

Using EvilTwinFramework
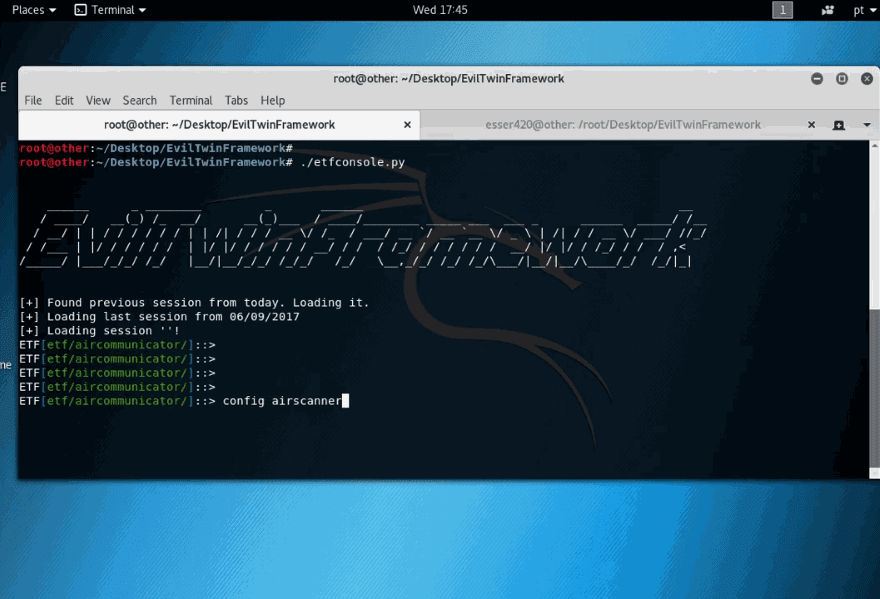
   First enter the ETF Console interface as root: sudo ./etfconsole.py

   For now there only is a console interface that is very easy to use and has tab completion! The whole thing will work according to the etf.conf file. You can view and change all configurations via de console, just type:
      config <press double tab>

   to list the modules available for configuration. While working on the console type: listargs

   to view the available parameters (here you can check if configurations are OK), then type: set <parameter> <value> to change it.

   If a parameter is (dict) it means it is another configurable module within.

   To start an access point make sure you have it configured correctly, type: config airhost

      check if everything is OK (use listargs)
      config aplauncher

      check if everything is OK (use listargs)
      config dnsmasqhandler

      check if everything is OK and start the access point
      start airhost

   You can also configure an access point by copying one that is nearby. Start scanning:
      config airscanner

      check if everything is OK (use listargs)
      start airscanner

      ... wait ...
      show sniffed_aps

   This lists the sniffed access points with their ids: copy ap <id>

   OR:
      show sniffed_probes
      copy probe <id>

   Then start the fake access point: start airhost

   You can deauthenticate others from their network while running the acces point. To add access points or clients to be deauthenticated type:
      show sniffed_aps
      add aps <filter_string>

   The filter_string follows an easy syntax, it goes:   
      <filter_keyword> <filter_args>

   The args can be any of the column names listed in the table. The filter keywords are 'where' for inclusive filtering or 'only' for exclusive filtering, examples:

   This will add the access point whose id is 5 to the deauthentication list (this is adding a single and specific AP): add aps where id = 5

   This will add the access point whose ssid is 'StarbucksWifi' to the deauthentication list: 
    add aps where ssid = StarbucksWifi

   This will add the access point whose encryption type has 'wpa' OR 'opn' to the deauthentication list: add aps where crypto = wpa, crypto = opn

   This will add the access point whose ssid id 'freewifi' AND is on channel 6 to the deauthentication list: add aps only ssid = freewifi, channel = 6

   You can use the same interface for injecting packets while running the fake access point. You can check and set configurations with:
      config airinjector
      listargs

   After all that run the Injector (which by default performs Deauthentication attack):
     start airinjector

   Same can be done when deleting from the deauth list with the del command. The show command can also be followed by a filter string.

   Contributors can program Plugins in python either for the airscanner or airhost or airdeauthor. Contributors can also code MITM scripts for mitmproxy.

WiFi-Pumpkin - A Framework for Rogue WiFi Access Point Attack

About WiFi-Pumpkin
   The WiFi-Pumpkin is a rogue AP framework to easily create these fake networks, all while forwarding legitimate traffic to and from the unsuspecting target. It comes stuffed with features, including rogue Wi-Fi access points, deauth attacks on client APs, a probe request and credentials monitor, transparent proxy, Windows update attack, phishing manager, ARP Poisoning, DNS Spoofing, Pumpkin-Proxy, and image capture on the fly. moreover, the WiFi-Pumpkin is a very complete framework for auditing Wi-Fi security check the list of features is quite broad.

Install WiFi-Pumpkin


   Or you can install WiFi-Pumpkin easily from .DEB file here.

Features of WiFi-Pumpkin:
 * Rogue Wi-Fi Access Point
 * Deauth Attack Clients AP
 * Probe Request Monitor
 * DHCP Starvation Attack
 * Credentials Monitor
 * Transparent Proxy
 * Windows Update Attack
 * Phishing Manager
 * Partial Bypass HSTS protocol
 * Support beef hook
 * ARP Poison
 * DNS Spoof
 * Patch Binaries via MITM (BDF-Proxy)
 * LLMNR, NBT-NS and MDNS poisoner (Responder)
 * Pumpkin-Proxy (ProxyServer (mitmproxy API))
 * Capture images on the fly
 * TCP-Proxy (with scapy)
 * Moduled plugins and proxys
 * Wireless Mode support hostapd-mana/hostapd-karma attacks

Plugins on WiFi-Pumpkin:
 * Dns2proxy: This tools offer a different features for post-explotation once you change the DNS server to a Victim.
 * Sstrip2: Sslstrip is a MITM tool that implements Moxie Marlinspike's SSL stripping attacks based version fork @LeonardoNve/@xtr4nge.
 * Sergio_proxy: Sergio Proxy (a Super Effective Recorder of Gathered Inputs and Outputs) is an HTTP proxy that was written in Python for the Twisted framework.
 * BDFProxy: Patch Binaries via MITM: BackdoorFactory + mitmProxy, bdfproxy-ng is a fork and review of the original BDFProxy @secretsquirrel.
 * Responder: Responder an LLMNR, NBT-NS and MDNS poisoner. Author: Laurent Gaffie.

Transparent Proxy
   Transparent proxies(mitmproxy) that you can use to intercept and manipulate HTTP traffic modifying requests and responses, that allow to inject javascripts into the targets visited. You can easily implement a module to inject data into pages creating a python file in directory "plugins/extension/" automatically will be listed on Pumpkin-Proxy tab.

   Plugins Dev Example


   About plugins: plugins on the wiki.

TCP-Proxy Server
   A proxy that you can place between in a TCP stream. It filters the request and response streams with (scapy module) and actively modify packets of a TCP protocol that gets intercepted by WiFi-Pumpkin. this plugin uses modules to view or modify the intercepted data that possibly easiest implementation of a module, just add your custom module on "plugins/analyzers/" automatically will be listed on TCP-Proxy tab.

   About TCP-Proxy: TCP-Proxy on the wiki

WiFi-Pumpkin's Screenshots: On the wiki

FAQ: On the wiki

Contact Us: Whether you want to report a bug, send a patch or give some suggestions on this project, drop us or open pull requests.

Monday, 28 January 2019

Avet - AntiVirus Evasion Tool

About Avet - AntiVirus Evasion Tool
   AVET is an AntiVirus Evasion Tool, which was developed for making life easier for pentesters and for experimenting with antivirus evasion techniques. In version 1.3 new stuff was introduced, for a complete overview have a look at the CHANGELOG file.

   For basics about antivirus evasion, AVET & more information have a look here:
    * PAPER AVET BLACKHAT USA ARSENAL 2018
    * AVET VIDEO
    * AV Evasion
    * Why_Antivirus_Fails_-_Daniel_Sauder.pdf
    * Daniel Sauder | Twitter

   What and why:
    * When running an exe file made with msfpayload, the exe file will often be recognized by the antivirus software.
    * Avet is a antivirus evasion tool targeting windows machines with executable files.
    * Assembly shellcodes can be used.
    * make_avet can be used for configuring the sourcecode.
    * With make_avet you can load ASCII encoded shellcodes from a textfile or from a webserver, further it is using an av evasion technique to avoid sandboxing and emulation.
    * Call MSF ASCII encoded shellcode as a parameter from CMD.
    * For ASCII encoding the shellcode the tool format.sh and sh_format are included.

Install and run Avet:

Important Note about Avet: Not all techniques will evade every AV engine. If one technique or build script does not work please test another one.

How to use Avet?
   The purpose of make_avet is to preconfigure a definition file (defs.h) so that the source code can be compiled in the next step. This way the payload will be encoded as ASCII payload or with encoders from metasploit. You hardly can beat shikata-ga-nai.

   Let's have a look at the options from make_avet, examples will be given below:

   Of course it is possible to run all commands step by step from command line. In the "build" folder you will find preconfigured build scripts for relevant use cases. The build scripts themselves are written so as they have to be called from within the avet directory:
      sudo ./build/build_win32_meterpreter_rev_https_20xshikata.sh

   However, it is strongly recommended to use the avet_fabric.py! It makes the tool easier to use
      The fabric provides a more convenient interface on the command line, where you can choose which build script you want to use. It also gives you the opportunity to alter build scripts on the fly (see below).

      The latter is especially useful as you can define new LHOST and LPORT variables for msfvenom each time you run a build script via the fabric. You can define default LHOST and LPORT values in the /build/global_connect_config.sh file, which are used if you don't redefine.

      Here's a quick example: sudo python3 avet_fabric.py


Build scripts: Some comments on what each script provides


AVET & metasploit psexec
   New in version 1.2 is the support for metasploits psexec module. The corresponding make file looks like:

   And on the metasploit site:

Comparison of Antivirus Evasion tools: AntiVirus Software Evasion: An Evaluation Of The AV Evasion Tools

The Rogue Toolkit - Perform Targeted Evil Twin Attacks with Evil Access Points

Re-edited from PixelPrivacy
Getting Started with The Rogue Toolkit
 * Introduction
 * Usage
 * Features list of current features and the toolkit's roadmap
 * Installation toolkit's installation guide
 * Selecting a 802.11 protocol and authentication mode toolkit's usage guide
 * Performing Attacks a collection of Rogue attacks examples

Introduction about The Rogue Toolkit
   The Rogue Toolkit is an extensible toolkit aimed at providing penetration testers an easy-to-use platform to deploy software-defined Access Points (AP) for the purpose of conducting penetration testing and red team engagements. By using Rogue, penetration testers can easily perform targeted evil twin attacks against a variety of wireless network types.

   Rogue was originally forked from s0lst1c3's eaphammer project. The fundamental idea of the Rogue toolkit was to levera Tge the core concept of the eaphammer project in an alternative manner to allow for flexibility, integration and adaption to future changes to the 802.11 standards and supporting tools. Rogue is suited for the the following cases:
    * Compromising corporate accounts to be later used in impersonation attacks to gain access to corporate wireless networks.
    * To subvert network protections, such as captive portals or client to client isolation, to be able to target and compromise connected wireless devices and using compromised devices and credentials to pivot deeper into internal networks.

Install and run The Rogue Toolkit
   git clone https://github.com/InfamousSYN/rogue
   cd rogue
   sudo python install.py
   sudo python rogue.py

Usage The Rogue Toolkit


Saturday, 26 January 2019

SSLScan - Fast SSL/TLS Open source Scanner


About SSLScan
   SSLScan queries SSL/TLS services, such as HTTPS, in order to determine the ciphers that are supported. SSLScan is designed to be easy, lean and fast. The output includes prefered ciphers of the SSL service, the certificate and is in Text and XML formats.

Features:
  * Highlight SSLv2 and SSLv3 ciphers in output.
  * Highlight CBC ciphers on SSLv3 (POODLE).
  * Highlight 3DES and RC4 ciphers in output.
  * Highlight PFS+GCM ciphers as good in output.
  * Highlight NULL (0 bit), weak (<40 bit) and medium (40 < n <= 56) ciphers in output.
  * Highlight anonymous (ADH and AECDH) ciphers in output (purple).
  * Hide certificate information by default (display with --get-certificate).
  * Hide rejected ciphers by default (display with --failed).
  * Added TLSv1.1 and TLSv1.2 support (merged from twwbond/sslscan).
  * Compiles if OpenSSL does not support SSLv2 ciphers (merged from digineo/sslscan).
  * Supports IPv6 hostnames (can be forced with --ipv6).
  * Check for TLS compression (CRIME, disable with --no-compression).
  * Disable cipher suite checking --no-ciphersuites.
  * Disable coloured output --no-colour.
  * Removed undocumented -p output option.
  * Added check for OpenSSL HeartBleed (CVE-2014-0160, disable with --no-heartbleed).
  * Flag certificates signed with MD5 or SHA-1, or with short (<2048 bit) RSA keys.
  * Support scanning RDP servers with --rdp (credit skettler).
  * Added option to specify socket timeout.
  * Added option for static compilation (credit dmke).
  * Added --sleep option to pause between requests.
  * Disable output for anything than specified checks --no-preferred.
  * Determine the list of CAs acceptable for client certificates --show-client-cas.
  * Experimental build support on OSX (credit MikeSchroll).
  * Flag some self-signed SSL certificates.
  * Experimental Windows support (credit jtesta).
  * Display EC curve names and DHE key lengths with OpenSSL >= 1.0.2 --no-cipher-details.
  * Flag weak DHE keys with OpenSSL >= 1.0.2 --cipher-details.
  * Flag expired certificates.
  * Flag TLSv1.0 ciphers in output as weak.
  * Experimental OSX support (static building only).
  * Support for scanning PostgreSQL servers (credit nuxi).
  * Check for TLS Fallback SCSV support.
  * Added StartTLS support for LDAP --starttls-ldap.
  * Added SNI support --sni-name (credit Ken).
  * Support STARTTLS for MySQL (credit bk2017).


Building on Windows
   Thanks to a patch by jtesta, SSLScan can now be compiled on Windows. This can either be done natively or by cross-compiling from Linux. See INSTALL for instructions.

   Note that SSLScan was originally written for Linux, and has not been extensively tested on Windows. As such, the Windows version should be considered experimental.

   Pre-build cross-compiled Windows binaries are available on the GitHub Releases Page.


OpenSSL issues: OpenSSL 1.1.0 Support
   OpenSSL 1.1.0 introduced a number of significant changes, including the removal of old and insecure features such as SSLv2. While this is a very good thing for the SSL ecosystem as a whole, it is a problem for SSLScan, which relies on these legacy features being available in order to detect them on client system.
   In order to work around this, SSLScan builds against Peter Mosmans' fork of OpenSSL, which backports the Chacha20 and Poly1305 ciphers to OpenSSL 1.0.2, while keeping the dangerous legacy features (such as SSLv2 and EXPORT ciphers) enabled.

 TLSv1.3 and the future of SSLScan
    Since the OpenSSL made the (very sensible) choice to remove support for legacy and insecure protocols and ciphers, SSLScan has relied on a fork of OpenSSL by Peter Mossmans which provided support for both these legacy ciphers and newly added ciphers (such as ChaCha). However, this fork of OpenSSL does not support TLSv1.3. To my knowledge there is no version of OpenSSL which supports both the legacy crypto (SSLv2, EXPORT ciphers, etc) and TLSv1.3 - which means that it is not possible to build SSLScan with support for both.

   The primary goal of SSLScan is to identify misconfigurations and security weaknesses in the SSL configuration of a target system, so support for the legacy ciphers and protocols is much more important than for the newer (secure) protocols like TLSv1.3 - however over time this will change as new vulnerabilities are found.

   Supporting both SSLv2 an TLSv1.3 in SSLScan would either require a fork of OpenSSL with all the new code backported (which would be increasingly difficult to maintain over time), or a complete rewrite of SSLScan to not rely on the OpenSSL library. This is not a project that I have the time available for at present, and if I did, it would probably be a better investment of time to work on one of the other SSL scanning tools, rather than starting from scratch.

   As such, SSLScan should be considered legacy. I will still maintain it as far as I have time, but it is unlikely to ever support TLSv1.3, unless an OpenSSL fork is created by someone else that supports this while maintaining the insecure crypto that SSLScan requires to be useful.


   Statically linking a custom OpenSSL build
      It is possible to ignore the OpenSSL system installation and ship your own version. Although this results in a more resource-heavy SSLScan binary (file size, memory consumption, etc.), this allows to enable both SSLv2 and SSLv3 ciphers. In comparison to the method of repackaging the Debian build, this custom OpenSSL build won't affect other tools on the same system, as they would use the version packaged by the distro's maintainers.
      To compile your own OpenSSL version, you'll probably need to install the OpenSSL build dependencies:
      sudo apt-get install build-essential git zlib1g-dev
      sudo apt-get build-dep openssl


      then run: make static

      which will clone the OpenSSL repository, and configure/compile/test OpenSSL prior to compiling SSLScan.


   Please note: Out of the box, OpenSSL cannot compiled with clang without further customization (which is not done by the provided Makefile). For more information on this, see Modifying Build Settings in the OpenSSL wiki.
      You can verify whether you have a statically linked OpenSSL version, if ./sslscan --version looks a bit like:
      1.x.y-...-static
      OpenSSL 1.0.2-chacha xx XXX xxxx
      (pay attention to the -static suffix and the 1.0.2-chacha OpenSSL version).

   Building on Kali Linux
      Kali now ships with a statically built version of sslscan which supports SSLv2.
      The package can be found in the Kali Git Repository.
      If for whatever reason you can't install this package, follow the instructions above for statically building against OpenSSL.

   Building on Debian
      It is recommended that you statically build sslscan using the instructions listed above. If this is not an option and you want to compile your system OpenSSL with support for legacy protocols such as SSLv2 and SSLv3 then follow the instructions below.

      Note that many modern distros (including Debian) ship with a version of OpenSSL that disables support for SSLv2 ciphers. If sslscan is compiled on one of these distros, it will not be able to detect SSLv2.

      This issue can be resolved by rebuilding OpenSSL from source after removing the patch that disables SSLv2 support.

      The 
build_openssl_debian.sh script automates this process for Debian systems. It has been tested on Debian Squeeze/Wheezy; it may work on other Debian based distros, but has not been tested. The built version of OpenSSL will be installed using dpkg.

      If it is not possible to rebuild OpenSSL, sslscan will still compile (thanks to a patch from digineo/sslscan, based on the debian patch). However, a warning will be displayed in the output to notify the user that SSLv2 ciphers will not be detected.