Sunday, 13 July 2014

Android swipe views example

It is very easy to create an android swipe views using the ViewPager and FragmentPagerAdapter class. In this example i create three fragments and i make the fragments visible in an android swipe view in the MainActivity xml layout file. Here are the steps i follow for creating this example.

Step 1: Add the ViewPager element to the activity_main.xml file.
Step 2: Extends the MainActivity.java class with FragmentActivity.

Step 3 : Create an adapter class that extends the FragmentPagerAdapter class

Step 4: Create three Fragments and its layouts.

Step 5: Create an object of the adapter class and set it as the adapter for the ViewPager.
            

MainActivity.java
package com.swapdemo;
import android.os.Bundle;
import android.support.v4.app.FragmentActivity;
import android.support.v4.view.ViewPager;

public class MainActivity extends FragmentActivity {
ViewPager viewpager;

@Override
protected void onCreate(Bundle savedInstanceState) {
super.onCreate(savedInstanceState);
setContentView(R.layout.activity_main);
viewpager = (ViewPager) findViewById(R.id.pager);
PagerAdapter padapter = new PagerAdapter(getSupportFragmentManager());
     viewpager.setAdapter(padapter);
}
}

PageAdapater.java

package com.swapdemo;

import android.support.v4.app.Fragment;
import android.support.v4.app.FragmentManager;
import android.support.v4.app.FragmentPagerAdapter;

public class PagerAdapter extends FragmentPagerAdapter {

public PagerAdapter(FragmentManager fm) {
super(fm);
// TODO Auto-generated constructor stub
}

@Override
public Fragment getItem(int arg0) {
// TODO Auto-generated method stub
switch (arg0) {
case 0:

return new FragmentOne();
case 1:
return new FragmentTwo();
case 2:
return new FragmentThree();

default:
break;
}
return null;
}

@Override
public int getCount() {
// TODO Auto-generated method stub
return 3;
}


}

FragmentOne.java

package com.swapdemo;

import android.os.Bundle;
import android.support.v4.app.Fragment;
import android.view.LayoutInflater;
import android.view.View;
import android.view.ViewGroup;

public class FragmentOne extends Fragment {
@Override
public View onCreateView(LayoutInflater inflater, ViewGroup container,
Bundle savedInstanceState) {
// TODO Auto-generated method stub
return inflater.inflate(R.layout.fragment_one_layout,container,false);
}


}

FragmentTwo.java

package com.swapdemo;

import android.os.Bundle;
import android.support.v4.app.Fragment;
import android.view.LayoutInflater;
import android.view.View;
import android.view.ViewGroup;

public class FragmentTwo extends Fragment {
@Override
public View onCreateView(LayoutInflater inflater, ViewGroup container,
Bundle savedInstanceState) {
// TODO Auto-generated method stub
return inflater.inflate(R.layout.fragment_two_layout,container,false);
}

}

FragmentThree.java


package com.swapdemo;

import android.os.Bundle;
import android.support.v4.app.Fragment;
import android.view.LayoutInflater;
import android.view.View;
import android.view.ViewGroup;

public class FragmentThree extends Fragment {

@Override
public View onCreateView(LayoutInflater inflater, ViewGroup container,
Bundle savedInstanceState) {
// TODO Auto-generated method stub
return inflater.inflate(R.layout.fragment_three_layout,container,false);
}
}


activity_main.xml

<android.support.v4.view.ViewPager
    xmlns:android="http://schemas.android.com/apk/res/android"
    android:id="@+id/pager"
    android:layout_width="match_parent"
    android:layout_height="match_parent">

</android.support.v4.view.ViewPager>

fragment_one_layout.xml

<?xml version="1.0" encoding="utf-8"?>
<RelativeLayout xmlns:android="http://schemas.android.com/apk/res/android"
    android:layout_width="match_parent"
    android:layout_height="match_parent"
    android:background="#F20C36" >
    </RelativeLayout>

fragment_two_layout.xml

<?xml version="1.0" encoding="utf-8"?>
<RelativeLayout xmlns:android="http://schemas.android.com/apk/res/android"
    android:layout_width="match_parent"
    android:layout_height="match_parent"
    android:background="#0C1BF2">
    </RelativeLayout>

fragment_three_layout.xml


<?xml version="1.0" encoding="utf-8"?>
<LinearLayout xmlns:android="http://schemas.android.com/apk/res/android"
    android:layout_width="match_parent"
    android:layout_height="match_parent"
    android:orientation="vertical" 
    android:background="#3EF20C"
    >
    

</LinearLayout>

Thursday, 10 July 2014

How To Set Up a Custom Domain in Blogger

Our web today is a wonderful place. It's increasingly become a knowledge hub for strollers around the globe. And you know what the best part is? It does not have a religion, race or color, that's where perhaps its strength lies in. Point being, no matter what you are after, from details of products to how to use them, from fruit varieties to language origins, from how to hack Facebook account to how to set up a custom domain name in Blogger. Each and everything is there, in abundance and easily available. Now I know you are here to understand how you can setup/host your custom domain on your Blogger account. So let's get on with it, without further delay.
blogger custom domain, godaddy

Before we start

It's important that you realize, it isn't difficult to add a custom domain into your blogger account. If you are a blogger, it's perfect if you already own your own blog, it shows your passion and love for blogging and provides you with freedom to move from one platform to another, when and if you need. Also from users perspective, it's much easier for them to remember and visit your blog at customized address like myblog.com than myblog.blogspot.com.

One of the best things about Blogger is that it does not push you to host your site with blogger. It is entirely your own choice to choose from either of two hosting plans 'hosting on BlogSpot' with address myblog.blogspot.com, or going with a custom domain with address myblog.com.

Some Popular Web Hosting Sites:

If you don't already have purchased yourself a custom domain, these are the places that you should be looking for to get one:
  • EasyDNS
  • 1and1
  • GoDaddy.com
  • Yahoo! Small Business
  • No-IP
  • ix web hosting
So now if you have bought yourself a domain, from either of these you would have an IP address and a name. Let's assume our is 'mynewdomain'.com.

Well, it's time to start adding a custom domain to your blogger account.

Remember:

Here we are using setup for GoDaddy.com, the most popular domain name provider. For custom domains from other sites, the steps are almost same, so don't vanish.

Setting Up Blogger Custom Domain

Step 1. Login to your Blogger account at www.blogger.com.

Step 2. Click on your blog and then go to "Settings", choose "Basic".

blogger custom domain

Step 3. Under "Publishing" section, click "+ Setup a 3rd party URL for your blog".

Step 4. Under "Third-party domain settings" next to "http://" type your domain that you just purchased and make sure that you don't forget to add the "www" prefix to the domain name.

set up custom domain in blogger

Step 5. Click "View settings instructions" to get the blogger's official instructions. On the Blogger instruction page, choose the "On a top-level domain (www.example.com)" option.

custom domain in blogger

Step 6. Under the point 9 of instructions, 4 IP addresses will be given, copy and save all 4 of them.

Step 7. Go back to your Blogger Settings and press Save. It won't get saved and an error will appear saying 'We have not been able to verify your authority to this domain. Error 32.'

setting up blogger custom domain

Step 8. Under the error, you will see two fields "Name, Label or Host Field" and "Destination, target, or Points To" field. Copy data of both rows from these fields.

Step 9. Now log in to your GoDaddy.com account and click on "My account" on the upper right corner > select "Manage my Domains".

godaddy manage domains

Step 10. Here you should see your purchased domain name > just click on your domain name.

godaddy domains

Step 11. Click on the "DNS Zone File" tab next to Settings and choose "Use Classic DNS Manager".

use classic dns manager

Step 12. Next, click the "Edit" button to edit your DNS Zone File.

blogger custom domain

Step 13. Under the "CNAME (Alias)" menu, click "Quick Add" button at the bottom of the screen (see image 1 in the below screnshoot).

Step 14. In the Edit box that now appeared, enter "www" in the first box and "ghs.google.com" in the second.

blogger custom domain

Step 15. Click "Quick Add" again and enter details from second row of the data we saved in step 8.

Step 16. Under the "A (Host)" menu, again choose Quick Add (see the below image).

Step 17. Host will be @ and the "Points to" value should be the one provided by Google IPs, saved in step 6 above. These are the Google IPs that you should get:
216.239.32.21
216.239.34.21
216.239.36.21
216.239.38.21
Step 18. Add all 4 of them one by one and delete old host as you won't need it anymore.

custom domain in blogger

Step 19. At the top of the page, click on the "Save Zone File" button to save your setings.

Step 20. Now go back to Blogger and try to save settings again. The registration process takes 24-48 hours, so don't worry if you get an error again. Come again later to Blogger after 24-48 hours, repeat step 2 to 4, press Save and the error should be gone.

Step 21. After your URL starts working, click on the "Edit" link next to domain name on setting page.

Step 22. Check the "Redirect... to..." checkbox below your site address to ensure that even if the visitors will miss out the www part, they will still be able to reach your site.

blogger custom domain

Step 23. And that's it. Enjoy your new URL!

So this was easy, right? Only a handful of steps and we have successfully completed our mission of adding our custom domain in our blogger account. In case you haven't yet, stay patient wait for 2 days and try again. Or repeat steps 1-22, and make sure you don't miss any. Otherwise your new URL is ready and all set to roam around the wonderful world of web.

Tuesday, 8 July 2014

How to give a face to your entities? Earn SEO profit with making Wikimedia Commons to your media hosting!

We already know, how to become an entity - create a Freebase topic. But this is a common issue that add image to Freebase topic is no longer possible. Our goals regarding semantic SEO and our images are however:
create new image at wikimedia commons
  • the ability to provide semantic informations about our images,
  • a possibility to share images with belonging semantic informations
  • embedding of semantically described images into web documents as images utilizing ImageObject class from Schema.org and, last but not least,
  • to host these images with belonging semantic informations on an authoritative source.
All these tasks can be accomplished using Wikimedia Commons, a free media repository of the Wikimedia Foundation. I divide this article about using of Wikimedia Commons into 2 sections:
  • How to upload to Wikimedia Commons (things like register, login, create user page, select and/or find out matching license, upload and describe image or other media file)
  • How to cite Wikimedia Commons (using on websites, embedding into semantic markup)
Read full article »

Monday, 7 July 2014

How to copy and paste a website address on an Android smartphone

This article explains how to copy and paste a website address (URL) when you are using the Chrome browser on an Android smartphone.


Copy and paste on an Android phone

When you are using an Android cellphone, the usual way to copy-and-paste text is to "long-click" on one word, and after it is selected, drag the selector-bars at either end to select more of the text.

After this, you have options on a list at the very top of the screen to cut, copy and page.

But this doesn't work on the Chrome browser's address-bar, ie the place where you type in website addresses, or see the address which your currently viewed pages has.

Here, there is no long-click, and you have to use a slightly different approach.


How to copy a web-address on a Smartphone using Google Android and Chrome


1 Inside Chrome, go to the website and page that you want to copy the address from.


2 From the top right handcorner, choose the Overflow menu button: this is three vertical dots.


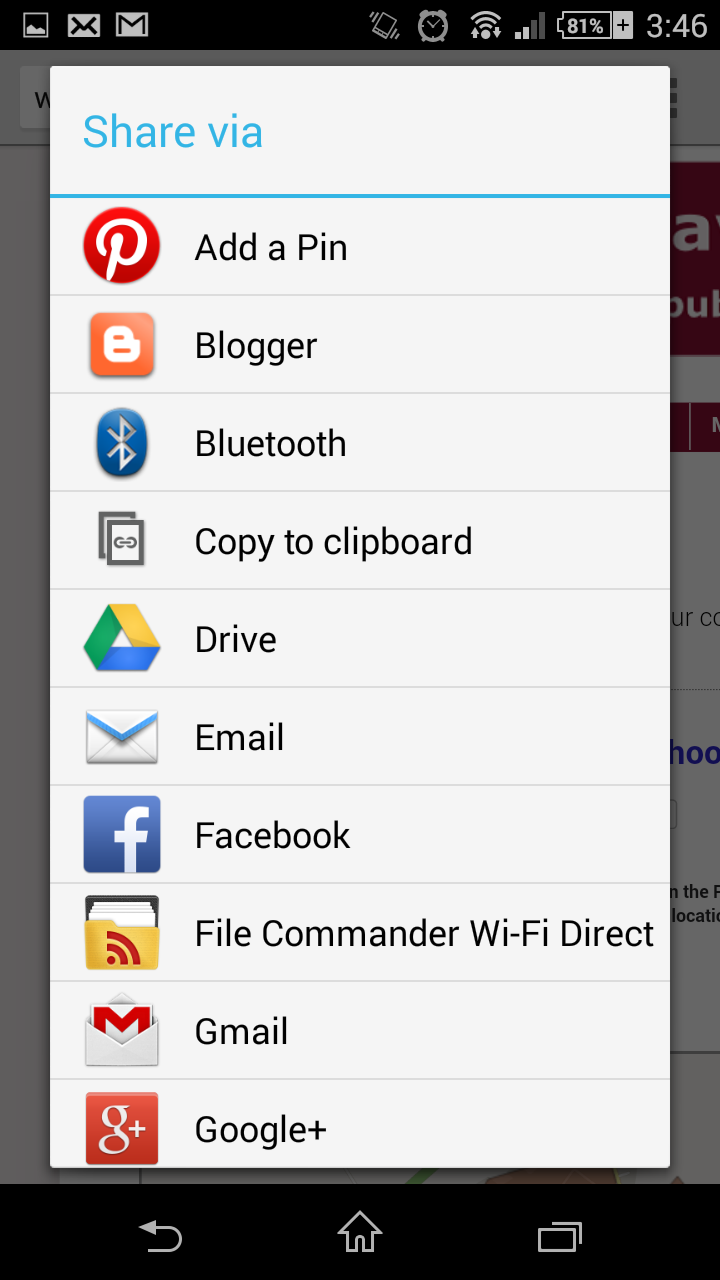
3 From the menu that opens, choose Share


4 choose Copy to clipboard from the list of sharing options.


Step 1: Choose Share

Step 2: copy-to-clipboard
Now, when you go into other applications and pages, you can long-press, and a small PASTE button will appear.   Click this - and watch your copied link get pasted.


Troubleshooting

Remember that if it's a Blogger site that the link came from, you may need to remove the " /?m=1" from the end of the URL, for the sake of non-mobile users of the place where you are pasting the link.


How exactly is this a Blogger tip?

Fair question - this a blog about using Blogger, Google's website tool for the rest of us, not about Android phones!   But as more and more people are using mobiles, and so mobile-friendly themes become ever-more important) I still think it's relevant - here's why:

Even with a new phone running a very recent version of the Android operating system, I still find it too hard to write anything exepct the simplest posts on the phone.

But I've found that I can do more and more of the promotional and social-media aspects of managing my blogs on the phone in my "spare mintues", eg while I'm on a bus, or sitting in a waiting room. Very often, this involves locating a blog-post which answers a question, and posting a short summary and link to the post there. An of course to do this, I need to copy the link to the post. So copy-and-pasting website URLs is now one of the tasks need to do fairly often.


Related Articles

Making a social media / communications plan for your blog

Turning off Blogger's mobile theme

Saturday, 5 July 2014

DevCorner: GameDevelop goes open-source

Thanks to GamingOnLinux for pointing out that this crossplattform *no-programming* 2D game development suite has gone fully FOSS.
It can export games to HTML5 and native code (x86 Linux and Windows).

Read the original announcement here. The github repository is here.

License infos:
  • The IDE (in the IDE folder) is licensed with GPL v3. 
  • The Core library, the native and HTML5 platforms (respectively Core, GDCpp and GDJS folders) are LGPL v3. 
  • Extensions (in the Extensions folder) are using zlib/libpng license. 
  • The name, Game Develop, and its logo are the exclusive property of Florian Rival.
Here is a small video to get you started:


& you can find some example games here.
----
By the way: I also recommend to have another look at the Godot engine which has had many improvements since it became open-source a few months ago.