Thursday, 7 August 2014

How to redirect HTTPS to HTTP without certificate

Redirect HTTPS to HTTP without certificate
Today we all got to know from Google officially, that HTTPS secured connection till now is a ranking signal for Google. Some of us run to buy one. Some other will try to get one for free, e.g. by StartSSL. While we don't know at the moment, how much weighs the secured connection as the ranking signal for Google, another issue exists for all website owners:  what if somebody tries to reach your site with HTTPS, but you haven't any certificate installed? Any browser will rise an error, something like ERR_SSL_PROTOCOL_ERROR. and the visitor will not see your site. What to do? If you will search for an answer, you will mostly get an answer, any redirection isn't possible, cause the SSL handshake happens before the whole connection, so any redirection will not work. But there is a little mighty thing named htaccess, which will allow us to make our sites visible for any visitor independently of with which URL the visitor tries to reach your sites. The trick is
Read full article »

Android Tricks and Tips (Secret Codes that Work)

Android has become the most used mobile operating system which has changed the world of mobile phones into smartphones. Android has not only provided common functionalities of a phone plus it also provided the power of a desktop into a phone. You can install a number of apps in your Android Smartphone from Google Playstore. I forget to tell one thing that some of you might know that Android is owned by Google, thats why Google Playstore provide so many apps for your android phone.


Android Tricks and Tips


Here we will provide some tricks and tips for your android phone to make it even better. Here it goes:

Music Equalizer

Most of us are not aware of this feature of Android Phone. Once you play and song there are three vertical dots on right upper corner of your screen. Touch it and open Equalizer. From there you can choose any preset like Jazz, Rock, Metal or whatever you want. There is a also a 3D sound option to get a feel of depth in music. This 3D Sound works good if you are using a headphone.

Personalized voice recognition

In your android phone you can dictate the text that you want to write. In the beginning you might find it a little bit funny. From a text input field, click the microphone button to the left of the space bar. If it is not identifying the words correctly then you can train it to work better through Personalized Voice Recognition. Go to your device’s Settings. Tap "Language and Input," then look for the "Text-to-speech output" option under the Speech section. It might take some time but in the end you will feel better.

Gallery View

I find this thing really interesting. When you view a number of pictures in your android phone you have to swipe left and right to view next and previous photos. But it can be made easier. Just pinch inward and you will see all pics in the form of a picture roll. If you want to  delete a pic then just swipe it up.

Data Usage

Ice Cream Sandwich and Jelly Bean users can keep a track of Internet Data consumed by your phone. Most of us have a limited data plan on our phones. Just go to Data Usage in Setting of your phone. It will not only show you the amount of data consumed but also shows you that which App has consumed how much data. You can even set a warning message for yourself when you are about to reach the limit.

Offline Speech Recognition

Usually speech recognition softwares require data connectivity on android phone but in Android Jelly bean you can download Offline Speech Recognition. Go to "Language and Input" in the Settings, then choose "Download offline speech recognition" under the "Voice Search" heading. You may get different language packs and you can download a language pack of your choice.

Respond to a call by text message

Usually we answer to a call either by picking it or disconnecting it. But its possible for an android phone to reply to an incoming call through a text message as well. There is an option "Ignore with text" to disconnect the call and send a text message.When you choose this option, it will show some message templates to send. You can pick any one of them. You can also add customs messages in this option.

Lock your phone in a unique style

Android phones provides you number of options to lock you phone. Previously you have seen with a four digit number lock. Now android phones have face lock, number lock and dots sequence. Face lock is the latest thing. It let the front camera of your phone check the face of user holding the phone. If its not you it will not let him/her unlock the phone.

A way to get your phone back if its lost

Suppose your phone is lost and get into the hands of a good guy who would like to return it to you. (Believe me ! There are good people in this world). But if your phone is locked then from where will he get information about you. Here is a way. From the Settings app, tap "Security" and look under the "Screen security" section for "Owner info." Here fill all details like your name, alternate number, address, email or anything you like. Now this information can be read even if your phone is locked.

Save Battery through Inverted Rendering

This option is available under the Accessibility option in Settings. It will make background black and text white. It save the battery, as displaying white color consumes more battery. So if background will be black, less battery will be consumed.

Use Google Maps Offline

Opening Google maps everytime consumes bandwidth. So you can download the maps of your area for offline usage. Click the three dots in the lower-right of Google Maps and select "Make available offline. It will ask you to select the location to download. So now you can access it offline as well.

Take a pic of your screen (Screenshot)

Desktop users might be aware of "PrtScr" button used to take screenshot. But now you can also do it on your android phone. Just press the power and volume button simultaneously and a screenshot will be saved in your photo gallery.

Whats consuming your Battery

Go to Setting ans choose Battery option. It will show you how much battery is consumed by different parts of your phone. For example it will show you battery consumed by screen, operating system and different apps. If you feel that some app is consuming more battery than expected then you can force stop of "Kill" that app.

Wednesday, 6 August 2014

Make Blogger Header, Navigation and Footer Full Width

Blogger is a user-friendly service that provides a lot of really attractive looking default templates for those just starting out. Default templates come in handy, but the nice things about owning your own blog is that you have the chance to add your own personal touch. As a matter of fact, templates aren't made to restrict your freedom of design, but instead they're there to provide you a foundation to build from. With every default template available on Blogger, you can make changes to fit your style.

One of the most common requests out of the Blogger community when making alterations is 
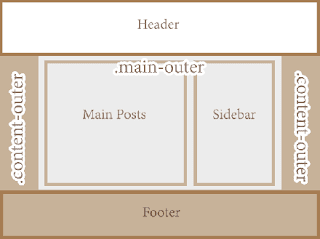
how to change the look of some of the key sections like header, navigation, and footer. Initially, these items are designed to fit within just 1/3 of the page, surrounded by padding and margins on either side. These margins are used to give the page a slim fitting appearance, but could also cause your content to look compressed.

Important: Backup your Template

Making the changes to a full screen Blogger navigation, footer, or header can be done and won't take you much time. Before you can make any changes, you should save extra copies of the template .xml file in case anything goes wrong. That way, if you don't like it or it doesn't come out looking like it should, you can reuse the contents of the original file to restore your blog to working condition.

Demo

Hover your mouse over the image to see a before and after example:


How to Make Header, Navigation and Footer Full Width in Blogger

Step #1: Access Your CSS File

If you've never opened up your CSS file before, log in to your Blogger account, select your blog and navigate to Template > Edit HTML. This will bring up the code of your template containing all your blog's internal files in one place.

Step #2: Modify the Background

Click anywhere inside the code area > press CTRL + F keys and type the following line > hit Enter to find it (stop at the first occurrence of it):
body {
Just below body { you should see some lines that will look like this:
body {
font: $(body.font);
color: $(body.text.color);
background: $(body.background);
padding: 0 $(content.shadow.spread) $(content.shadow.spread) $(content.shadow.spread);
$(body.background.override)
}
Where you see the highlighted line above in the code, remove the line and replace it with:
padding: 0px;
Different templates will have minor variations, but you should still be able to find these lines within every template.

Step #3: Change the Content Section

Next, search using the CTRL+F keys for this part:
.content-inner {
Just below it, you will see this line:
.content-inner {
padding: $(content.padding) $(content.padding.horizontal); 
}
Remove the line in red and replace it with:
padding: 0px;
This will remove any of the padding around the inner content, so it won't leave any room on both sides.

Now find this part:
$(content.background.color.selector){
Just below it you will see this line:
$(content.background.color.selector){
background-color: $(content.background.color);
}
Replace the line in red with:
background-color: $(body.background);
Finally, search for this tag:
]]></b:skin>
And just above it, add this CSS:
.main-outer {
background: $(content.background.color);
}

Step #4: Make the Content Outer Full Width

Content is displayed differently between browsers, so you'll next want to fix this so that it alters the width across the board. This code can be found searching for:
.content-outer, .content-fauxcolumn-outer, .region-inner {
And just below it you will see the following lines:
.content-outer, .content-fauxcolumn-outer, .region-inner {
min-width: $(content.width);
max-width: $(content.width);
_width: $(content.width);
}
Delete the line in red and replace that line with:
max-width: 100%;

Step #5: Finish It Up

Now you have just two more lines you need to change. Look for:
</b:template-skin>
And click on the right arrow to expand the styles. Note: you will need to search for </b:template-skin> tag again, and just before it you'll see these symbols highlighted in yellow:
]]>
</b:template-skin>
Above this ]]></b:template-skin> section of code, add the following:
.main-outer {
max-width: $(content.width);
margin: 0 auto;
}
Then run a search for:
]]></b:skin>
Add these lines of code just before/above it:
.tabs-inner {
padding: 0px;
}
.section {
margin: 0px;
}
.header-inner .widget {
margin: 0px;
}
Save the template and exit out of the editor.

Finished!

Following along with this tutorial won't affect or alter the pictures you are using on the blog, just the design of the content area. If you have a logo that stretches across the screen and fits perfectly for 1/3 page header, you will need to resize and re-upload this content so that it is able to work with the new adjustments.

Tuesday, 5 August 2014

Online shopping versus In Store Shopping - What's Better

Online shopping versus In Store Shopping


Online shopping is increasing day by day. Advertisements of Online Shopping websites on television is now a common thing and every common man now about it. In the initial days people were not sure about the quality of product, how much time it will take to reach you and what will do if you don't like the product. All of these problems were not sorted out by online shopping websites. Now they provide high quality pictures of the product on website with its complete description and they also inform you about the expected delivery date with details about the courier company and your package number. Apart from that returns are also made easy by several website. Some of them even provide a return pickup facility.


But there are some people who still like in store shopping. They say it provides them satisfaction that the product they are buying is genuine. These people also have some good points to support in store shopping. Here we will provide the pros and cons of both type of shopping and then you can decide which one in better.

Benefits of Online Shopping


  • It saves your time of going to the store.
  • It provides you a larger variety of products as all brands are available on a single website. You might need to walk to different showrooms to do the same thing, if you are doing in-store shopping.
  • You can compare same product of different brands very easily through online shopping website.
  • You can compare the price of same product of different shopping websites and then purchase the cheaper one.
  • Some expert shoppers can also use promotional coupon codes to get discounts on the retail price.
  • Most of the websites provide free shipping if your total order amount is above a certain limit.
  • You can pay through credit card, debit card or COD (Cash on Delivery).
  • If you don't like the product then you can return it.
  • Through Online shopping you may get those items which are not available through in-store shopping.


Benefits of In Store Shopping


  • It takes lesser time get the product to your home as you bring it to your home within a fer hours. Online shopping take minimum two to three days to get the product to your home.
  • It makes you come out of home and walk is little which is also necessary. In store shopping also makes you a social being.
  • You can see the products before you buy it, so there is minimal chance of getting cheated.
  • Some times warranty issues create problem in online shopping while its not so in in-store shopping.


Here we have provided some benefits of both online and in-store shopping. So can better decide in yourself that which one in better.

Cheapest 3G Phone in India 2014 Video Calling, Wifi and Hotspot

Cheapest 3G Phone in India 2014


3G Phone are the latest thing in the smartphone market in 2014. Now everybody wishes for a large touch screen phone with 3G connectivity. 3G connectivity not only helps in better data connectivity but also gives you power to do video calls. Most of the 3G phones have a front camera so that you can make a video call and users on both sides can see each other. Some people don't want to spend much money to get 3G connectivity. So here we are bringing a list of smartphones with 3G connectivity.


List of Cheapest 3G Phones: Read More 

If you the above list of Cheapest 3G phones, you will find that some of them provide good screen size, some provide good processor speed and some have better RAM to make faster. But all of these things will not be available in a one phone. So depends on your usage that which type of 3G Smartphone do you want to purchase.

If you want better connectivity options then go for those phones which provide connectivity like Wifi, USB and Bluetooth apart from the 3G connectivity. If you want better speed then go for processor speed higher than 1GHz. If you want to install more apps and games then go for more RAM.

Usually 3G phones start from from a price range of 3K. You will find most of these cheap 3G phones in 3K-4K range. So check the features of these phones and then you can also order your favorite phone online. Online shopping of phones is also increasing as these phones are usually not available in the retail market. Apart from that most of the online shopping websites are providing the facility of COD (Cash on Delivery). So don't hesitate and order your cheap 3G phone online.

People visit this page while searching for:

  • Cheapest 3G Phones in India
  • Cheapest 3G Phones in India 2014
  • Cheapest 3G Phones in India with Wifi
  • Cheapest 3G Phones in India with Video Calling
  • Cheapest 3G Smartphones in India