Sunday, 9 March 2014

How to Use Cookies in Javascript

Each time we visit a website, cookies can be stored to 'remember' things that we do while browsing a page. This may happen, for example, when we visit a page where we have to login with an username and a password. In this case, after verifying that the login is correct, usually a cookie is stored on our computer.

An example would be the popular page of Google. This search engine allows users to choose how many search results they want to see on each page. Thanks to a cookie, this configuration remains unchanged for each computer, even after rebooting several sessions. Despite this, it is good to remove them from time to time because although some will expire being erased automatically after a while, some of them will never do so.
cookies with javascript, blogger tricks

Like many other things, cookies may suffer a poor use and hence, their bad reputation. For instance, some websites can store and study the browsing habits of a user without their knowledge. This is why most browsers already include a system to filter them and can decide if they will provide some privacy or not.

If you want to see a live example of how a cookie works, please visit this page and refresh it a few times. You should get an alert window telling you about how many times you visited the page.

Script source: javascriptkit.com

There could be other ways to use cookies but a server could do this with JavaScript. Below we have a simple script that can be used as many times we want, even for different purposes. Basically, what the following script does is to create three functions: the first one is to set a cookie, the second one is to read it, and the last one is to erase it. We can apply it in Blogger by accessing the template HTML and add it just before the </head> tag:
<script type='text/javascript'>
//<![CDATA[

// Set cookie
function setCookie(name, value, expires, path, domain, secure) {
document.cookie = name + "=" + escape(value) +
((expires == null) ? "" : "; expires=" + expires.toGMTString()) +
((path == null) ? "" : "; path=" + path) +
((domain == null) ? "" : "; domain=" + domain) +
((secure == null) ? "" : "; secure");
}

// Read cookie
function getCookie(name){
var cname = name + "=";
var dc = document.cookie;
if (dc.length > 0) {
begin = dc.indexOf(cname);
if (begin != -1) {
begin += cname.length;
end = dc.indexOf(";", begin);
if (end == -1) end = dc.length;
return unescape(dc.substring(begin, end));
}
}
return null;
}

//delete cookie
function eraseCookie (name,path,domain) {
if (getCookie(name)) {
document.cookie = name + "=" +
((path == null) ? "" : "; path=" + path) +
((domain == null) ? "" : "; domain=" + domain) +
"; expires=Thu, 01-Jan-70 00:00:01 GMT";
}
}

//]]>
</script>
Once done, in order to set a cookie, we only need to put the name and the value in quotes when we call the function. Additionally, we will set the expiry date by getting the current Time (in milliseconds) and add the required number of minutes (in milliseconds):
var expiration = new Date();
expiration.setTime(expiration.getTime() + 10000); //Expire after 10 seconds
setCookie("cookiename","hello",expiration);
}
The above code sets a cookie called cookiename, with the hello value and set its expiry date to 10 seconds after it has been set (10000 milliseconds = 10 seconds). If we want to restore the value of this cookie, then we should use the second function with the cookie name:
var checkCookie = getCookie("cookiename");
By adding this code below the <body> taag, we created a cookie with the value 'hello' which can be shown on the screen if we want to. The cookie will disappear after 10 seconds:
<script type='text/javascript'>
var expiration = new Date();
expiration.setTime(expiration.getTime() + 10000);
setCookie("cookiename","hello",expiration);
var checkCookie = getCookie("cookiename");
document.write(checkCookie);
</script>
The erase function is used in the same way as the one for reading just by clicking on the name of the cookie. The setCookie values for 'domain' and 'secure' are not used. Use 'domain' on the JavaScript cookie if you are using it on a subdomain, where the cookie is set on the widgets subdomain, but you need it to be accessible over the whole yoursite.com domain.

The combination of these three functions will allow us to handle cookies for specific purposes, as we will see in the near future.

Saturday, 8 March 2014

How to Add CSS code To Blogger using Template Designer

If you are having difficulties adding the CSS codes in a Blogger template, here's a short guide that will show you a more practical and fast way to add CSS (Cascading Style Sheets) so that it will be easier for you to customize your blog.

Some users have complained that when they had to add the CSS codes to install some feature in Blogger, they found it difficult to locate the ]]></b:skin> tag. So, I decided to make this quick tutorial to show you another way of adding the CSS without having to access the Blogger HTML editor.

Adding CSS via the Blogger Template Designer

Step 1. Log in to your Blogger account and select the blog that you want to customize.

Step 2. From the Blogger dashboard, choose "Template" and click on the "Customize" button.


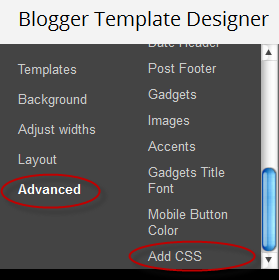
Step 3. Click on the "Advanced" tab.

Step 4. Now just add your CSS code inside the "Add CSS" tab (if you have more options, you may need to scroll down the list). Here you can add any CSS code each time you want to apply a new style to your template.


Step 5. Once added, click on the "Apply to blog" button to save the changes.

Following this method, you can't edit the existing CSS styles already added in your template which will require to access the template's HTML and make the modifications there. Here, you can only add new styles and edit the existing styles added through the Blogger Template Designer panel.

Please note that when adding the CSS styles, there's no need to put the <style type="text/css"> ... </style> style tags, which usually would go above the </head> tag in the template's HTML code. Adding these tags may result in an error.

If you change the template, the CSS added here will be removed. The same goes for any other additions or CSS customizations made ​​through the template HTML editor. So this is how we can easily add CSS code to Blogger using Template Designer without having to search the ></b:skin> tag.

Wednesday, 5 March 2014

How to add custom Variable definitions to Blogger

In this tutorial, we are going learn about the CSS Variable Definitions for Colors and Fonts that could be found at the top of the style sheet of a Blogger blog. The values for the Variable definitions can be modified directly through the Blogger Template Designer where are the settings for colors, backgrounds, fonts and font sizes.
blogger variable definitions

Most default Blogger templates, such as the Minima Template, use these settings for the CSS, which makes it easier to modify the variables through the Blogger dashboard, using the Template Designer ("Template" > "Customize") editor and going to the "Advanced" section.

blogger template designer, variable definitions

If the definitions are already added in the CSS, we'll be able to change the background colors, font colors, styles or sizes, directly from our Blogger dashboard without having to touch the HTML code of our template.

If these values ​​are not set, we can define them by creating our own variables. The more variables are created, the greater will be the ease of changing colors and fonts of the Page Elements by going to the "Template Designer" and click on the "Advanced" tab.

In some cases, we can't change the color or font of a custom template if the designer has not implemented the variables and didn't defined & specified a particular value directly into a property. And if there is no definition for these values​​, we may not be able to customize it through the Blogger's Template Designer.

There are two types of variables:

1) Color Variable:
<Variable name="body.background.color" description="Outer Background" type="color" default="#66bbdd" value="#66bbdd"/>
  • In red is the variable name. Here you can put any name you want, however, it must not contain spaces, that's why we may see some variable names using a dot "." between each word.
  • In green is the description that will appear in the Fonts and Colors panel (it can contain spaces).
  • In blue is variable type, which in this case is "color".
  • In purple is the default value, which runs in the absence of any other value.
  • In orange is the value of the selected color.
2) Font Variable:
<Variable name="body.font" description="Font" type="font" default="normal normal 12px Arial, Tahoma, Helvetica, FreeSans, sans-serif" value="normal normal 12px Arial, Tahoma, Helvetica, FreeSans, sans-serif" />
  • In red the variable name without spaces.
  • In green the description of the variable, may contain spaces.
  • In blue is the type of the variable, which in this case is font.
  • In purple the default font.
  • In orange is the font that you choose.

Where Are Variable Definitions located

We can find the variables definitions in the <head> section of our Template by accessing the HTML code (click on the "Edit HTML" button). There we should see a pair of <b:skin>..</b:skin> tags. The CSS style declarations will go in between those tags, along with the variable names.

variable definitions

How to Create Variables with type Color

Now, let's see how we can create type="color" variables in our template.

Please copy the below snippet and replace the names and types as you like, then paste the code below this comment:
/* Variable definitions
   ====================
Code to copy:
 <Variable name="NAME" description="DESCRIPTION" type="color" default="#xxxxxx" value="#xxxxxx" />
For a better understanding, let's take a look at this example with variable of type "color":
<Variable name="variablecolor" description="Variable with light blue color" type="color" default="#DDF2FF" value="#DDF2FF" />
color variable type

Here, I have created a variable of type "color", with the "variablecolor" name. The color values (#DDF2FF) can be applied to all the borders of my blog and whenever I want to apply color styles to a specific border, I will type it like this:
border: 1px solid $(variablecolor);
Note that I have added the "$" symbol before the variable's name and included the name inside the parentheses. These should be added every time you want to implement a new variable definition.

Once we have created the variable, we can apply it on any property (not only borders) of any selector (page element) where it is possible applying the chosen color.

For example, if I want to add this color in the main-inner background (sidebar and posts area), I will add it just after the "main-inner" class selector, like this:
.main-inner {
background-color: $(variablecolor);
}
variable type color, variable definitions

Now that a new variable has been added, save and return back to the blogger dashboard by clicking on the "Customize" button, then the "Advanced" tab. You will notice that there is a new variable called "Variable with light blue color". In order to change the color, just use the color picker tool.

blogger template designer

How to Create Variables of type Font

Now let's say that I want to create a new variable of type="font" which I want to apply on the title of the sidebar gadgets. I will add it this way:
<Variable name="gadgetstitlefont" description="Gadgets Title Font" type="font" default="normal normal 16px Arial,Verdana,'Trebuchet MS',Trebuchet,Sans-serif"  value="normal normal 20px Cambria"/>
In this variable that I just created, the default font to be searched by the web browser should be Arial, and in its absence, Verdana and so on. Otherwise, apply the Cambria font which is actually the font that we want and which can be easily changed by accessing the Blogger Template Designer.

Once the font variable has been implemented, we can add it to any property of any selector where we want to define this font style.

To define where this variable should be applied (which, in my example, is the title of the sidebar gadgets), I will need to include the values ​​directly in the "h2" property of the "sidebar" selector (sidebar-right-1), by creating the following CSS rule:
#sidebar-right-1 h2 {
font: $(gadgetstitlefont);
}
And I will add this above the ]]></b:skin> tag of the Template (don't forget to add the "$" symbol before the variable's name, also put the name between the parentheses, otherwise it won't work).

variable font type

Now, that we have included a new variable, Save the template and return to the Blogger dashboard by clicking on the "Template" > "Customize" button and access the "Advanced" tab. Scroll down and we will see a new variable named "Gadgets Title Font" - if you want to change the font type or size, you can do it directly via this panel.

variable font type advanced

After you've decided what font style should be applied, click on the Apply to blog button on the right side.

apply to blog button

As you work on your template design, you can add lots of color and font variable types, however, for other types of CSS attributes, it is not necessary to create variables. The other types, such as margin, padding, need to be included in the HTML of the template above the ]]></b:skin> tag. So that's how you can add custom variable definitions to Blogger. Enjoy!

Tuesday, 4 March 2014

Dragon City Hack Get Island For Free

Dragon City Hack Get Island For Free


Dragon City Hack Get Island For Free. With this tools you can get dragon city island for free, you can get 5th island and 6th island. For how to get free 5th island and 6th island you can see in the tutorial.

Info Update: 
Dragon City buy All Island with gold and erase the island from grass, trees and rocks update ‎Wednesday, ‎March ‎05, ‎2014. To getting free gold and in large numbers, use this tool : Tools Dragon City 100M Gold per Submit No Proxy

Tutorials how to get dragon city All Island and Delete All Rock and Tree for free:
  1. Log in to your facebook account and play Dragon City
  2. Find your facebook id and session id, to how to find facebook id and session id you can see in the video below.
  3. After that open this site:

    Tools Dragon City Open Island 
            you will be asked to fill out facebook id and session id, fill with your facebook id and session id

   4. After it all filled and then click submit.

   5. The final step, reload your dragon city and see your island

Candy Crush Hack Engine All Free

Candy Crush Hack Engine All Free


Candy Crush Hack Engine all free, with this hack you can get a high score, can get unlimited movement and many more features that can be used. Contents of this cheat: Free Lives, Sets moves to 50 (Can be used many times), Free Boosters, Set Score to 300K, Freeze Bomb Countdown and many more.
Update : 
Candy Crush Saga Hack All in One Update ‎Sunday, ‎March ‎02, ‎2014. Update to Candy Crush Saga Trainer v3.6.4. All the instructions on how to use Candy Crush Saga Trainer is already in the Trainer

Tools Required:

   1.Cheat Engine 


  2. Candy Crush Saga Trainer v3.6.4 32 bit or 64 bit (Free Download, No Password and No Survey) 


 3.Your browser

Steps to use Candy Crush Saga Trainer:
  1. Download and Instal Cheat Engine (but do not open)
  2. Download Candy Crush Saga Trainer (not open)
  3. Log in to your facebook account and open Candy Crush Saga
  4. Open Candy Crush Trainer and select process example: FlashPlayerPlugin (Accordance the browser you are using.)
  5. Click continue button then select cheat you want to use.
  6. All the instructions on how to use Candy Crush Saga Trainer is already in the Trainer
  7. Then let's play.