Monday, 3 March 2014

Browlock ransomware cases increasing


Browlock is (unfortunately) nothing new. It's a simple webpage that "locks" your browser and demands a certain amount (usually $/£/€ 100) to unlock it. You cannot exit out of the browser.

Browlock typically gets delivered via malvertising (which is the user clicking on a malicious ad). Read more about Browlock here:
Browlock Ransomware Malvertising Campaign

Anyways, it seems they're now also stepping up their game for Belgian (or Dutch-speaking) victims, as I recently stumbled upon the following:

Browser blocked by Browlock


If we check the source of this webpage, we see the following iframe:


This suggests they're testing the waters in regards to Belgian users.

I have listed the most important points below, written in the most awful Dutch I have ever seen (Google Translate is clearly not the best translator out there for some languages):

U zijn onderworpen aan schending van de auteursrecht en de naburige rechten (Video, Muziek en Software) en onrechtmatig gebruik oftewel verspreid auteursrechtelijk beschermde content

U hebt bekeken of verspreiden verboden pornografische content

Onrechtmatige toegang is gestart vanaf uw computer zonder uw medeweten of toestemming, Uw PC kan besmet raken met malware

Om uw computer te ontgrendelen en naar andere juridische gevolgen te voorkomen, bent u verplicht om een release vergoeding van 100 EUR-te betalen via PAYSAFECARD (u moet aankopen PAYSAFECARD kaart, opwaarderen van 100 EUR en voer de code). U kunt aankopen de code in elke winkel of tankstation. PAYSAFECARD is beschikbaar in de winkels in het land.


When trying to exit the page:

Message in Internet Explorer. Oops :-)


In Firefox, I got no weird characters in the messagebox, but as indicated in the screenshot above - Internet Explorer wasn't exactly happy. Maybe it's due to the fact that their Dutch is terrible.

To unlock your browser, you need to pay €100. You can use any of these payment methods:

Payment methods by Browlock


Seems like quite a lot of Browlock (and in the past other ransomware) is hosted on this IP:
146.185.235.7 - IPvoid Result - VirusTotal information

WhoIs data:

WhoIs data, most probably fake


It seems the abuse address is: noc@webhosting-area.net
Somehow I doubt we will get a reply when sending to that address...


Prevention

  • First and foremost in these cases, install an extension that blocks (malicious) ads! 
    I suggest using Adblock Plus, compatible with most modern browsers.
  • An additional layer of protection in your browser (and a must nowadays) is NoScript (Firefox), ScriptSafe (Chrome) or NotScripts (Opera) to prevent automatic loading of malicious Javascripts.


Disinfection

First things first: do not ever pay! Not for Browlock, nor for other ransomware types.

Luckily, Browlock is very easy to counter: simply close your browser by killing the browser's process

When you encounter Browlock, open up Task Manager by pressing on your keyboard on:
CTRL + SHIFT + ESC, or pressing CTRL + ALT + DEL, then choosing to open Task Manager:

Start Task Manager


After Task Manager is opened, go to the "Processes" tab and kill your browser's process:

Internet Explorer - iexplore.exe
Google Chrome - chrome.exe
Mozilla Firefox - firefox.exe
Opera Software - opera.exe


Conclusion

Have you encountered Browlock? First thing to do is not panic - as you can easily remediate it.

Secondly, follow the prevention tips above to avoid Browlock.

Thirdly, if you encounter ransomware - Browlock or not: do not pay, ever! You will not get your money back and chances are you will still have the malware on your machine.

Lastly, as usual; keep your operating system, antivirus and browser up-to-date.

Sunday, 2 March 2014

AUD/USD 3rd March 2014 Monthly Report

1st Quarter Support @ 87.01 and expectation it is rising back towards the 50% levels...

A slow rise up into the end of March, and then a continuation down from around .9092 & down into the 2014 lows 8560, as part of the Primary break & extend pattern into the 2014 lows. (Previous Report)


AUD/Weekly Primary and Monthly cycles

Primary cycles suggests the AUD will continue down into the 2014 lows, as part of the break -n - extend pattern from the 2013 yearly lows (Dilernia Principle)

Monthly cycles in February also playing their part, as it forms resistance....

As long as it remains below the MARCH 50% level @ .8918, the trend bias is down.

if it breaks above the 5-day highs, then it's retesting the Quarterly 50% @ 9092.


Understanding the Page Elements of a Blogger Layout

When following a tutorial on how to add a gadget/widget or make some customizations in a Blogger blog, some new users may not know the meaning of certain terms, and it may be harder to locate them. As for the gadgets, usually it is required to access the blog's layout in order to add or arrange any of the page elements.

For a better understanding, here are some basic explanations about the Page Elements located in the Layout section of a Blogger dashboard.

What are the Page Elements?

Page Elements is, basically, the body of our blog. To access the Page Elements, we need to click on the "Layout" option in the Blogger dashboard.


Understanding the Page Elements sections

The Blogger Layout is made of sections and elements. The sections mark certain areas of a page. Every section is represented by the <b:section> tag and has an unique "ID" that names its element which is followed by a CSS "class" selector. Each section has some attributes and through these, we can determine the number of elements allowed in the section and if this section gives the option to add a "page element".


Let's take a look to an example of the default code related to the header section found in the HTML of a Blogger template:
<b:section class='header' id='header' maxwidgets='1' showaddelement='no'>
<-- rest of the code -->
</b:section>
Breaking apart the code above:
  1. <b:section is the opening tag of the section.
  2. class='header' - describes the existing group inside the "header" element
  3. id='header' - identifies and specifies the header as a single element.
  4. maxwidgets='1' - determines the number of elements allowed in the "header"; here we have the number of gadgets that we can include in the header section. In this example, '1' means that this section allows us to add only a gadget.
  5. showaddelement='no' - the 'no' attribute means that the header will not show the "Add a gadget" link or we won't be able to move any Page Elements. To activate this option so that we can add new Page Elements (Add a gadget), we should change 'no' to 'yes'. By setting the "showaddelement" attribute to 'yes', we'll be able to arrange the elements as we like, just click on the element that you want to move and drag & drop it wherever you want.
The spaces reserved for adding elements in the existing sections are called Gadgets (or Widgets). You can easily add various Page Elements by clicking on the "Add a Gadget" link. This will open a pop-up window for you to pick and choose which elements should be added. Just click on the Gadget's title or on the blue plus sign symbol to add it to your blog's layout.


After you have added a page element, gadgets can be moved up, down or sideways. You can put them wherever you want. Of all the existing gadgets, the most used is the "HTML/JavaScript". Inside this gadget (widget) you can insert any code, as long as it is in the HTML or JavaScript language.

Each time you decide to add a new gadget, click on the "Add a gadget" link in the area where you want to add it. For example, if you want to add a JavaScript code and want it to appear in the sidebar, you should click on the "Add a gadget" link in the "Sidebar" section, choose the "HTML/JavaScript" option and paste the code in there.

Once you have added new gadgets (widgets), it is recommended to check the changes by clicking on the Preview button before saving anything. So, if something went wrong, you simply click on "Clear" and everything that was not saved will return to its previous state. If the position of any Page Elements (Gadgets) has been rearranged, you will need to click on the Save arrangement button in order to see the changes.

Saturday, 1 March 2014

POTM March 2014 winner announced

Quite close outcome this time for the Project of the Month 2014 vote over at linuxgameawards.org. But there has to be a winner:


Here is a closer look that which project got how many votes:


Congratulations to the winner Battle for Wesnoth!


Thursday, 27 February 2014

How to Add Neat CSS3 Dropdown Menu in Blogger

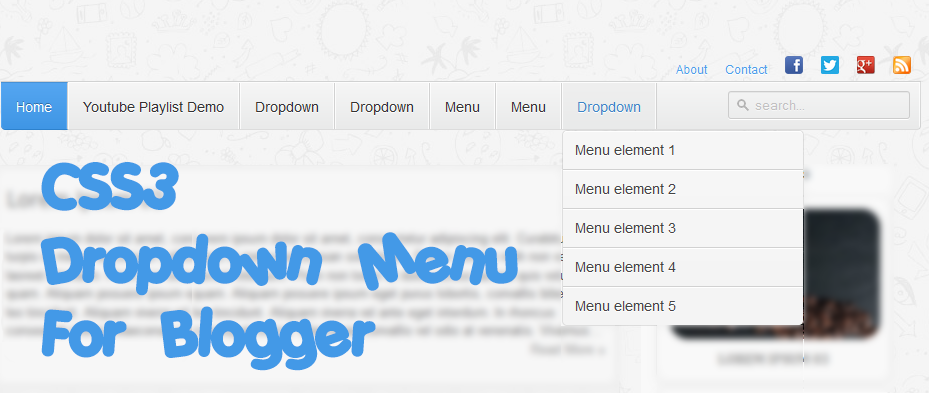
Here's another simple yet amazing dropdown menu with pure CSS3 made by Andrew from script-tutorials.com with some slight modifications so that it can be easily adapted to our Blogger template.

In the upper right side of this menu, we have the contact links and social media icons for Facebook, Twitter, Google Plus and RSS feed. Below these links, there is the drop-down navigation menu and on the left side, the search form.

To achieve a better user interface and interaction, the CSS dropdown menu features sub categories that appear with a nice touch of CSS3 box-shadow, text-shadow and a cool transition once the parent link is activated by a hover selector.

dropdown menu


Adding the CSS dropdown navigation menu in Blogger

Step 1. Access your Blogger Dashboard and go to "Template", then click on the "Edit HTML" button


Step 2. Next, click anywhere inside the code area and press the CTRL + F keys to open the search box. Type the tag below inside the search box and hit Enter to find it.
</header>
Step 3. Just below </header> add the HTML structure of the dropdown menu:
<div id='contact-links'>
    <div id='my-links'>
        <a href='#'>About</a>
        <a href='#'>Contact</a>
                <a href='#'><img height='18px' src='https://blogger.googleusercontent.com/img/b/R29vZ2xl/AVvXsEgOIyyCTna-6FWInGXLvOpALM3U4-YCRBH_wkVp_aR6F1aq-UvJAGwID9tzsAgmUe9pXOy5Ov6qSumz9JwOpK7kEKhC_nwDgrjAquM-izQxKywO_w1SZi-guXXqPfx3gtJGtyX7CS0bsEra/s1600/facebook-icon.png' title='Facebook' width='18px'/></a>
<a href='#'><img height='18px' src='https://blogger.googleusercontent.com/img/b/R29vZ2xl/AVvXsEjUmfn6Kwteh_xY0PZ49nHvW6ZZLlSb4gEqbgZBbhZhZKYi-YTz1X9d8q2oGj6ocvpk8td1ma_U6IObeakP9qFnOWN30pyYdqQmIL78KLdLn9fApeBhyphenhyphen06Rq9sN-_oBU9PramQGXUz-7U8r/s1600/twitter.png' title='Twitter' width='18px' /></a>
        <a href='#'><img height='18px' src='https://blogger.googleusercontent.com/img/b/R29vZ2xl/AVvXsEinnjSwwBMj6cAuAhH6h4vz7VGcKHApw0W1Bi9mB3nmdV6IJ_ewnCA7U5SmxKaOjZjtM3TMNPASiKl3g25cAk4xXCl1-g2VzPWeadT18cluE7FGwylXvguNezh0rJf7QNgJQQdLcToJMOJP/s1600/google-plus-icon.png' title='Google' width='18px'/></a>
        <a href='#'><img height='18px' src='https://blogger.googleusercontent.com/img/b/R29vZ2xl/AVvXsEgLjiCvRI0q_TwFR7Z_eena2JOrPREPlWbybSMCV5pudzTUUTauzEIxvVrjhTUsuw8LsFJ2e1fDh85KTGBlot3qQH1dN1CLfF5e0BYl11c9wNcrPQuFdjvTZHGBBbocXswQE3v-Va1Roi-r/s1600/rss-icon.png' title='RSS Feed' width='18px'/></a>
    </div>

    <div id='menu-container'>
        <nav id='neat-menu'>
            <ul>
              <li class='active'><a href='/'>Home</a></li>
                <li><a href='#'>Dropdown</a>
                    <ul>
                        <li><a href='#'>Menu element 1</a></li>
                        <li><a href='#'>Menu element 2</a></li>
                        <li><a href='#'>Menu element 3</a></li>
                        <li><a href='#'>Menu element 4</a></li>
                        <li><a href='#'>Menu element 5</a></li>
                    </ul>
                </li>
                <li><a href='#'>Single Menu</a></li>
                <li><a href='#'>Single Menu</a></li>
                <li><a href='#'>Dropdown</a>
                    <ul>
                        <li><a href='#'>Menu element 1</a></li>
                        <li><a href='#'>Menu element 2</a></li>
                        <li><a href='#'>Menu element 3</a></li>
                        <li><a href='#'>Menu element 4</a></li>
                        <li><a href='#'>Menu element 5</a></li>
                    </ul>
                </li>
            </ul>
        </nav>

        <!-- menu-search form -->
        <div id='menu-search'>
          <form method='get' action='/search'>
                <input autocomplete='off' name='q' placeholder='search...' type='text' value=''/>
            </form>
        </div>
    </div>
</div>

How to Set up the Dropdown Menu

  • Replace the # symbols with the URLs of your links and replace the texts in blue with the titles that you want to appear in the menu.
  • To change the social media icons, add the links of your icons instead of the ones in blue. For more help, please see this tutorial on how to upload and get the URL of an image.
  • If you want to remove the sub categories, remove the code within the tags highlighted in yellow, including the ul tags. To remove only a menu element, remove the part that starts with <li> and ends with </li>
Step 4. Now, let's add the CSS styling for the menu. Search for the following tag:
]]></b:skin>
Step 5. Just above the ]]></b:skin> tag, add this CSS code:
#contact-links{text-shadow:0 -1px 0 rgba(0,0,0,0.3);margin:auto;position:relative;width:100%}#contact-links a{color:#4C9FEB}#contact-links a:hover{color:#3D85C6}#my-links{float:right;font-size:12px;margin:4px 10px;overflow:hidden;text-shadow:0 1px 0 #FFF}#my-links a{margin-left:7px;padding-left:8px;text-decoration:none}#my-links a:first-child{border-width:0}#menu-container{background:-webkit-linear-gradient(#f6f6f6,#e9eaea) repeat scroll 0 0 transparent;background:-moz-linear-gradient(#f6f6f6,#e9eaea) repeat scroll 0 0 transparent;background:linear-gradient(#f6f6f6,#e9eaea) repeat scroll 0 0 transparent;filter:progid:DXImageTransform.Microsoft.gradient(startColorstr='#f6f6f6',endColorstr='#e9eaea',GradientType=0);border-radius:0 0 4px 4px;border:1px solid rgba(0,0,0,0.1);box-shadow:-1px 1px 0 rgba(255,255,255,0.8) inset;clear:both;height:46px;padding-top:1px}#neat-menu{float:left}#neat-menu a{text-decoration:none}#neat-menu ul{list-style:none;margin:0;padding:0}#neat-menu > ul > li{float:left;padding-bottom:12px}#neat-menu ul li a{box-shadow:-1px 0 0 rgba(255,255,255,0.8) inset,1px 0 0 rgba(255,255,255,0.8) inset;border-color:#D1D1D1;border-image:none;border-style:solid;border-width:0 1px 0 0;color:#333;display:block;font-size:14px;height:25px;line-height:25px;padding:11px 15px 10px;text-shadow:0 1px 0 #FFF}#neat-menu ul li a:hover{background:-webkit-linear-gradient(#efefef,#e9eaea) repeat scroll 0 0 transparent;background:-moz-linear-gradient(#efefef,#e9eaea) repeat scroll 0 0 transparent;background:linear-gradient(#efefef,#e9eaea) repeat scroll 0 0 transparent;filter:progid:DXImageTransform.Microsoft.gradient(startColorstr='#efefef',endColorstr='#e9eaea',GradientType=0)}#neat-menu > ul > li.active > a{background:-webkit-linear-gradient(#55A6F1,#3F96E5) repeat scroll 0 0 transparent;background:-moz-linear-gradient(#55A6F1,#3F96E5) repeat scroll 0 0 transparent;background:linear-gradient(#55A6F1,#3F96E5) repeat scroll 0 0 transparent;filter:progid:DXImageTransform.Microsoft.gradient(startColorstr='#55A6F1',endColorstr='#3F96E5',GradientType=0);border-bottom:1px solid #2D81CC;border-top:1px solid #4791D6;box-shadow:-1px 0 0 #55A6F1 inset,1px 0 0 #55A6F1 inset;color:#FFF;margin:-1px 0 -1px -1px;text-shadow:0 -1px 0 rgba(0,0,0,0.3)}#neat-menu > ul > li.active > a:hover{background:-webkit-linear-gradient(#499FEE,#3F96E5) repeat scroll 0 0 transparent;background:-moz-linear-gradient(#499FEE,#3F96E5) repeat scroll 0 0 transparent;background:linear-gradient(#499FEE,#3F96E5) repeat scroll 0 0 transparent;filter:progid:DXImageTransform.Microsoft.gradient(startColorstr='#499FEE',endColorstr='#3F96E5',GradientType=0)}#neat-menu > ul > li:first-child > a{border-radius:0 0 0 5px}#neat-menu ul ul{background:-webkit-linear-gradient(#F7F7F7,#F4F4F4) repeat scroll 0 0 padding-box transparent;background:-moz-linear-gradient(#F7F7F7,#F4F4F4) repeat scroll 0 0 padding-box transparent;background:linear-gradient(#F7F7F7,#F4F4F4) repeat scroll 0 0 padding-box transparent;filter:progid:DXImageTransform.Microsoft.gradient(startColorstr='#F7F7F7',endColorstr='#F4F4F4',GradientType=0);border-radius:5px 5px 5px 5px;border:1px solid rgba(0,0,0,0.1);box-shadow:0 1px 0 #FFF inset;height:0;margin-top:1px;opacity:0;overflow:hidden;width:240px;padding:0;position:absolute;visibility:hidden;z-index:1;-webkit-transition:all .5s;-moz-transition:all .5s;-ms-transition:all .5s;-o-transition:all .5s;transition:all .5s}#neat-menu ul li:hover ul{margin-top:0\2;height:auto;opacity:1;visibility:visible}#neat-menu ul ul a{border-right-width:0;border-top:1px solid #D1D1D1;box-shadow:0 1px 0 #FFF inset;color:#444;height:24px;line-height:24px;padding:7px 12px;text-shadow:0 1px 0 #FFF}#neat-menu ul ul a:hover{background:-webkit-linear-gradient(#55A6F1,#3F96E5) repeat scroll 0 0 transparent;background:-moz-linear-gradient(#55A6F1,#3F96E5) repeat scroll 0 0 transparent;background:linear-gradient(#55A6F1,#3F96E5) repeat scroll 0 0 transparent;filter:progid:DXImageTransform.Microsoft.gradient(startColorstr='#55A6F1',endColorstr='#3F96E5',GradientType=0);border-top:1px solid #4791D6;box-shadow:-1px 0 0 #55A6F1 inset,1px 0 0 #55A6F1 inset;color:#FFF;text-shadow:0 -1px 0 rgba(0,0,0,0.3)}#neat-menu ul ul li:first-child a{border-top-width:0}#menu-search{margin:8px 10px 0 0;float:right}#menu-search form{background:url(https://blogger.googleusercontent.com/img/b/R29vZ2xl/AVvXsEiSvYOYoH82UBhgKkD7MMFlvR3Eprqy5pesUJNTqRkOEd2Ky8lcW_Q4ykXeEXsYI-0x3hDiuTS9fy-CcTaD8KOeAqjVpLNYafVo4l9fiFirGX85Jos-WIvgLOFKnW3wHy4oHjBsM3-GlLqk/s1600/menu-search.gif) no-repeat scroll 5% 50% transparent;border:1px solid #CCC;border-radius:3px 3px 3px 3px;box-shadow:0 1px 0 rgba(0,0,0,0.05) inset,0 1px 0 #FFF;height:26px;padding:0 25px;position:relative;width:130px}#menu-search form:hover{background-color:#F9F9F9}#menu-search form input{color:#999;font-size:13px;height:26px;text-shadow:0 1px 0 #FFF;background:none repeat scroll 0 0 transparent;border:medium none;float:left;outline:medium none;padding:0;width:100%}#menu-search form input.placeholder,#menu-search form input:-moz-placeholder{color:#C4C4C4}
Step 6. Click on the "Save template" button to save the changes and you're done!

Hope you like this CSS3 dropdown menu for Blogger and if you enjoyed the tutorial, please share and subscribe.