Struts is a java framework used to implement the MVC architecture more effectively. In this post i explain some simple steps to create a java web application using the struts framework. For this demonstration i use the Netbeans IDE.
Here i am going to create a simple login validation web application. In the login page there are two fields, first one is the name field and second one is an email field. If user enter any improper contents for any of these fields then display an error message on the same login page using struts framework. You have to follow the steps given bellow for creating this simple strut application by yourself.
Step 1:
Create a java web application with name "
StrutDemo" and choose the Struts framework from the frameworks window on the netbeans ide and click finish.
Now the IDE creates the project and a welcomeStruts.jsp page will appear on the editor window of the ide. The project hierarchy is shown bellow.
Step 2:
Create the login.jsp page. (Right click the project choose new option and select jsp. ) Name the jsp page as "login.jsp". At the top of the login.jsp page add the following tag libraries.
 <%@taglib uri="http://struts.apache.org/tags-bean" prefix="bean" %>
 <%@taglib uri="http://struts.apache.org/tags-html" prefix="html" %>
Now create the following html form in the body tag of login.jsp page. Make sure that the action of the html form is "/login".
  <html:form action="/login">
  <table>
  <tr>
  <td>Enter Name :</td>
  <td><html:text name="LoginForm" property="name" /></td>
  </tr>
  <tr>
  <td>Enter Email :</td>
  <td><html:text name="LoginForm" property="email" /></td>
  </tr>
  <tr>
  <html:submit value="Login" />
  </tr>
 </table>
 </html:form>
Notice that the value provided for the name attribute in the html text tag is the name of the
Struts ActionForm Bean that we are going to create in this application. Property is the name of the variables in the ActionForm Bean class.
Step 3:
Create the
Struts ActionForm Bean. Right click the project, choose new and select other. Form the categories select Struts. From Struts choose the Struts ActionFrom Bean and click next.
Provide LoginForm for class name and choose the package and click finish.
By default the IDE creates two variables on the Bean class
name and
number. Also there is setter and getter methods for name and number. We have to add two additional String variables
email and
error. The
email variable is for getting the value of
email from the html form and the
error variable is for setting the error message when user enter wrong data on the input form in the login.jsp. Now you need to add getter and setter for
email and
error variables. For adding this methods just place your cursor on the variable name and press alt + insert on the keyboard and choose getter and setter. We do't need the number variable. So you may have to delete it. After doing all these above steps the
LoginForm.java look like this.
LoginForm.java package com.myapp.struts;
import javax.servlet.http.HttpServletRequest;
import org.apache.struts.action.ActionErrors;
import org.apache.struts.action.ActionMapping;
import org.apache.struts.action.ActionMessage;
/**
*
* @author prabeesh
*/
public class LoginForm extends org.apache.struts.action.ActionForm {
private String name;
private String email;
private String error;
public String getEmail() {
return email;
}
public void setEmail(String email) {
this.email = email;
}
public String getError() {
return error;
}
 public void setError()
  {
  this.error = "<span style='color:red'>Please enter valid data for both fields</span>";
  }
public String getName() {
return name;
}
public void setName(String string) {
name = string;
}
public LoginForm() {
super();
// TODO Auto-generated constructor stub
}
public ActionErrors validate(ActionMapping mapping, HttpServletRequest request) {
ActionErrors errors = new ActionErrors();
if (getName() == null || getName().length() < 1) {
errors.add("name", new ActionMessage("error.name.required"));
// TODO: add 'error.name.required' key to your resources
}
return errors;
}
}
Note that we set the error message on the setError() method.
public void setError()
{
this.error = "<span style='color:red'>Please enter valid data for both fields</span>";
}
Step 4:
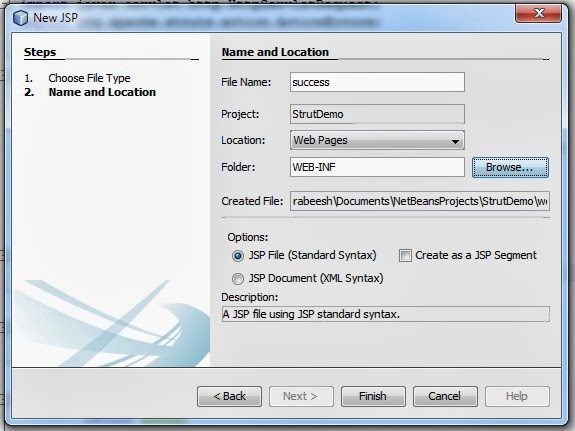
Make the success.jsp . Right click the project choose new option and select jsp. Name the file as success. On the same window choose folder by click browse and select WEB-INF folder and click finish.
Now edit the success.jsp file as shown bellow.
 <%@taglib uri="http://struts.apache.org/tags-bean" prefix="bean" %>
 <%@page contentType="text/html" pageEncoding="UTF-8"%>
 <!DOCTYPE html>
 <html>
 <head>
 <meta http-equiv="Content-Type" content="text/html; charset=UTF-8">
 <title>JSP Page</title>
 </head>
 <body>
 <h1>Login Success</h1>
 <p>Your Name :<bean:write name="LoginForm" property="name" /></p>
 <p>Your Email :<bean:write name="LoginForm" property="email" /></p>
 </body>
 </html>
Don't forget to add the bean tag library at the top of success.jsp. We print the values for name and email by using the
<bean:wrie /> tag.
Step 5:
Create
Struts Action class. Right click the project choose new select other and select Struts in the categories and choose
Struts Action and click next.
Provide
LoginAction for class name, choose the package and type
/login for action path and click next.
Remove the forward slash from the Input Resource field and dis select the validate ActionForm Bean and click finish.
We are going to done the validation on the
execute() method of the Action class as shown bellow.
LoginAction.java public class LoginAction extends org.apache.struts.action.Action {
private static final String SUCCESS = "success";
private static final String FAILURE = "failure";
@Override
public ActionForward execute(ActionMapping mapping, ActionForm form,
HttpServletRequest request, HttpServletResponse response)
throws Exception {
LoginForm loginBean = (LoginForm)form;
String name,email;
name = loginBean.getName();
email = loginBean.getEmail();
if(name==null || email==null || name.equals("")||email.indexOf("@")==-1)
{
loginBean.setError();
return mapping.findForward(FAILURE);
}
return mapping.findForward(SUCCESS);
}
}
Step 6:
Add the error message on the login.jsp page using the
<bean:write /> tag. Complete source of login.jsp is given bellow.
login.jsp <%@taglib uri="http://struts.apache.org/tags-bean" prefix="bean" %>
<%@taglib uri="http://struts.apache.org/tags-html" prefix="html" %>
<%@page contentType="text/html" pageEncoding="UTF-8"%>
<!DOCTYPE html>
<html>
<head>
<meta http-equiv="Content-Type" content="text/html; charset=UTF-8">
<title>JSP Page</title>
</head>
<body>
<html:form action="/login">
<table>
<tr>
<td><bean:write name="LoginForm" property="error" filter="false" /></td>
</tr>
<tr>
<td>Enter Name :</td>
<td><html:text name="LoginForm" property="name" /></td>
</tr>
<tr>
<td>Enter Email :</td>
<td><html:text name="LoginForm" property="email" /></td>
</tr>
<tr>
<html:submit value="Login" />
</tr>
</table>
</html:form>
</body>
</html>
Step 7:
Open
struts-config.xml right click anywhere in it from
strut choose the
add forward option.
Type
success as Forward name, choose success.jsp in the WEB-INF folder as Resource file by clicking the browse button. Provide
/login as action and click
add button.
In the same way you need to add Action Forward for failure also. After adding action Forwards for both success and failure you can see the following forward tags on the strut-config.xml file.
 <action-mappings>
 <action name="LoginForm" path="/login" scope="session" type="com.myapp.struts.LoginAction" validate="false">
 <forward name="success" path="/WEB-INF/success.jsp"/>
 <forward name="failure" path="/login.jsp"/>
 </action>
 <action path="/Welcome" forward="/welcomeStruts.jsp"/>
 </action-mappings>
Step 8 :
Open the
web.xml file under the WEB-INF folder. Select pages and type
login.jsp for welcome files.
Step 9:
Save the project and run. You go the following outputs.